Path-planning navigator using ARC NMS position and obstacle data to map, log trajectories, and autonomously follow waypoints.
How to add the The Navigator robot skill
- Load the most recent release of ARC (Get ARC).
- Press the Project tab from the top menu bar in ARC.
- Press Add Robot Skill from the button ribbon bar in ARC.
- Choose the Navigation category tab.
- Press the The Navigator icon to add the robot skill to your project.
Don't have a robot yet?
Follow the Getting Started Guide to build a robot and use the The Navigator robot skill.
How to use the The Navigator robot skill
A navigation skill for path planning based on receiving NMS location/positioning and obstacle data. This skill is combined with other skills that contribute navigation data to ARC's Navigation Messaging System (NMS).
Updated Skill
If your robot has a LIDAR, this robot skill has been superseded by a SLAM version called The Better Navigator. If your robot uses pose data without any lidar, you can use this robot skill, but it will provide an unreliable experience.Example
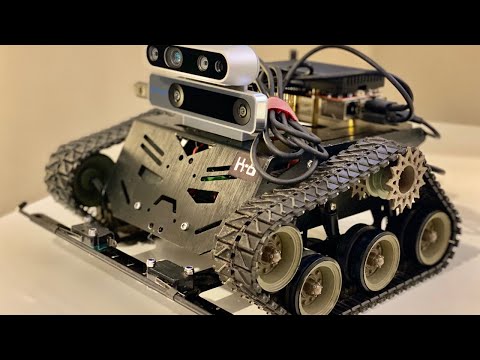
This screenshot uses an Intel RealSense T265 with three low-cost HC-SR04 ultrasonic distance sensors. The robot was instructed to drive around the waypoints at various speeds. Ideally, you want to use this robot skill with a 360-degree lidar or other high-resolution obstacle detection.
Here is a video of The Navigator working in conjunction with the Intel RealSense T265 tracking camera skill, which operates at NMS Level #3 Group #2 by providing position/location data into the NMS
ARC Navigation Messaging System
This skill is part of the ARC navigation messaging system. Reading more about the Navigation Messaging System and learning compatible skills is encouraged. This particular skill (The Navigator) operates on Level #1 of the NMS overview. This skill (The Navigator) requires a Level #3 Group #2 location/position sensor for operation. The location/positioning system will feed position data into the NMS, which this skill will use for navigation. See the NMS for compatible skills that provide location/position data.
Mapping
This skill logs the trajectory as your robot navigates. You define the waypoints and path points by manually moving your robot to various locations (waypoints). Once multiple path points are defined for a waypoint, you can instruct your robot to autonomously navigate to that exact waypoint (or back again) at any time.Map Size
The map is currently hardcoded for 20x20 meters.Main Screen
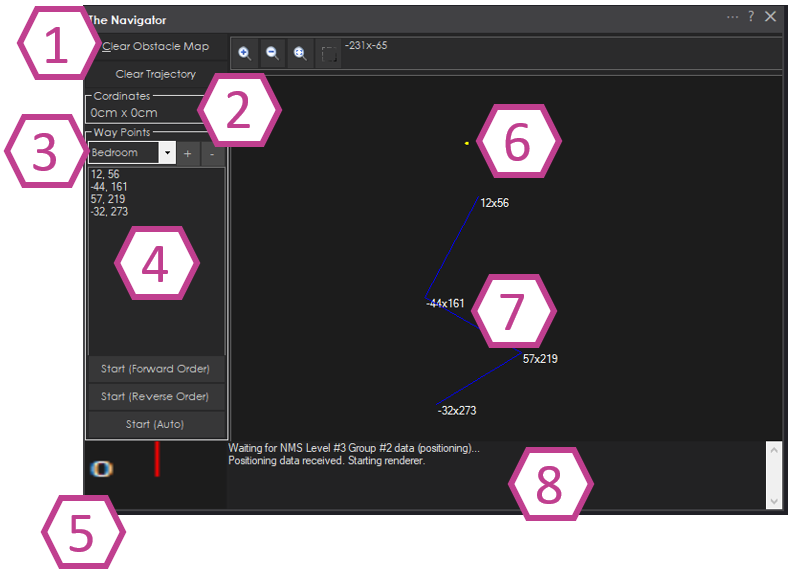
Map control buttons are used to clear the trajectory and clear the map.
The robot's current Cartesian coordinates as reported by an NMS Level #3 Group #2 sensor (i.e., Intel T265, wheel encoders).
Saved waypoints. Here, you can add, remove, and select waypoints.
The path points within a waypoint. A waypoint will consist of many path points for navigating throughout the environment. You may right-click path points to edit their coordinates for fine-tuning. You may re-order the path points by right-clicking and selecting Move Up or Down.
The robot's Current heading relative to the Cartesian starting position as reported by an NMS Level #3 Group #2 sensor.
The yellow dot marks the robot's current Cartesian position as reported by an NMS Level #3 Group #2 position/location sensor.
Path points are connected with a straight line, demonstrating where the robot would drive. Right-click on the map view and select Add Path Point to add path points. It is best to drive the robot to create a trajectory. Then, right-click on some points on the tractor to add new path points to the selected waypoint.
Log messages about navigation and sensor activity are displayed.
Main Screen - Navigation Controls
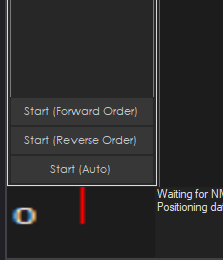
Start (Forward Order) - This will instruct the robot to start following the specified paths within the waypoint, from the first to the last, in that order. If your robot is close to the starting (first path point), it will be convenient to head there. However, if your robot is far away from the first path point, you may wish to use the Reverse or Auto button.
Start (Reverse Order)-This will instruct the robot to start following the specified paths within the waypoint in reverse order from last to first. If your robot is closest to the previous path point, it will be convenient to get it back to the first path point in the waypoint.
Start (Auto)-This automatically calculates the order to execute the path direction based on the robot's distance from the first or last path point. This is the most convenient operation because it allows a waypoint to be navigated to and from. For example, if your robot drives to a location, use this button to return it to the starting area. This will happen automatically.
Config - Scripts
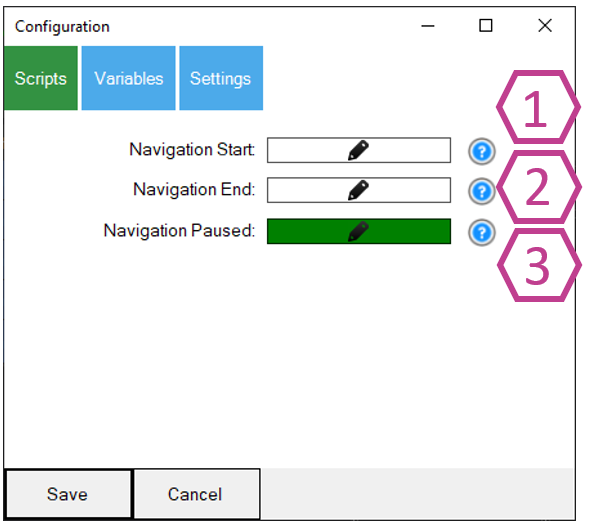
Script that will execute when the navigation to a waypoint is started. Navigation can begin by pressing the Start button manually or by using ControlCommand().
The script will execute when the navigation is canceled or successfully ended.
If the navigation is paused by a JavaScript/Python command from the Navigation namespace or if it is triggered by the NMS Level #3 Group #1 distance sensor returning a value less than the specified range, this is configured in the Settings tab.
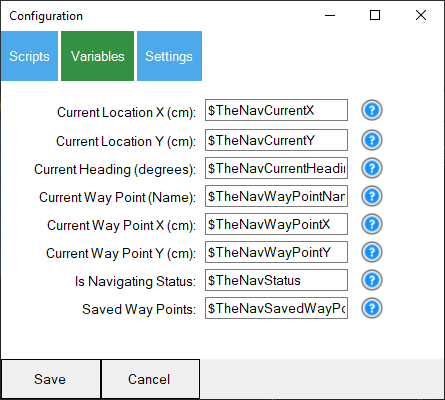
Config - Variables
Config - Settings
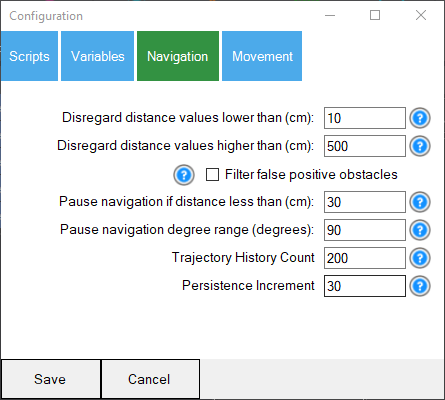
- Disregard distance values lower than Ignore distance values less than this specified distance in CM. The distance values are provided by any NMS Level #3 Group #1 sensor.
2) Disregard distance values higher than Ignore distance values further than this specified distance in CM. Any NMS Level #3 Group #1 sensor provides the distance values.
Filter false positive obstacles Filter false positives by removing detected obstacles, and later remove those that are not detected within the same area.
Pause navigation if the distance is less than Navigation will be paused if the NMS distance sensor provides a value greater than the "lower than" value but less than this. This will also execute the PAUSE script from the Scripts tab. Your program may use this opportunity to navigate the obstacle and continue navigating again. Use the JavaScript or Python command in the Navigation namespace to continue navigating. That command is Navigation.setNavigationStatusToNavigating();
Pause navigation degree range This value complements the pause navigation distance value. This value will determine the range of degrees at which to pause navigation. If you wish to pause the entire range, enter 360 degrees. If you only want the robot's objects paused, enter 90. The degree number entered is divided by 2, and the left and right sides of the robot are used. If 90 degrees is entered, then 45 degrees to the left and 45 degrees to the right of the robot's center are detected. If 180 degrees is entered, then 90 degrees to the left and 90 degrees to the right of the robot's center are detected.
- If 360 degrees are entered, the full range will be detected.
- Trajectory history Count The number of history lines to keep on the map. This prevents the history map from becoming messy with too many historical lines.
7) Persistence increment This increases the brightness of a detected object based on its persistence. This means that if an object is detected once but then moves or is a false positive, it will slowly disappear. This is how Slam works: it lets the map change dynamically.
Starting Position
This navigation skill uses Cartesian coordinates in CM from the starting position (0, 0). Any saved maps will be referenced from the same starting position and heading angle. When you reload a project to have the robot navigate the same course, the robot must be positioned at the same starting position and with the same heading angle. We recommend using painter/masking tape as the starting reference point for the robot. If your robot has an auto-dock for charging, secure the charger to a fixed position on the floor as a reference point.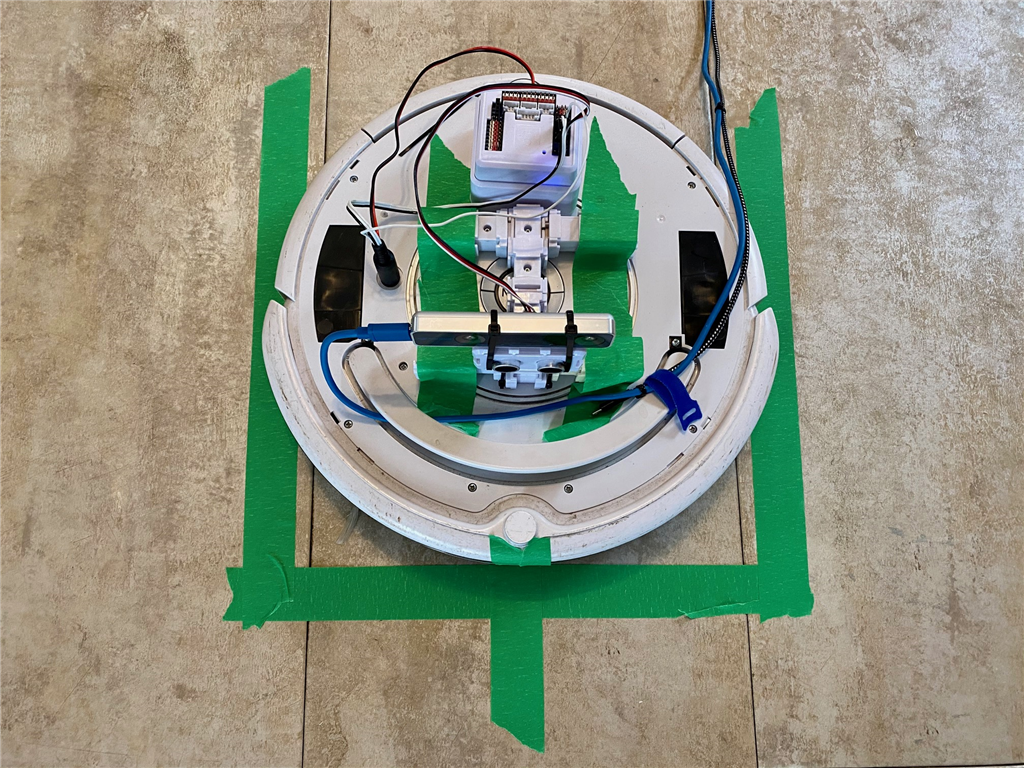
In the photo above, we're using an iRobot Roomba with an Intel T265 positioning sensor. The painter's tape on the floor marks the robot's starting position. The outline allows us to position the robot within the square, and the marking on the robot's front aligns with the specified heading.
Cartesian Coordinate System
This robot skill uses Cartesian coordinates to reference the robot's starting position, which is always 0,0 and defined at startup. As the robot navigates, the skill measures the distance from the starting position. The unit of measurement is CM (centimeters). Read more about the Cartesian coordinate system on Wikipedia.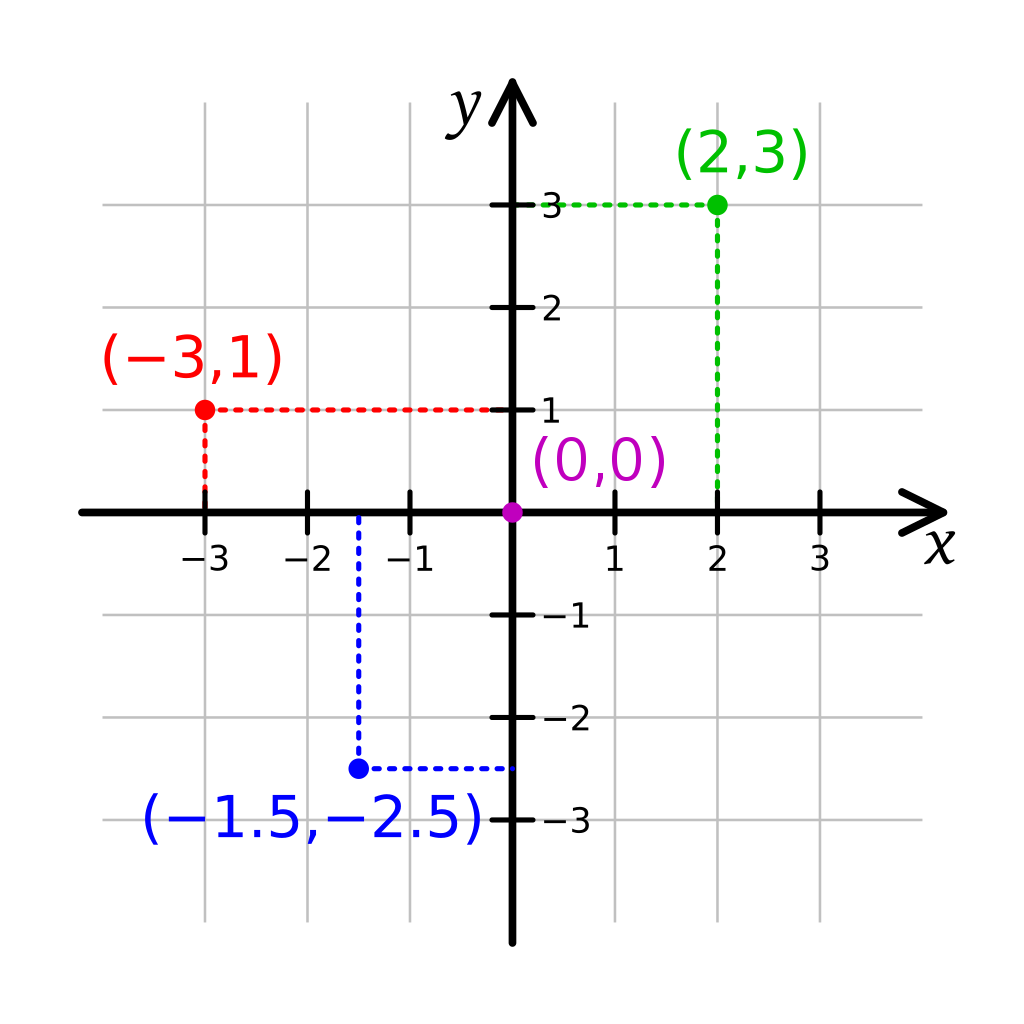
How Do You Use This
This skill is a navigation renderer and movement planner. It can build a map from participating sensor data and control the robot by navigating it to specified locations. To get sensor data, other compatible skills must be loaded. In this quick example, we'll use the Intel RealSense T265 in combination with this skill.Connect your Intel RealSense T265 to the computer's USB port
Load ARC (version must be >= 2020.12.25.00)
Add the Intel RealSense skill to your workspace
Now, add this skill (The Navigator) to your workspace
Press START on the Intel RealSense skill
You should now begin to see localization path data from the Intel RealSense sensor displayed in the Navigator window. This robot skill will display and render the data.
*Optionally, you may add a supporting NMS Level #3 Group #1 sensor to detect the distance of obstacles and the environment.
Control Commands for the The Navigator robot skill
There are Control Commands available for this robot skill which allows the skill to be controlled programmatically from scripts or other robot skills. These commands enable you to automate actions, respond to sensor inputs, and integrate the robot skill with other systems or custom interfaces. If you're new to the concept of Control Commands, we have a comprehensive manual available here that explains how to use them, provides examples to get you started and make the most of this powerful feature.
Control Command ManualGoToLocation", "x", "y
Example: controlCommand("The Navigator", "GoToLocation", "x", "y")
StopNavigating
Example: controlCommand("The Navigator", "StopNavigating")
CreateNewWayPoint", "WayPointName
Example: controlCommand("The Navigator", "CreateNewWayPoint", "WayPointName")
AddCurrentPositionAsPathPoint
Example: controlCommand("The Navigator", "AddCurrentPositionAsPathPoint")
Related Hack Events
A Little Of This, A Little Of That
DJ's K8 Intel Realsense & Navigation
Related Questions


Upgrade to ARC Pro
Unlock the true power of automation and robotics by becoming a proud subscriber of Synthiam ARC Pro.
Hi DJ, i am so happy i could buy you a beer!! Great job man! It locks very promising and i will test it as soon as possible. I have a suggestion. It would be so cool if we could organize a online video chat meeting so we could discuss this topic and to get to know some members of the ARC community. What do you think DJ and all of you guy?
That’ll be fun! I’m in
This ki d if thing is what I have been hoping for since I started with EZ-B. Need to save some pennies for the hardware, but it is going to be enough to get me back into the hobby and paying for ARC.
(now just need to find a good solution for docking and charging that won't eletrocute the cats if they explore the dock when the robot is wandering )
Hi thetechguru, wb. I to think this is a game changer. There are so many people frustrated with robot navigation, and ROS has such big learning curve that this will make the diference. Just spread the word!
This is an exciting start....I just ordered the T265!
As for a Zoom meeting or other virtual meeting...I've been suggesting this for a long while....I'm up for it.
I'm curious if the IMU on the T265 can be be affected by magnetic interference. I have a motion capture suit that uses joint based IMUs and they are extremely susceptible to magnetic fields (microwave and refrige as example). As a result, world and local space return inaccurate tracking data. I guess that's the reason for a secondary tracking?
@alan - I wrote some javascript that docks a robot 100% with our telepresence. I have been meaning to put it into a configurable skill. I'll add it to my todo list.
It's a pretty simple solution to by using magnets on the end of the conductors. The alignment is done with a glyph and a camera looking down.
The intel realsense will get you close to the charger, but not 100%. The camera helps a lot
Version 6: Updated to work with latest ARC NMS updates