
Dual H-Bridge w/PWM movement panel: control two DC motors' direction and speed via EZ-B PWM for responsive forward/reverse/turning.
How to add the Dual Hbridge W/PWM robot skill
- Load the most recent release of ARC (Get ARC).
- Press the Project tab from the top menu bar in ARC.
- Press Add Robot Skill from the button ribbon bar in ARC.
- Choose the Movement Panels category tab.
- Press the Dual Hbridge W/PWM icon to add the robot skill to your project.
Don't have a robot yet?
Follow the Getting Started Guide to build a robot and use the Dual Hbridge W/PWM robot skill.
How to use the Dual Hbridge W/PWM robot skill
The Dual H-Bridge w/PWM skill is a Movement Panel used to drive a robot that has two DC motors (usually a left wheel motor and a right wheel motor). It lets ARC control:
- Direction (forward / reverse) for each motor
- Turning (left / right) by running the motors in different directions or speeds
- Speed using PWM (Pulse Width Modulation)
An H-Bridge is an electronic circuit that can apply voltage to a motor in either direction, allowing the motor to spin forward or backward. A Dual H-Bridge (such as the EZ-Robot 2.5 Amp H-Bridge) contains two H-Bridge channels, so it can control two DC motors.
This skill uses 6 digital signal wires from the EZ-B:
- 4 direction pins (two pins per motor) to choose forward vs reverse
- 2 PWM enable pins (one per motor) to control speed
How Movement Panels Work (in simple terms)
Movement Panels are skills that provide the standard robot movement commands: Forward, Reverse, Left, Right, and Stop.
Other skills (Joystick, Speech Recognition, Camera tracking, scripts, etc.) can “press” these movement directions automatically by sending commands to the Movement Panel. This is why getting your Movement Panel working is usually the first step to making a mobile robot.
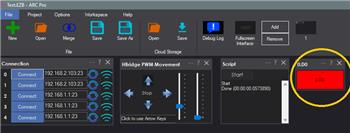
Main Window
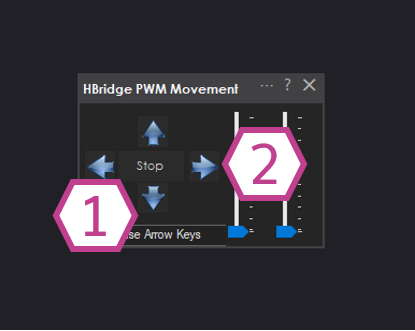
1) Movement Panel Buttons
Use these buttons to move the robot: Forward, Reverse, Left, Right, and Stop. ARC translates these into the correct motor directions for the left and right motors.
2) PWM Sliders (Speed Control)
These sliders set the PWM output (from 0% to 100%) sent to the H-Bridge ENA and ENB pins (the “enable/speed” pins). Higher PWM = faster motor speed (in most builds).
Settings
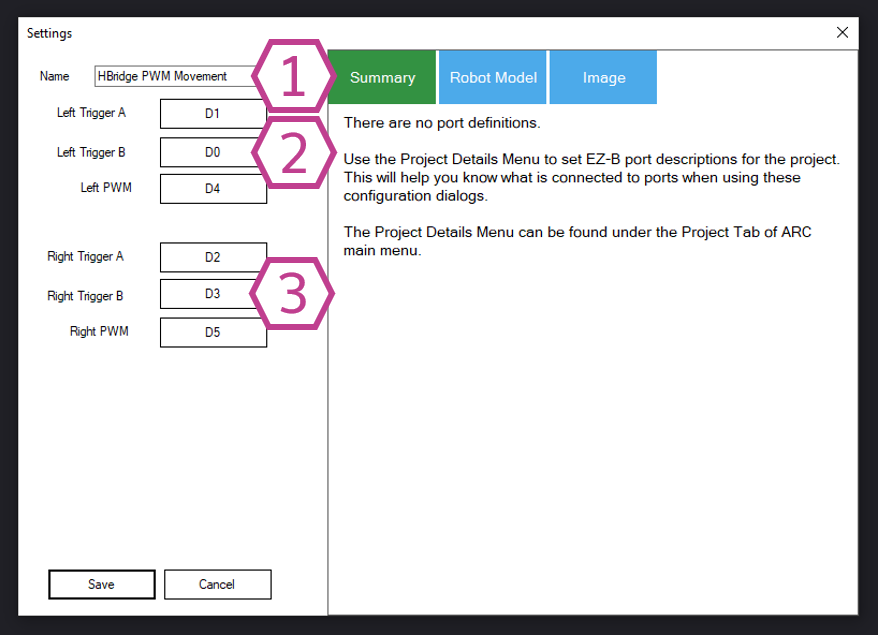
This is the name of the skill instance in your project. You can rename it to something like “Drive Base”.
Note: If you change this title, it also changes the name used by controlCommand() calls for this skill.
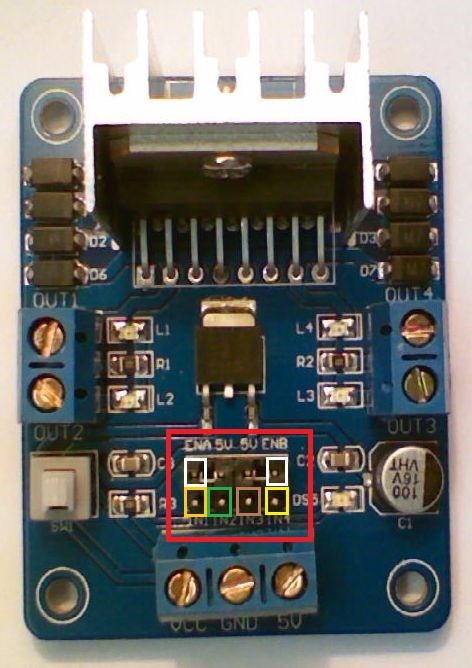
Choose which EZ-B digital ports connect to the H-Bridge pins that control the left motor: the two direction inputs (often IN1/IN2) and the left PWM enable (often ENA).
Choose which EZ-B digital ports connect to the H-Bridge pins that control the right motor: the two direction inputs (often IN3/IN4) and the right PWM enable (often ENB).
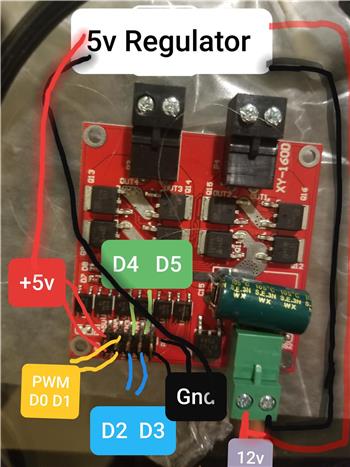
Wiring Diagram
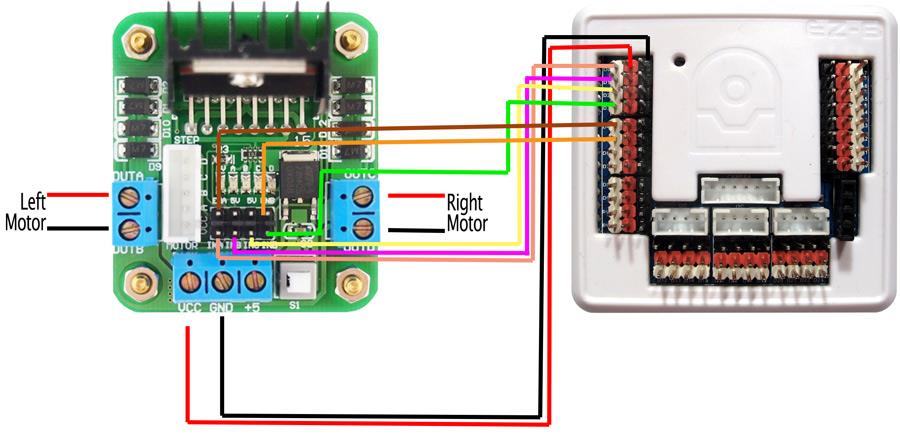
Step-by-step wiring (example)
The example below matches the common port choices shown in the diagram (D0–D5). You may use different ports, but keep a note of what you used so you can select them in the skill settings.
- Power: Connect Dual H-Bridge VCC to your motor/battery positive (or EZ-B power on D0 red, if your design supports that).
- Ground: Connect Dual H-Bridge GND to your motor/battery ground (or EZ-B power on D0 black).
- Connect Dual H-Bridge IN1 to EZ-B D0 (Signal)
- Connect Dual H-Bridge IN2 to EZ-B D1 (Signal)
- Connect Dual H-Bridge IN3 to EZ-B D2 (Signal)
- Connect Dual H-Bridge IN4 to EZ-B D3 (Signal)
- Connect Dual H-Bridge ENA to EZ-B D4 (Signal) (PWM enable for one motor)
- Connect Dual H-Bridge ENB to EZ-B D5 (Signal) (PWM enable for the other motor)
- Connect Dual H-Bridge motor outputs OUTA/OUTB to the left motor wires
- Connect Dual H-Bridge motor outputs OUTC/OUTD to the right motor wires
How to Use Dual H-Bridge w/PWM (Beginner Checklist)
- Wire everything: EZ-B signal pins to IN1–IN4 and ENA/ENB, and motor wires to the output terminals.
- Add the skill in ARC: Project → Add Skill → Movement Panels → Dual H-Bridge w/PWM.
- Open the skill settings and select the same digital ports you used for: IN1, IN2, IN3, IN4, ENA, ENB.
- In the skill main window, raise the PWM sliders to a starting value (example: 30%–60%).
- Press Forward. If it works, test Left, Right, and Reverse.
Initializing Speed with Script (Code Sample)
When ARC connects to the EZ-B, PWM may start at 0, meaning the motors will not move until you set a speed. You can initialize the speed in your project’s startup scripts (commonly in the Connection skill’s “Connection Established” script).
- Open the Connection skill.
- Click the triple-dot menu.
- Go to the Scripts tab.
- Find 0 - Connection Established Command and click Edit.
- Add this code and click Save.
# Sets the speed for the active Movement Panel that uses SetSpeed()
# Range is 0 to 255
# This initializes PWM output for the motor controller
SetSpeed(255)
Videos
Requirements
- 1 x EZ-B I/O Controller
- 1 x Dual H-Bridge (example: EZ-Robot 2.5 Amp H-Bridge)
- 2 x DC motors
- This Movement Panel only works on EZ-B index 0
Troubleshooting & Helpful Resources
If the motors do nothing
- Make sure the H-Bridge has power and the power LED is on.
- Make sure PWM sliders are above 0% (they default to OFF).
- Confirm the correct digital ports are selected in the skill Settings.
- Confirm your EZ-B is connected as Index 0.
If forward/reverse is backwards
Swap the two motor wires for the motor that is reversed (for example, swap the wires on OUTA and OUTB for the left motor). This is the easiest fix.
If swapping motor wires is difficult, you can also try changing the input port order in the skill settings.
For example, change [D0, D1, D2, D3] to one of these:
[D1, D0, D2, D3], [D0, D1, D3, D2], or [D1, D0, D3, D2].
You may need to test a few combinations.
Understanding “PWM Speed Control”
PWM (Pulse Width Modulation) controls how much time the motor power is ON vs OFF very quickly. More ON time usually means more average power and a faster motor. This skill exposes that as speed control so other skills (like joysticks) can smoothly speed up or slow down your robot. Learn more about Movement Panels here: Movement Panels Overview.
Community tutorial from Rich: view tutorial.
Related Tutorials

My Current Dewy Drive Train Setup + Info
L298n H-Bridge
Use Arduino For Wheel Encoder Counter
Control Meccano Meccanoid
Related Hack Events
Grippy Live Hack Part #1
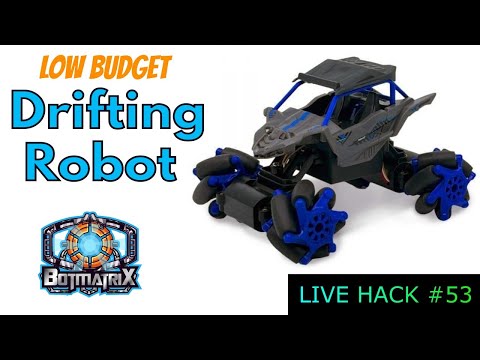
Drifting Robot Live Hack
Related Questions
H Brige Not Working
Hbridge PWM Movement - No Signal On Trigger A And B

Upgrade to ARC Pro
Stay at the forefront of robot programming innovation with ARC Pro, ensuring your robot is always equipped with the latest advancements.