A navigation skill for path planning based on receiving external location and obstacle data
How to add the The Navigator robot skill
- Load the most recent release of ARC (Get ARC).
- Press the Project tab from the top menu bar in ARC.
- Press Add Robot Skill from the button ribbon bar in ARC.
- Choose the Navigation category tab.
- Press the The Navigator icon to add the robot skill to your project.
Don't have a robot yet?
Follow the Getting Started Guide to build a robot and use the The Navigator robot skill.
How to use the The Navigator robot skill
A navigation skill for path planning based on receiving NMS location/positioning and obstacle data. This skill is combined with other skills that contribute navigation data to ARC's Navigation Messaging System (NMS).
Updated Skill
This robot skill has been superseded by a newer version called The Better Navigator.Example
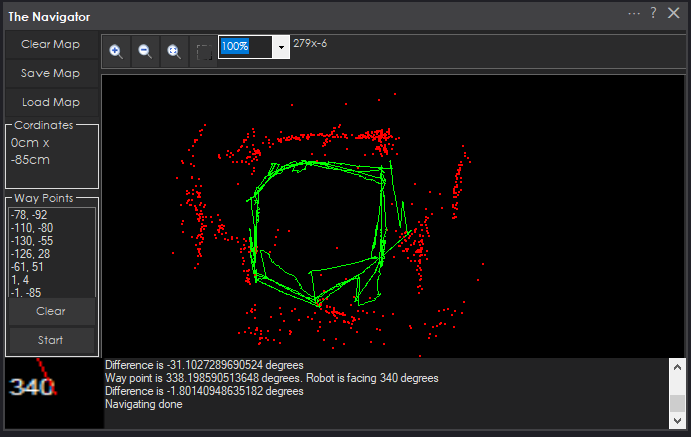
This screenshot uses an Intel RealSense T265 with three low-cost HC-SR04 ultrasonic distance sensors. The robot was instructed to drive around the waypoints at various speeds. Ideally, you would want to use this robot skill with a 360-degree lidar or other high-resolution obstacle detection.Here is a video of The Navigator working in conjunction with the Intel RealSense T265 tracking camera skill, which operates at NMS Level #3 Group #2 by providing position/location data into the NMS
ARC Navigation Messaging System
This skill is part of the ARC navigation messaging system. It is encouraged to read more about the Navigation Messaging System and learn compatible skills. This particular skill (The Navigator) operates on Level #1 of the NMS overview. This skill (The Navigator) requires a Level #3 Group #2 location/position sensor for operation. The location/positioning system will feed position data into the NMS, which this skill will use for navigation. See the NMS for compatible skills that provide location/position data.Mapping
While your robot is driving around and navigating, this skill will log the trajectory. You define the waypoint and path points by manually driving your robot to various locations (waypoints). Once multiple path points are defined for a waypoint, you can instruct your robot to autonomously navigate to that exact waypoint (or back again) at any time.Map Size
The map is currently hardcoded for 20x20 meters.Main Screen
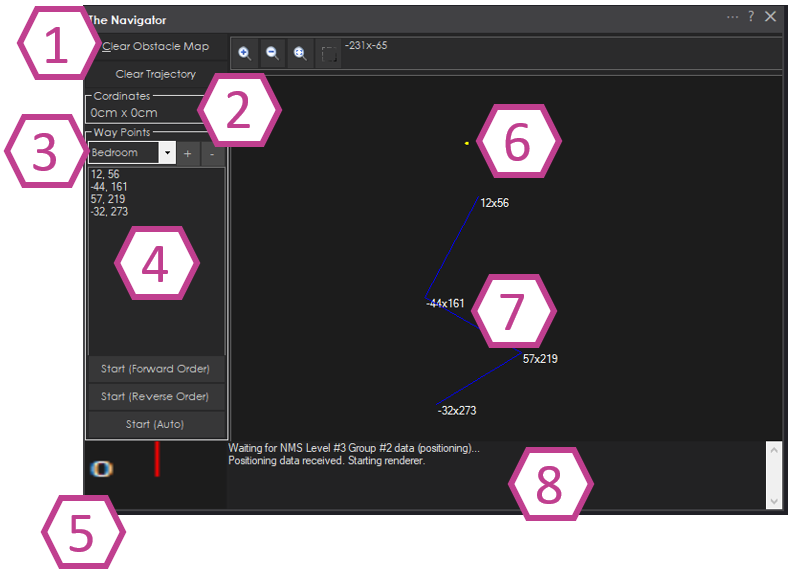
Map control buttons for clearing trajectory and clearing the map.
The robot's current cartesian coordinates as reported by an NMS Level #3 Group #2 sensor (i.e., Intel T265, wheel encoders).
Saved waypoints. Here you can add, remove and select waypoints.
The path points within a waypoint. A waypoint will consist of many path points for navigating throughout the environment. You may right-click on path points to edit the coordinate for fine-tuning. You may also re-order the path points by right-clicking and selecting Move Up or Move Down.
Current heading of the robot relative to the cartesian starting position as reported by an NMS Level #3 Group #2 sensor.
The yellow dot marks the robot's current cartesian position as reported by an NMS Level #3 Group #2 position/location sensor.
Path points are connected with a straight line demonstrating where the robot would drive. Right-click on the map view and select Add Path Point to add path points. It is best to drive the robot, which creates a trajectory. Then, right-click on some points of the tractory to add new path points to the selected waypoint.
Log messages are displayed about navigation and sensor activity.
Main Screen - Navigation Controls
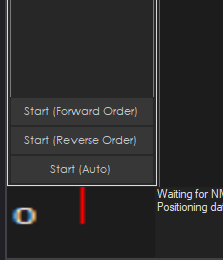
There are three buttons for manually starting navigating. You may also start navigating by using ControlCommands from other skills. The three buttons each have different behavior.Start (Forward Order) - This will instruct the robot to start following the specified paths within the waypoint from the first to last in that order. If your robot is close to the starting (first path point), then it will be convenient and head right there. However, if your robot is far away from the first path point, you may wish to use the Reverse or Auto button.
Start (Reverse Order) - This will instruct the robot to start following the specified paths within the waypoint in reverse order from last to first. If your robot is closest to the last path point, this will be convenient to get your robot back to the first path point in the waypoint.
Start (Auto) - This will automatically calculate which order to execute the path direction based on the robot's distance from the first or last path point. This is the most convenient operation because it will allow a waypoint to be navigated to and from. For example, if your robot drives to a location, use this button to get your robot back to the starting location. This will happen automatically.
Config - Scripts
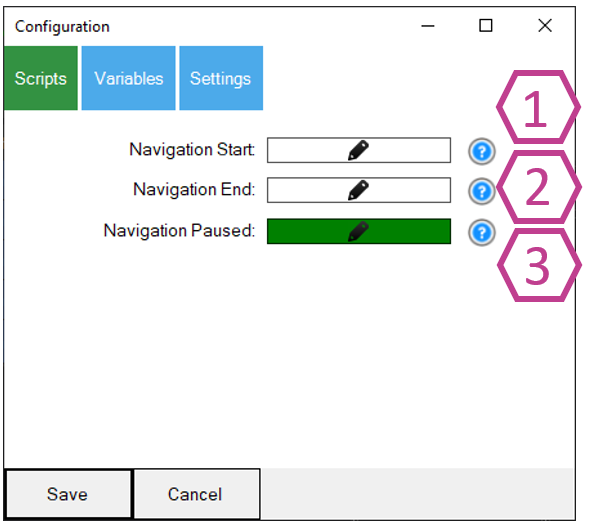
Script that will execute when the navigation to a waypoint is started. Navigation can start by manually pressing the Start button or using a ControlCommand().
Script will execute when the navigation is canceled or successfully ended.
If the navigation is paused by a JavaScript/Python command from the Navigation namespace. Or if the paused is triggered by the NMS Level #3 Group #1 distance sensor returning a value less than the specified range. This is configured in the Settings tab.
Config - Variables
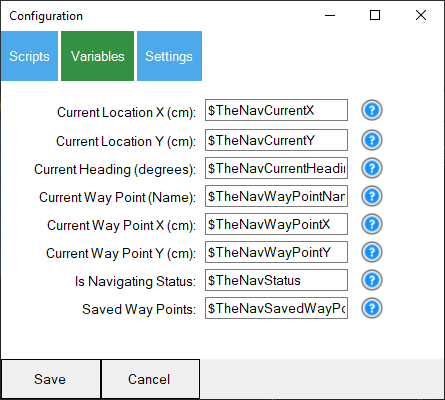
Many global variables are set for The Navigator. A question mark next to each variable explains in greater detail. The variable contents can be viewed using the Variable Watcher skill found in the Scripts category.Config - Settings
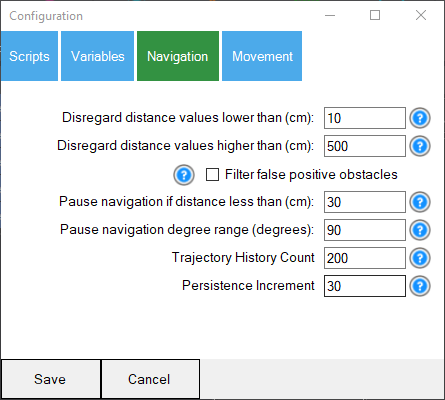
Ignore distance values less than this specified distance in CM. The distance values are provided by any NMS Level #3 Group #1 sensor.
Ignore distance values further than this specified distance in CM. The distance values are provided by any NMS Level #3 Group #1 sensor.
Filter false positives by removing detected obstacles and then later not detected within the same area.
If the NMS distance sensor provides a value greater than the "lower than" but lower than this, any navigation will be paused. This will also execute the PAUSE script from the Scripts tab. Your program may use this opportunity to navigate the obstacle and continue navigating again. Use the Javascript or Python command in the Navigation namespace to continue navigating. That command is Navigation.setNavigationStatusToNavigating();
5) This value complements the pause navigation distance value. This value will determine the degree range of when to pause navigation. If you wish for the entire range to be paused, enter 360 degrees. If you only want objects in front of the robot paused, enter 90. The degree number entered is divided by two and used from the left and right of the center of the robot.
- If 90 degrees is entered, then 45 degrees to the left of the center of the robot and 45 degrees to the right of the center of the robot are detected.
- If 180 degrees is entered, then 90 degrees to the left of the center of the robot and 90 degrees to the right of the center of the robot are detected.
- If 360 degrees are entered, the full range will be detected.
Starting Position
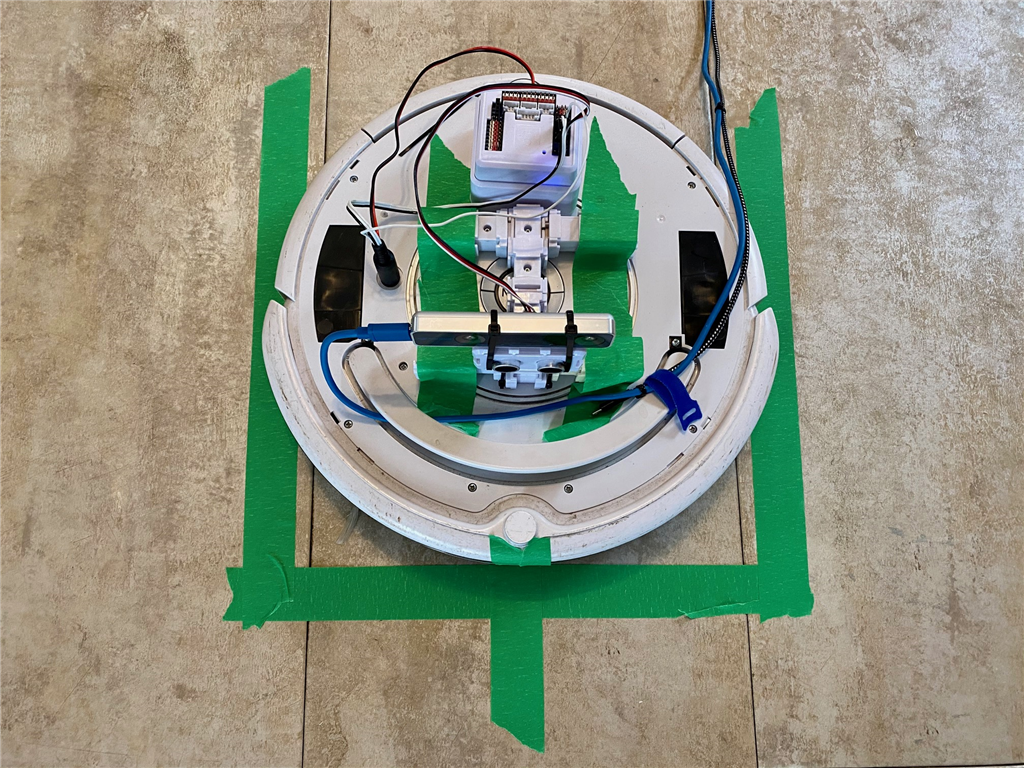
This navigation skill uses cartesian coordinates in CM from the starting position (0, 0). This means that any saved maps will be referenced from the same starting position and heading angle. When you re-load a project to have the robot navigate the same course, the robot must be positioned in the same starting position and heading angle. We recommend using painter/masking tape as the starting reference point for the robot. If your robot has an auto dock for charging, secure the charger to a fixed position on the floor, which can be used as a reference point.We're using an iRobot Roomba as the robot with an Intel T265 positioning sensor in the photo above. The painter's tape on the floor marks the robot's starting position. The outline allows us to position the robot into the square, and the marking on the front of the robot aligns with the specified heading.
Cartesian Coordinate System
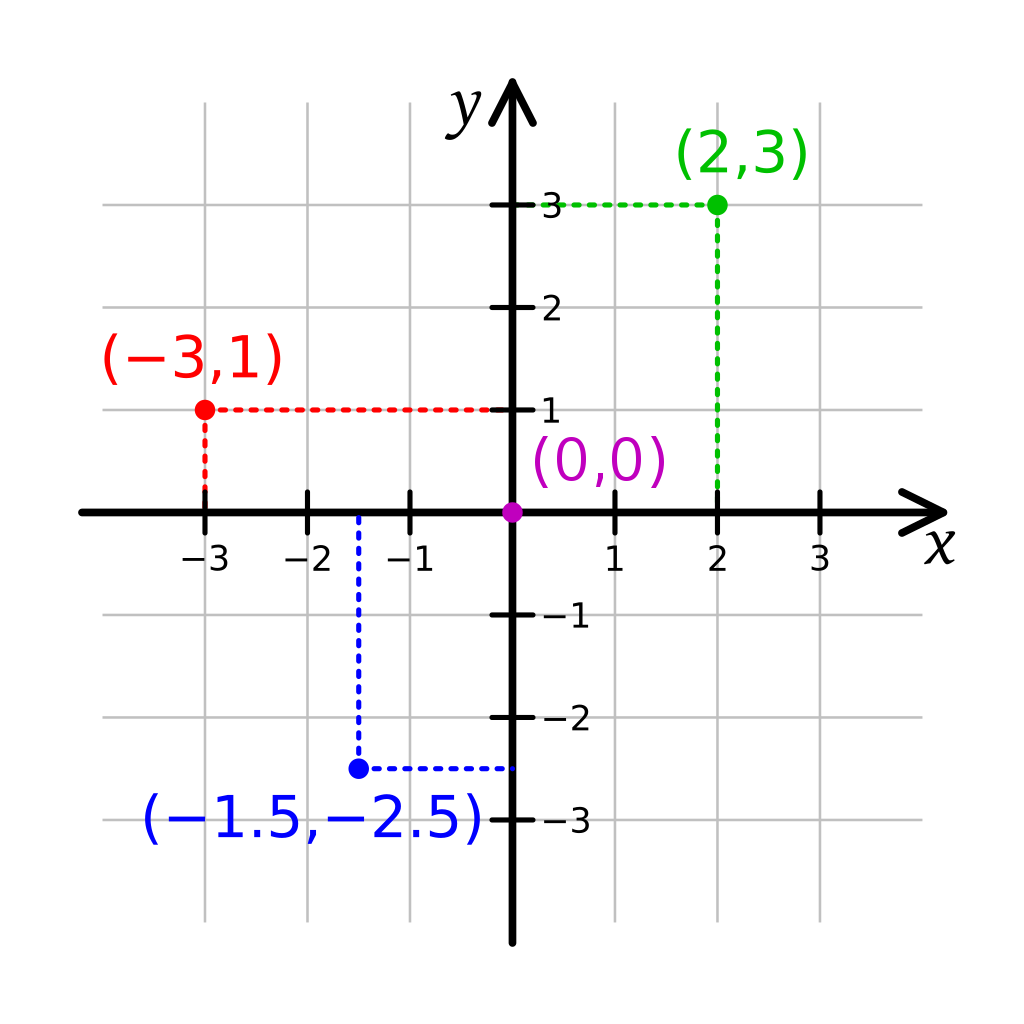
This robot skill uses cartesian coordinates to reference the robot's starting position. The starting position is always 0,0 and is defined at startup. As the robot navigates, the skill measures the distance from the starting position. The unit of measurement is in CM (centimeters). Read more about the cartesian coordinate system on Wikipedia.How Do You Use This
This skill is a navigation renderer and movement planner. This means it can build a map from participating sensor data and control the robot by navigating it to specified locations. To get sensor data, other skills must be loaded that are compatible. In this quick example, we'll use the Intel Realsense T265 in combination with this skill...Connect your Intel RealSense T265 to the computer's USB port
Load ARC (version must be >= 2020.12.25.00)
Add the Intel RealSense skill to your workspace
Now, add this skill (The Navigator) to your workspace
Press START on the Intel RealSense skill
You should now begin to see localization path data from the Intel RealSense sensor displayed in The Navigator window. This robot skill will be displaying and rendering the data.
*Optionally, you may add a supporting NMS Level #3 Group #1 sensor to detect the distance of obstacles and environment.
Related Hack Events
A Little Of This, A Little Of That
DJ's K8 Intel Realsense & Navigation
Related Questions
Upgrade to ARC Pro
Discover the limitless potential of robot programming with Synthiam ARC Pro – where innovation and creativity meet seamlessly.
Hi DJ, i am so happy i could buy you a beer!! Great job man! It locks very promising and i will test it as soon as possible. I have a suggestion. It would be so cool if we could organize a online video chat meeting so we could discuss this topic and to get to know some members of the ARC community. What do you think DJ and all of you guy?
That’ll be fun! I’m in
This ki d if thing is what I have been hoping for since I started with EZ-B. Need to save some pennies for the hardware, but it is going to be enough to get me back into the hobby and paying for ARC.
(now just need to find a good solution for docking and charging that won't eletrocute the cats if they explore the dock when the robot is wandering )
Hi thetechguru, wb. I to think this is a game changer. There are so many people frustrated with robot navigation, and ROS has such big learning curve that this will make the diference. Just spread the word!
This is an exciting start....I just ordered the T265!
As for a Zoom meeting or other virtual meeting...I've been suggesting this for a long while....I'm up for it.
I'm curious if the IMU on the T265 can be be affected by magnetic interference. I have a motion capture suit that uses joint based IMUs and they are extremely susceptible to magnetic fields (microwave and refrige as example). As a result, world and local space return inaccurate tracking data. I guess that's the reason for a secondary tracking?
@alan - I wrote some javascript that docks a robot 100% with our telepresence. I have been meaning to put it into a configurable skill. I'll add it to my todo list.
It's a pretty simple solution to by using magnets on the end of the conductors. The alignment is done with a glyph and a camera looking down.
The intel realsense will get you close to the charger, but not 100%. The camera helps a lot
Version 6: Updated to work with latest ARC NMS updates
Version 7: This update includes specifying way-points. In this screenshot, the robot was instructed to cruise to each way-point at a variety of speeds. The red dots are the obstacle map of the room by budget HC-SR04 ultrasonic distant sensors.
Again demonstrating how the NMS works with supporting skills. The RED are obstacles reported by a supported sensor (in this case HC-SR04 ultrasonic distance sensors). The GREEN is the positioning, reported by a supporting sensor (in this case Intel RealSense T265 tracking sensor)
DJ i have a few suggestions.
Good ideas! We're getting there
I am getting excited here.
Uh oh, I am getting more idea from this!
Keep your pants on boys. There's still lots more coming!
Not sure if you saw this...
I am already thinking of gadgets in the kitchen and all around the house for all of my bots to use for practical purposes, those of us too lazy to go get a beer, Yo Roomba get me a beer!
"Roomba, get me and beer and bring it dj in calgary"
now that's a battery you'll need to figure out
I just checked and still have a week of subscription to devise a Beer drone delivery system, It may or may not involve Hijacking one of the new Amazon delivery drones. ~ But just joking of course.......Er
DJ, what represents each red dot from the us sensors in terms of fiscal size in the real world?
I wrote this on the other site:
Another excellent part 3 demonstration -
I had a thought while sleeping this morning :-)
Is it possible to create. in camera tracking, a tab for tracking "way points" - and the it will connect to the navigator by coordinates (latitude, longitude)?
Like my drome's way points --
just a thought,
EzAng
Proteusy, the distance is in cm. The ultrasonic distances sensors are not a reliable source of mapping. As I said in the video, ignore that . A lidar or 360 degree lidar would be recommended
Ezang - I deleted your duplicate comment. Please comment only once with the same comment. And please put the comment in an appropriate place for organization.
you cannot relate the camera to the location. They don’t share enough usable data to fuse the sensors. And the t265 is tracking camera not depth. It doesn’t know about obstacles or distances within the image. It only knows where it is
DJ, how does the Path planning react if you put some obstacles between one waypoint to another?
Right now that's up to you to handle as this navigation skill is in development. It's in the TO DO of this skill's description up above. I'll be tackling that in a week or so. Right now this skill is in a good place. I'm moving onto the 360 lidar and then virtual reality skill to use controllers
Ok thanks DJ, no hurry:)
oh i'm hurrying we're all having too much fun!
Updated to save waypoints with multiple path points. There's also a setting to Pause navigation when a scan distance is less than the specified value from the settings. And a script will execute when the pause is enabled. The ARC 2020.12.25.00 and greater include new Navigation javascript and python commands.
Added the ability to specify the direction of the navigation path. Also, there is Auto navigation which will determine the direction of the path to travel based on the robot's distance from either the end or starting point. So this will help a robot get to a waypoint, and back again.
Read the manual at the top of this page for details about how to use these features.
I have it working ok now as long as nothing changes in the environment. I wonder if it would be logical instead of mapping the path it can take between destinations mapping the path it can’t take.
run the robot around the edge of all the rooms and go back to start creating a closed loop. Now the area inside the loop is green and outside the loop is red. It can go anywhere in green zone. Also run around objects (table, chairs, kitchen counter, the shaggy rug) creating more closed off areas. These are also red.
now create your end point destinations. The robot can then take shortest path to get to that destination from anywhere. You also have a map now that resembles the actual room so setting new destinations you just click on map. Long term the ultrasonic sensor then could handle any minor changes for obstacle avoidance.
Nink, you described the invert of how the navigator works. The navigator is designed for waypoint navigation. I believe you’re describing a different robot skill that hasn’t been created yet.
The suggested description drastically increases the issue of environmental changes. Waypoint path navigation is the most common method because the defined path is the highest chance that nothing will interrupt it (ie hallways etc). There’s more information in the additional reading area of this manual to learn about navigation challenges.
consider a gps map that provides directions to the grocery store from your house. The map doesn’t know of all the trees, houses, garbage cans, etc in your city. It instead knows the most viable path points to a waypoint.
If a navigation system were to know of everything except the clear path, that’s defining the location of infinite number of items that can move. It’s safer to define a reliable path to a waypoint.
If somehow something moves into the path of the waypoint, use the obstacle detection script in the navigator to get around it or alert you. There’s details in this manual on using the obstacle detection script for the navigator.
I guess I was envisioning something more autonomous. ie upload floor plan and robot reads plans and off it goes.
I edited my post above with more detail.
I do recommend reading the links I provided about navigation challenges. Once they’re read, the conversation will be easier to know why waypoint navigation is preferred.
Combining waypoint navigation with the obstacle avoidance script is the way to go.
the idea of slam gives expiry to detected obstacles using lidar or some multipoint distance sensor. The trouble with slam is the map / environment constantly changes as well. But what experts have determined during mapping over the last few centuries is that paths don’t change.
The paths in your home do not change. However, all of the stuff that’s not nailed to the floor does change. So defining where stuff is that isn’t nailed down would be a difficult thing to keep track of.
every time you move a chair or a table or a shelf, you have to recreate a map. Vs waypoint navigation which leaves enough room for things to move around. And use obstacle avoidance script to detect and behave accordingly to a detected object.
Hi DJ, would it be possible to create a "path points" via script? Also a navigation "Resume" should appear when navigation is paused and not "Stop" The right click to create a "Path Point" is wrong it says "way point"
Added the ability to add path points and waypoints with ControlCommand(). Check the Cheat Sheet or right-click when editing script to see available control commands for this skill.
Thank you DJ, will give it a go tomorrow.
Added ability to adjust the speed for navigating in the config menu. Please read the question marks next to the options to learn more.
Bug> When i change the Forward Speed in The Navigator the path points seem to move down relative to the saved path points.
Question> what does that mean?
Reply> See pic:
Haha I still don’t understand. Can you write more words that explains some detail?
Sure DJ, If i have various path points and then change the Forward speed in The Navigator, the path points that should be in the green area, move down as seen in the pic.
I’m guessing the intel release t265 doesn’t appreciate the speed change. Remember, the coordinates come from the t265, not me
Hum, odd..., must experiment a bit. Does it happen to you to DJ?
Not sure - I haven’t tried. It’s kind of a pain to set up the realsense right now because I’m at my cabin in northern Ontario.
the t265 gives me x,y,z pose coordinates and I plot them on the map. That’s about it - there’s no math or anything on my side. Just take the coordinates and push them into the nms
so if everything is slightly off, I’d gather the t265 returns different distances when moving at different speeds?
id have to test someday
but your screenshot does kinda show that the robot isn’t on the home position... so not sure
This shift occurs as soon as you change the speed and hit save. The position of the camera is correct but all the way points shift.
Weird eh. I guess there’s always challenges with pose sensors. So choose a static speed and use that
Hey DJ, did you do something in the last update? The nav point issue is ok now. Also i need a bigger map, lot bigger.
I did not do an update to this robot skill
2nd the bigger map I can’t even make it from the couch to the beer fridge.
Updated map size to 2000x2000 cm so @Nink can get beer
Aha ha! Sound like a plan!xD
#DJ I am using only one ping sensor to do the mapping and the Navigator does not plot the map. Must i use more?
There is no minimum sensor count that can push into the NMS for The Navigator to use. Maybe this will help you: https://synthiam.com/Community/Robots/Intel-RealSense-T265-Adventures-Bot-Part-3-20083
Sweet! Locking forward for part 4!
@Dj Any update on this skill?
Thanks
The last update appears to have been on January 10th (Version #20). ARC will automatically prompt you of updates to robot skills.
There is a list of ToDo items in the manual above. ToDo's don't have an ETA but feel free to jump into the source code and make appropriate changes as necessary - I always support that! _
In the navigator, I can't add waypoints by right clicking anywhere in the program like the video, or how I did it in the past
Did you add a way point first? Then you can add path points.
How to add paths? any video or picture of how to do this?
The names I create do not show up on the screen anymore
DJ video is pretty good. Step 1 turn on camera in your start location / direction. Don't start camera until you are in a known starting point. I use my Roomba docking station and then it auto drives backwards about 2 feet from charger. Step 2 click on + symbol and type a location for the endpoint name. (Say Kitchen Sink) I then start driving in a straight line to the first turning point. I stop, Right click on the map where the yellow dot is and then add a path point. If you can't see the yellow dot mouse click on the 3rd magnifying glass about the map and then zoom in with + Magnifier. Step 3 drive to next Turing point and again right click to add a path point. Keep repeating until you are at your destination. Step 4 add a final path point by right clicking on the yellow dot again. You are done. Now drive your robot back to start location and then Auto Navigate to Kitchen sink or where ever you wanted to go.
Now repeat entire process for next location. I have a common location that is central that I set up to go home to each time, not the best method as you may want to go to bedroom 2 from bedroom 1 but there are too many permutations to set up all possible routes. I guess I could script if at bedroom 2 and want to go bedroom 1 select this navigation route but going back to a common central location seems to work for now. When I drift from calibration I send it back to the docking station turn off camera and then turn it back on again to calibrate.
For my start point charger I have a location set up there when it needs recharging. After it drives out two feet I created a path point for charger but then drive forward about another 6 inches and create a final path point for charger. I did this so my robot is always facing in the right direction when I do auto seek dock and it docks perfect every time now. Camera Turns off just before docking and when it is docked camera turns on again and it has recalibrated.
Watched the video, worked last time I did this
I did as you suggested, I add the Home, 3 waypoints, I see nothing on the screen
So you don't have home on your drop down list? With 3 path points you just created underneath it. And if you click the 3rd Magnifying glass you don't see map and the points?
You must have a sensor group 1 or 2 running.
Did you try yours today?
here is a pic:
as you can see nothing on the screen
Here is mine today:
Ezang has no NMS level #3 group #2 sensor. Some form of positioning sensor is required and documented in the manuals.
an NMS level #3 group #2 sensor provides positioning or pose information. An example sensor would be an iRobot movement panel, t265 intel realsense, or wheel encoders, etc.. Check the NMS page for more info.
here’s a screenshot from the manual for The Navigator
is this ok?
Does that sensor work at level 3 group 1 or level 3 group 2?
what does the manual say for that sensor? Also, in the NMS diagram, check out where that sensor sits in the group list...
I am using the ultrasonic sensor - 3 wire - - ez robot
and a
ultrasonic sensor 4 wire - look like lever 3
on an IoTiny
strange, this all worked when you first did this
The Navigator with NMS would never have worked for anyone, including myself, without a Level #3 Group #2 location/pose input.
You require an NMS Level #3 Group #2 input, here's the image again - which can be seen in the NMS manual as well.
Level #3 - Sensor Groups Skills you require are sensors that feed data into the messaging system that maps are made from. The Navigation Messaging System collects data by supporting two sensor input groups...
Supported skills are... Ultrasonic Distance
take a look strange, today it shows:
level 3 - ultrasonic sensor is showing today:
Navigation Messaging System
send ping results to NMS
however I still don't see the the red on the screen like you with the ultrasonic sensors
I will watch video again, thanks
You need an encoder or a T265. How could the Navigator know the position of your robot without them? Level 3 group 2 sensors!
ok I understand thanks
I almost bought the camera 69.00 ZasLuke Webcam, 1080P HD USB QuickCam Intelligent Motion Tracking Camera, Built-in Dual Noise Canceling Microphone, 270Rotation Smart Tracking Streaming Webcam for Zoom Skype Facetime, PC Mac Laptop
Added variables for nearest and furthest degree and distance.
Minor bug fix to NMS auto pause
@DJ.
Question about the TODO items:
Do you have an estimated timeframe for the first one? My experience now that I have my Lidar working (mostly) is that the Navigator is not looking a the direction of movement and the direction of near obstacle, so if it passes close to a wall but nothing is obstructing the direction of travel, it is still pausing. If you are a week or two away from building in the functionality, I will wait. If it is further down your list, or you don't know, I can write some scripts to handle the situation, but they will be pretty complex since I'll want to compare distances to each side in a range of degrees to determine which way to turn before attempting to continue.
For the second item, I just wanted to say I am glad you are planning it. For now, my plan is to just save different versions of hte project for different maps (or really, starting points) but as I make changes in projects, that could become a real hassle. Would rather just pull up the map for a particular starting point in the same project.
Alan
I don’t have a time frame. But you can just disable the pausing feature in the navigator.
I'll start with some scripts and see how fancy I can get using the navigator variables available. (I seriously need to learn Javascript though. I think it would be way less complex to script this in Javascript than EZ-Script).
Alan
Updated
Awesome, thanks for the update.
I can't test tonight, but I will try it out tomorrow.
Updated object renderer
Performance improvement
Saves map with project
new option for enabling/disabling map building. If unchecked, the map will stay static and not be updated
new option in config for how many trajectory points to remember (Avoid clutter of UI)
The Navigator has been under going a large re-write. I wanted to share some news on this because we're close to launching the new version. I'm really excited about it with built-in path planning and a few other goodies. I was playing with the prototype last night and it was real cool.
Particularly, the new mapping system is neat. As objects are detected, they increase their persistence. So when objects stop being detected, they slowly disappear because their persistence is decreased. This means if you move a chair or object around the room, the map slowly learns that the object has moved. It's cool to see the prototype - which makes the maps self-learning and adjust over time.
I'm waiting on some hardware to test more with. Because we want to make a rpi lidar driver as well. We're a few weeks away but i did want to share.
Sounds like great news, thanks
Been way from the site for a while for "reasons", but glad I chose tonight to check in and see this. I should be back regularly soon.
Alan
I hope everything is okay over there, Alan. Good to see you back!
The new navigator (internally called The Better Navigator) is based on the Hector Slam, a popular ros package. It only works with 360-degree lidars, though. I'm trying to hack the algorithm to see if I can get it to work with depth cameras.
The EZ Slam uses Core Slam; we might modify that one to work with The Better Navigator.
The outcome I want from The Better Navigator is to have a table that I can instruct to move around my house to anywhere I want. I can ask the table to move to the kitchen counter. Or the living room small sofa. Or the dining room table, etc... I want to define many different house areas in waypoints and have the table move to them with speech commands.
The use case is to put stuff on the table, like dinner dishes, tools, or whatever... And say, "hey magic table bring this into the kitchen by the fridge," haha
Hi EzAng, Alan and DJ. Sure gona follow this...
Great insight thanks a lot!!
Will be able to use our Hitachi-LG LDS Lidar or do we need to buy a different Lidar unit?
Yeah, the Hitachi LG is the one I'm testing with. But with the NMS, any lidar can work if time is taken to create a driver robot skill.