

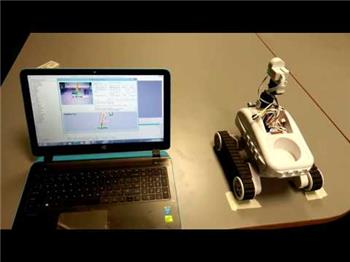
Displays HC-SR04 ultrasonic distance readings in ARC; scriptable via GetPing(), pausable, sets a variable with multiplier, optional NMS output
 Hardware Info
How to add the Ultrasonic Distance robot skill
- Load the most recent release of ARC (Get ARC).
- Press the Project tab from the top menu bar in ARC.
- Press Add Robot Skill from the button ribbon bar in ARC.
- Choose the Ultrasonic category tab.
- Press the Ultrasonic Distance icon to add the robot skill to your project.
Don't have a robot yet?
Follow the Getting Started Guide to build a robot and use the Ultrasonic Distance robot skill.
How to use the Ultrasonic Distance robot skill
What this skill does NOT do: It does not automatically steer, stop, or avoid obstacles. For navigation/avoidance, use the Ultrasonic Radar skill.
Ultrasonic sensors measure distance using sonar (sound navigation ranging)—they send out a quick burst of sound and listen for the echo. The time it takes for the echo to return is used to estimate how far away an object is. This is similar to how bats and dolphins “see” with sound.
Good to Know (Beginner Tips)
- Works well on hard surfaces (walls, wood, plastic, boxes).
- Less reliable on soft or angled surfaces (fabric, carpet, curtains, plush items) because they absorb or deflect the sound.
- Unlike many IR sensors, ultrasonic sensors are generally not affected by sunlight or black materials.
- Temperature and voltage can affect readings (sound travels differently in warm vs. cold air).
When an HC-SR04 (or equivalent) Ultrasonic Distance Sensor is wired to your EZB and configured in this skill, the skill will display a distance value for whatever is directly in front of the sensor.
How Readings Work (Important)
The value shown by this skill is typically 0–255. This number is a raw sensor value and is not automatically “cm” or “inches”. The raw value can vary depending on the sensor model, input voltage, the surface you’re detecting, and even room temperature.
Main Window
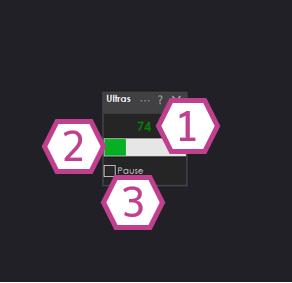
What You See
1. Ultrasonic Distance Value
- Shows the current distance reading (usually 0–255).
- Higher/lower values represent farther/closer objects depending on sensor and configuration.
2. Bar Display
- A quick visual way to see changes in distance without watching the number.
- Helpful for testing wiring and sensor direction (point it at a wall and move closer/farther).
3. Pause Checkbox
- When checked, the skill stops continuously sampling the sensor.
- This is useful if you only want readings on demand from a script (see next section).
Using This Skill with Scripts (GetPing)
This skill integrates with ARC scripting. If the Pause checkbox is checked, the skill will not constantly poll the sensor.
Instead, it will update when your script calls GetPing() (as long as the skill’s configured ports match your wiring).
Why pause + GetPing() is useful
- Reduces unnecessary communication traffic to the EZB.
- Lets you control exactly when a reading is taken (for example, only when the robot is moving forward).
- You can keep the skill paused permanently and still see updated values whenever
GetPing()is called.
Settings
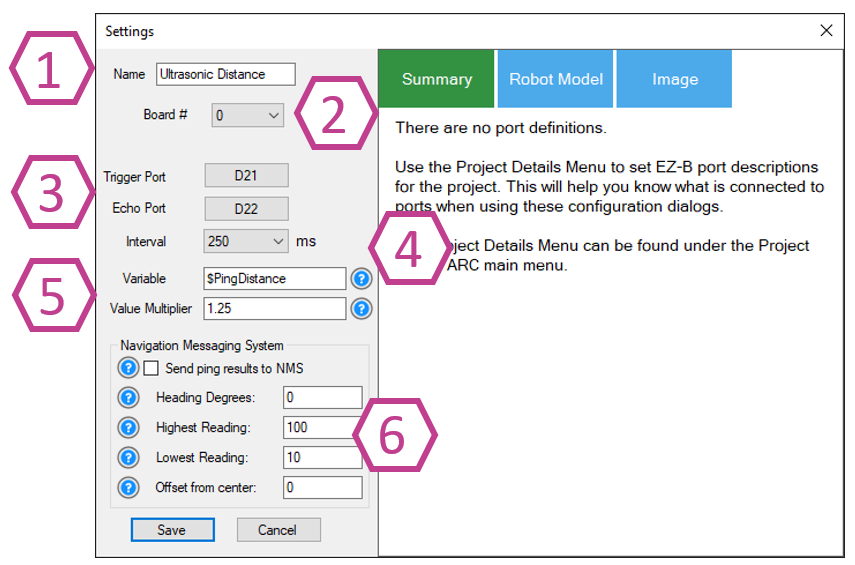
Sets the name shown on the skill’s window. You can rename it to match where it’s installed (example: “Front Ultrasonic”).
Note: Changing the title also changes the name used in the controlCommand() reference for this skill.
Choose which EZB you are using (example: EZB #0). If you only have one EZB connected, it is usually 0.
- Trigger port: the digital pin used to send the ultrasonic “ping”.
- Echo port: the digital pin used to listen for the returning echo.
- 3-wire sensors: some combine trigger/echo into one signal wire—when using that type, set Echo to the same port as Trigger (as required by the sensor design).
Controls how often the skill samples the sensor (in milliseconds). Range: 100–60000 ms. Default: 250 ms.
- Smaller number = faster updates (more frequent readings).
- Larger number = fewer updates (less traffic and CPU usage).
Variable
- Stores the most recent reading into a variable automatically.
- This can reduce the need to call
GetPing()repeatedly, which can add unnecessary communication overhead.
Multiplier
- Scales the raw value into a more useful unit.
- Example: the default multiplier of 1.25 is commonly used to convert the reading into centimeters (depending on the sensor and setup).
- For best accuracy, calibrate: measure a known distance with a tape measure, compare to the raw value, then adjust the multiplier until it matches.
Optionally pushes distance data into the NMS (Level #3, Group #1) so other navigation skills (such as The Navigator) can use it. If you are new, you can leave this disabled until you start working with navigation behaviors. Use the ? help icons in ARC and the NMS manual for details on each option.
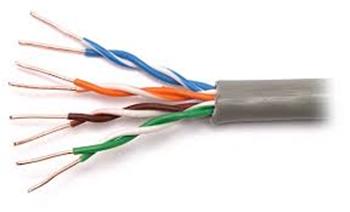
Wiring Diagram
Ultrasonic distance sensors commonly come in two styles: 3-wire (trigger+echo combined) and 4-wire (separate trigger and echo). Some versions include a voltage regulator (inline or built-in).
If your ultrasonic sensor has a regulator, it typically needs +6V or higher (often connected to Vin).
If it does not have a regulator, it typically needs +5V.
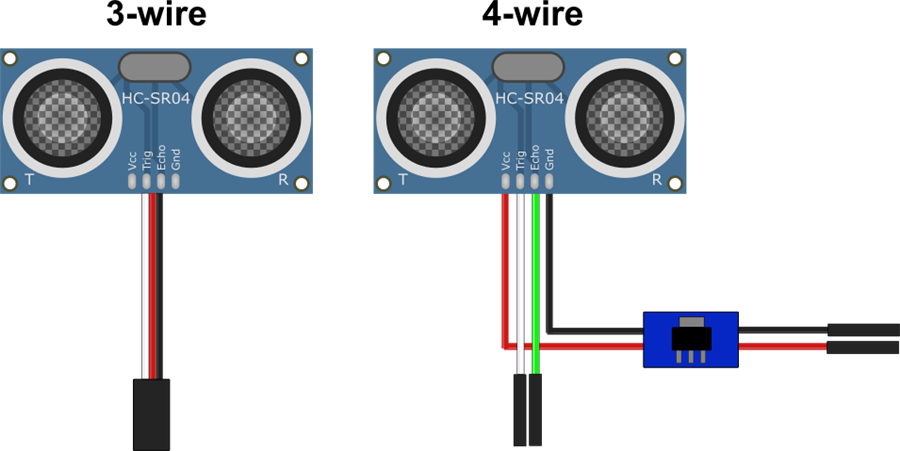
3-wire Wiring (with built-in regulator)
- Ground: Black wire to GND
- Power: Red wire to Vin
- Trigger/Echo: White wire to a Digital pin
4-wire Wiring (with regulator)
- Ground: Black wire from regulator to GND
- Power: Red wire from regulator to Vin
- Trigger: White wire to a Digital pin
- Echo: Green wire to a second Digital pin
Beginner Troubleshooting Checklist
- No reading / stuck value: confirm GND and power wiring, then confirm the configured digital ports match where you plugged in trigger/echo.
- Reading seems random: try changing the Interval to a slower value (e.g., 500–1000 ms), and test with a flat wall 30–100 cm away.
- Always detects “something”: check for nearby surfaces that could reflect sound (robot body panels, brackets), and see the “Fix Resolution” section below.
- Inconsistent on fabric: test with a hard surface; fabric often absorbs sonar.
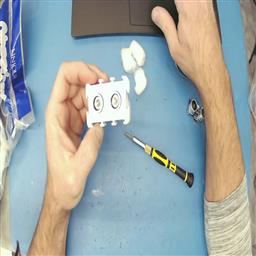
Fix Resolution (False Positives on Some Housings)
If you use an EZ-Robot ultrasonic distance sensor, you may occasionally see false positives caused by the ping echoing inside the sensor casing. A common fix is placing a few small cotton balls inside the case around the sensors to dampen internal reflections.
Tech Details (Video)
Resources
Synthiam’s ultrasonic hardware reference design is available here.
Related Tutorials
Related Robots
Related Questions
Wire Length For The EZB Ultrasonic Sensor
How Do I... Not Be Hopelessly Lost?

Upgrade to ARC Pro
Become a Synthiam ARC Pro subscriber to unleash the power of easy and powerful robot programming
Thomas can I copy and paste the response I made above and claim the reward?!?
I probably used an hour of work time to do a demonstration and then make a post about it with sample code.
There's something going on with your hardware, you may have overvolted the sensor. It's a mystery why it would work with the Arduino. I recommend grabbing another ultrasonic to test with, they are fairly inexpensive and prevalent.
hi jeremie
your right . your colors in post 24 are diff connected then in post of messersmidt in post 22
Thanks for pointing that out @Nomad it’s definitely possible that the Ultrasonic was damaged due to reverse polarity as well.
I did have a hunch that the sensor could be working with the Arduino because the chip on the sensor has been weakened but not completely blown, you see the Arduino uses a higher TTL than the EZ-Bv4. The Arduino used 5V TTL and the EZ-B is at 3.3V TTL.
I have seen odd things happen like that when electronics are slightly damaged by over voltage or reverse polarity.
I recommend trying a new Ultrasonic sensor.
Jeremy/Nomad,
No, you cannot claim the reward because I still cannot get any ping sensor to work. Sorry.
Gee. No takers on the $50. I thought it would take some bright robotics genius no more than 5 minutes to figure out my issue. Sigh.
messersmid
am not doing it for the reward . am doing it to learn to recognize errors . if 7 sensors work and only one doesn .that means jeremie is correct . its hard to see burn stuff on circuitboards .
No sensors have worked with the EZ-B. All of the sensors have worked with the Arduino.
ah then the ezbv4 is the problem not the sensors . can you open the ezbv4 for inspection , burn spots ?
if all 8 sensors stil works on the arduino today? a or one doesn ?
does the 7 sensors works on the ezbv4 ? if not the problem can be the ezbv4 .