
XInput joystick skill for ARC: maps Xbox controllers to movement, servos, triggers, vibration, variables; supports analog inputs and scripts.
How to add the Joystick (Xinput) robot skill
- Load the most recent release of ARC (Get ARC).
- Press the Project tab from the top menu bar in ARC.
- Press Add Robot Skill from the button ribbon bar in ARC.
- Choose the Remote Control category tab.
- Press the Joystick (Xinput) icon to add the robot skill to your project.
Don't have a robot yet?
Follow the Getting Started Guide to build a robot and use the Joystick (Xinput) robot skill.
How to use the Joystick (Xinput) robot skill
This is a Joystick skill for XInput devices (Xbox controllers, etc.). The advantage to this over the Direct Input joystick skill is that you have access to vibration hardware and independent access to analog inputs. Analog inputs, such as the triggers, can control servos or vibration motors.
*Note: If your joystick is connected after the project has been loaded, press the Refresh button to detect and load the joystick.
Main Window
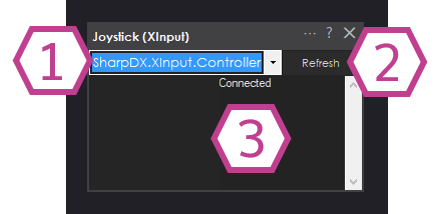
1. Device Drop-down This drop-down shows the Xinput devices that are available to be used by the Joystick Xinput Skill
2. Refresh Button This button refreshes the devices listed in the Device drop-down. Whenever a new device is inserted into the computer, you will have to press refresh to have it show up.
3. Status Field This displays the status of the skill's connection to the Joystick Xinput controller.
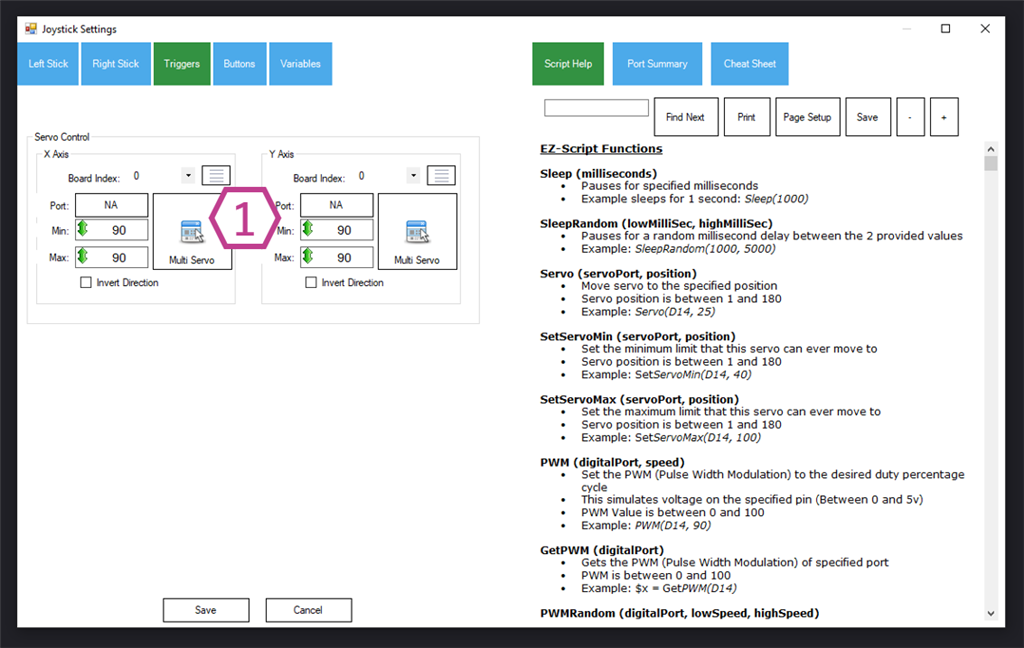
Settings - Left Stick Tab
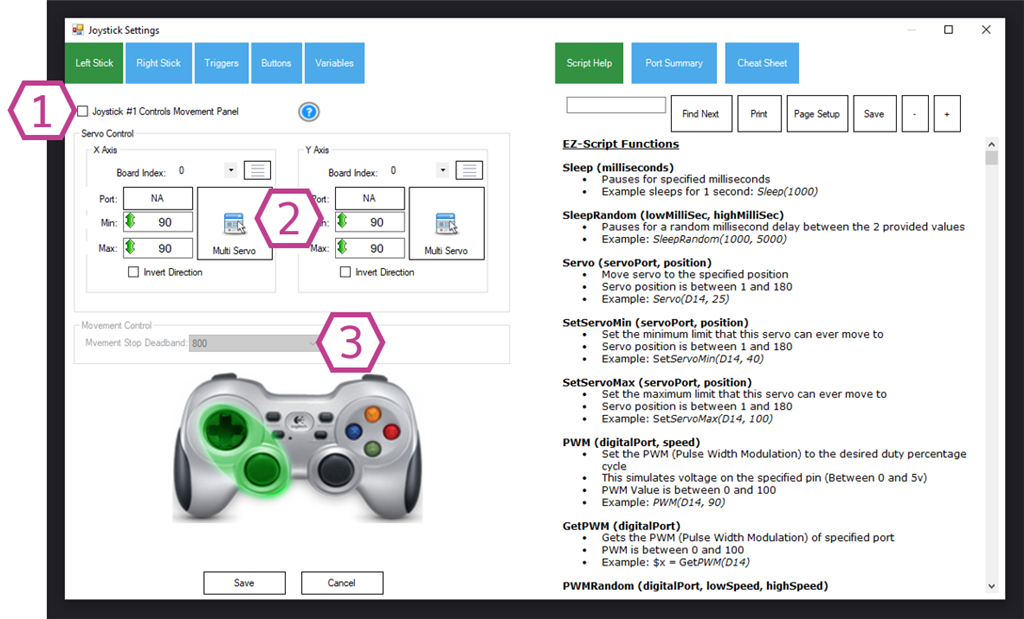
1. Joystick #1 Controls Movement Panel Checkbox This checkbox enables the left joystick #1 to control a movement panel. By default the D-Pad has assigned scripts for calling forward(), reverse(), left(), right(), and stop() Movement Panel commands. However, the D-Pad does not give you variable speed control, so you can enable the joystick to control movements with variable speed. If you use a variable speed on the joystick, you may wish to edit the scripts for the D-Pad in the buttons tab.
2. servo Control By default, the left joystick#1 will control servos. This option is only available when the Joystick #1 Controls Movement Panel Checkbox is unchecked. This section allows you to set up servo movement parameters such as servo port, board index, servo configuration, max/min degree limitations, multiple servo control, and inverted direction.
3. Movement Control Deadband Value Field This option is only available when the left joystick #1 Controls Movement Panel Checkbox is enabled. This value controls the sensitivity of the joystick. The joystick values move in a range between -32768 and 32767. If the value is 800, the joystick must move to a value greater than +/- 800 from the center for the joystick to respond. The lower the number, the more sensitive the joystick will be.
Settings - Right Stick Tab
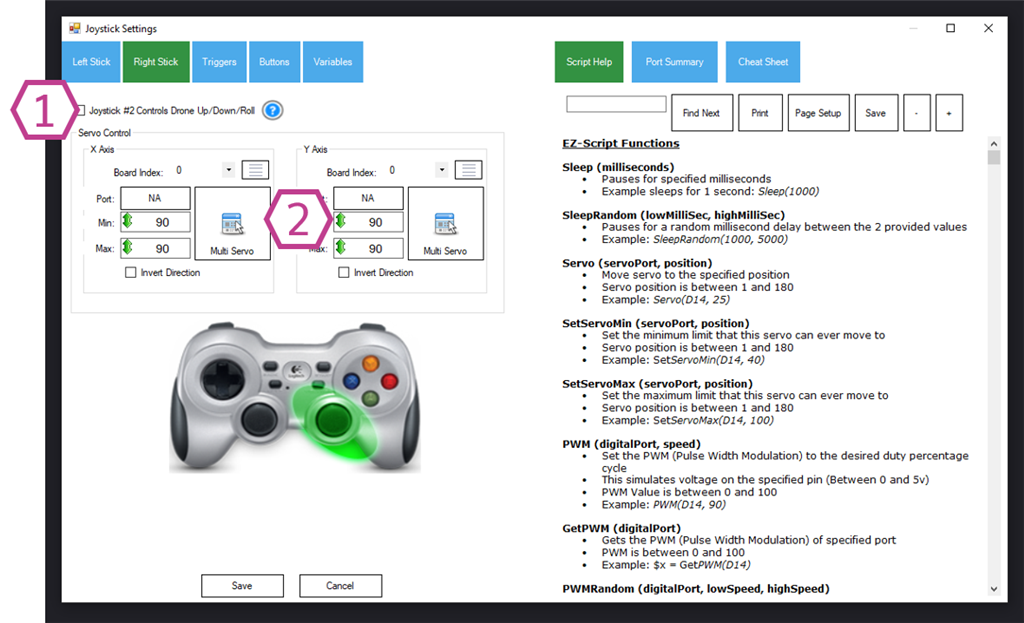
1. Joystick #2 Controls Drone Up/Down/Roll Checkbox This checkbox enables the right joystick #2 to control the Up/Down/Roll of the A.R. Drone movement panel. If unchecked, the joystick will control the configured servos.
2. servo Control By default, the right joystick#2 will control the servos. This option is only available when the joystick Controls Drone Checkbox is unchecked. This section allows you to set up servo movement parameters such as servo port, board index, servo configuration, max/min degree limitations, multiple servo control, and inverted direction.
Settings - Triggers Tab
1. servo Control By default, the left and right triggers will control servos. This section allows you to set up servo movement parameters such as servo port, board index, servo configuration, max/min degree limitations, multiple servo control, and inverted direction. If servo control is not desired, don't configure them, and you can use the triggers for other tasks, such as activating the vibration motors. See the code sample below.
Settings - Buttons Tab
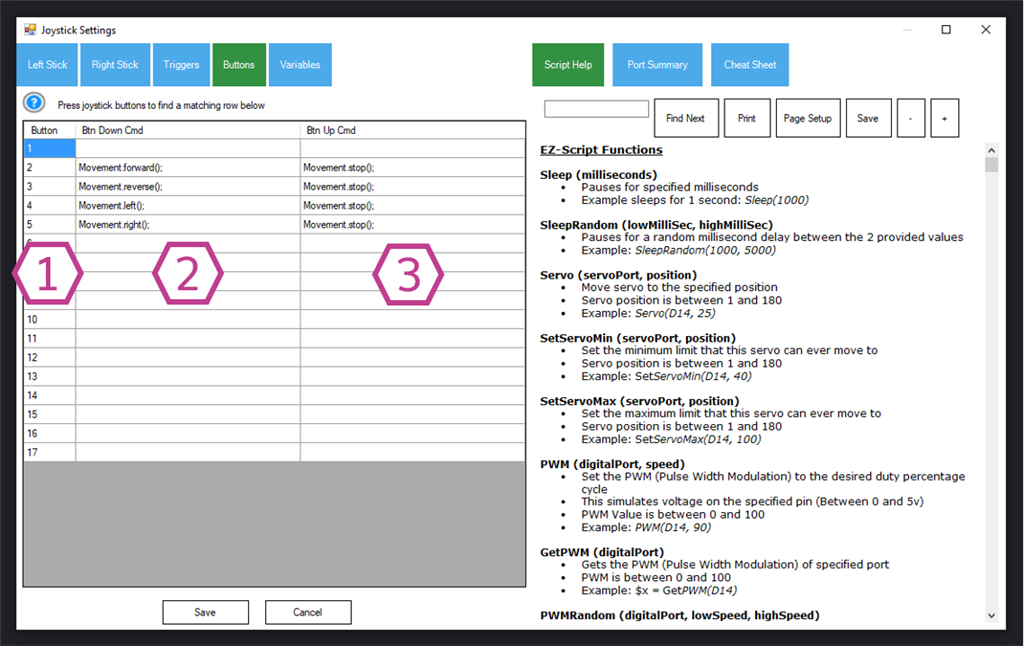
1. Button Number Field The buttons of joysticks can internally be labeled differently from one device to another, so we generically numbered them for you. To see what button corresponds to the script positions, push the button on the joystick to see the respective row highlighted in blue.
2. Button Down Command Field The script in the corresponding position will activate when a button is pressed.
3. Button Up Command Field The script in the corresponding position will activate when a button has been released.
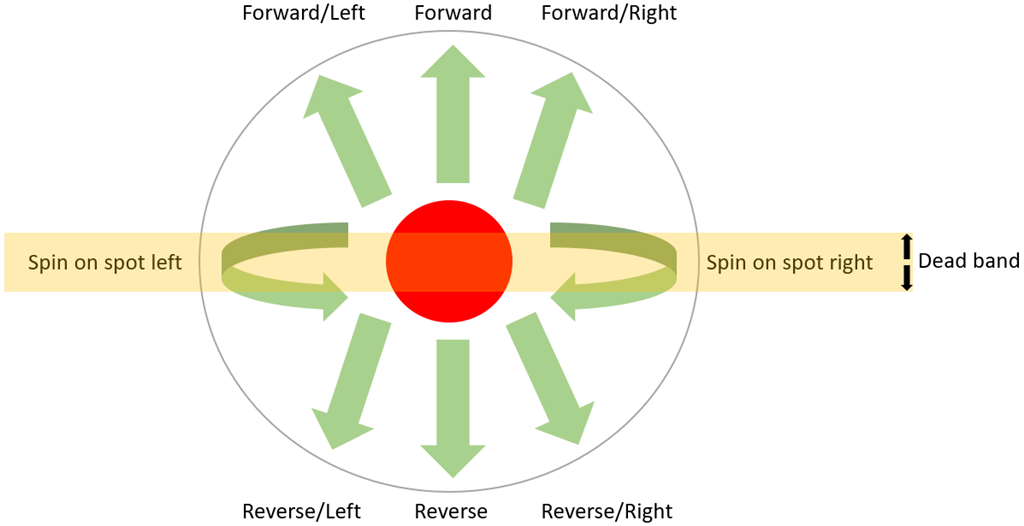
Movement Control
The joystick controls the current Movement Panel that has been added to the project. When a Movement Panel is being used that supports variable speeds, you will have the ability to move forward or reverse with a slight right or left turn. The analog stick can be moved to the right or left to rotate the robot or spin it on the spot.The dead band can be configured, which determines how much the joystick must move before registering as a movement. It is also used to determine how large the spin-on-spot (right/left) band is.
Settings - Variables Tab
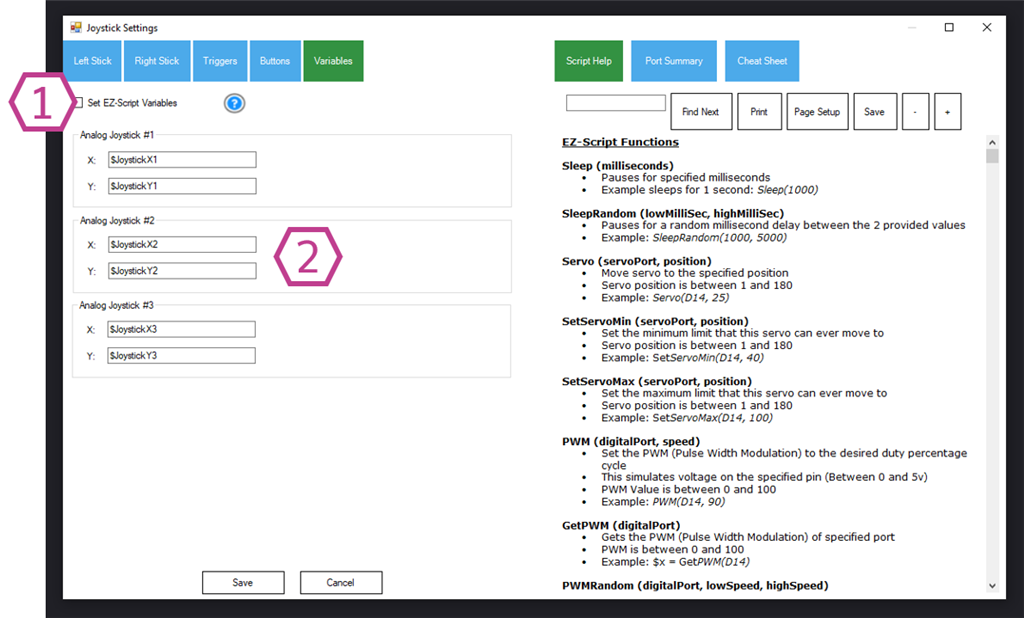
1. Set EZ-Script Variables Checkbox Variables will be assigned to the analog joystick positions if this checkbox is enabled. The analog joystick #1 (left) and #2 (right) will set variable values between -32768 and 32767. The analog triggers will set variable values between 0 and 255.
2. Variable Section This section assigns the joystick and trigger values to customizable variable names.
How to Use Joystick (XInput)
Add the Joystick (XInput) skill to your ARC project (Project -> Add Skill -> Misc -> Joystick (XInput) ).
Plug your wireless/wired joystick into your PC's USB ports (or connect via Bluetooth).
Find your Joystick in the Device drop-down and select it.
If you don't see your joystick listed, click the refresh button and try step 3 again.
Once the Status field reports that you are connected, you can enter the Settings and configure your Joystick.
Centering Consideration
When the joystick is in a resting position, the servos will be in the center position between the Min and Max values. The joystick's resting position will be the halfway point between the servo's min and max positions. So, if your MIN is 10 and your MAX is 100, the resting position will be 55.Code Sample
Vibration The vibration of the joystick's left and suitable rumble motors can be enabled via controlCommand(). For example, to demonstrate variable control of the rumble motors with the finger triggers, add this JavaScript code to a script skill and run it.
map = function (value, in_min, in_max, out_min, out_max) {

  return (value - in_min) * (out_max - out_min) / (in_max - in_min) + out_min;
}

while (true) {

   var y1 = map(getVar("$JoystickX3"), 0, 255, 0, 100);

   var y2 = map(getVar("$JoystickY3"), 0, 255, 0, 100);

  ControlCommand("Joystick (XInput)", "VibrateLeftAndRight", y1, y2);

   sleep(100);
}
Requirements
This skill is not compatible with legacy Direct Input joysticks. For direct input joysticks, use the Joystick (DirectInput) found HERE. Some joysticks have a switch for change between Direct Input and XInput. Generally, the switch is labeled D or X. For this skill, change the switch to X.Resources
Here is a project which includes the script for testing the joystick xinput functions: test joystick.EZBRelated Questions
Cycle Servos For Controller Analog Sticks
Thrustmaster Skill
Joystick Release Servo Reset

Upgrade to ARC Pro
Take control of your robot's destiny by subscribing to Synthiam ARC Pro, and watch it evolve into a versatile and responsive machine.
I have a copy cat PS3 game pad bought from EB Games, works as direct replacement bluetooth to PS3 or on windows steam games through USB c Cable....would something like this work if I wanted to take control of a Roomba?
Yes, it should be no prob to use a PS3 controller to control a Roomba with this skill.
I found this tutorial to help you set up a PS3 controller as a Xinput device in windows: How to Use PS3 Controllers on PC Through Xinput on Windows 7/8/10 : 9 Steps - Instructables
Hey thanks Jer, will try that out now!
Oh Jer ,forgot to mention you outdid yourself on the Tiny That pulsing L.E.D. reminds me of the bright heart beat on the EZv3 and the cute munchkin voice when it starts,ha ha right on Jer!
Does anyone know if shoulder buttons, the direction pad and buttons x, y,a, b can be read?
@TMesserschmidt I'm not sure about the D-pad but the rest for sure!
Yes. The d pad is used. By default they’re set for movement. See screenshot in the manual above. They are mapped button inputs 2-5
@DJ Looking into it further it seems that the D-pad doesn't work with Xinput. The manual above does mention: "The D-pad is not functional using Xbox and XInput."