
Connect Intel RealSense depth cameras to ARC NMS for depth-based distance detection, point-cloud mapping, video streaming, and navigation telemetry.
 Hardware Info
How to add the Intel Realsense D435i robot skill
- Load the most recent release of ARC (Get ARC).
- Press the Project tab from the top menu bar in ARC.
- Press Add Robot Skill from the button ribbon bar in ARC.
- Choose the Navigation category tab.
- Press the Intel Realsense D435i icon to add the robot skill to your project.
Don't have a robot yet?
Follow the Getting Started Guide to build a robot and use the Intel Realsense D435i robot skill.
How to use the Intel Realsense D435i robot skill
Connect the D435i Intel Realsense camera to the ARC Navigation Messaging System (NMS) for distance detection and mapping. This should also work with other Intel RealSense depth camera models because the FOV and parameters are used from the device.
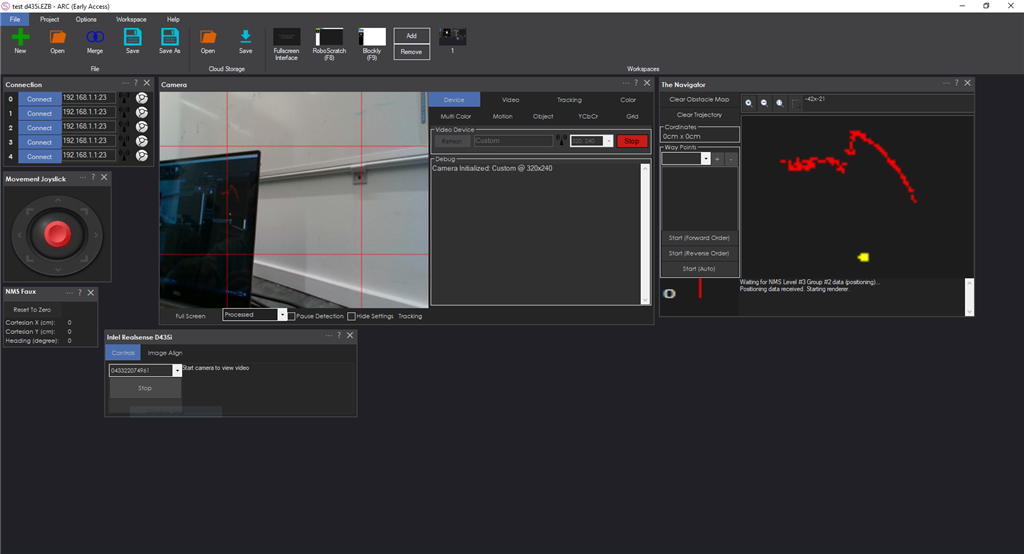
Main Screen
Select the device by the serial number. This allows multiple Intel Realsense devices to be added to a project.
START/STOP button connecting to the RealSense device.
Log window for status and errors.
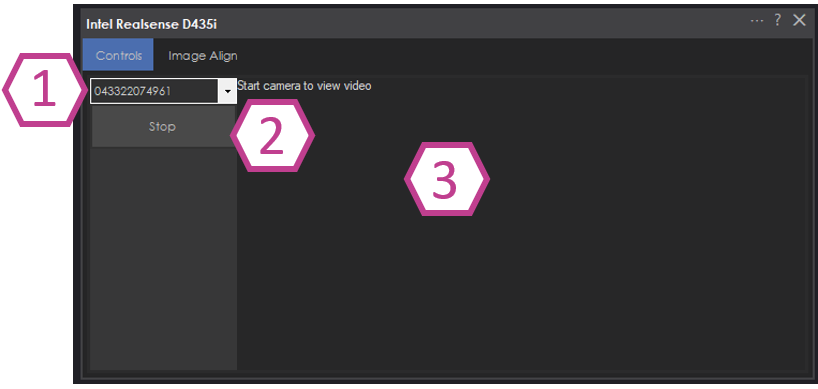
Image Align
The Image Align tab allows you to select the area of the image that you wish to detect for the point cloud. For example, setting the detection too low will detect the floor at a close distance. Ideally, set the bar high enough to avoid detecting the floor.
Adjust the top of the detected image range.
Adjust the bottom of the detected image range.
The detected image range is highlighted in purple.
Configuration
The configuration screen displays several options for customizing the device to work with your robot project.
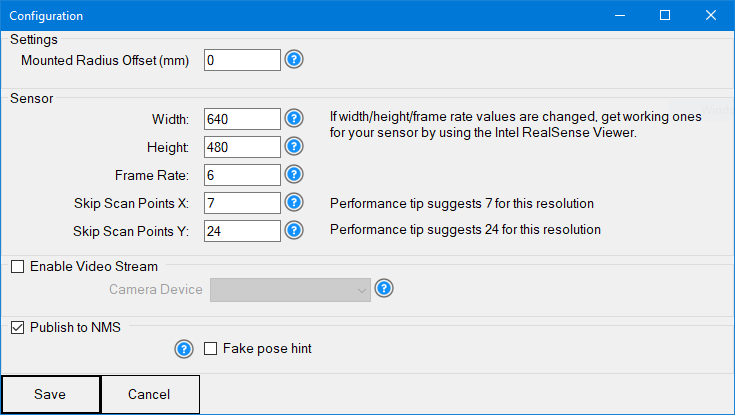
Mounted Radius Offset in mm (input)
Offset of the sensor from the center of the robot. A positive number means the sensor is toward the rear; a negative number means the sensor is toward the front. The measurement is from the center of the robot. The sensor must sit aligned with the center of the robot, not toward the left or right. The sensor must face 0 degrees heading.
Sensor Width, Height, and Frame Rate (input)
Sensor resolution during initialization. If the values are changed from the default, obtain them from the Intel RealSense viewer. Changing these values may be necessary if using a sensor different from the D435i. Set both width & height to 0 for auto-size, which isn't the most efficient for performance.
Skip Scan Points X and Y (input)
The number of depth pixels to skip when processing the depth data. This is useful for lower CPU PCs or when high-resolution depth is not required. Since the sensor has a limited field of view (FOV), processing every depth pixel may not be necessary. If the sensor resolution is 1280x720, the CPU would be processing 921,600 depth points for every scan of the specified framerate. At 1280x720 @ 15 FPS, that's 13,824,000 depth points per second. If the Skip Scan Points for X & Y are set to 10 for that resolution/fps, the CPU would only need to process 9,216 depth points per scan (or 138,240 per second).
The editor will recommend a value for the best balance between performance and detection based on the sensor FOV.
Enable Video Stream (checkbox)
The camera video from RealSense can be pushed into a selected Camera Device. In the selected camera device, choose CUSTOM as the device type. This will accept the video feed from this robot skill. Ensure START is pressed on the selected camera device as well.
Use NMS (checkbox)
Enable pushing the data to the NMS to combine with a navigation robot skill.
Enable the Fake Pose hint checkbox
- Do not use if another robot skill provides pose data to NMS
- 3d Cameras do not provide enough data for SLAM systems to identify the position, so this isn't very useful. You would want at least two cameras (facing opposite directions) for this to work properly. Or combine with a lidar, etc..
SLAM systems, such as The Better Navigator (Hector), will require the robot's pose/position in cartesian coordinates to identify its position. This is generally provided by an odometry setup such as wheel encoders. If your robot does not have this, you can fake the pose hint by selecting this option. This will send 0,0 as the pose location of the robot to force The Better Navigator to render. Do not check this if you have another robot skill submitting pose data to the NMS!
Getting Started
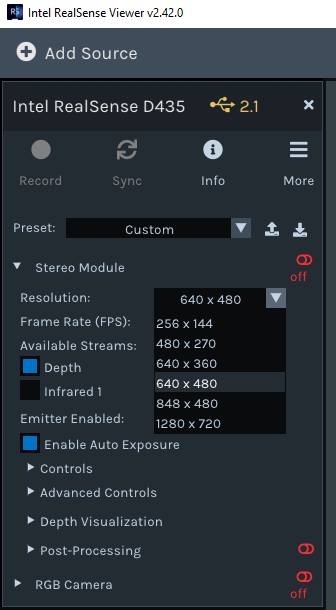
At the time of this guide, the Intel Realsense Viewer being used is available here, in the Assets section of the release: https://github.com/IntelRealSense/librealsense/releases/tag/v2.55.1
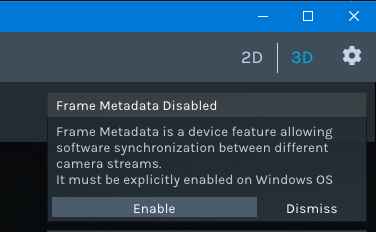
Ensure the computer's USB 3 port is used. Second, load the Intel RealSense Viewer, which is available in the Intel Realsense SDK package. A prompt to "Enable USB Meta Data" may be displayed, a system-wide change. Ensure you answer ENABLE to that option. Lastly, update the firmware if there is a prompt to do so.
If the sensor works in the Intel RealSense viewer, it will work with this robot skill. Depending on the version of the sensor, you may need to configure the capture width/height/framerate. This can be done in the robot skill configuration screen. The RGB and Depth camera resolution values must be the same. You can use the Intel RealSense Viewer to see what values work for your camera. If the RGB camera is 640x480 x 15 FPS, the depth camera must have a supporting resolution with the same settings. This robot skill will parse the depth and RGB data together.
Using the RealSense viewer, select a profile and note the resolution it is set for. The "Hand" profile seems to work well, although a lower camera imager is ideal to limit the amount of processing on your PC.
Variables
This skill will create four global variables that scripts can reference.
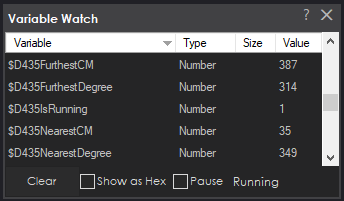
$D435IsRunning - status of the D435 robot skill, whether connected to the sensor or not.
$D435FurthestDistanceCM - furthest distance detected
$D435FurthestDistanceDegree - furthest degree of the furthest distance CM variable.
$D435NearestDistanceCM - nearest distance detected
$D435NearestDistanceDegree - nearest degree of the closest distance CM variable.
ARC Navigation Messaging System
This skill is part of the ARC navigation messaging system. You are encouraged to read more about the messaging system to understand the available skills HERE. This skill is in level #3, group #1 in the diagram below. It contributes to telemetry positioning in the cartesian positioning channel of the NMS. Combining this skill with Level #3 Group #2 skills for obstacle avoidance works well. For Level #1, the Better Navigator robot skill is recommended.

Control Commands for the Intel Realsense D435i robot skill
There are Control Commands available for this robot skill which allows the skill to be controlled programmatically from scripts or other robot skills. These commands enable you to automate actions, respond to sensor inputs, and integrate the robot skill with other systems or custom interfaces. If you're new to the concept of Control Commands, we have a comprehensive manual available here that explains how to use them, provides examples to get you started and make the most of this powerful feature.
Control Command ManualcontrolCommand("Intel Realsense D435i", "Start") Starts the D435i robot skill.
controlCommand("Intel Realsense D435i", "Stop") Stops the D435i robot skill.

when you "test" in the realsense app, are the RGB camera and Sensors both at the same resolution?
I have set them the same and different resolutions, and it works regardless.
Alan
Your tests in the realsense app would need to be the same resolution for both the sensor and rgb. Otherwise, there image and distance detected would be out of sync for mapping in ARC.
What is the resolution and format for both rgb and sensor in realsense app that provide the best cpu usage?
Also, try setting the width & height in the latest version to 0. That will use the auto-size, or the last size used (i.e. from intel realsense viewer)
Will try after work tonight and let you know.
I am sure we'll get this figured out.
Should I run the calibration app that came with the driver download too? I didn't both since you didn't mention it in the documentation. Also, there are several profiles in the viewer app for what you are expecting to see (ie, hand signals, far distances close, etc...). Is there a preferred one and does the device remember it after it is used in the app to when the skill accesses it?
Alan
I don't know anything about a calibration app. That's most likely a question for the intel company that makes the product. You're somewhat exceeding my knowledge of the device haha
I have tried everything I could think of, I removed the Intel drivers I had installed and just tried whatever Windows installed. Still worked in the viewer, but the same issues in ARC. I tried multiple resolutions. The only 2 that the RGB and the Stereo have in common are 640x 480 which gives this errors (same as 0x0 no matter what the resolution in the viewer was:
or 1280 x 720 which works but only when set to 6 frames per second and actually only updates the distance about every 20 seconds so the robot drives into walls.
All other resolutions give some variation of:
Here are screen shots of the supported resolutions:
andI also tried removing the Intel driver and letting Windows find its own driver in case it was a driver issue, with the same results. If this is not what you see in the viewer, I will return the device and get a 435i. Otherwise, I am going to go back to Lidar for a while so I can work on navigation scripts that work until we have a 435 skill that actually works. (that sounded more pissy than I meant. My mom is in the hospital with Pneumonia, Thank G-D it is not Covid, but I am stressed).
As always, if you want to provide a debug version with high or highest logging level set to figure out what is causing the issue, I am glad to install and test, although depending on my Mom's condition and if they send her home, I may be offline for a week or so... They won't let me visit the hospital despite the fact I am fully vaccinated, so at least for the next few days I should be available to test.
I have a question, about the Intel Device. Can it work for outdoors as well? would beinteresting to have an indoor/outdoor sensoe on the robot.