
Control UBTECH Alpha UBT-12HC smart servos via ARC using EZ-B v4/IoTiny UART, assign virtual ports, set baud, custom bits and position mapping.
How to add the UBTECH Alpha Servos UBT-12HC robot skill
- Load the most recent release of ARC (Get ARC).
- Press the Project tab from the top menu bar in ARC.
- Press Add Robot Skill from the button ribbon bar in ARC.
- Choose the Servo category tab.
- Press the UBTECH Alpha Servos UBT-12HC icon to add the robot skill to your project.
Don't have a robot yet?
Follow the Getting Started Guide to build a robot and use the UBTECH Alpha Servos UBT-12HC robot skill.
How to use the UBTECH Alpha Servos UBT-12HC robot skill
Control the UBTECH Alpha Robot Digital smart Servos (UBT-12HC) with ARC. The servos must be powered appropriately, and connected to the EZ-B v4 or IoTiny with the respective port. Visit the Config menu of this plugin to view the port configuration.
The Virtual Ports (V0..V99) in ARC can be assigned to the UbTech servos.
UART Ports
This plugin requires the RX signal wire of the servo be connected to TX of the selected UART or digital port (if Software UART is selected on IoTiny)
Hardware UART is for the EZ-B v4 only. Do not use software UART on EZ-B v4. View the EZ-B v4 datasheet to identify the UART ports (0, 1, or 2). EZ-B v4 datasheet can be found here: https://www.ez-robot.com/Tutorials/Lesson/18
Software UART should only be used with IoTiny
Default baudrate of UBTECH servos is 115,200
Bind To Virtual Servos
- The configuration menu also provides an option to select the Virtual Ports, which correspond with the ID's of the UBTech servos. If the UBTECH servo ID #0 is connected, select V0. #1 = V1, #2 = V2, etc..
Additional Info
- Discussion on these servos is here: https://synthiam.com/Question/3932

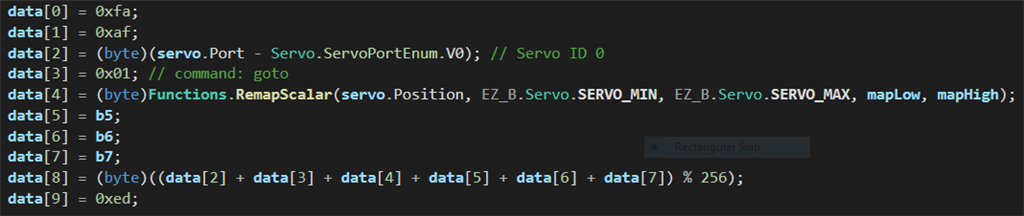
Custom Bit Settings There are 3 bits that seem to not be understood for the protocol. Since UBTech does not release the protocol for their products, the community is working to better understand what the parameters are. The configuration menu of this plugin allows you to set hardcoded values for those bits. The bits are for 5, 6 & 7.
Custom servo Position Mapping The UB Tech servos have their own position range, and we don't know what it is. So, the configuration menu allows you to specify the min and max positions for the range. This will be mapped to the ARC servo position range. Meaning, if you set the range in this plugin, it will be mapped to the range for all ARC servo controls.
Protocol Packet Code Here's a copy and paste from the plugin code. This is how the packet is being assembled to be sent to each servo. The values specified by you in the configuration menu are b5, b6, b7, mapLow and mapHigh.

I must be blind ! I wrote 127.0.0.1.23 instead of 127.0.0.1:23 !...Now the emulator works. I can read the famous 160 bytes (i had guessed 170), I had seen with the oscilloscope, The messages are quite different from the bluetooth ones. I can't get any inspiration from them. I'll change my mind. I'll go on experimenting with the incomplete protocol from Australian member Nicky777, trying to make it work correctly with ezb. Thanks to PTP for his great help.
@PTP. About your post 112
You're right. This video shows a Jimu's servo, that appears to be quite different from alpha 1s ones. Related considerations about movement range probably don't apply to alpha's servos. I'm probably the unique member who actually tested the plug-in in an alpha robot. This script stalls the servo when 140 is exceded. Actual range is : 1=-90,70=center, 140=+90 So do I. I'll try with 1. ( the checksum needs to be modified accordingly) I think these values don't apply to alpha's servos.This plugin has a change to allow the bits 5, 6 & 7 to be hardcode set in the config menu. Remember, byte positions start at 0, not 1. So when you discuss byte #8, you're really discussing byte #7.
You can also specify the servo range as well.
I no longer need to be involved in this plugin. All of the settings and configuration are available to you in the plugin. Have fun
I'm happy to see you went on working.... i'll test the new plug in.