

Control servos, movement panels and scripts via Wii Remote or mobile accelerometer; D-pad, buttons and Home-enabled accelerometer tracking.
How to add the Wii Remote robot skill
- Load the most recent release of ARC (Get ARC).
- Press the Project tab from the top menu bar in ARC.
- Press Add Robot Skill from the button ribbon bar in ARC.
- Choose the Remote Control category tab.
- Press the Wii Remote icon to add the robot skill to your project.
Don't have a robot yet?
Follow the Getting Started Guide to build a robot and use the Wii Remote robot skill.
How to use the Wii Remote robot skill
The Wii Remote skill lets you use a Nintendo Wii Remote (Wiimote) to control your robot in ARC:
- Drive a Movement Panel with the D-pad
- Move servos using the Wii Remote’s accelerometer (great for a pan/tilt camera)
- Run scripts when you press buttons (A, B, +, -, 1, 2, etc.)
Important notes (please read):
- There are many versions of Wii Remotes (Nintendo and clones). ARC supports the standard Wii Remote protocol, but Synthiam does not manufacture the controller and can’t guarantee compatibility with every clone.
- If you connect the Wii Remote after your ARC project loads, press the skill’s Refresh button so it appears in the device list.
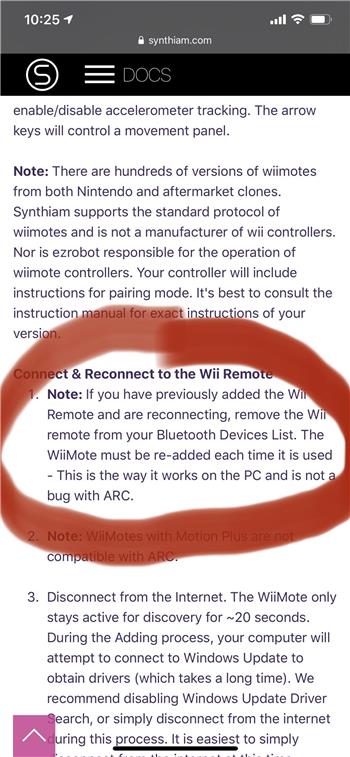
- On many Windows PCs the Wii Remote must be re-added each session. If reconnecting fails, remove it from Windows Bluetooth devices and add it again.
- Wii Remotes with MotionPlus are not compatible with ARC.
Main Window
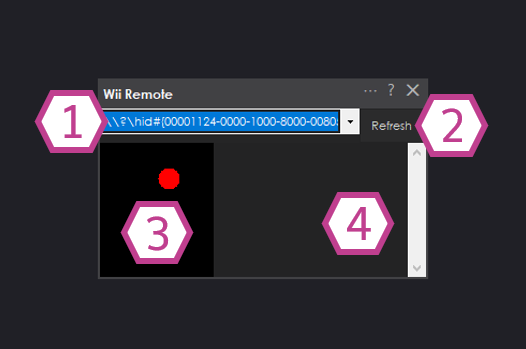
What you see on the main screen
Select which Wii Remote ARC should connect to. If you have multiple Bluetooth game controllers nearby, make sure you pick the correct Wii Remote entry.
Updates the device list. Use this when:
- You paired the Wii Remote in Windows after ARC was already open
- The Wii Remote is flashing blue LEDs but doesn’t appear in the drop-down yet
Shows the tilt of the Wii Remote as a colored circle:
- Pitch (tilt forward/back) moves the circle up/down
- Roll (tilt left/right) moves the circle left/right
- You can tilt in both directions at once
A running log of what ARC is receiving/doing (for example: “Button A down”). Use this to confirm ARC is seeing your button presses and motion.
Settings – Accelerometer
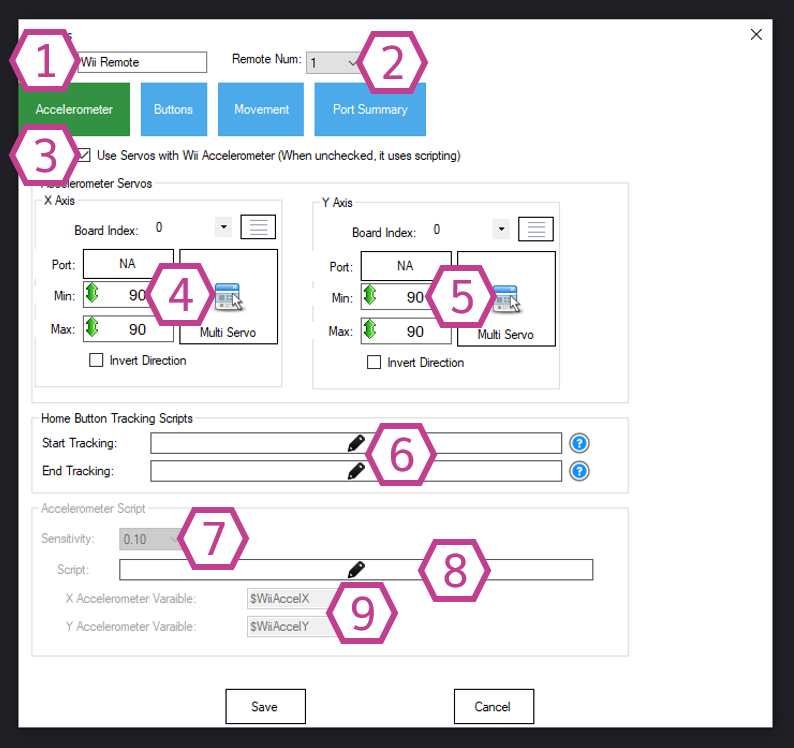
Make the Wii Remote tilt control servos (or trigger scripts)
Renames this skill instance. Helpful if you have multiple controllers/skills in one project.
Note: Changing the title also changes the name used by controlCommand() for this skill.
Sets which “player number” the Wii Remote thinks it is (the LEDs on the Wii Remote shift to match). This is useful if you have more than one Wii Remote in the same room.
When enabled, the accelerometer directly moves servos (instead of running an accelerometer script). This is most commonly used for:
- Pan/Tilt head or camera mount
- Turret aiming
- Any “point where I tilt” style control
Tip for beginners: If you are not ready to control servos yet, leave this unchecked and use the Accelerometer Script option instead (item #8).
Only available when Use Servos with Wii Accelerometer is enabled. Configure how the left/right tilt controls servo movement:
- Servo Port and Board Index: where the servo is connected
- Servo Configuration: uses your ARC servo settings (range/center, etc.)
- Min/Max Degrees: safety limits so you don’t over-rotate
- Multiple Servo Control: move more than one servo together (if supported/needed)
- Invert Direction: flips direction if movement feels backwards
Only available when Use Servos with Wii Accelerometer is enabled. Configure how the forward/back tilt controls servo movement (same concepts as X-axis).
- Set port/board to the tilt servo
- Set min/max limits to protect the mechanism
- Use invert if “tilt up” makes it go down (or vice versa)
The Home button toggles “tracking” (accelerometer control active vs. inactive):
- Start Tracking Script: runs when Home is pressed to enable tracking; the circle turns green
- Stop Tracking Script: runs when Home is pressed again; the circle turns red
Beginner idea: In your Start script, you can say something like “Tracking On”, and in Stop say “Tracking Off”, so you always know which mode you’re in.
How much the tilt value must change before ARC reacts. Smaller values react more often (more sensitive), larger values react less often (more stable).
Range: 0.02 to 2.00 (default: 0.1).
This script runs when the accelerometer changes enough to meet your sensitivity setting.
Only used when Use Servos with Wii Accelerometer is disabled.
Use this option when you want tilt to do something custom (for example: change a variable, trigger an Auto Position, move a servo with your own math, etc.).
Names of the variables that store the current accelerometer values (X and Y). You can reference these variables inside ARC scripts. If you rename them, update any scripts that read those values.
Settings – Buttons
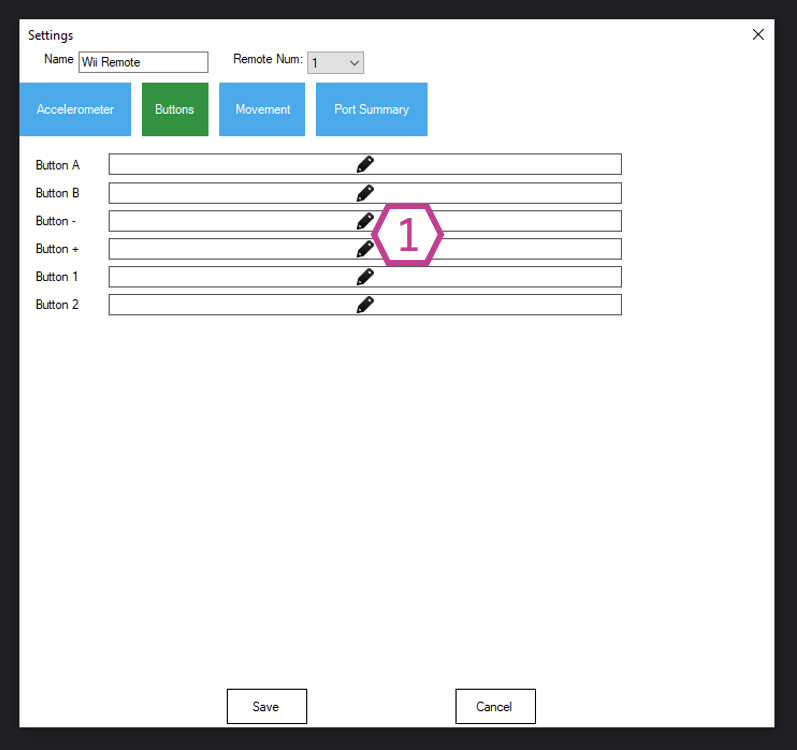
Run scripts when you press buttons
1. Button Down ScriptsEach script field runs when its matching button is pressed. Common uses:
- Start/stop behaviors (follow, avoid, patrol)
- Toggle LEDs or sounds
- Move arms, grippers, or accessories
Supported buttons include: A (top), B (trigger), +, -, 1, 2.
Settings – Movement
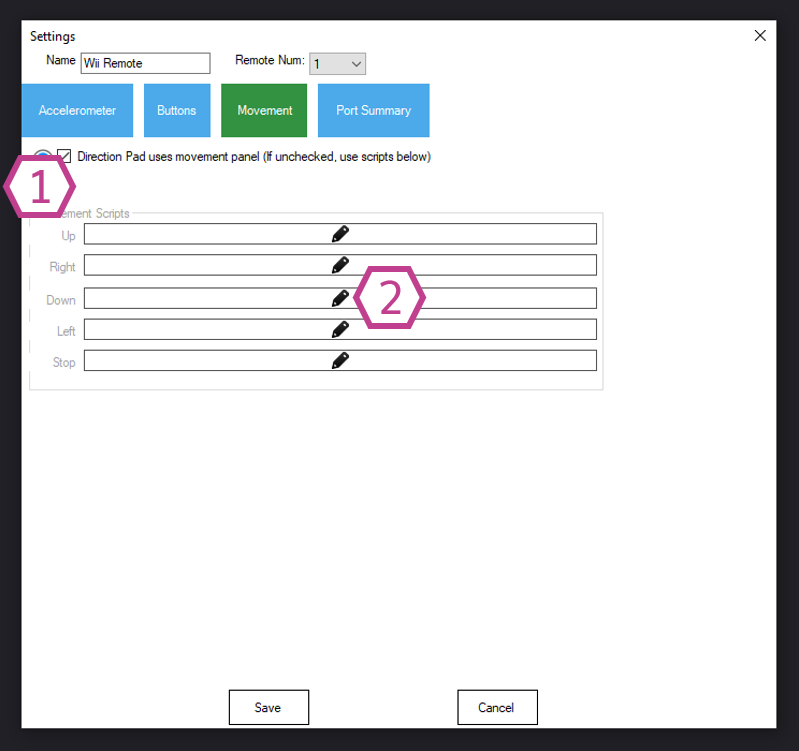
Use the D-pad to drive (or run D-pad scripts)
When enabled, the Wii Remote D-pad controls the selected Movement Panel.
This is the easiest way for beginners to drive a robot.
When disabled, the D-pad does not drive—each direction will run your scripts instead (see #2).
These scripts run only when Direction Pad Uses Movement Panel is disabled:
- Up/Down/Left/Right scripts run when that direction is pressed
- Stop script runs when you release the direction
Beginner tip: If you want “press to move, release to stop” behavior without a Movement Panel, put your motor/drive command in the direction script and a stop command in the Stop script.
Settings – Port Summary
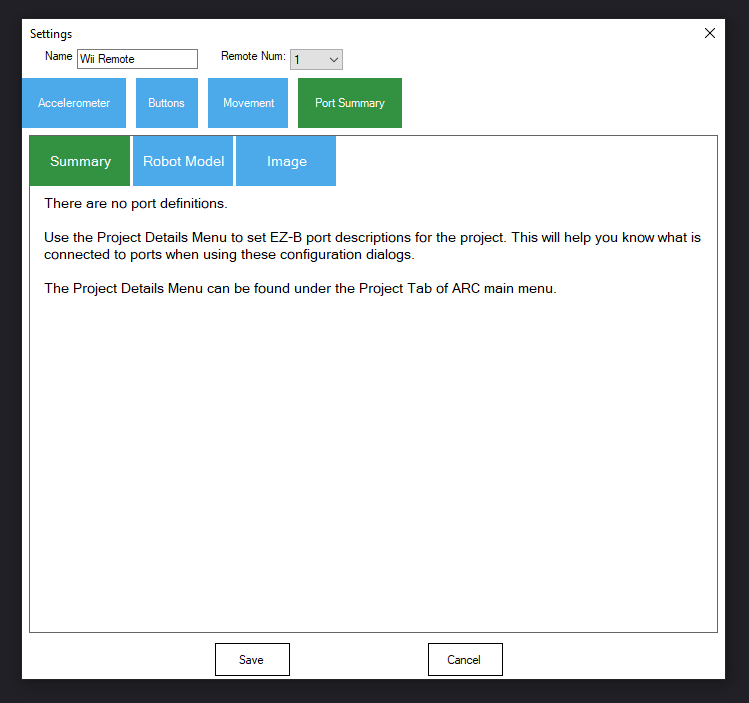
The Port Summary is a quick reference for how your servo ports and settings are configured for this skill. If something isn’t moving the way you expect, this is a good place to double-check that the correct ports/boards are selected.
How to Use the Wii Remote Skill (Beginner Walkthrough)
This section explains the full process: pair in Windows, then connect in ARC.
-
Install Bluetooth and drivers (first time only).
The first time you connect a Wii Remote, Windows may download drivers from Windows Update. This can take a few minutes.
-
Put the Wii Remote into pairing/sync mode.
Depending on your Wii Remote version, do one of the following:
- Press and hold 1 + 2 together, or
- Open the battery cover and press the red Sync button
-
Open Windows Bluetooth device adding.
On Windows 10, open Control Panel and choose View devices and printers (Classic View can make this easier to find).
-
Click “Add device”.
It’s usually in the upper-left area of the Devices and Printers window.
-
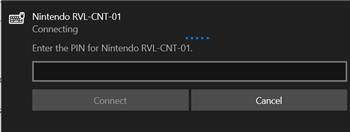
Select the Wii Remote.
It may appear as a Nintendo device such as RVL-CNT-01. Choose it and click Next.
-
Pair without a code.
When Windows asks for a pairing code/PIN, leave it blank and click Next.
-
Wait for Windows to finish connecting.
When Windows says the device is connected/installed, pairing is complete.
-
Confirm the Wii Remote is still flashing LEDs.
The LEDs typically keep flashing until ARC connects to it through the skill.
-
Add the skill in ARC.
In ARC: Project → Add Skill → Misc → Wii Remote
-
Connect the skill to the Wii Remote.
Use the Device Drop-down to select the controller. If you don’t see it, click Refresh.
If it still doesn’t appear:- Make sure the Wii Remote LEDs are flashing (if not, replace batteries)
- Put it back into sync mode (1+2 or red sync button)
- Remove the device from Windows Bluetooth list and add it again
-
Choose what you want the controller to do.
Pick one (or combine them):
- Drive: enable Direction Pad Uses Movement Panel and select your movement panel
- Servo tilt control: enable Use Servos with Wii Accelerometer and set X/Y servo ports + limits
- Custom actions: assign scripts to button presses and/or D-pad scripts
Mobile App Use
The Wii Remote skill works with ARC mobile apps (iPhone and Android), but the mobile device does not connect to a physical Wii Remote. Instead, the app uses your phone/tablet’s built-in accelerometer to simulate a Wii Remote.
Video
Related Tutorials
Related Questions
Wii Controller Not Working Consistently On Windows 10
Whats The Passcode For Connecting A Wii Remote?

Upgrade to ARC Pro
With Synthiam ARC Pro, you're not just programming a robot; you're shaping the future of automation, one innovative idea at a time.