
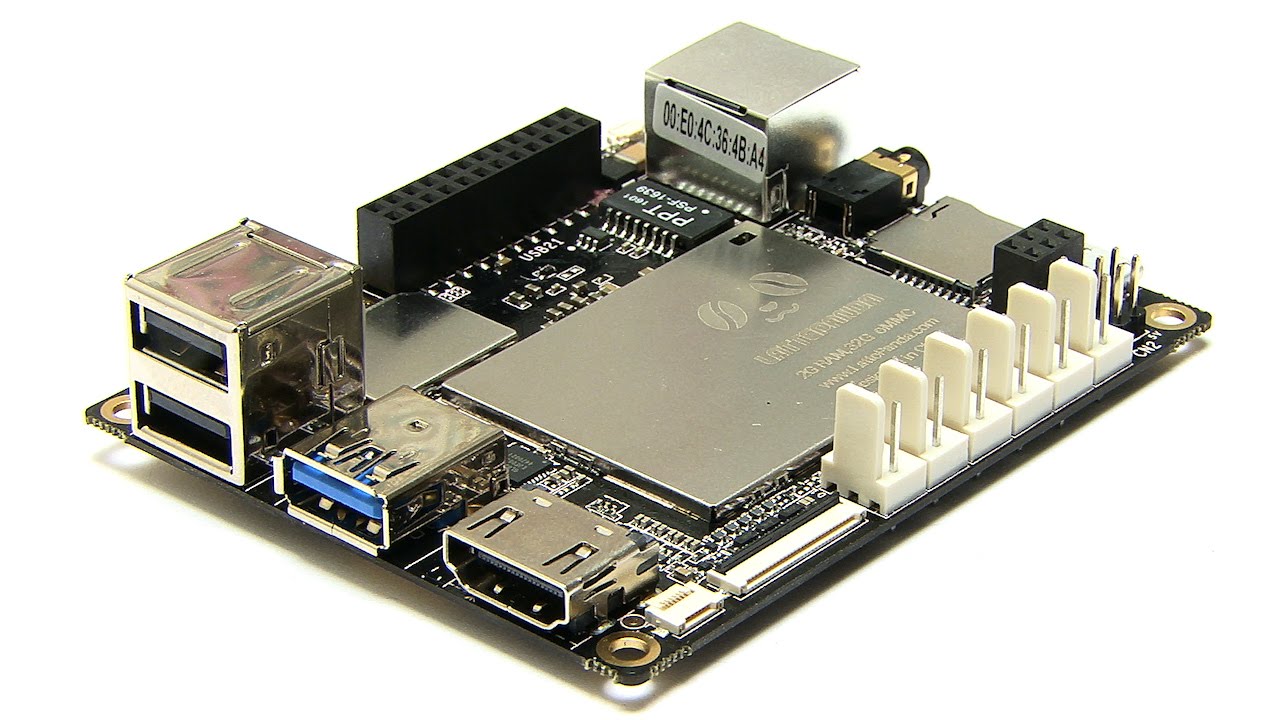
Lattepanda by DF Robot
The LattePanda is a small single-board computer (SBC), similar to the Raspberry Pi and a kabillion times more powerful. The LattePanda can run Windows 10 and, therefore, a full version of ARC! The LattePanda also has an Arduino Leonardo built on board, which means you can load the EZB Firmware and have a self-contained and competent PC robot controller. This firmware works with ARC versions greater or equal to 2019.06.25.00.
* Connection Notes *
Due to an undocumented bug feature (?), the Arduino Leonardo's USB, the serial driver, requires DTR Enabled to trigger received data events. This can be done by viewing the Connection Config screen (the same place you set the baud rate) and checking DTR Enabled checkbox.
Arduino Firmware
In the meantime, download the Arduino firmware below. You can program on the Arduino Leonardo that's built into the LattePanda. Adding this firmware lets you connect ARC to the local Arduino and directly control the GPIO.
Download Arduino Leonardo Firmware: EZ-Genuino_Leonardo.zip (updated Dec 11, 2022)
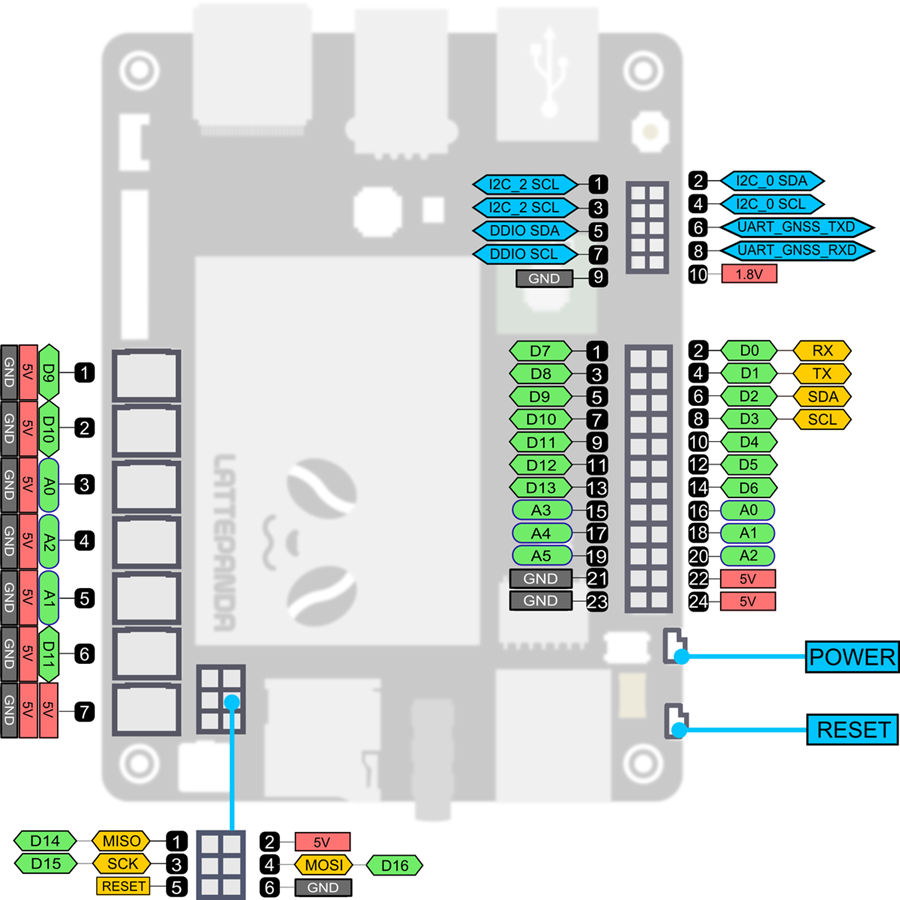
Pinouts
The Digital pins can be used for PWM, servos, and digital on/off. The ADC ports are 0-5 for analog input. Digital pin 0 is Uart #0 RX, and digital pin 1 is Uart #0 TX.
| Board | PWM Pins | PWM Frequency |
|---|---|---|
Uno, Nano, Mini |
3, 5, 6, 9, 10, 11 |
490 Hz (pins 5 and 6: 980 Hz) |
Mega |
2 - 13, 44 - 46 |
490 Hz (pins 4 and 13: 980 Hz) |
Leonardo, Micro, Yún |
3, 5, 6, 9, 10, 11, 13 |
490 Hz (pins 3 and 11: 980 Hz) |
Uno WiFi Rev2, Nano Every |
3, 5, 6, 9, 10 |
976 Hz |
MKR boards * |
0 - 8, 10, A3, A4 |
732 Hz |
MKR1000 WiFi * |
0 - 8, 10, 11, A3, A4 |
732 Hz |
Zero * |
3 - 13, A0, A1 |
732 Hz |
Nano 33 IoT * |
2, 3, 5, 6, 9 - 12, A2, A3, A5 |
732 Hz |
Nano 33 BLE/BLE Sense |
1 - 13, A0 - A7 |
500 Hz |
Due ** |
2-13 |
1000 Hz |
101 |
3, 5, 6, 9 |
pins 3 and 9: 490 Hz, pins 5 and 6: 980 Hz |
PDF Robot has a great shield for the latte panda that powers it from 7-12v and breaks out the I/o for servos and sensors. We highly recommend getting the shield to reduce spaghetti wiring on your robot :). Check it out here: lattepanda shield
EZ-Robot EZ-B v4 Direct Connection
While the onboard Arduino Leonardo is convenient, the amount of gpio is limiting. Those who wish to connect an EZ-B v4 to the LattePanda directly can do so and have full access to the 24-pin, three hardware UART, eight ADC, i2c, digital switching power supply, and real-time streaming audio.
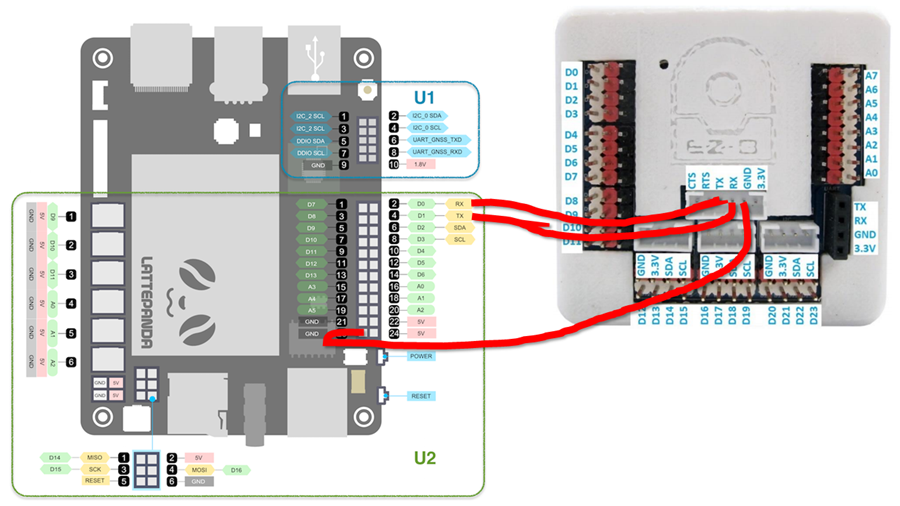
- The camera port of the EZ-B v4 will be used for the hardwired connection. View the datasheet of the EZ-B v4 to see the pinouts of the camera connection. It's best to modify an existing EZ-Robot camera cable to access the pins. Connect the EZ-B camera's TX to LattePanda pin #2 (D0 RX) on the Arduino header. Connect the EZ-B camera's RX to the Arduino header's LattePanda pin #4 (D1 TX). Connect the EZ-B camera's GND to LattePanda pin #23 (GND) on the Arduino header.
- The EZ-B v4 web configuration must be configured in the Advanced Tab to change the Serial/USB Connection to 256000 BAUD. This is done by connecting to the EZ-B v4 via Wi-Fi and visiting https://192.168.1.1 in your browser. Select Advanced Settings and change the Serial/USB Connection dropdown to 256000. Press the Save and Reboot button.
- Upload the following program to the onboard Arduino Leonardo on the LattePanda: EZB_Passthrough.zip. Due to the lack of hardware UARTs on the LattePanda, this converts the onboard Arduino Leonardo into a USB UART adapter at 256,000 baud.
- In ARC, press the CONFIG button on the connection control and enable DTR Enable.
- Select the COMx port from the drop-down in the connection control and press CONNECT. You are now connected to the EZ-B v4 via hardwire for instant response and no latency.
Installation Tips & Performance for SBCs
We have a guide in the Support section that includes steps on freeing storage space, increasing the performance, powering the SBC, and running headless with remote desktop software of robot computers, such as single-board computers. View the instructions HERE.

Hello User, yes you can use EZB out anywhere when no internet because the Latte Panda can connect to the EZB's built in server, No other Wifi needed.
Hi Robo rad,
thanks a lot; good to read, indeed !
Do you have a link for a corresponding wiring between these two units ?
You don't need any cable or wire as both communicate through wireless EZB server wifi. Then when you do want to add a different home Wifi the EZB can be changed to client mode where Latte panda and EZB use the home wifi router. I Use both methods as i bring robot out to cottage where no Wifi, then use just EZB to connect with Panda wireless. You can connect a cable to the Uart on the EZB but I have never tried that, DJ or Jeremie could chime in on that connection. Are you wanting to use windows 10 or the Arduino built in on the Panda,you can use both.
Hi robo rad,
it's for my XXL insect: What will be the pros and cons for the two options to connect a Lattepanda and an EZ-B ?
- 3-wire connection (as shown above) - EZ-B wifi hotspot
I guess, when using the hotspot I may circumvent these software changes in the EZ-B web configuration.
Thanks a lot for any hint !
Cheers
Volker
Yes the default ezb connection works great when you reset it and have no other Wifi . The Latte Panda does not even need to be on the robot but just near by for the wireless to EZB on the robot. I do this because the Latte Panda needs around 3---5 Amps to boot up to windows unless you follow DJ's tutorial how to run micro computers "headless" and other ways to run with less power. The EZB can run with just any 7.4 battery up to something like 16 volts I believe.Even 5 volts Jeremie told me with no extra servos attached.
Sure, a LattePanda does not need to be installed onboard ...
... but then I can also use my Toughbook (it's a CF-D1); a really solid control unit.
In a few weeks I will be confronted with the task to realise remote control for my insect.
Currently I do not see a direct way with Synthiam BLOCKLY.
Maybe I will use a surplus RC gear:
- Low-pass filtering the outputs of the PWM receiver outputs (RC section with long time constant). - Connecting the resulting DC signals to ADC inputs of the EZ-B
Could work; at least worth a try !
Use the user interface and control it by a mobile device or a phone or computer. The user interface also displays the camera feed and gives you access to customizable scripts and buttons. https://synthiam.com/Support/Skills/User-Interface/Interface-Builder?id=16063
Within Blockly ?