

Control a 3-wire continuous 360-degree servo in ARC: adjustable forward/reverse speeds, start/stop buttons, board/port selection and test controls
How to add the Continuous Servo robot skill
- Load the most recent release of ARC (Get ARC).
- Press the Project tab from the top menu bar in ARC.
- Press Add Robot Skill from the button ribbon bar in ARC.
- Choose the Servo category tab.
- Press the Continuous Servo icon to add the robot skill to your project.
Don't have a robot yet?
Follow the Getting Started Guide to build a robot and use the Continuous Servo robot skill.
How to use the Continuous Servo robot skill
Unlike a Standard Servo (usually limited to about 180° of movement), a Continuous Servo is modified so it can rotate forever in either direction. To make that possible, two parts are changed or removed inside the servo:
-
Mechanical Stop
Standard servos have a physical stop on the internal gears so the output shaft cannot rotate past its range (typically ~180°). Continuous rotation servos have that stop removed, so the output can keep turning. -
Potentiometer (Position Sensor)
Standard servos use a potentiometer to measure the output shaft position. Since a potentiometer can only turn so far, it limits the usable range. In a continuous servo, the potentiometer is removed or replaced (often with fixed resistors). As a result, the servo no longer “knows” its position—so you cannot command a specific angle. Instead, you command a speed and direction.
How a Continuous Servo Behaves (Beginner-Friendly)
- You don’t set positions like “45°” or “120°”. You set direction (forward/reverse) and a speed value.
- Most continuous servos use a “neutral” value around 90. At (or near) 90, the servo should stop (or barely creep).
- Values above 90 usually spin one direction; values below 90 usually spin the other direction.
- The farther the value is from 90, the faster it spins (example: 110 is typically slower than 170).
Good Uses
Because continuous servos accept simple direction/speed commands and are easy to mount, they are a great choice for:
- Robot wheels (left/right drive)
- Tank/tractor treads
- Conveyor belts or rollers
- Simple spinners and mechanisms
Compared to a standard DC gear motor, a continuous servo can be simpler to control because the servo signal includes speed and direction in one command.
Main Window
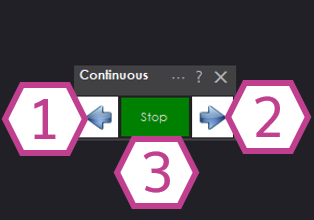
1. Forward Button
Starts spinning the servo in the forward direction (the actual “forward” direction depends on how the servo is mounted).
2. Stop Button
Releases the servo signal and the servo will slow to a stop. If your gearbox allows it, you may be able to turn the output shaft by hand once stopped.
3. Reverse Button
Starts spinning the servo in the reverse direction (again, direction depends on physical orientation).
Settings
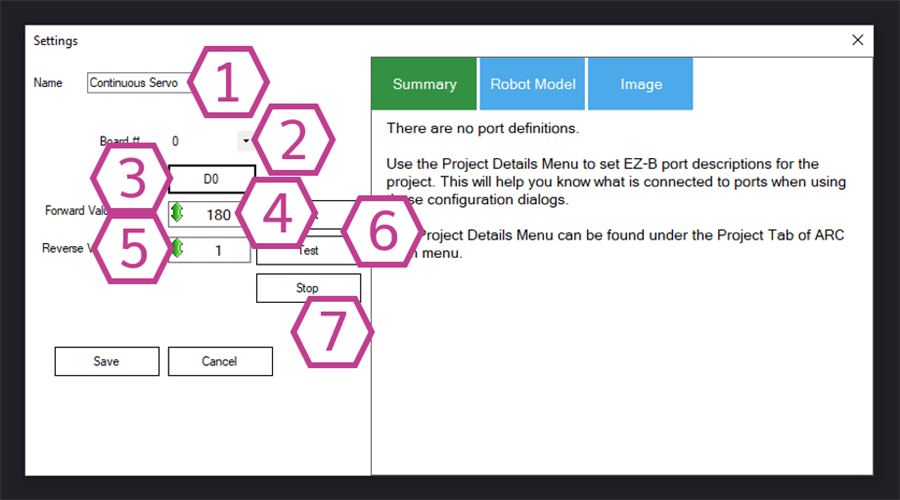
1. Name Field
Give this servo a friendly name (example: Left Wheel, Right Track). This helps when your project has multiple skills/devices.
2. Board Index Drop-down
Select which controller board the servo is connected to (useful if you have more than one board connected to ARC).
3. Port Drop-down
Choose the digital port where the servo’s signal wire is connected. (Most servos use a 3-wire connection: Ground, Voltage, Signal.)
4. Forward Value Adjust
Sets the value used when you press Forward. You can click/drag with the mouse, or right-click to type a value. The farther the number is above 90, the faster it usually spins in that direction.
5. Reverse Value Adjust
Sets the value used when you press Reverse. You can click/drag with the mouse, or right-click to type a value. The farther the number is below 90, the faster it usually spins in the opposite direction.
6. Test Buttons
Lets you try the Forward/Reverse settings while still in the Settings window, so you can quickly confirm speed and direction.
7. Stop Button
Same as the main window Stop button: releases the servo and allows it to coast to a stop.
How to Use the Continuous Servo Skill (Step-by-Step)
-
Add the skill to your project
In ARC, go to Project → Add Skill → Servo → Continuous Servo. -
Wire and connect the servo
Plug the servo into a compatible 3-wire GVS port (Ground/Voltage/Signal). Make sure the controller board is connected in ARC. -
Choose the correct board and digital port
Open the skill’s Settings and select the Board Index and Port that match where you plugged in the servo. -
Set Forward and Reverse values
Start with the defaults, then fine-tune:- If it’s too fast, move the value closer to 90.
- If it’s too slow, move the value farther away from 90.
- If Forward/Reverse feel swapped, either swap the values or flip the servo orientation mechanically.
-
Use the main window buttons
Press Forward or Reverse to run the servo, and Stop to stop it.
Video
Requirements
- A 3-wire GVS (Ground-Voltage-Signal) continuous rotation / 360° servo
- A compatible controller board supported by ARC with a servo-capable digital port
- A suitable power source (servos can draw more current than a USB port can provide)
Resources
- Servo motor fundamentals: https://synthiam.com/Docs/Advanced-Fundamentals/servo-motor
- Using servo skills in ARC: https://synthiam.com/Docs/ARC-Overview/Servo-Controls
Related Tutorials
Related Questions
Continuous Servo Control From Variable Resistor.

Balancing A Robot On 2 Wheels (EZ Boxbot)
How To Move A Servo 360 Using Blocky With Time

Upgrade to ARC Pro
Join the ARC Pro community and gain access to a wealth of resources and support, ensuring your robot's success.