Overhead camera tracks a glyph to give precise robot pose to ARC's NMS for multi-camera indoor/outdoor navigation and waypoint control
How to add the Camera NMS Pose robot skill
- Load the most recent release of ARC (Get ARC).
- Press the Project tab from the top menu bar in ARC.
- Press Add Robot Skill from the button ribbon bar in ARC.
- Choose the Navigation category tab.
- Press the Camera NMS Pose icon to add the robot skill to your project.
Don't have a robot yet?
Follow the Getting Started Guide to build a robot and use the Camera NMS Pose robot skill.
How to use the Camera NMS Pose robot skill
Use an overhead camera to track the pose location for localized navigation. The robot must have a Glyph attached to the top of itself. The camera must be overhead. Ideally, having the camera overhead looking down works best. Although, having a slight angle will work okay for most cases. Ensure there is proper lighting so the camera can detect the glyph.
Anyone with a camera can use this robot skill to experience high accurate NMS with autonomous navigation.
This positioning system will work indoors or outdoors as long as the glyph is visible. The coordinates of the robot will be updated to the NMS. Combining this robot skill with The Better Navigator allows you to have waypoints and autonomous navigation with 100% pose certainty.
Camera Type
Any camera will work with this robot skill, including remote wireless, USB, or EZB cameras (such as the ESP32Cam or EZ-Robot Camera). If you're experimenting and merely trying out this robot skill at home or school, you will not need to be picky about the camera so that any USB camera will do. However, consider cameras with wide-angle lenses for a permanent installation in a home, warehouse, or business. A wide-angle lens will provide a larger viewable area and require fewer cameras.Multiple Cameras Supported
You can support a larger area or multiple rooms by combining many cameras. The configuration menu of this robot skill has an option for an offset of each camera when being rendered on the NMS map. You would require one of these robot skills for each camera being used. In the configuration menu, specify the offset of each camera on the map in CM. There is more information in the configuration section below about using multiple cameras.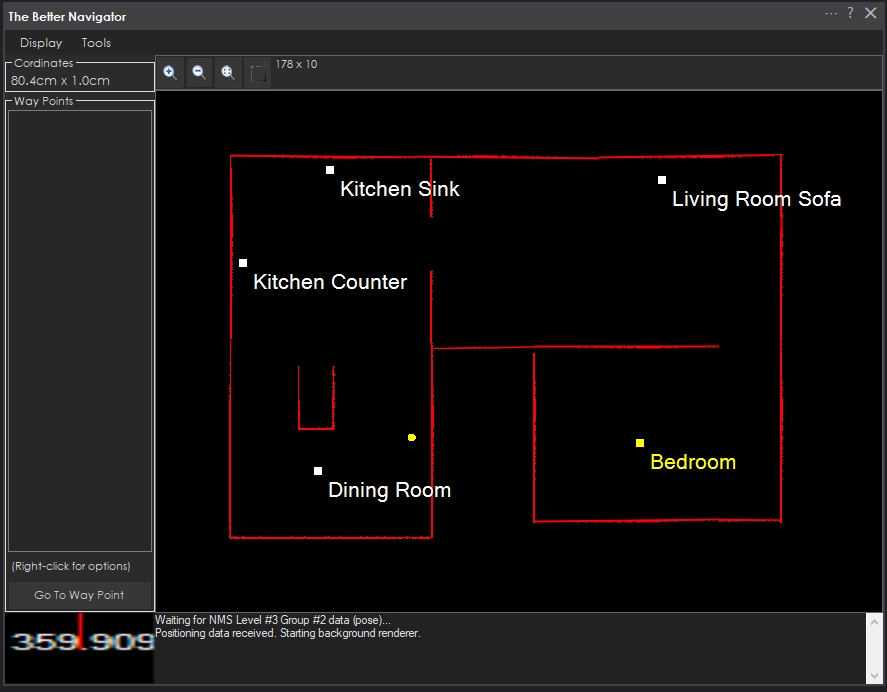
Main Form
The main form of this robot skill is what you see in the project workspace of ARC.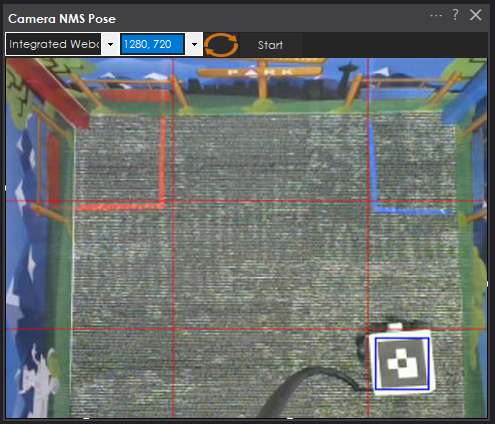
Camera Device Select the USB camera device. This is only visible if you are not using an external Camera Device robot skill specified in the configuration menu.
Camera Resolution Select the resolution of the camera
Refresh devices list Pressing this will refresh the list of camera USB devices
Start/Stop Starts or stops the camera and NMS pose data.
Configuration
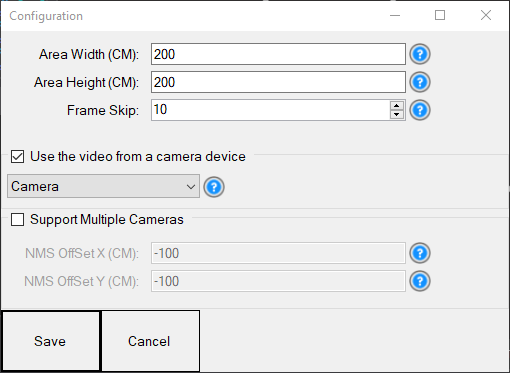
Area Width (CM) For the NMS to accurately understand where the robot is, it needs to know the visible area of the camera. This is not the playfield for the camera; it is the entire visible width from the floor. Place a rule or tape measure on the floor and look at the video preview to determine how comprehensive the view is.
Area Height (CM) For the NMS to accurately understand where the robot is, it needs to know the visible area of the camera. This is not the playfield for the camera or the camera's height from the floor; it is the entire visible height dimension on the floor in the camera's view. Place a rule or tape measure on the floor and look at the video preview to determine how high the view is.
Support Multiple Cameras Check this box if multiple cameras are used for a larger area or across many rooms. This will disable the area border from being scanned in the ray trace. That means each camera will have no boundaries on the NMS map. You are, therefore, responsible for drawing your boundaries for each camera. See the Block Off Areas section of this document to draw boundaries.
NMS OffSet X (CM) The X offset of the upper left corner in CM will be mapped on the NMS. If you have multiple cameras covering a large area, this allows you to specify where this area would cover in an NMS mapping solution, such as The Better Navigator. View the "Support Multiple Cameras" option above for more information.
NMS OffSet Y (CM) The Y offset of the upper left corner in CM will be mapped on the NMS. If you have multiple cameras covering a large area, this allows you to specify where this area would cover in an NMS mapping solution, such as The Better Navigator. View the "Support Multiple Cameras" option above for more information.
Frame Skip It is unnecessary to view every camera frame. This is not how the detector processes many frames. This is how many frames to skip in the viewing window. You can save CPU usage by skipping viewable frames.
Use Video from Camera Device Rather than using a USB camera directly with this robot skill, it can piggyback off an existing camera device robot skill. You can select the name of the other camera device robot skill using the video feed. This is a useful option if using a WiFi or remote camera.
Block Off Areas
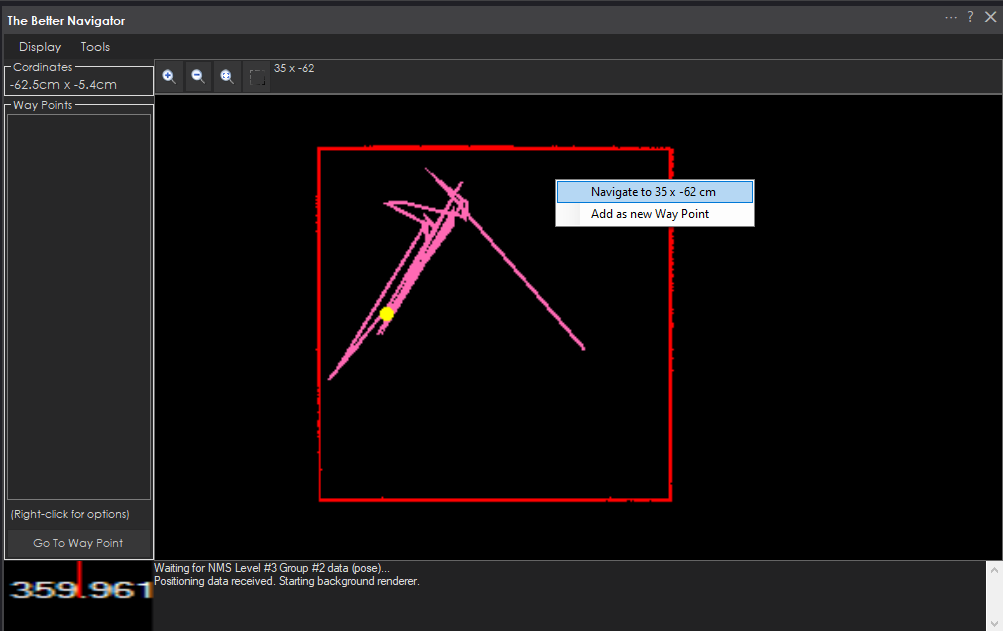
There may be areas where you do not want the robot to go, specifically when using multiple cameras. Perhaps a table, wall, or chairs. These objects will be detected using an NMS Level 3 Group 1 distance sensor, such as a Lidar or Depth camera. However, if you are only using the camera and wish to block off areas, that can be done by right-clicking on the video feed with the mouse, dragging the yellow box over the area, and releasing.When using a single camera, the area border will be automatically detected as a boundary for the NMS map. When multiple cameras are used, the boundary is not automatically detected. You must outline the area when using multiple cameras because it will not be done for you. This allows the camera views to overlap, which helps the robot to move across camera areas.
In the image below, you can see an area that we blocked off in the middle of the window. Looking at The Better Navigator to the right, you can see that same square detected.

Adding Blocked Area
- Right-click in the top left of the blocked area in the video window.
- Continue moving the mouse toward down and right to highlight the blocked area completely.
- Release the mouse when the area has been highlighted in yellow
Deleting Blocked Area
- Position the mouse cursor over the center of the block area that you wish to delete
- Right-click with the mouse
- The area will now be removed.
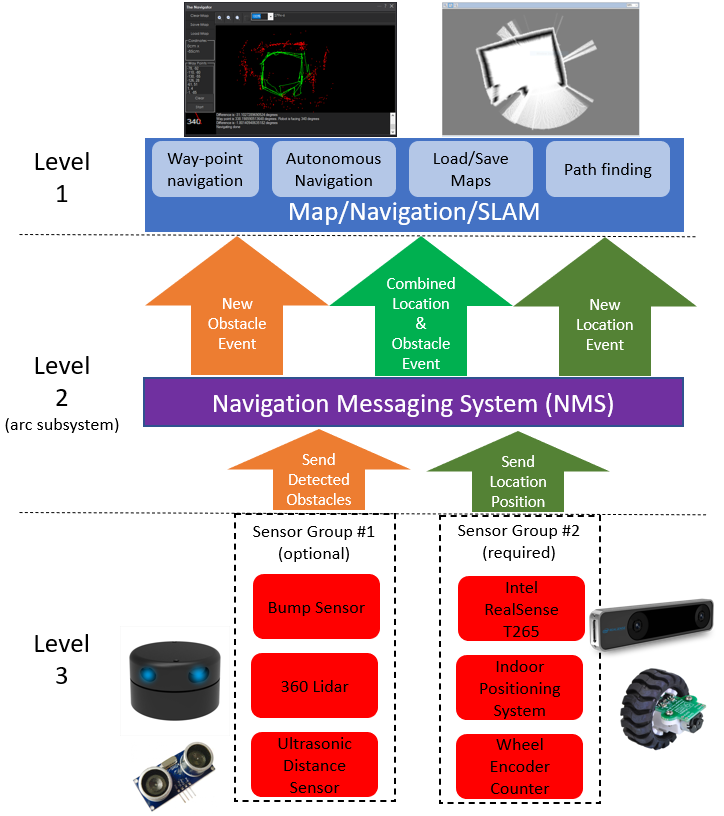
NMS
This robot skill publishes the navigation and pose data to the NMS (Navigation Messaging System) in ARC. The Navigation Messaging System (NMS) is built into the ARC framework. It allows skills to push data (location & obstacle detection) into the messaging system. Then, mapping/navigation SLAM skills can subscribe to the navigation events. The NMS was designed to provide transparent Navigation to the user in ARC. You do not have to write any complicated code because the robot skills will work for navigation and obstacle avoidance.Read more about the NMS and compatible robot skills here: https://synthiam.com/Support/ARC-Overview/robot-navigation-messaging-system
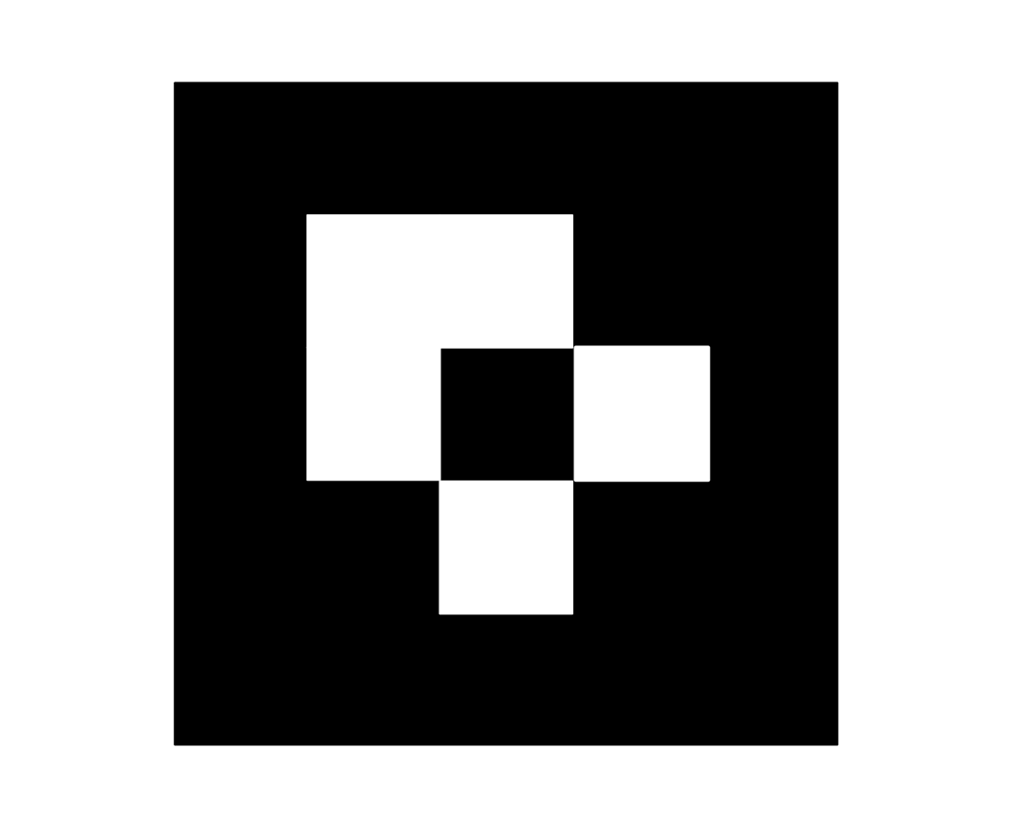
Glyph
This is the glyph that you can print out and put on the robot. You can also get the PDF to print directly here: ARC NMS Glyph.pdf. The larger the glyph, the higher accuracy of being detected. Ensure the orientation of the glyph is correct. If you're using The Better Navigator, and the heading direction is not correct for the direction the robot is facing, you must rotate the glyph accordingly.The robot is tracked by the glyph when a green square marker is over the display.
How To Use This Robot Skill
To begin, you must have an ARC project configured for your robot. If you don't have an ARC robot project, any robot will work with ARC; check the Getting Started guide. All you need to test this robot skill is a Movement Panel that allows the robot to move.
Connect a USB camera to your laptop and place it high above the robot facing down. A tripod will work, so taping it to the ceiling or resting it high on a ledge. If the USB cable is not long enough to reach the laptop, USB extension cables are affordable on Amazon or your local computer parts distributor (i.e., Best Buy)
Print the Glyph and tape it to a piece of cardboard or something that prevents the paper from bending. Mount the cardboard glyph on the top of your robot.
Load your robot project that works with your robot. Remember, all you need is a Movement Panel that allows the robot to move.
Add this robot skill to your project
Choose the USB camera from the drop-down in this robot skill. Select the resolution for the camera (the highest resolution will give you the best results). And press the START button to begin streaming the video.

Press the Configure button on this robot skill to open the configuration dialog. Edit the values for the area of your webcam. If you're unsure of the dimension values, use a ruler or tape measure. Lay the measuring device on the ground and view it through the camera view. Enter the dimensions of the viewable area of the camera. This is necessary for proper MM resolution during navigation. Save this menu when you are finished entering the information.

8) We will now add a navigation skill to view the navigational data for the robot. We will use The Better Navigator. Press Add Control, Navigation, and add The Better Navigator to your project.
- Place the robot on the ground under the camera. You will now see the robot's position displayed in The Better Navigator window. You can drive the robot around the area and see the robot's path. You can also right-click in the area and select Navigate To or add new waypoints. There is more information in The Better Navigator menu to do more, such as adding speech recognition to instruct the robot to navigate around the area.
10) You may also read the section above about blocking off areas for the robot not to drive. This will prevent the auto path generation from navigating the robot around blocked-off regions of furniture or walls.


v5 updated to allow blocking off areas where the robot can't drive.
This is some good stuff. The North Woods are good for your creativity DJ.
I don't recall seeing this Skill. How long has it been out? I never can tell how old these are. There is never a authoring date shown.
Thanks it was posted yesterday
Can this support multiple cameras (specifically thinking different rooms, I would use something like this https://www.amazon.com/dp/B06WGVX3NQ to extend the USB camera - there are more expensive ones that can extend up to 600 meters)? Alternatively, could you add the ability to use wireless cameras that output an RTSP or MJPG stream? (not that my wife is actually going to let me put cameras on the ceiling of every room, but it would be great for a whole house security patrol bot...).
Alan
This uses either a usb camera or a camera device. So if you want to use a wireless video stream, use the Stream All The Sources robot skill. You’ll find it in the Camera tab in ARC
With a small modification I can make it support multiple rooms. I’d just need to add a setting for the NMS offset
Updated with an NMS offset value that allows multiple cameras to chain the areas together. Read the manual above for how to use the setting - or hover over the question blue question marks when editing configuration.
You are the bestest!!!
Alan
Wow that's a good one. I will be experimenting with this one. Are there some videos for it? I would think this this very similar to using the Intel Realsense scenario. Thanks, Don