
Control UBTECH Alpha UBT-12HC smart servos via ARC using EZ-B v4/IoTiny UART, assign virtual ports, set baud, custom bits and position mapping.
How to add the UBTECH Alpha Servos UBT-12HC robot skill
- Load the most recent release of ARC (Get ARC).
- Press the Project tab from the top menu bar in ARC.
- Press Add Robot Skill from the button ribbon bar in ARC.
- Choose the Servo category tab.
- Press the UBTECH Alpha Servos UBT-12HC icon to add the robot skill to your project.
Don't have a robot yet?
Follow the Getting Started Guide to build a robot and use the UBTECH Alpha Servos UBT-12HC robot skill.
How to use the UBTECH Alpha Servos UBT-12HC robot skill
Control the UBTECH Alpha Robot Digital smart Servos (UBT-12HC) with ARC. The servos must be powered appropriately, and connected to the EZ-B v4 or IoTiny with the respective port. Visit the Config menu of this plugin to view the port configuration.
The Virtual Ports (V0..V99) in ARC can be assigned to the UbTech servos.
UART Ports
This plugin requires the RX signal wire of the servo be connected to TX of the selected UART or digital port (if Software UART is selected on IoTiny)
Hardware UART is for the EZ-B v4 only. Do not use software UART on EZ-B v4. View the EZ-B v4 datasheet to identify the UART ports (0, 1, or 2). EZ-B v4 datasheet can be found here: https://www.ez-robot.com/Tutorials/Lesson/18
Software UART should only be used with IoTiny
Default baudrate of UBTECH servos is 115,200
Bind To Virtual Servos
- The configuration menu also provides an option to select the Virtual Ports, which correspond with the ID's of the UBTech servos. If the UBTECH servo ID #0 is connected, select V0. #1 = V1, #2 = V2, etc..
Additional Info
- Discussion on these servos is here: https://synthiam.com/Question/3932

Custom Bit Settings There are 3 bits that seem to not be understood for the protocol. Since UBTech does not release the protocol for their products, the community is working to better understand what the parameters are. The configuration menu of this plugin allows you to set hardcoded values for those bits. The bits are for 5, 6 & 7.
Custom servo Position Mapping The UB Tech servos have their own position range, and we don't know what it is. So, the configuration menu allows you to specify the min and max positions for the range. This will be mapped to the ARC servo position range. Meaning, if you set the range in this plugin, it will be mapped to the range for all ARC servo controls.
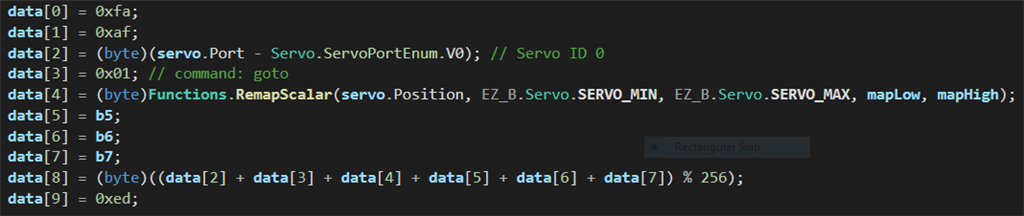
Protocol Packet Code Here's a copy and paste from the plugin code. This is how the packet is being assembled to be sent to each servo. The values specified by you in the configuration menu are b5, b6, b7, mapLow and mapHigh.

I haven't done yet. For this I have to isolate some servo without damaging the alpha , and use the ezb from another robot. This requres some time . I'll send a post as soon as possible.
Hardware issues for ubtech servos.
1)The description for this plug-in refers to dynamixel servos, that have 4 wires, with separate rx and tx . Ubtech servos, instead, have 3 wires only. Their communication is bi-directional, but half duplex . So the servo sometimes will try to force high and low the communication pin, that's connected to the tx pin of ezb v4 , that's an output and can't be driven high or low by the wire. Can this work correctly ?
Software issue. I see 3 software uarts in the plug-in configuration menu. But ezb v4 has only one. I guess I must select uart # 0.
no, dynamixel and your servos have 3 wires. The description connects the signal wire together to RX and TX. It's documented above with a diagram.
i can't help with your wiring
no, the ez-b v4 has 3 hardware uarts. It's documented above in the manual. You can click to view the datasheet of your ez-b v4
1)My doubt was if hardware problems might arise connecting ezb's uart TX pin to ubtech's unique pin , that can receive , but can also send digital signals to ezb TX port , that obviously can't receive , but , when non transmitting , is always outputting its own digital level, i.e. 3,3 V. If this is not a problem , I'll connect the ubtech control pin to TX of ezb's uart. as I did in my previous tests.
3)Sorry, I was wrong. I intended hardware uarts, the ones to use with ezb v4. And wanted to know which one of the 3 to configure ( I guess #0).
Hi DJ, I 'm starting with the test. I'm here:
Unfortunately this new plug-in doesn't output anything at the the uart TX pin (oscilloscope). Previous plug ins , used in my previous tests, actually created a 115,200 bps signal. What's new now ? Note that it says "non connected to ezb". But I connected a pwm servo to a digital port and could move it. ezb was working ok.i canceled this post. previous is still valid.
The UART TX works fine. Please ensure you have read the manual for this plugin. I don't believe you have checked the appropriate options in the config for this plugin. If you're using ID 3, then V3 needs to be selected in the UBTech Alpha servo Plugin.
Check this manual description for a link to the datasheet of your EZ-B v4 controller. That datasheet will show you where the respective UART pins are.
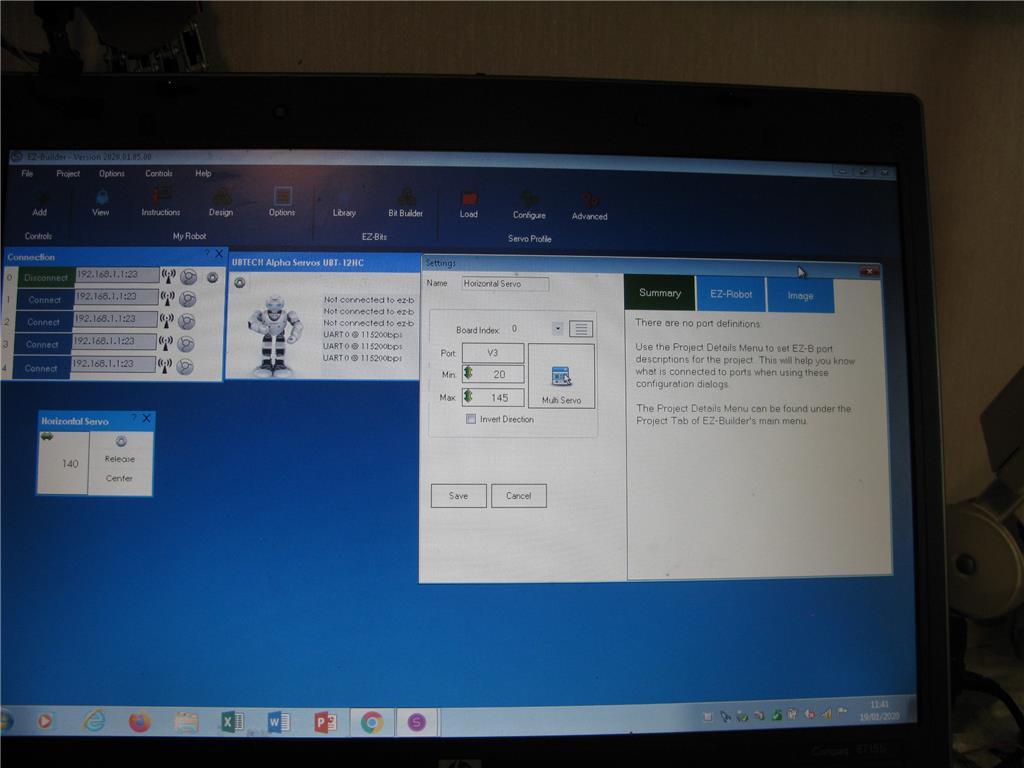
I used the right pins, and set uart 0 and V3 as required, but I clicked in the small square only, not in the blue button , so setting had no effect , even if saved. I checked well , and now it works. You're right, as always. I'll connect more servos . I had hardware problems in previous tests increasing the number of servos connected to the TX pin. Digital levels weren't correct (low level =1,5 V). I'll check all connections before. Connectors don't exist and I don't want to cut the wires, Hard to solve !