

Record and replay named servo movements with adjustable speed/direction (-5 to +5), multiple recordings, ControlCommand triggers and status var
 Source Code
How to add the Servo Recorder robot skill
- Load the most recent release of ARC (Get ARC).
- Press the Project tab from the top menu bar in ARC.
- Press Add Robot Skill from the button ribbon bar in ARC.
- Choose the Servo category tab.
- Press the Servo Recorder icon to add the robot skill to your project.
Don't have a robot yet?
Follow the Getting Started Guide to build a robot and use the Servo Recorder robot skill.
How to use the Servo Recorder robot skill
This plugin allows recording and replaying servo movements at specified speeds and directions. Trigger the recording playback and speed using ControlCommand() from scripts.
Realistic Motions For realistic motion recordings, we recommend using the servo Pad Control. Find more information about the servo Pad here: https://www.ez-robot.com/Tutorials/Help.aspx?id=150
Recording You can store multiple recordings in this plugin. Each can be given a unique name that allows the recordings to be differentiated - click on the name to rename a recording. Pressing the Add button will append a new recording instance to the list. You may re-record over existing recordings as well. Press the Record button to set the instance to begin recording at the first servo movement.
Playback Individual or multiple recordings can be played back manually by pressing the Play button. Programmatically, you can play recordings using ezscript or Blockly. In Blockly, select the recording from the ControlCommand block located under Utility. With ezscript, the Cheat Sheet shows the ControlCommand() for starting and stopping the playback of each recording.
Playback Speeds & Direction The modifier allows playback of speed and direction. A value of 1 means original playback speed in the forward direction. A value of -1 means original playback speed in the reverse direction. The ControlCommand() method also accepts an optional speed parameter. You can specify a value between -5 and +5 with increments of 0.1. For example, -0.5 is half speed in reverse. Half speed forward is 0.5.
There is also a ControlCommand() to set the speed while a recording is being played back. You can programatically reverse the playback direction with the ControlCommand() speed parameter, or change the speed.
// Play Reverse at half speed
ControlCommand("Servo Recorder", "Play", "No Name", -0.5);

// Wait for 2 seconds
sleep(2000);

// Set the speed to play forward at half speed
ControlCommand("Servo Recorder", "Speed", "No Name", 0.5);
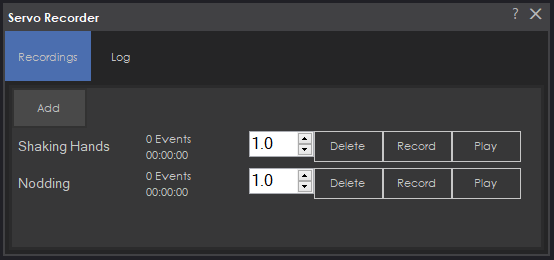
UI The UI includes an Add button that adds a new recording index. Each recording index has several UI elements...
- Title of recording (click the title to change its name)
- Number of events in record
- Length of recording
- Numeric speed selector (negative numbers mean reverse)
- Delete button to remove the recording
- Record button to begin recording (overwrites existing values)
- Play button to begin playing back the recording
Variable There is a variable that returns the playback status of recordings. If a recording is being played back, the variable $IsServoRecorderRunning will be true. You can wait for a playback to complete by using WaitFor(). See the example code below, which will run Test 1, Test 2, and Test 3 recordings one after another. The WaitFor() waits until the recording completes, and the Sleep(100) is merely to ensure the recording has started before checking the variable. The sleep(100) is most likely not required; my tests without it worked, but I put it in for safe practice. Test in your application to see if it's required as well; it may not be.
print("Playing test 1")

ControlCommand("Servo Recorder", Play, "test 1")

# Wait a short while to ensure record is running
sleep(100)

# Wait for the recorder to stop running
waitfor($IsServoRecorderRunning = false)

print("Playing test 2")

ControlCommand("Servo Recorder", Play, "test 2")

# Wait a short while to ensure record is running
sleep(100)

# Wait for the recorder to stop running
waitfor($IsServoRecorderRunning = false)

print("Playing test 3")

ControlCommand("Servo Recorder", Play, "test 3")

# Wait a short while to ensure record is running
sleep(100)

# Wait for the recorder to stop running
waitfor($IsServoRecorderRunning = false)
Control Commands for the Servo Recorder robot skill
There are Control Commands available for this robot skill which allows the skill to be controlled programmatically from scripts or other robot skills. These commands enable you to automate actions, respond to sensor inputs, and integrate the robot skill with other systems or custom interfaces. If you're new to the concept of Control Commands, we have a comprehensive manual available here that explains how to use them, provides examples to get you started and make the most of this powerful feature.
Control Command ManualPlay
Play the animation: Recording Title
- Parameter 3: Name of animation as String (optional: False)
- Parameter 4: Speed of playback as Number (optional: False)
- Returns: Boolean [true or false]
Example:
controlCommand("Servo Recorder", "Play", "Recording Title", 1)
SetSpeed
Set speed of the animation: Recording Title
- Parameter 3: Name of animation as String (optional: False)
- Parameter 4: Speed of playback as Number (optional: False)
- Returns: Boolean [true or false]
Example:
controlCommand("Servo Recorder", "SetSpeed", "Recording Title", 1)
Stop
Stop the animation: Recording Title
- Parameter 3: Name of animation as String (optional: False)
- Returns: Boolean [true or false]
Example:
controlCommand("Servo Recorder", "Stop", "Recording Title")
Record
Start recording servos to the animation: Recording Title
- Parameter 3: Name of animation as String (optional: False)
- Returns: Boolean [true or false]
Example:
controlCommand("Servo Recorder", "Record", "Recording Title")

When i run this script i don't get errors but it runs all the scripts at the same time it doesn't wait for the next one to complete. Am I doing something wrong? For sure.......nearly blew apart Alan..looked like a scene from Total Recall when they are gasping for air on mars....
I think you need to check for the word false, not 0. That is what DJ's example shows.
You can always check the content of variables using variable watcher to see what they show with a simpler script before committing multiple lines that could conflict.
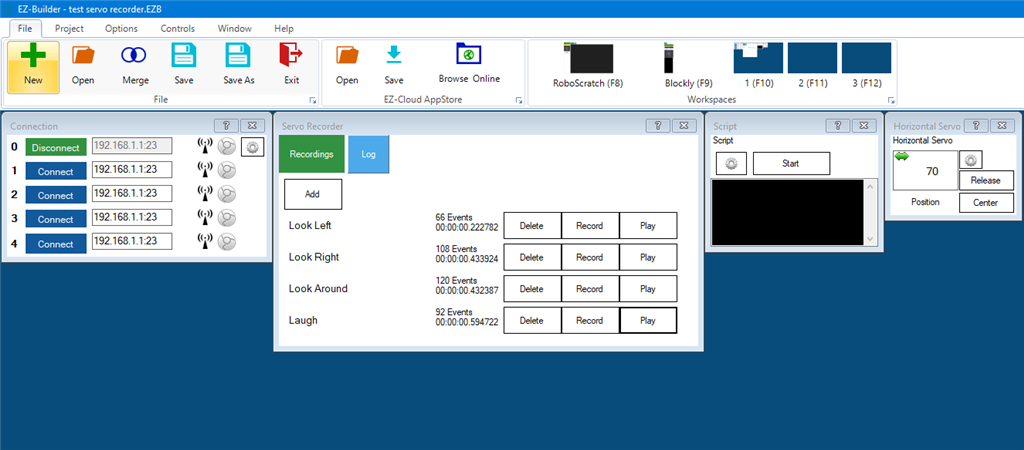
I did try both, 0 and false. Neither worked for me. When I run the above script, all the other servo recorder play buttons are active at the same time (red). See Pic and you can see the variable watch throwing back a 1 as true its running and running all the servo recorders at once.
And yes, it was stupid to have the robot active during this stage of testing..that wont happen again.
Ooops - I was distracted with family on new years eve and didn't pay attention to the example code syntax. Check the description now, it has the correct WaitFor() syntax. WaitFor() expects an expression.
This is a good example that you can proof my work in the future . Next time check the EZ-Script manual to see if i presented the correct syntax, because I'm not perfect haha
Much better. Thank you, now works as advertised!
Is there a reason why this control does not have an option to move to other desktops using right click in the title bar? When i save and reload the servo recorder windows move from desktop to desktop but don't have the option to move them back ie F11,F12 etc
Plugins don't support that currently
Ok Thanks very much. And again thanks for this variable!!