

Stereo mic sound localization triggers left/right scripts to control robot movement, enabling directional responses (turn/move) to audio.
Compatible with:
 Windows
How to add the Sound Movement robot skill
- Load the most recent release of ARC (Get ARC).
- Press the Project tab from the top menu bar in ARC.
- Press Add Robot Skill from the button ribbon bar in ARC.
- Choose the Audio category tab.
- Press the Sound Movement icon to add the robot skill to your project.
Don't have a robot yet?
Follow the Getting Started Guide to build a robot and use the Sound Movement robot skill.
How to use the Sound Movement robot skill
What this skill does: Sound Movement listens to a stereo microphone (two channels: Left and Right). When a sound is louder on one side, the skill can run a script for that direction (for example: turn your robot toward the sound).
Important note: Not all computers have stereo microphones or a stereo microphone input. If your microphone input is mono (one channel), both sides will look the same and direction detection will not work.
Important note: Not all computers have stereo microphones or a stereo microphone input. If your microphone input is mono (one channel), both sides will look the same and direction detection will not work.
Main Window
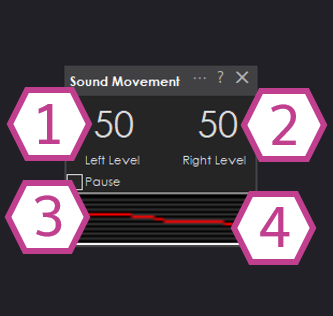
- 1. Left Microphone Sound Level
- Shows the current sound level coming from the left audio channel. ARC updates this number based on the Update Speed setting.
- 2. Right Microphone Sound Level
- Shows the current sound level coming from the right audio channel. ARC updates this number based on the Update Speed setting.
- 3. Pause Checkbox
- Temporarily stops (pauses) microphone sampling. Use this if you want to freeze the readings while you adjust settings.
- 4. Audio Waveform
-
A visual “live view” of the incoming audio. If you clap or speak near the mic, you should see the waveform react.
If the waveform is flat: ARC is not receiving audio from the selected input device (wrong mic selected, permissions, muted mic, etc.).
Settings
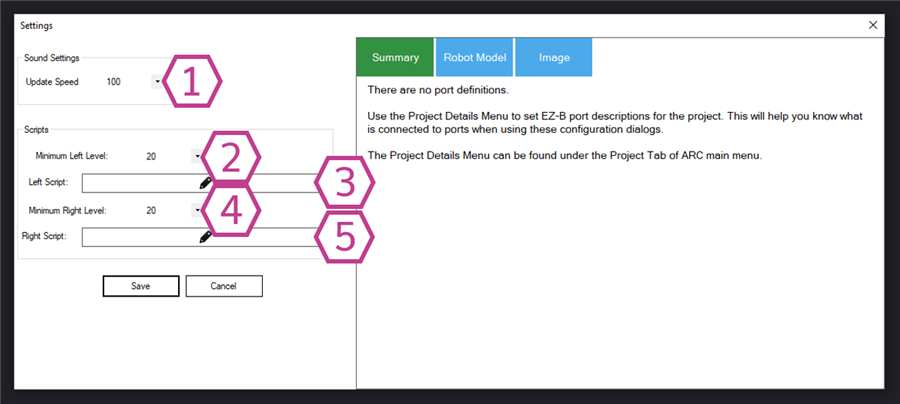
- 1. Update Speed
-
How often ARC samples (reads) the left/right microphone levels.
- Range: 100–60000 milliseconds
- Default: 100 ms (fast response)
Beginner tip: If scripts trigger too often or feel “twitchy,” try a slightly slower update (ex: 200–500 ms). - 2. Minimum Left Level
-
The threshold that the Left Script must exceed to run.
- Range: 5–125
- Default: 20
Beginner tip: Raise this value if background noise triggers the script. Lower it if the robot doesn’t respond to normal sounds. - 3. Left Script
- The EZ-Script code that runs when the left level goes above Minimum Left Level. Use this to turn the robot left, look left, play a sound, etc.
- 4. Minimum Right Level
-
The threshold that the Right Script must exceed to run.
- Range: 5–125
- Default: 20
- 5. Right Script
- The EZ-Script code that runs when the right level goes above Minimum Right Level.
How to Use the Sound Movement Skill (Beginner Walkthrough)
This example makes your robot turn right when it hears a louder sound on the right microphone channel.
-
Install, configure, and test your microphone first (see the “Configure Audio Input Device” section below).
Direction detection requires stereo input (Left + Right).
-
In ARC, add the skill:
Project → Add Skill → Audio → Sound Movement -
Add a movement control so ARC can drive your robot:
Project → Add Skill → Movement PanelMake sure your Movement Panel is configured for your robot’s drive type and connected to your controller. -
Go back to the Sound Movement main window and verify the Audio Waveform moves when you clap or speak.
If the waveform moves but Left/Right numbers are identical, you may be receiving mono audio instead of stereo.
-
Open the skill Settings and add scripts for Left and Right.
For example, to turn right when the right level is above the minimum threshold, put this in the Right Script:
Right()
Sleep(200)
Stop()
What this does: start turning right, wait 200 ms, then stop. Adjust the sleep time to change how far the robot turns.
Common beginner issue: If your robot keeps turning repeatedly, your microphone may be picking up continuous noise (fans, motors, music).
Increase the Minimum Left/Right Level or lower your microphone input gain.
Requirements
- A stereo microphone (two channels: left and right). Examples: a USB stereo mic, a stereo microphone array, or an embedded device with two mics wired as separate channels.
- A computer/input device that provides a stereo microphone input. If the operating system reports the mic as “1 channel” or “mono,” this skill cannot determine direction.
Resources: Configure Audio Input Device (Windows)
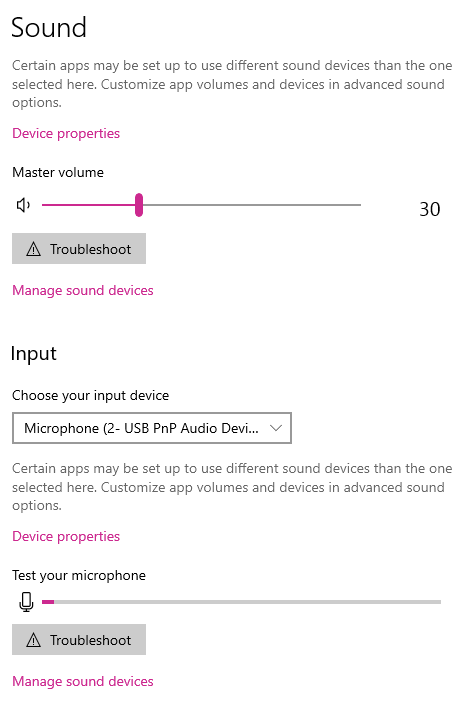
You may need to adjust your microphone input volume/gain. If the gain is too low, the levels never reach your minimum thresholds. If it’s too high, background noise will trigger scripts.
- Right-click the speaker icon in the Windows system tray.
- Select Open Sound settings.
-
Under Input, choose the microphone you want to use.
Some computers have multiple microphones (webcam mic, headset mic, built-in array). Pick the one you intend to use.
- Watch the small input level meter (VU meter) while you talk or clap—confirm it moves.
-
Click Device properties and adjust the Volume slider.
Many setups work well around ~78, but the best value depends on your hardware and environment. Aim for normal speaking to land around the middle of the meter.
Quick Checklist
- Waveform moves when you make sound
- Left and Right values change independently (stereo)
- Minimum thresholds aren’t too high/low
- Movement Panel is added and configured
- Scripts include a stop (to avoid continuous turning)
Beginner Script Ideas
Turn left on left sound:
Left()
Sleep(200)
Stop()
Look right with a servo (example):
# Example only - replace the servo port/name with yours
Servo(D0, 90)
Hello DJ,
My robot has a webcamera with two microphones. I added the control. Unfortunately, it shows left at 10 and right at 10 but never changes. The "pause" is off and Sound servo shows the right levels. What am I doing wrong?
Configure your microphone to be the windows default input device.