

Bluetooth control for UBTech Alpha1 servos via ARC: map Vx to servo IDs, enable servos, and integrate with ARC movement & LEDs.
How to add the Ubtech Alpha 1 Bluetooth robot skill
- Load the most recent release of ARC (Get ARC).
- Press the Project tab from the top menu bar in ARC.
- Press Add Robot Skill from the button ribbon bar in ARC.
- Choose the Movement Panels category tab.
- Press the Ubtech Alpha 1 Bluetooth icon to add the robot skill to your project.
Don't have a robot yet?
Follow the Getting Started Guide to build a robot and use the Ubtech Alpha 1 Bluetooth robot skill.
How to use the Ubtech Alpha 1 Bluetooth robot skill
Control UBTech Alpha robot via bluetooth and control servos. The Virtual Servos in ARC will control the UBTech Alpha robot servos. Use the configuration button on this skill to configure what servos are to be used. The Vx servos in ARC correspond to the servo IDs of the UBTech Alpha robot.
For example:
Main Window
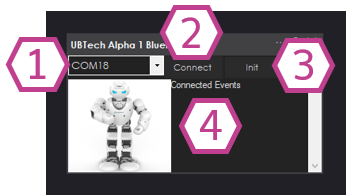
1. COM Port Drop-down Select the Bluetooth COM port that corresponds with the Alpha1 robot connected to your PC.
2. Connect Button Once the proper COM ports is selected, press the Connect button to connect ARC to the Alpha1 3. Init Button Initiates communication with the Alpha1 robot.
4. Status Display Displays text corresponding to what actions are happening with the skill.
Configuration
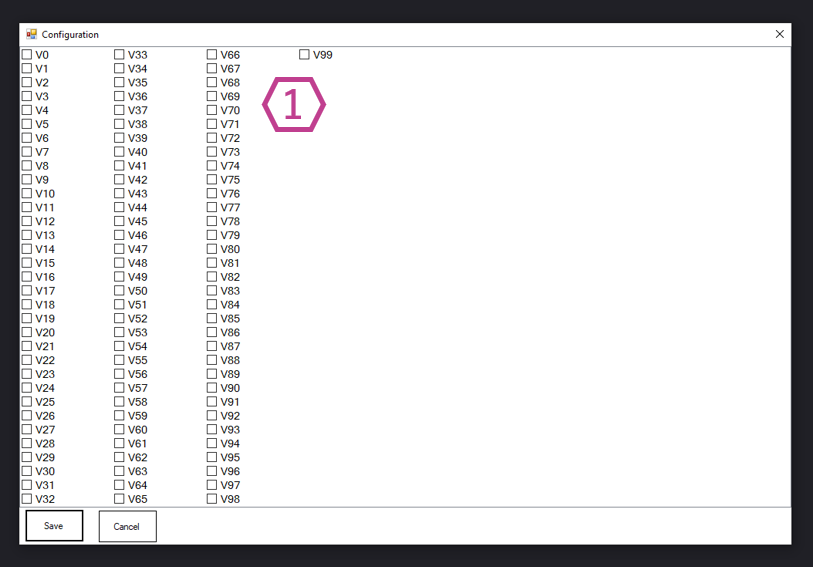
1. Virtual servo Checkboxes Check (enable) each virtual servo that corresponds to the servo ID's you have on your Alpha1. If you would like to control the servo, it will have to be enabled.
How to Use UBtech Alpha1 Bluetooth Skill
Connect your PC to the Alpha1 robot via Bluetooth.
Add the UBtech Alpha1 Bluetooth skill to your ARC project (Project -> Add Skill -> Movement panels -> UBtech Alpha1 Bluetooth).
Select the Bluetooth COM port for the Alpha1 robot and select CONNECT.
Use the configuration menu of this skill to select the servos you wish to control. Place a check in the box beside each servo to control.
Now that you have the skill configured, you may use any skills in ARC that support servos to move the Alpha1 robot. This includes Auto Position, Camera, Joystick, and more.
*Note: When editing scripts in other skills, use the Cheat Sheet or right-click in the editor to see available ControlCommand of this skill. You may connect, disconnect, and control LEDs.

The Auto Position currently requires an ezb connection to operate. Connect to either the ezb emulator or an ezb during operation for the time being. I’ll change that Auto Position the next release of ARC
OK, I understand. An update is needed to make ez b work with bluetooth only. I tested with an ezb connected , all works.
Can you make a refinement for ezb=0 to goto 90 exactly (my post #32 ) ? May I suggest (posts 15 and 16.1) , to have a partial control on alpha's audio, to provide a command to start / stop specific mp3 files already stored in the sd card ? The bluetooth protocol should have messages for that.
Everything that can be done is done with the plugin. The protocol document is incomplete by UBtech. There is no complete information on how to trigger audio files from the sd card. servo positions are done as well. No additional work can be done with the incomplete documentation from ubtech. Contact UBTech to obtain complete command set and perhaps more can be done.
Never mind ! This plug-in is a great tool to hack alpha and its good servos. All other functions can be obtained adding EZB v4 or Iotiny. Please, provide in the plug in a command for internal leds on/off (this function is no more in the latest version of plug-in).
DJ, I edited my last post , asking for a command for ubtech leds, that was in previous test version of the plug in but not in the latest..
Added. It's a ControlCommand and documentation has been updated.
I'm testing this plug-in. It's necessary to connect an ezb v4, as you said in a previous post, otherwise actions don't work. Is a new version of ezb already available to fix this ? Note 1: init resets all servos. Ezb initial position is 90 for all servos , but servos go to various unpredictable different positions. Note 2: if robot is switched off, ezb crashes, and PC must be restarted.
blue.EZB
This is the program i'm using to test the plug in. There is an action that should move servo n.1 between 1 and 180 and then repeat for ever. But it doesn't repeat this exact sequence for ever. After one cycle, positions aren't always the same, for example they are 45 or 135, sometimes 180, and even pauses seem to be different in each cycle. The message sent to a servo for going to a specific position seems not to have always the same effect. Remember also that, if you switch off the robot for some reason, EZB crashes and the PC must be restarted.