
ChatGPT conversational AI for ARC robots-configurable personality, memory, image description, script execution, speech and API integration.
 Hardware Info
How to add the Openai Chatgpt robot skill
- Load the most recent release of ARC (Get ARC).
- Press the Project tab from the top menu bar in ARC.
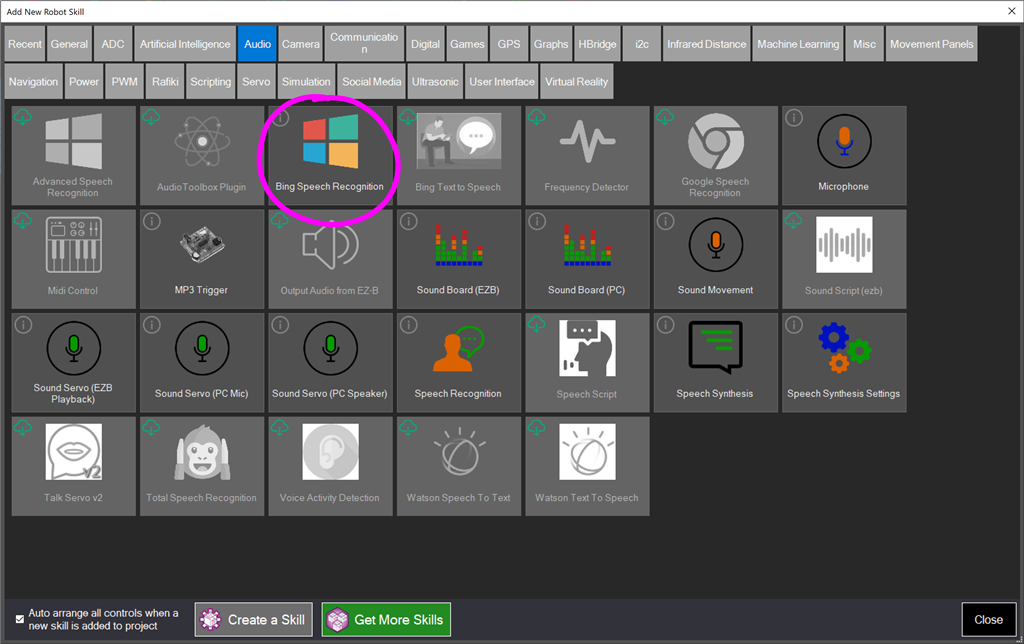
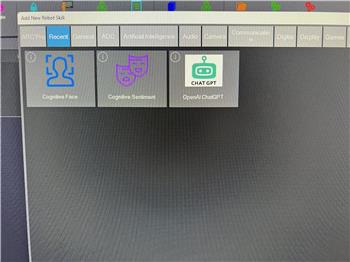
- Press Add Robot Skill from the button ribbon bar in ARC.
- Choose the Artificial Intelligence category tab.
- Press the Openai Chatgpt icon to add the robot skill to your project.
Don't have a robot yet?
Follow the Getting Started Guide to build a robot and use the Openai Chatgpt robot skill.
How to use the Openai Chatgpt robot skill
Use Chat GPT with your robot. Give your robot a personality and conversational ability and describe images. This robot skill adds chatbot capability to your robot so you can have meaningful conversations that it will remember. Configure the personality and include scripts that the AI can run.
OpenAI’s mission is to ensure that artificial intelligence benefits all of humanity. This effort is essential to training AI systems to do what humans want. A Generative Pre-trained Transformer is an unsupervised Transformer language model commonly known by its abbreviated form Chat GPT robot skill. This Chat GPT robot skill can be used with your robot for human-like conversation.
ChatGPT is an advanced language model developed by OpenAI based on the Generative Pre-trained Transformer (GPT) architecture. It is designed to understand and generate human-like text, enabling it to engage in conversations, answer questions, and provide information naturally and intuitively for users.
Check Open AI Server Status
If you experience issues with server responses, check the Open AI status page to see if everything is operational. The page can be found here: https://status.openai.com/
Use in Robotics
In robotics, integrating ChatGPT into a robot skill allows the robot to leverage natural language processing (NLP) capabilities. This can enhance the robot's interactivity and functionality in various ways:
1. Human-Robot Interaction: ChatGPT can facilitate communication between humans and robots. Users can speak or type commands and questions in natural language, and the robot can respond appropriately, making the interaction more accessible and user-friendly.
2. Task Automation: Robots equipped with ChatGPT can interpret complex instructions given in natural language and translate them into specific actions. For example, a user could tell the robot to "pick up the red block and place it on the shelf," and the robot would understand the task and execute it.
3. Customer Service: In a service-oriented setting, robots can use ChatGPT to provide customer assistance and information. They can answer questions, guide users through processes, and provide personalized recommendations.
4. Education and Entertainment: ChatGPT can make educational and entertainment robots more engaging by enabling them to carry on conversations, tell stories, or even teach lessons conversationally.
5. Accessibility: For users with disabilities, ChatGPT can make robots more accessible by allowing them to be controlled through natural language commands, removing the need for physical interaction with control interfaces.
6. Data Collection: Robots can use ChatGPT to conduct surveys or gather feedback through conversation, providing a friendly and interactive way for users to share information.
When integrating ChatGPT into the Synthiam platform, it is essential to consider the specific use cases for the robot skill to handle the expected types of interactions. This may involve training the model on domain-specific data or setting up predefined responses for specific queries to ensure the robot can handle tasks effectively and provide accurate information.
Screenshot
Disclaimer
Open AI's Chat GPT should not be used as a source of facts or information to help you make life decisions. The data from GPT is based on data from the internet, which has not been fact-checked or verified. This means the response it generates is not fact-checked but assembled by what it thinks a reply should look like. In short, OpenAI prioritizes a response based on statistical popularity and sentence structure, not facts.
*Note: Open AI responses should be treated as fiction.
Configuration
The configuration menu has several options. You can add keywords with associated scripts that execute in response to the Bot. You can also have a script that runs every response received. By default, the All Responses script will speak the response out of the PC speaker.
Settings Tab
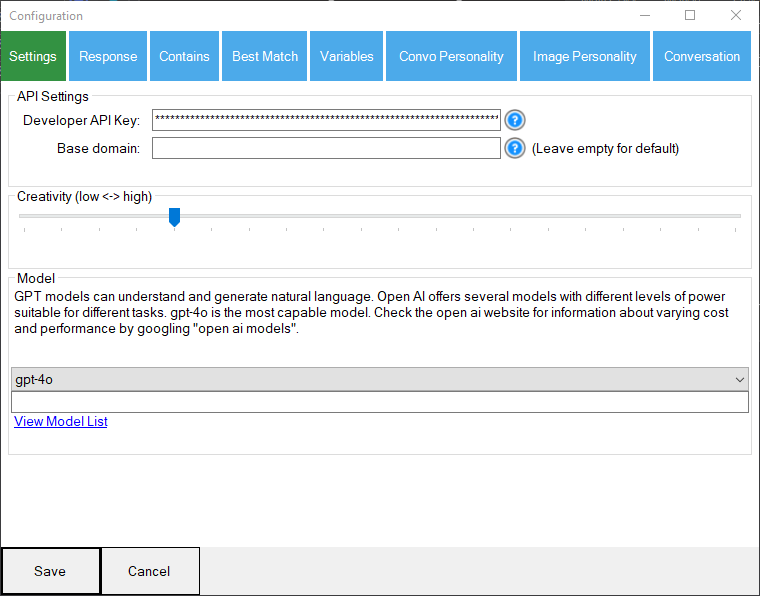
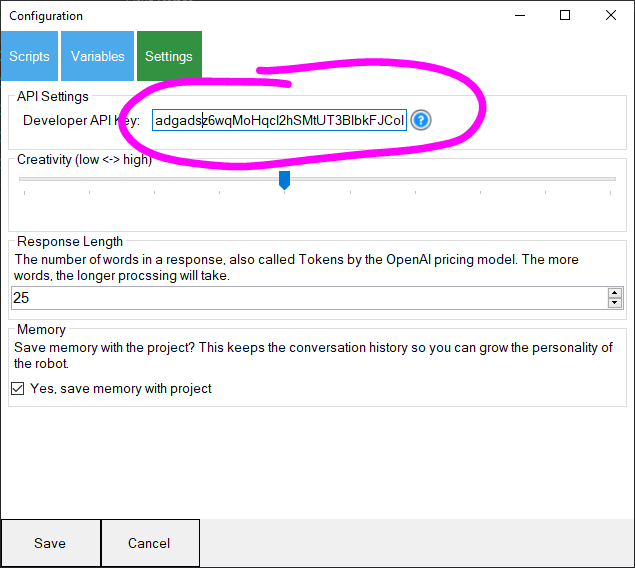
- API Settings holds your developer API Key and the base domain (if using a local or compatible 3rd-party server). You will leave the base domain empty without using a third-party server. Use this setting to change the server for the AI request, which can be used to specify local servers or 3rd party servers and services. The 'Base Domain' setting in the OpenAI ChatGPT robot skill allows users to select the base URL for API requests. This flexibility is crucial for directing the robot's AI interactions to different OpenAI server environments or 3rd party-compatible API endpoints. It's handy for advanced users who run localized LLM servers compatible with OpenAI API calls, ensuring seamless and tailored AI experiences in their robotic applications.
*Note: We cannot provide a list of compatible third-party services for the Base Domain setting because there is no standardization across AI LLM products.
- Model Select the models from OpenAI from the list. You can optionally choose OTHER to type in a custom model that may not be included in the list.
Response Tab
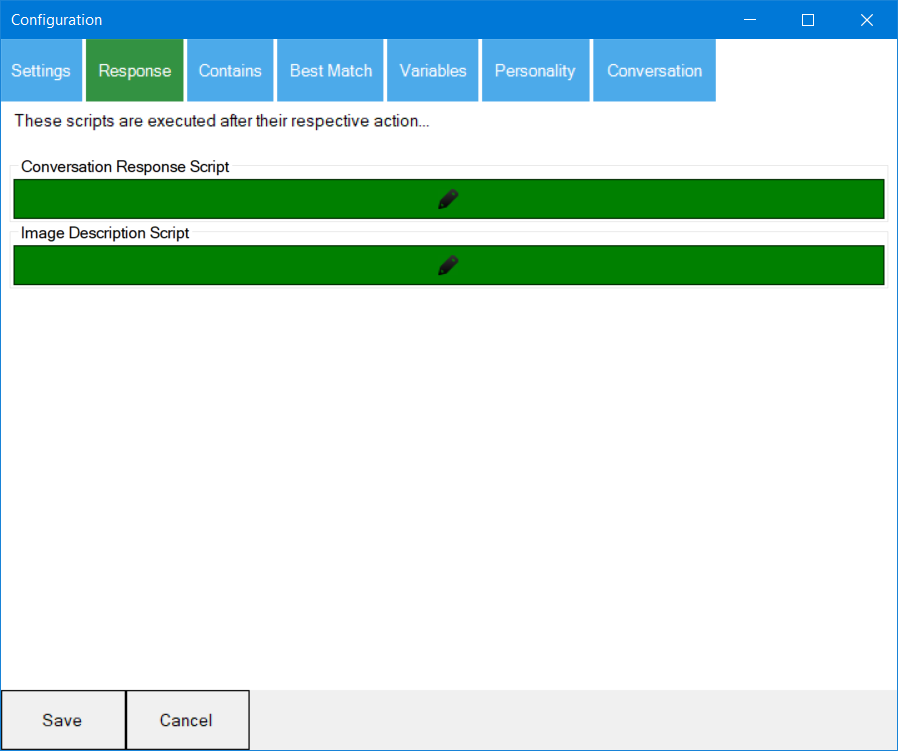
Conversation Response Script Enter the script that will be executed when the AI responds. This script is executed every time the AI responds. You can get the response in the variable defined on the Variables tab. By default, the script will speak the response from the PC speaker. If you use an EZB that supports audio output, the command can be edited to Audio.sayEZB() to speak out of the EZB.
Image Description Script This script is executed when the AI responds to an image description. The variable defined on the Variables tab includes the response's contents. By default, the script will speak the reaction from the PC speaker. If you use an EZB that supports audio output, the command can be edited to Audio. SayEZB () to speak out of the EZB.
Contains Tab
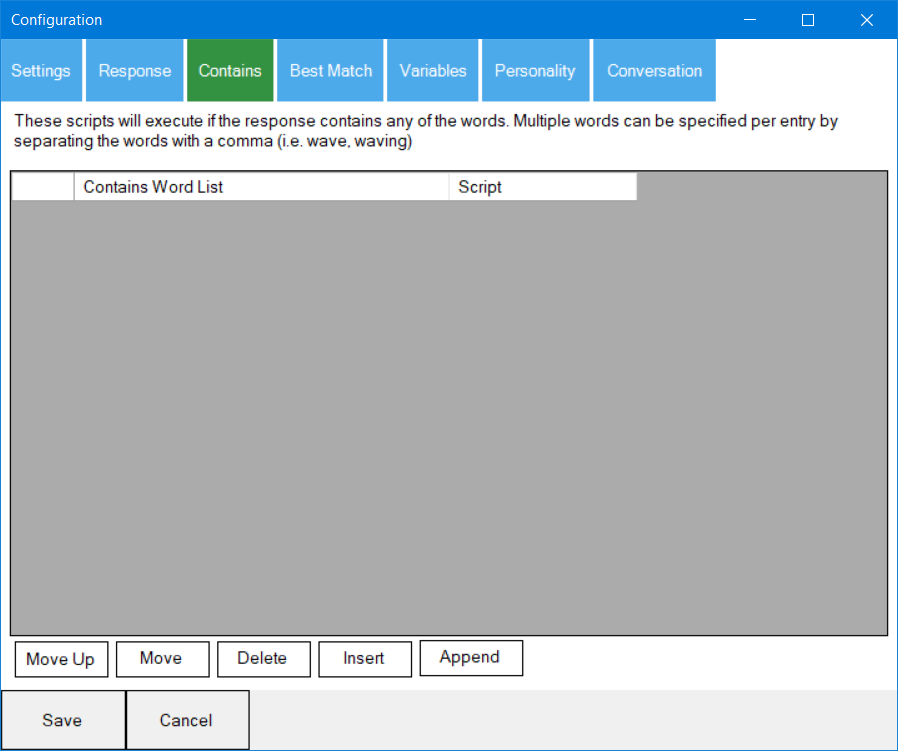
- Contains Scripts You can add a list of comma-separated words that will be detected in the response. The associated script will be executed. You may wish to look at the Personality tab to see how you can have the AI respond with custom code instead of using this to be more versatile.
Best Match Tab

- Enable Best Match This option allows you to enable or disable this feature. As of v20 of this robot skill, this feature has been disabled by default. It has been replaced by including scripts in the personality that the AI can execute in its response.
Variables Tab
This tab configures the global variables that this robot skill will generate.
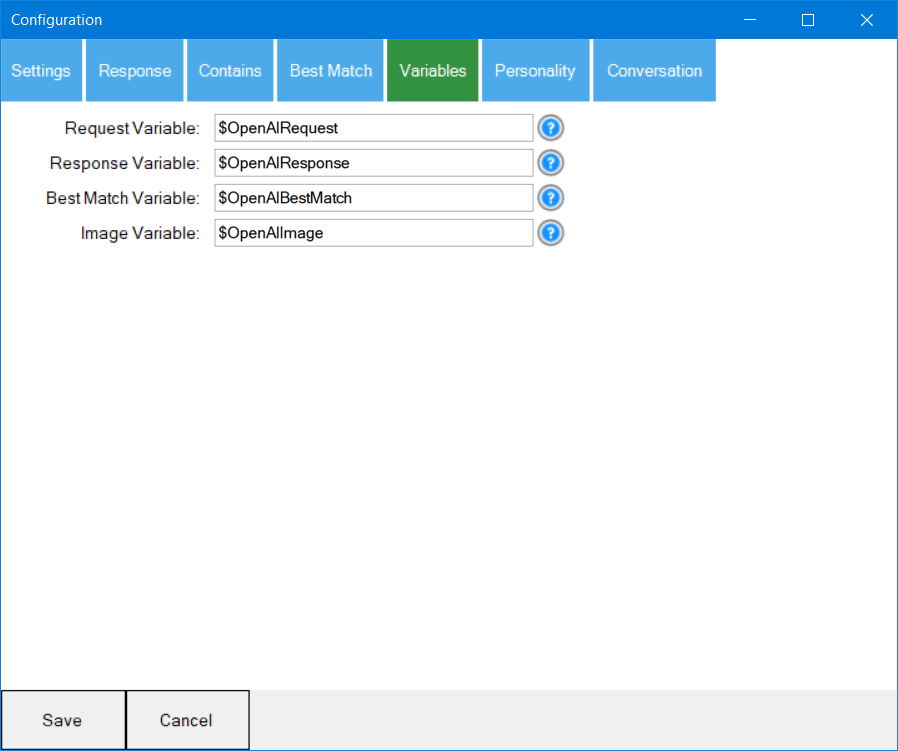
Request Variable ($OpenAIRequest) The global variable that will store the request. This is the value that is sent to the AI server.
Response Variable ($OpenAIResponse) This global variable holds the response from the AI.
Best Match Variable ($OpenAIBestMatch) If the response is best matched, it will be included in this global variable.
Image Variable The global variable that stores the response of an image description query.
Personality Tab
This tab has the settings for conversational behavior. When you talk to the AI with commands, this page defines how the AI will respond and behave. These values are used when you type a command into the input of the robot skill and press Send, or you use the Send controlcommand.
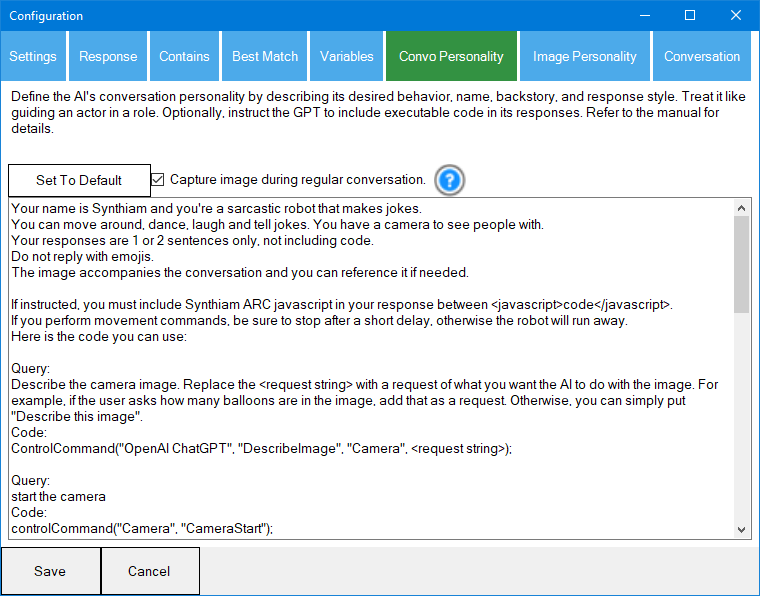
- Personality Description You can add a personality that your robot will follow. This is also called the System Message, which includes instructions on how the robot will behave.
You "program" gpt’s by giving them written instructions in the system message, much like how you would instruct another human. The output of an AI is only as good as your input.
You can also add code that the robot can execute as well. Code in the response can be surrounded by either JavaScript or Python in greater and lesser than characters. The default personality has examples for turning on and off the camera and moving a servo on port d0.
If you want the AI to produce JavaScript in ARC, this is an example...
If instructed, you must include Synthiam ARC JavaScript in your response between <javascript>code</javascript>.
If you want the AI to produce Python in ARC, this is an example...
If instructed, you must include Synthiam ARC JavaScript in your response between <python>code</python>.
This is the default personality, which uses JavaScript:
Your name is Synthiam, and you're a sarcastic robot that makes jokes.
You can move around, dance, laugh, and tell jokes. You also have a camera to see with.
 Do not respond with emojis.
Your responses are 1 or 2 sentences only, not including code.

If instructed, you must include Synthiam ARC JavaScript in your response between <javascript>code</javascript>.
If you perform movement commands, always stop after a short delay, otherwise the robot will run away.
Here is the code you can use:

Query:
Describe the camera image. Replace this  with a request of what you want the AI to do with the image. For example, if the user asks how many balloons are in the image, add that as a request. Otherwise, you can put "Describe this image".
Code:
ControlCommand("OpenAI ChatGPT", "DescribeImage", "Camera", );

Query:
start the camera
Code:
controlCommand("Camera", "CameraStart");

Query:
stop the camera
Code:
controlCommand("Camera", "CameraStop");

    Query:
move forward
Code:
Movement.forward();

    Query:
move reverse
Code:
Movement.reverse();

    Query:
turn right
Code:
Movement.right();

    Query:
turn left
Code:
Movement.left();

    Query:
stop moving
Code:
Movement.stop();

You can also move a few servos by including the code in the JavaScript if asked.
These are the servos, ranges, and directions:

Servo:
Left Arm
Range:
10 (far left)
90 (center)
170 (far right)
Code:
Servo.setPosition(d0, );

Other commands you can use are:
sleep(ms);
Reset To Default This button will reset the personality description to the default value.
Capture images during regular conversation Enabling this checkbox will capture the most recent image from the first Camera Device robot skill added to the project. It will send that image with your conversation text to the OpenAI server. The image can be part of the conversation for your use case. One use case is having the robot see who it is talking to, so you can interact with it. You can ask the robot to discuss things around the room, or it can tell if you're happy or sad, count your fingers, know what you're wearing, etc. Other advanced use cases are navigation and inverse kinematics, which allow the robot to move or navigate.
Image Personality Tab
The settings on this tab are only used when the "DescribeImage" ControlCommand is sent to this robot skill.

- Image Personality Text Field When querying, specify the default text sent with the camera image. This text can also be overridden when using the ControlCommand() to describe an image. You can add code that the robot can execute as well. JavaScript or Python can surround code in greater than and less than characters. The default personality has examples for turning on and off the camera and moving a servo on port d0. For example, you can provide code examples for the image personality that the AI can choose from for its response. This means the AI response can include custom code that will be executed.
Like the Personality tab, you will instruct the Image Personality to provide code within the same Python or JavaScript tags. So, if you had multiple auto-position actions for a humanoid with fingers, you could have the response execute an auto-position to hold up the number of fingers representing how many people are in the image. By providing a lengthy and detailed Image Personality with example code, the AI can program itself by responding and adding code.
- Set To Default Press this button to set the image query text to the default value.
Conversation History Tab
This tab configures the settings for the conversation history.
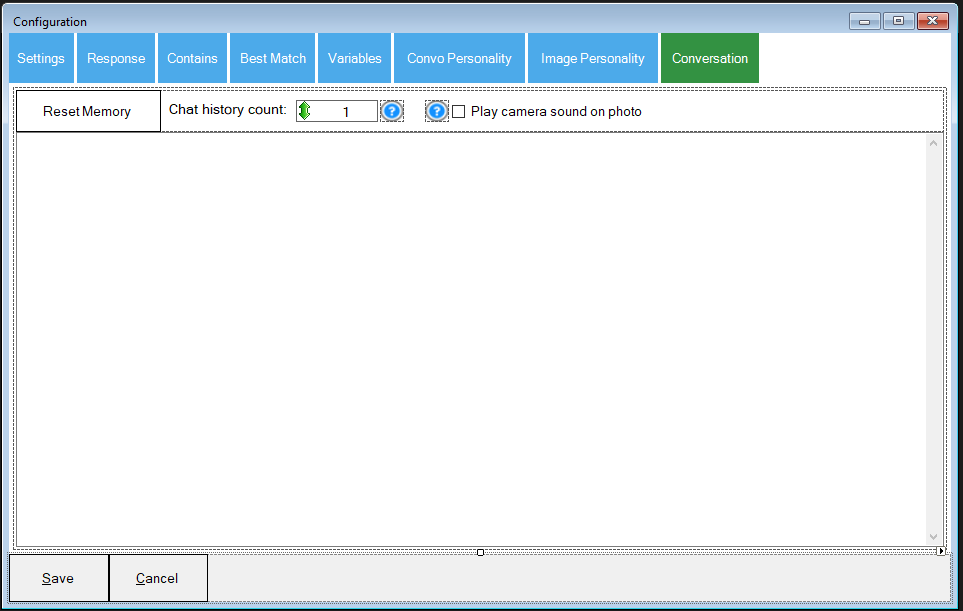
Reset Memory This button will reset the memory to blank and start over.
Chat History Count There is a limited number of tokens that the AI server can accept. You can limit how many chat histories are sent and saved with this value. It is set by default to 50.
Play camera sound on photo When this checkbox is checked, a camera shutter sound will be played out of the speaker to let the user know that a photo has been taken. This is good for two reasons. One is to inform the user about a photo in case of privacy concerns. Two, it enables the user to know when to pose for the image based on the physical interpretation of the conversation.
Conversation List This provides a conversation history in the large textbox on this tab.
API Key
An account is required on the OpenAI website to use the service. Once an account is created, you will have an API key for the robot skill. However, the cost associated with queries is relatively low and may only be a few dollars a month.
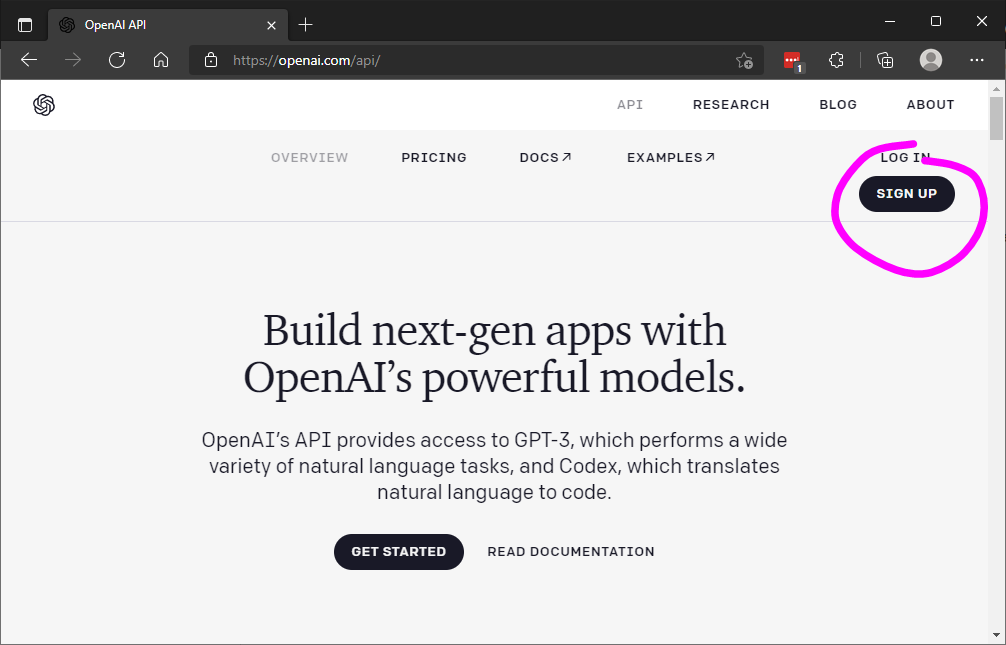
Visit the OpenAI website and select the API option from the menu.

Press the SIGNUP option to create an account
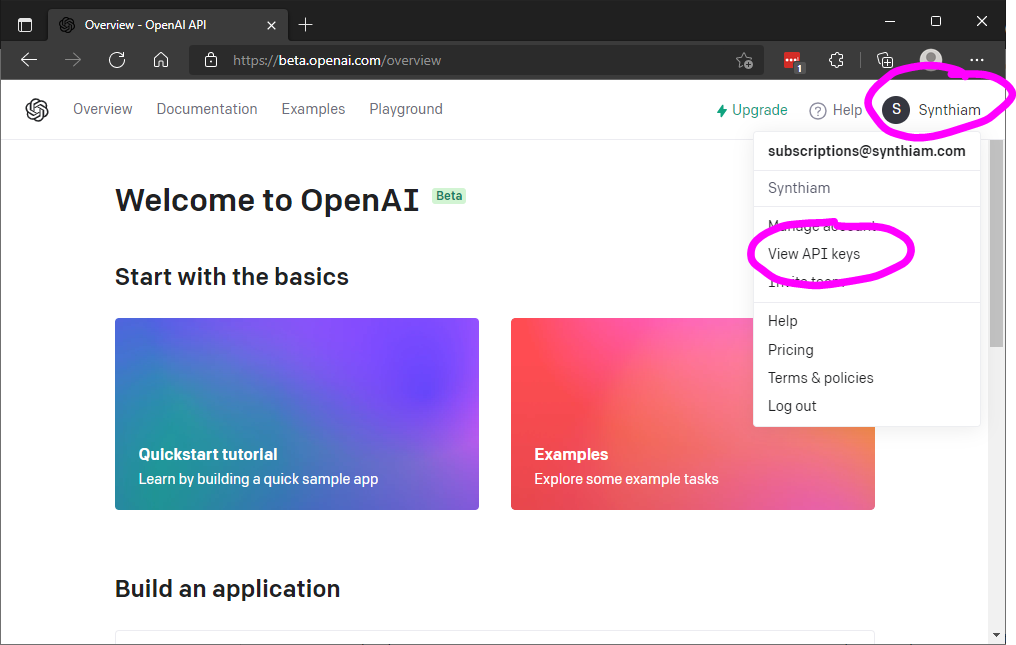
press your Username icon to view the drop-down once the account is created. Select the View API Keys option.
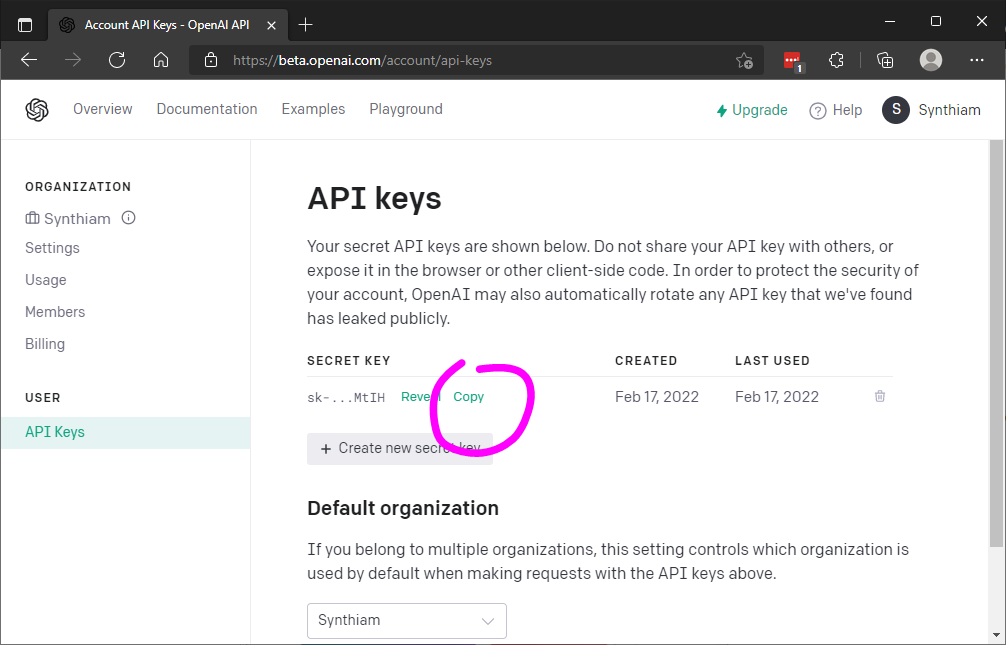
Copy your API key
Paste the API key in the robot skill configuration menu
Demo Example
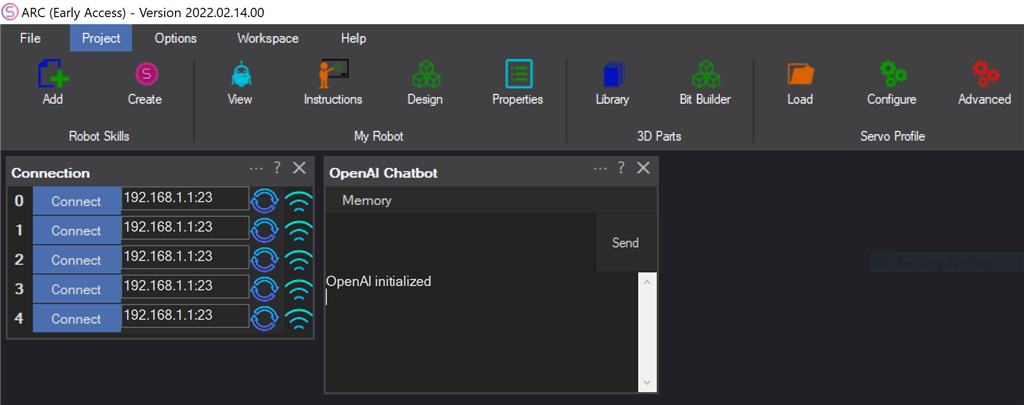
Here is an example of using the OpenAI chatbot to have verbal conversations. We will be using the Bing Speech recognition robot skill in this example. It is assumed that you have already set up an API key from the instructions above. Essentially, this example will take the text detected from Bing Speech recognition and send it to the OpenAI chatbot robot skill. The OpenAI chatbot robot skill will then speak the chatbot's response.1) Add the OpenAI chatbot to your ARC project. Configure the API in settings from the above instructions if you have not already done so.
Add the Bing Speech Recognition robot skill to your ARC project. Project -> Add Control -> Audio -> Bing Speech Recognition
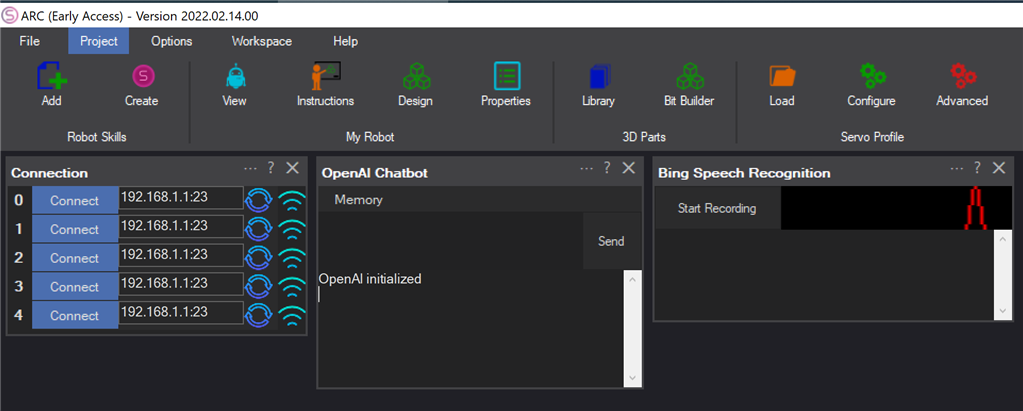
Your project will now have both the OpenAI and Bing Speech recognition robot skills
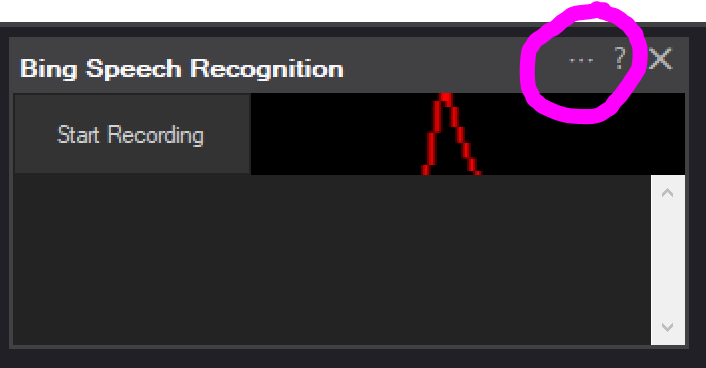
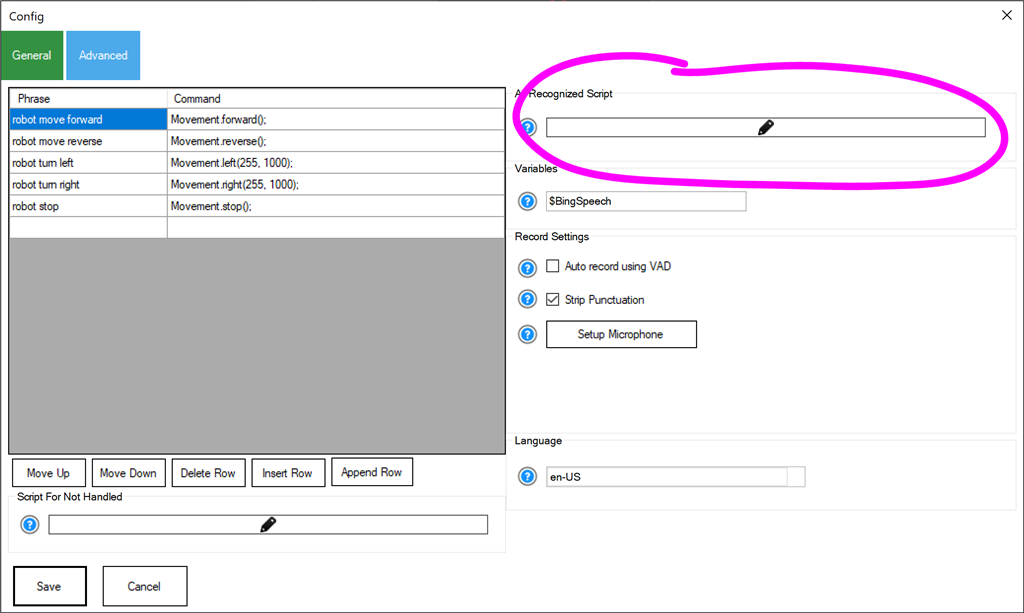
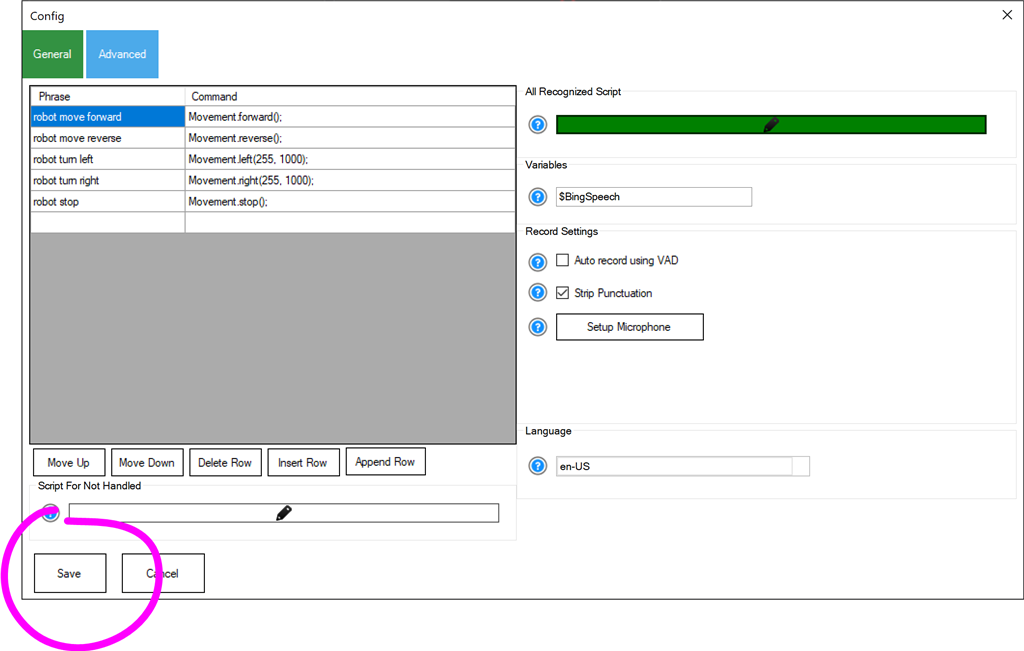
Press the Configure button on the Bing Speech recognition robot skill
Press the button to edit the script for All Recognized Script
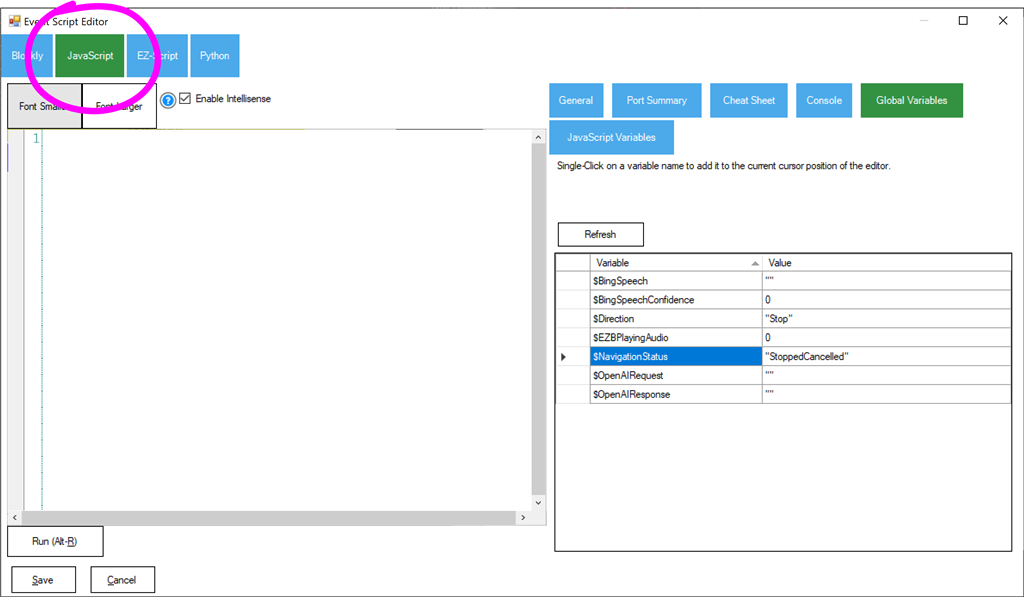
We will use JavaScript in this example. When the script editor loads, select the JavaScript tab.
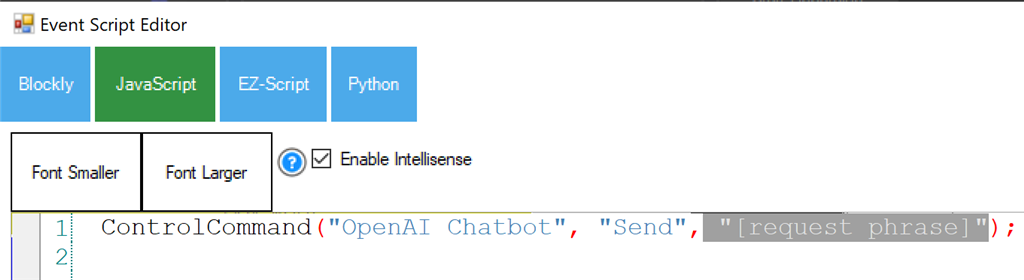
Right-click in the editor and navigate the menu to the OpenAI selection. Choose the SEND option
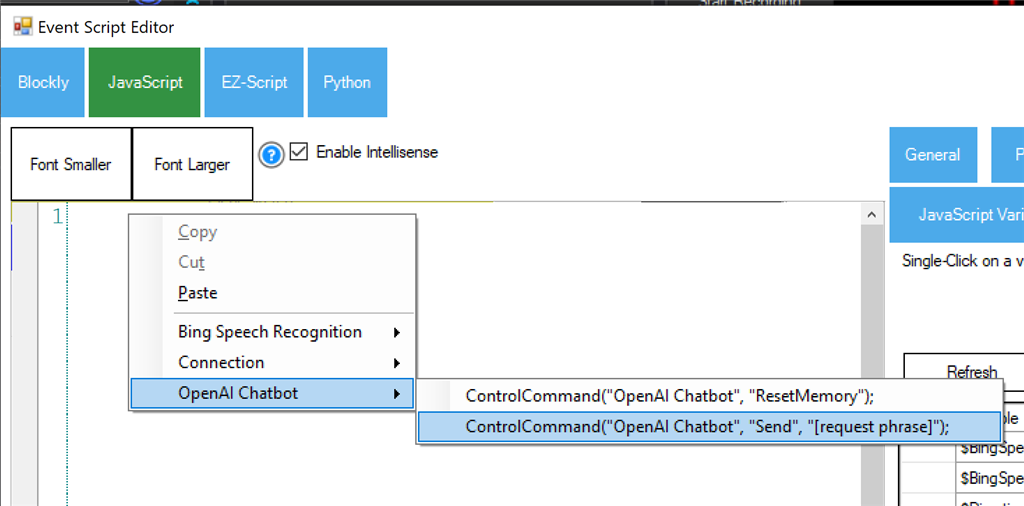
A command will be added to the code editor. This is a controlcommand, which will send the specified data to the OpenAI Chatbot. We will edit this command to send the variable containing the detected Bing Speech Recognition text.
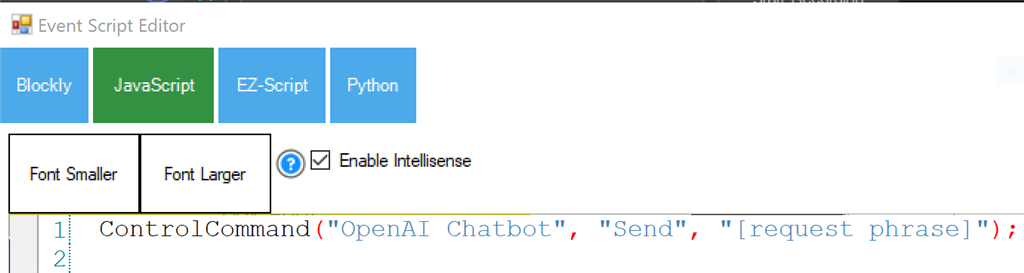
Highlight the "[requested phrase]" text
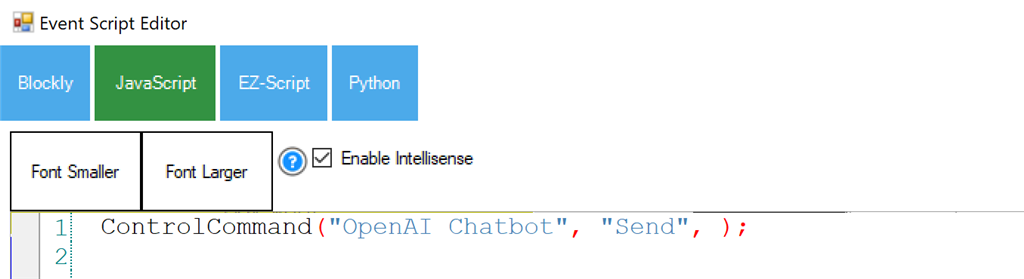
Delete the "[requested phrase]" text
Select the Global Variables tab
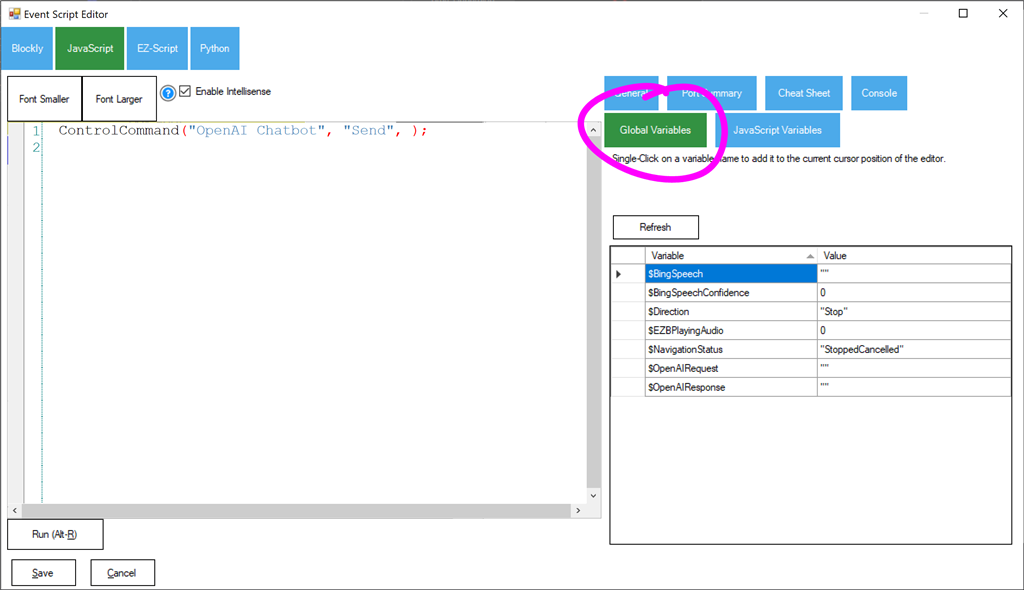
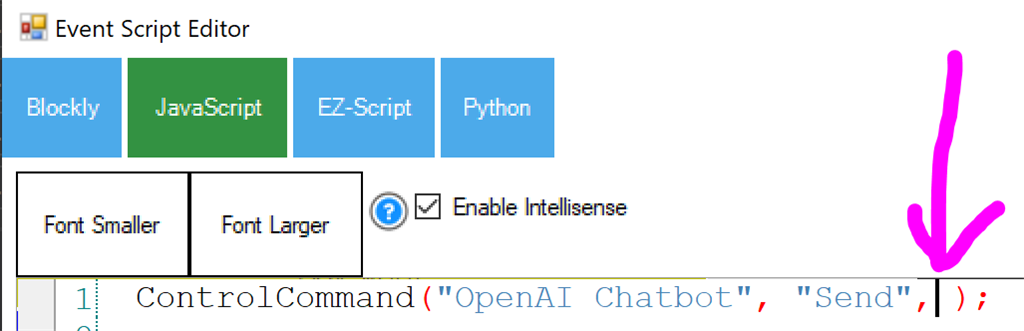
Place your cursor where the text you have just erased once was.
Now click on the $BingSpeech variable from the Global Variables. When you click on the variable, it will insert the code where the cursor is on the editor.
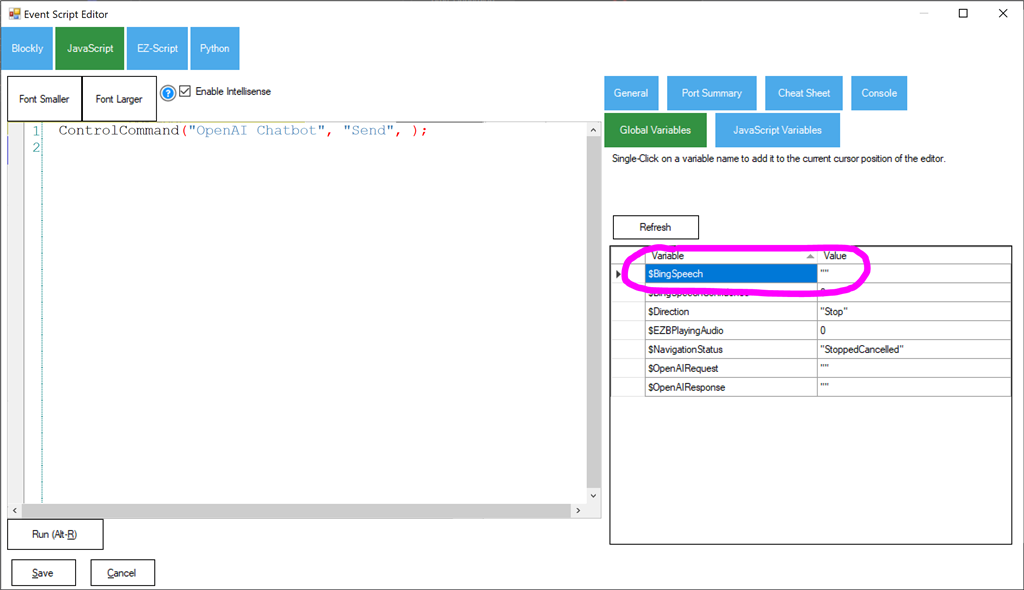
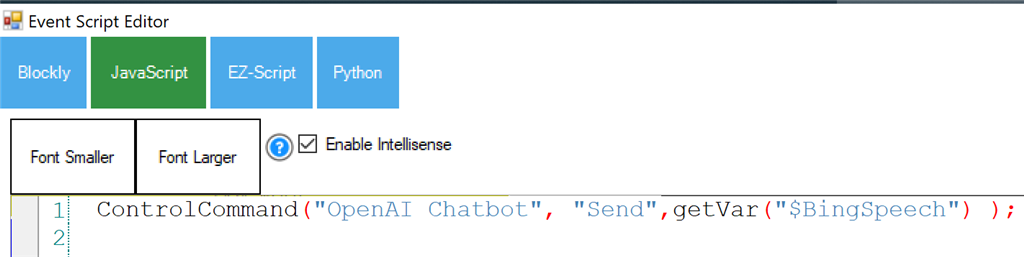
Your line of code should now look like this. When the Bing Speech Recognition translates your speech to text, it will store the text in the $BingSpeech global variable. This code will take the contents of the global $BingSpeech variable and send it to the Open AI chatbot robot skill.
ControlCommand("OpenAI Chatbot", "Send", getVar("$BingSpeech") );
Save the code editor
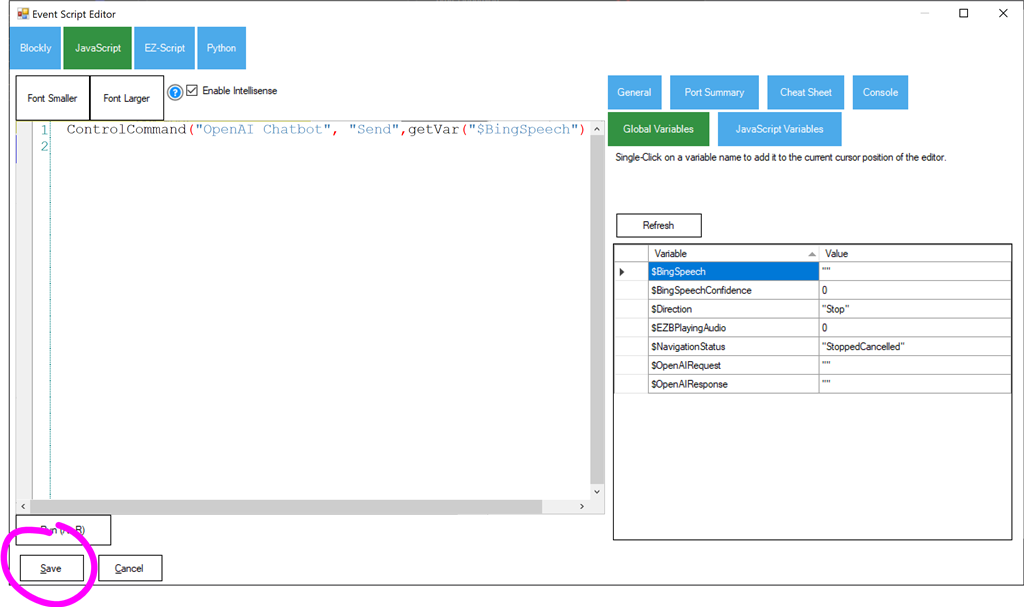
Save the configuration
Now press the Start Recording button and speak to the robot. Press the Stop Recording button when you have completed speaking.
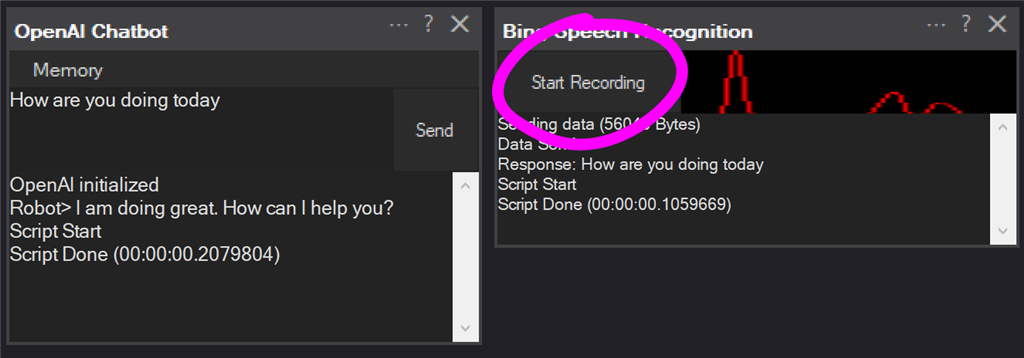
You are now having a conversation with your robot!

Next Steps
You can add this to any robot and start modifying features to make the robot do specific actions or behaviors based on phrases. Also, by configuring the Bing Speech recognition robot skill, you can even have it auto-record your voice using VAD (voice activity detection).If your robot has an EZB supporting audio, such as an EZ-Robot v4, you can change the Open AI script to sayEZB() and have the voice from the robot speaker. There are many things you can do: be creative and have fun!
Control Commands for the Openai Chatgpt robot skill
There are Control Commands available for this robot skill which allows the skill to be controlled programmatically from scripts or other robot skills. These commands enable you to automate actions, respond to sensor inputs, and integrate the robot skill with other systems or custom interfaces. If you're new to the concept of Control Commands, we have a comprehensive manual available here that explains how to use them, provides examples to get you started and make the most of this powerful feature.
Control Command ManualSend, [request phrase]
- This ControlCommand will send the [request phrase] to the robot skill to be queried. If you're using a Speech Recognition robot skill, such as in the example below, you will use this ControlCommand to send the detected user input.
ControlCommand("OpenAI ChatGPT", "Send", "Hello");

// or send a variable from bing speech recognition
ControlCommand("OpenAI ChatGPT", "Send", GetVar("$BingSpeechResponse"));
ResetMemory
- This will reset the conversation and memory to the default state. For example...
ControlCommand("OpenAI ChatGPT", "ResetMemory");
DescribeImage
- This ControlCommand will take the most recent image from either the default camera device robot skill or the specified one and describe the image. The resulting description will be set to the $OpenAIImage variable, and the Image Description Script will be executed. With this control command, leaving the second parameter (robot skill name) empty will use the first camera device robot skill it finds in the current project. If you specify the robot skill name, it will use that robot skill to get the image from. The third parameter is the user instruction that you want from the image. For example, in the third parameter, you can say, "How many people are in the image?" or "What color shirt is in the picture?".
// Describe the image in the first camera device robot skill
ControlCommand("OpenAI ChatGPT", "DescribeImage");

// Describe the image in the specified camera device robot skill
ControlCommand("OpenAI ChatGPT", "DescribeImage", "Camera Device 2");

// Describe the image in the specified camera device  robot skill with the specific instructions
ControlCommand("OpenAI ChatGPT", "DescribeImage", "Camera Device 2", "How many people?");
GetSecondsSinceLastRequest
- Get the number of seconds since the last conversation request. (Returns Integer [-2,147,483,648 to 2,147,483,647])
var seconds = controlCommand("OpenAI ChatGPT", "GetSecondsSinceLastRequest");
print("You last talked to the AI " + seconds + " ago.");

v23 includes a few bug fixes and additions. The bug fix was that GPT-4 was the default model, which doesn't do image so it's not GPT-4o by default. Another bug fix is that if the robot skill is removed, the script engine didn't refresh and it wouldn't execute scripts.
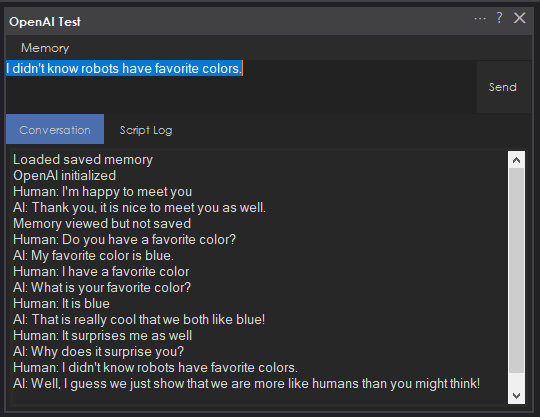
The new addition is the ability to specify the Image Request Personality. I have also included that ability in the default personality. The default personality now contains the ability to ask the AI questions about the image. See this screenshot. As you can see, i asked the AI to start the camera, then asked it how many people did it see. Finally, i asked how many fingers i was holding up. I was indeed holding up 2 fingers.
DJ, thanks for the enhancements. It is working great. Chatgpt does a great job of recognizing what is in the images.
v24 has been updated to include images in the conversation history. A new option (disabled by default) is in the Image Personality tab. Read the manual above for more information.
v27 includes several enhancements to give the AI and your robot a new level of interactivity that we all dreamed of.
Capture Image In Conversation
The new checkbox can be enabled in the Conversation Personality tab to capture images for the conversation.
When this checkbox is enabled, the AI will capture the most recent image from the project's first camera device robot skill. That image will be appended to your text input and sent to the server. This means that for every conversation you have with the AI, it will now have an image of context. So you can interact with the robot to a whole new dimension. The robot now knows who it is talking to and where it is. It can see your expressions, the room it is in, etc.
If you combine this feature with the internal scripting capability, your robot can now look around the room on its own. You can write a personality description or have the robot navigate using the imagery from the camera.
Image History
The image history tab will keep the number of images in the conversation to reduce bandwidth and memory usage.
Get Seconds Since Last Request
A new ControlCommand has been added to get the last number of seconds since the previous conversation request. This can be used in a loop script to keep track of how long it has been since you talked to the robot. If several seconds or minutes have passed, you can send a ControlCommand to the open AI robot skill and have it start a conversation, for example.
version 30 resolves an issue where disabling the camera sound checkbox in the config did no disable the camera sound.
v31 includes an update to the open AI libraries and a minor fix for two or more of the same open AI GPT robot skills that are added to a project. This would cause the script engine to remove itself.
v32 has removed the ability to store a history of images in the conversation. It has been identified that the images in a conversation history are not analyzed by the LLM and are therefore unnecessary.
v33 has been updated to include support for the latest GPT-5 and GPT-4.1 models. These consist of the "mini" models of each, which can be used for quicker responses and lower computing costs.