
EZ-B V3 by EZ-Robot
This page explains what the EZ-B v3 is, what it can do, and how a beginner can get connected in ARC.
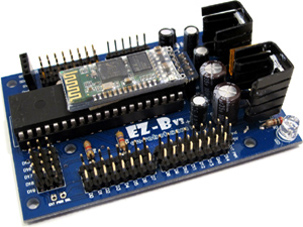
What the EZ-B v3 Is (Beginner Overview)
The EZ-B v3 is a small microcontroller board designed for robotics. Think of it as the “brain connector” between your computer (running ARC) and robot parts like servos, sensors, LEDs, and motors. Instead of writing firmware or uploading sketches like some other controllers, you typically connect ARC to the EZ-B v3 over Bluetooth and then control ports using ARC’s tools and scripts.
Why people liked EZ-Robot controllers
EZ-Robot hardware was designed as an all-in-one hardware + software robotics platform. The EZ-B v3 includes helpful built-in circuitry (like regulation and wireless), and ARC provides an easy way to control the board without needing a separate hardware programmer.
EZ-Robot Advantages
The EZ-B v3 was designed as a reusable robotics controller. Many builders created multiple robots and simply moved the same controller from one project to another. The board combines several robotics-friendly features in one place, such as:
- Voltage regulation to help provide stable power for the controller (and in many builds, servos/sensors depending on wiring)
- Bluetooth wireless communication so ARC can connect without a USB cable
- Digital I/O for switches, LEDs, and general on/off signals
- Analog inputs (ADC) for reading sensors that output a variable voltage
- Servo control ports for controlling RC servos
- Serial interfaces for modules that communicate over TTL serial
- TellyMate interface support (legacy feature used by some older builds)
EZ-Robot Features (Specifications)
Common features of the EZ-B v3 include:
- Compact in size
- Does not require a hardware programmer
- EZ-B is shipped pre-assembled
- Optional XBee/Synapse/WiFi long-distance communication (requires the correct add-on hardware)
- Wireless Class 2 (2.5 mW, 4 dBm) Bluetooth (~10 m / 30 ft typical range)
- iRobot Roomba support
- Arduino shield support for sensors & peripherals
- 8 analog-to-digital converter (ADC) inputs
- 20 standard serial TTL ports (9600, 19200, 38400, 57600)
- 1 high-speed serial TTL port (115200)
- 20 digital input/output ports
- 20 servo ports
Getting Connected in ARC (Beginner-Friendly Steps)
The EZ-B v3 connects to ARC through Bluetooth. The exact steps vary slightly by Windows version and Bluetooth adapter, but the overall flow is:
1) Power the EZ-B v3
- Connect a proper battery or power source as recommended for your EZ-B v3 setup.
- Confirm the board powers on (LED indicators may vary by revision).
- Keep the board close to your computer for initial pairing.
2) Pair Bluetooth in Windows
- Open Windows Bluetooth settings and choose Add a device.
- Select the EZ-B v3 when it appears.
- If asked for a PIN, try common defaults such as 1234 or 0000 (depends on module/firmware).
- After pairing, Windows typically assigns a COM port.
3) Find the COM Port
- Open Device Manager in Windows.
- Look under Ports (COM & LPT).
- Find the Bluetooth serial port assigned to the EZ-B (example: COM5).
4) Connect from ARC
- Open ARC.
- Add the proper EZ-B connection (or choose the COM port in the connection settings).
- Select the COM port you found (example: COM5) and connect.
- Once connected, you can add controls (servo control, ADC graphs, digital controls, etc.).
- Can’t find the EZ-B in Bluetooth: verify the EZ-B is powered, try moving closer, and restart Bluetooth on the PC.
- ARC won’t connect: confirm the correct COM port, disconnect other serial apps, and re-pair the device if needed.
- Frequent disconnects/resets: this is commonly caused by insufficient power (battery sag under servo/motor load).
Connection Video Tutorial (Legacy)
The EZ-B v3 is discontinued, but ARC still supports it. The video below is an older tutorial, but it remains one of the closest demonstrations of connecting an EZ-B v3 to ARC.

@Kwixson, this thread may give you more info on getting that V3 up and running:
https://synthiam.com/Community/Questions/Ezb-v3-software-for-windows-10-18994/comments#comments-list
If the link doesn't work try cutting and pasting it into your browser window.
Personally I think you'd be better off buying a V4 and using that wonderful work of art. There used to be a by back program. I don't know if it's still available anymore.
Thank you. I doubt the buy back program is still operative. If anybody happens across some material from some enthusiast or other, please let us know!
I saw a couple of these on Ebay....
Wow - people are really charing a lot for those old kits. Actually, those look like the original v3 not the v3.1! Thats ancient
how do you code with it on the ARC ide/ ARC
To code with the EZ-B v3 using the ARC (formerly known as EZ-Builder) IDE, you can follow these steps:
1. Install ARC Software
First, ensure you have the latest version of ARC installed on your computer. You can download it from the Synthiam website: Download ARC.
2. Connect EZ-B v3 to ARC
3. Add and Configure Robot Skills
4. Programming with JavaScript or Python
ARC supports multiple programming languages, but JavaScript or Python is recommended for more advanced scripting. Here’s a basic example of how to move a servo using JavaScript or Python:
Example: Moving a Servo
5. Using ControlCommand()
You can use the
ControlCommand()function to interact with other controls in your project. For example, if you have a camera control and want to start face tracking when a button is pressed, you can use:6. Testing and Debugging
Additional Resources
Feel free to ask more questions if you need further assistance!
I ordered a V4 Nov,27th and finally received an email saying they are back logged, so i cancelled the order and am going to just use my V3.
I've been waiting many months for a warrantee replacement EZB. They've been saying the same thing to me. "Backlogged". Not sure what's going on with EZ Robot. Maybe paying attention to their Education customers supply.
I was forced to buy from the only other palace who has them in stock, The Robot Shop". Their website says they have two available.
https://www.robotshop.com/products/ez-b-v4-2-wifi-robot-controller?qd=25e4bde5385eac636faff052c1c487c7