
DirectInput joystick control for ARC: drive movement panels, control servos, assign button scripts, variable speed and rumble feedback.
How to add the Joystick (Direct Input) robot skill
- Load the most recent release of ARC (Get ARC).
- Press the Project tab from the top menu bar in ARC.
- Press Add Robot Skill from the button ribbon bar in ARC.
- Choose the Remote Control category tab.
- Press the Joystick (Direct Input) icon to add the robot skill to your project.
Don't have a robot yet?
Follow the Getting Started Guide to build a robot and use the Joystick (Direct Input) robot skill.
How to use the Joystick (Direct Input) robot skill
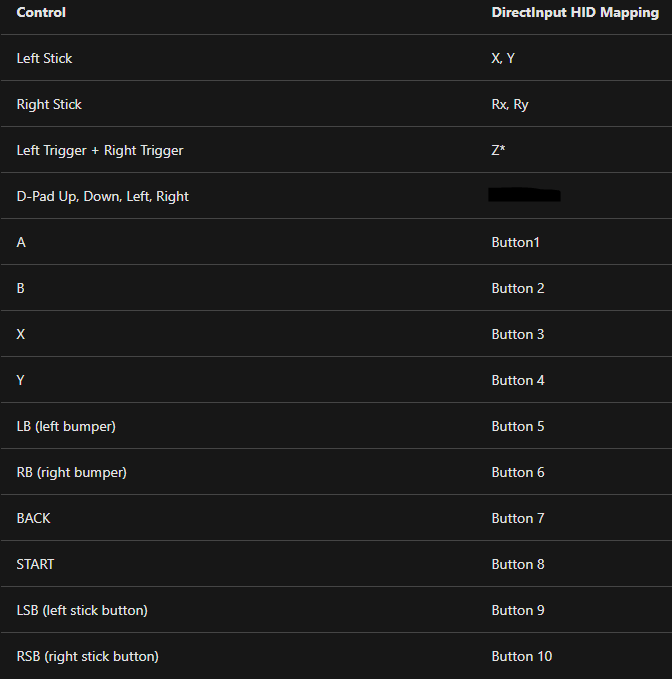
ARC can read multiple joystick parts:
- Analog sticks (left and right)
- D‑Pad (digital up/down/left/right)
- Triggers (often treated like an additional “joystick” axis)
- Buttons (A/B/X/Y, bumpers, start/back, etc.)
Main Window
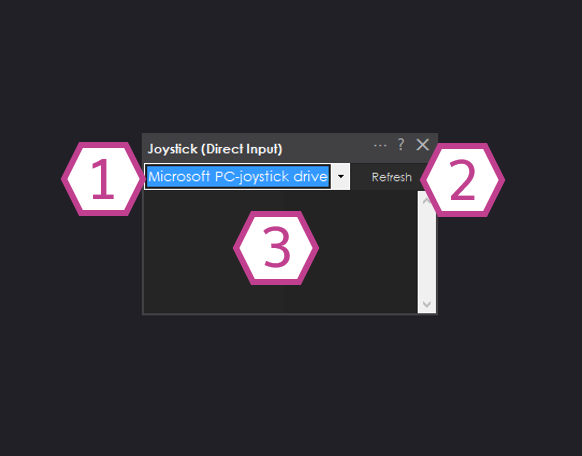
1) Device Drop-down
2) Refresh Button
- You plugged in a USB controller
- You paired a Bluetooth controller
- You turned on a wireless controller after ARC started
3) Status Field
Quick Start (Beginner Steps)
- In ARC, add the skill: Project → Add Skill → Misc → Joystick (Direct Input).
- Connect your controller to your PC (USB wireless dongle, USB cable, or Bluetooth pairing).
- Open the skill and select your controller from the Device drop-down.
- If you don’t see it, click Refresh, then select it again.
- Confirm the Status shows connected, then click Settings to choose what the sticks/buttons should do.
Settings: Joystick #1 Tab (Usually the Left Stick)
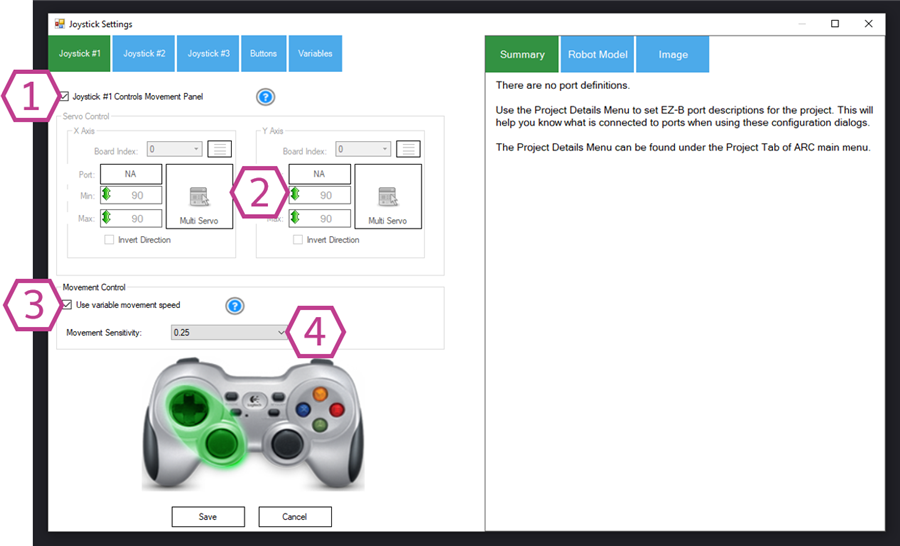
Turn this ON if you want the left stick to drive your robot using the active Movement Panel in ARC.
-
By default, the D‑Pad has scripts assigned to call:
forward(),reverse(),left(),right(), andstop(). - The D‑Pad is digital (on/off). If you want smoother control, enable stick-based movement and (optionally) variable speed below.
This section is available when Joystick #1 Controls Movement Panel is OFF. Use it to make the stick move servos (example: head pan/tilt, arm, camera mount).
- Servo Port: which servo output number to move (example: D0, D1, etc. depends on your controller/board).
- Board Index: which connected servo controller to use if you have more than one.
- Servo Configuration: which ARC servo config entry to use (lets you re-use limits/center settings).
- Min/Max limits: prevents the servo from going beyond safe angles.
- Multiple servo control: useful if you want one stick axis to move more than one servo together.
- Invert: flips the direction if “left” moves the wrong way.
Only available when the left stick is controlling a Movement Panel. When enabled, ARC uses the analog stick amount (how far you push it) to request slower or faster movement. This only works if your chosen Movement Panel supports variable speed.
Only available when controlling a Movement Panel. This sets the minimum stick movement before ARC considers it “intentional”.
- Joystick values range from -1 to 1.
- Default is 0.25 (you must move past 0.25 before it moves).
- Increase it if your robot “creeps” when you aren’t touching the stick.
- Decrease it if you want very light stick movements to respond.
Settings: Joystick #2 Tab (Usually the Right Stick)
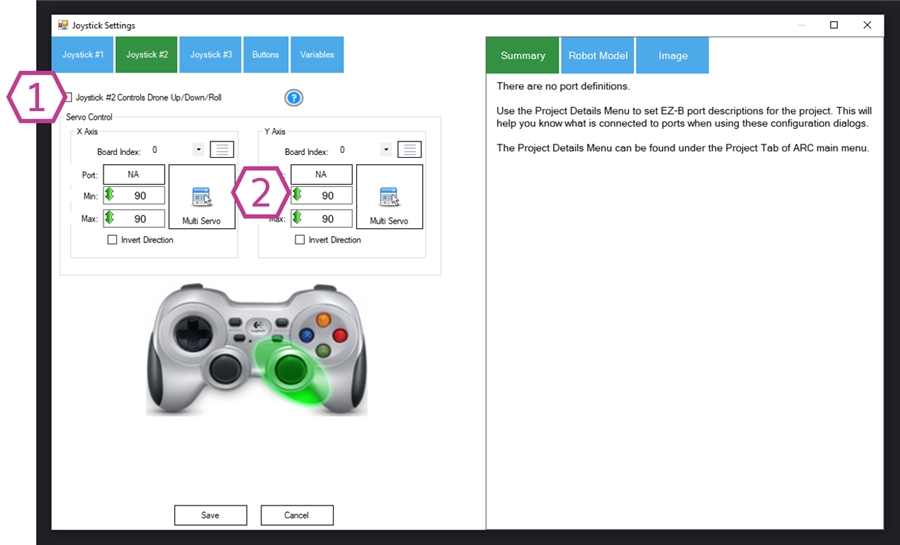
1) “Joystick #2 Controls Drone Up/Down/Roll”
2) Servo Control (when NOT controlling the drone)
Settings: Joystick #3 Tab (Triggers)
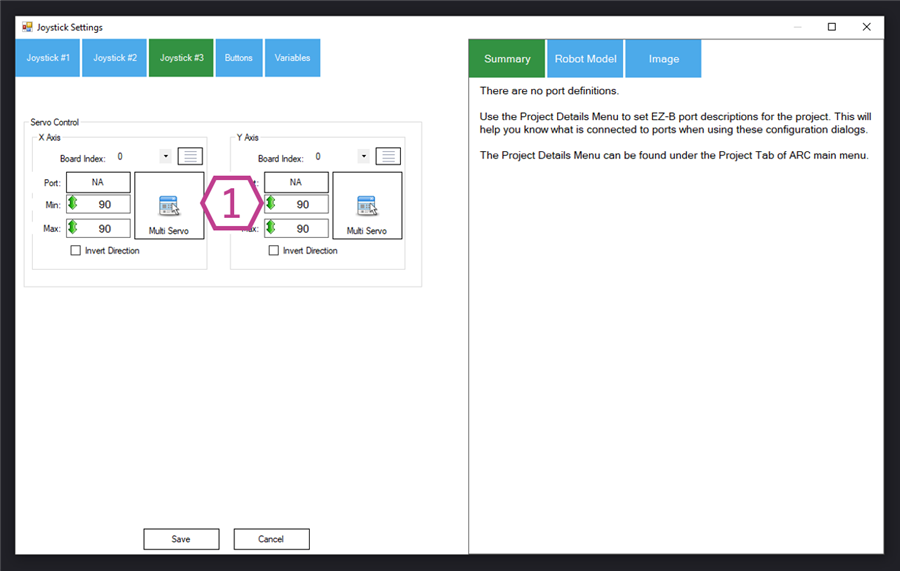
Trigger Servo Control
Many controllers expose the left and right triggers as analog inputs. This tab can map triggers to servos.
- If you do not want triggers to move servos, simply don’t configure servo control here.
- You can then use triggers for other logic (for example: scripts, variables, rumble control).
Settings: Buttons Tab (Run Scripts on Press/Release)
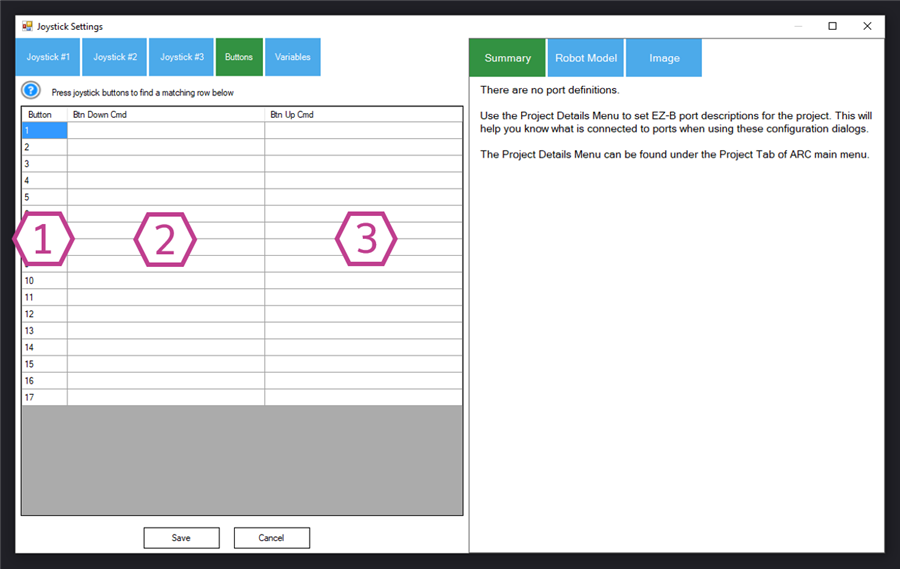
1) Button Number
2) Button-Down Command
Say("Hello"), CameraStart(), Forward(), etc.).
3) Button-Up Command
Stop(), CameraStop(), open/close gripper, etc.).
Settings: Variables Tab (Read Stick Values in Scripts)

1) “Set EZ-Script Variables”
Enable this if you want ARC to continuously store joystick positions into variables that your scripts can read.
- Analog sticks (#1 and #2): values from -32768 to 32767
- Triggers: values from 0 to 255
2) Variable Names
You can customize the variable names (example: $JoystickX1, $JoystickY1, etc.) so your scripts are easier to read.
How Movement Works (Driving a Robot)
When joystick movement control is enabled, the controller will drive the current Movement Panel in your ARC project. If your Movement Panel supports variable speed, pushing the stick slightly can move slowly, and pushing further moves faster.
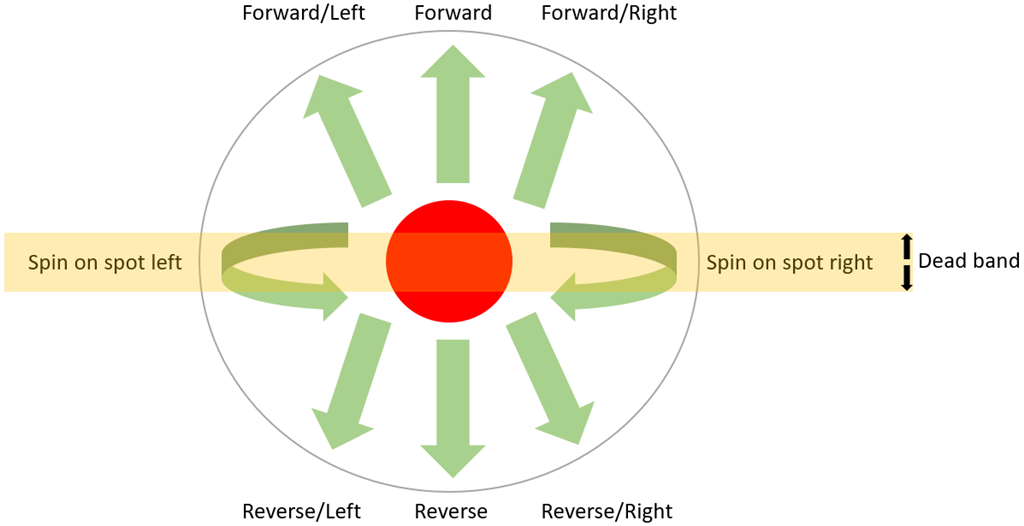
The stick can also be used to turn. Depending on the Movement Panel, moving left/right may rotate the robot or “spin in place”.
Deadband (Movement Sensitivity) Visual
Deadband means “ignore small stick movement near the center”. This prevents drift and helps you control when turning/spinning starts.
Code Sample: Control Controller Vibration (Rumble)
Some controllers support vibration motors (left and right “rumble”). This skill exposes vibration using:
controlCommand().
The example below maps trigger values (0–255) to rumble strength (0–100).
map = function (value, in_min, in_max, out_min, out_max) {
  return (value - in_min) * (out_max - out_min) / (in_max - in_min) + out_min;
}

while (true) {

  var y1 = map(getVar("$JoystickX3"), 0, 255, 0, 100);
  var y2 = map(getVar("$JoystickY3"), 0, 255, 0, 100);

  controlCommand("Joystick (Direct Input)", "VibrateLeftAndRight", y1, y2);

  sleep(100);
}$JoystickX3 and $JoystickY3 update automatically.
Requirements & Compatibility Notes
Recommended controller: Logitech F710 Wireless Joystick.
- On the Logitech F710, set the physical switch to D (DirectInput), not X (XInput).
- This ARC skill uses the Windows DirectInput driver system. Different controllers may behave differently depending on their driver and mode.
Resources
Xbox Controller Mapping (DirectInput vs XInput)
Microsoft documents how Xbox controllers appear in DirectInput: DirectInput and XUSB devices.
- The D‑Pad may not function in DirectInput mode on some Xbox controllers.
- On some devices, the two triggers may be combined into a single axis in DirectInput.
Video
Related Questions

Joystick In ARC
Cycle Servos For Controller Analog Sticks
Thrustmaster Skill

Upgrade to ARC Pro
ARC Pro will give you immediate updates and new features needed to unleash your robot's potential!