

Uses Microsoft Cognitive Emotion cloud to analyze camera images, returning emotion descriptions and confidence for speech/output (requires internet).
How to add the Cognitive Emotion robot skill
- Load the most recent release of ARC (Get ARC).
- Press the Project tab from the top menu bar in ARC.
- Press Add Robot Skill from the button ribbon bar in ARC.
- Choose the Camera category tab.
- Press the Cognitive Emotion icon to add the robot skill to your project.
Don't have a robot yet?
Follow the Getting Started Guide to build a robot and use the Cognitive Emotion robot skill.
How to use the Cognitive Emotion robot skill
The Synthiam ARC Cognitive Emotion robot skill uses Synthiam's cloud-based emotion service to detect emotions from a camera image (for example: happy, sad, surprised, neutral, etc.). The camera image comes from a Camera Device skill that you add to your ARC project.
If you are using an EZ-B and your robot is also using WiFi, make sure you have a working internet connection on the computer running ARC. Many users either:
- Configure the EZ-B for WiFi Client Mode (robot joins your home/office WiFi), or
- Add a second USB WiFi adapter so one connection can be dedicated to the robot and the other to the internet.
Beginner Overview
The basic flow is:
- Add a Camera Device skill
- Add the Cognitive Emotion skill
- Point the Emotion skill at your camera
- Use the emotion variables in scripts (ex: make ARC speak the result)
What Can You Do?
Once the Cognitive Emotion skill is running, it updates variables you can use in ARC scripts. A simple first project is to have ARC speak the emotion it detects from the computer’s speaker.
What you need
- ARC installed and running
- A working Camera Device skill in your project (USB camera, IP camera, etc.)
- The Cognitive Emotion skill added to the project
- An active internet connection
Step-by-step (Beginner)
-
Add a Camera Device
In ARC, click Project → Add Skill → search for Camera Device. Configure it so you can see a live video image. -
Add the Cognitive Emotion skill
Click Project → Add Skill → search for Cognitive Emotion. -
Select the camera source
Open the Cognitive Emotion skill’s configuration and choose the Camera Device you want it to analyze. (If you have more than one camera, this step is important.) -
Make sure it’s updating
With the camera pointed at a face, the skill should begin returning an emotion description and a confidence value. If you are not getting results, confirm your internet connection and that the camera image is working. -
Add a script to speak the result
In the Emotion skill’s configuration (or in a separate script), add the example code below.
Here is an example script line that will speak the detected emotion and confidence:
say("You are " + $EmotionConfidence + " percent " + $EmotionDescription)
$EmotionDescription is the emotion name (example: happy), and
$EmotionConfidence is how confident the service is (example: 85).
See It In Action
DJ Sures created a fun example project using an EZ-Robot JD humanoid. The robot detects a person’s emotion and responds during conversation. This is a great way to see how emotion recognition can be combined with speech and other skills.
If you have an EZ-Robot JD Humanoid, you can try the same sample project:
Download DJ's testemotion.EZB project
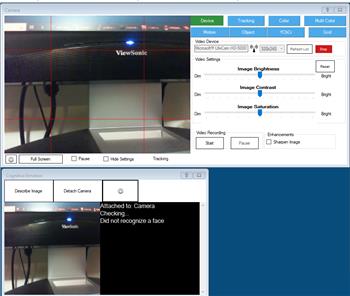
A project layout may look similar to this (your skills may vary depending on your robot and camera):


I see the same eight emotions listed for both Cognitive Emotion and Cognitive Face. Does this skill duplicate the emotion detection functionality of the Cognitive Face skill? If not, how are they different when it comes to reading someone's emotions?
Thanks,
Thomas
It is actually the other way around. The Face robot skill uses features from the emotion robot skill. For more information, the author of the robot skills and their documentation at microsoft can be found here: https://azure.microsoft.com/en-us/products/cognitive-services/#api
FYI the testemotion example that you can download on this page no longer works. Plugins out of date