

Synchronize servos by designating a master; slave servos mirror scaled (decimal/negative) positions with min/max limits and pause control
How to add the Relative Servos robot skill
- Load the most recent release of ARC (Get ARC).
- Press the Project tab from the top menu bar in ARC.
- Press Add Robot Skill from the button ribbon bar in ARC.
- Choose the Servo category tab.
- Press the Relative Servos icon to add the robot skill to your project.
Don't have a robot yet?
Follow the Getting Started Guide to build a robot and use the Relative Servos robot skill.
How to use the Relative Servos robot skill
The Relative Servos skill lets one servo act as a Master and automatically moves one or more Slave (Relative) servos based on the Master’s position. This is helpful when you want multiple servos to stay “linked” together (for example: two servos that lift an arm together, or mirrored servos on a left/right mechanism).
What this skill does (beginner explanation)
Think of the Master servo as the “leader.” Every Slave servo is a “follower.” When the Master moves, each Slave moves to a position that is calculated using a ratio.
- If you move the Master servo inside this skill (using the slider), the Slave servos will follow.
- If you move the Master servo from any other skill (or a script), the Slave servos will also follow automatically—as long as this skill is not paused.
- You can temporarily stop the follower behavior using the Pause checkbox or via scripting (pause/unpause).
Understanding “Ratio” (how followers calculate movement)
Each Slave servo uses a ratio to decide where to move based on the Master’s position:
Slave Position = Master Position × Ratio
Examples
-
Ratio = 2
If Master is at 10, Slave moves to 20 (10 × 2 = 20). -
Ratio = 2.5 (decimal ratios are allowed)
If Master is at 10, Slave moves to 25 (10 × 2.5 = 25). -
Ratio = -2 (negative ratios reverse direction)
If Master is at 10, Slave moves to -20 (10 × -2 = -20).
This is commonly used for “mirrored” movement (one servo turns the opposite direction of another).
Main Window
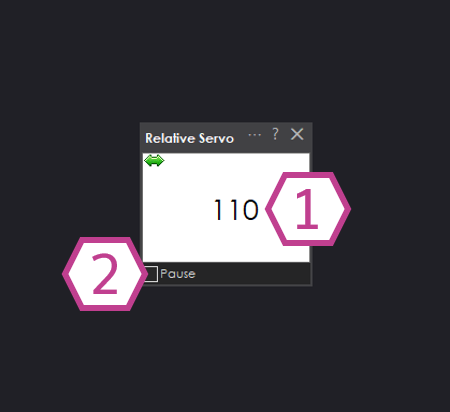
1. Servo Slider (Master position)
Click and hold the left mouse button on the slider area to change the Master servo position. The number shown is the target position, and it will stay within the Min and Max you set in the Settings. When you change this slider, any configured Slave servos will automatically move to their calculated positions (unless paused).
2. Pause Checkbox
When checked, the skill is paused and the Slave servos will stop following the Master. When unchecked, the skill is active again and the Slave servos will follow the Master’s movement. This is useful when you want to temporarily control servos independently without removing the relative setup.
Settings
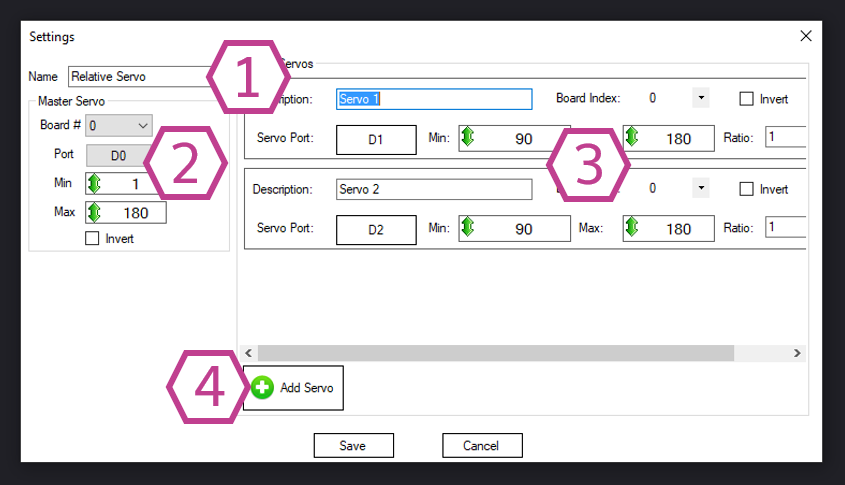
1. Title Field
This is the name of the skill as it appears in your ARC project.
You can rename it to something meaningful (for example: Arm Linkage or Head Servos).
Note: Changing the title also changes the name used by controlCommand() for this skill.
2. Master Servo Settings
Choose the servo that will be the “leader.” Here you configure:
- Board Index: which connected controller board the servo is on (if you have more than one).
- Port: which servo port/pin the Master servo is plugged into.
- Servo Configuration: the type/range used by your controller/servo setup.
- Min/Max limits: prevents the servo from moving beyond safe mechanical limits.
- Invert: reverses direction if the servo moves opposite of what you expect.
3. Relative (Slave) Servos Settings
This section lists all follower servos you have added. For each Slave servo, you typically configure:
- Board Index and Port (where that servo is connected).
- Min/Max limits for that servo.
- Invert (if needed).
- Ratio (how strongly it follows the Master, and whether it mirrors).
4. Add Servo Button
Adds a new Slave servo to follow the Master. After you click this, the new servo entry will appear in the Relative Servos list so you can choose its port, limits, and ratio.
How to use Relative Servos (step-by-step)
-
Add the skill to your ARC project:
Project → Add Skill → Servo → Relative Servos - Open Settings and configure the Master servo: select the correct board index and port, then set safe Min/Max limits.
-
Click Add Servo to add one or more Slave servos.
For each one, select its board/port and set:
- Ratio (example:
1follows exactly,-1mirrors,2moves twice as far) - Min/Max limits (protects your robot from binding or damage)
- Invert only if direction is backwards
- Ratio (example:
- Go back to the Main Window and move the Master slider. Watch the Slave servos move automatically to their relative positions.
- If you need to temporarily stop the followers, check Pause. Uncheck it to resume following.


Wow how come I never saw this before, simple but effective for multiple servos ,head arms etc..
Use this if multiple in the advanced settings doesn’t work for your needs: https://synthiam.com/Support/ARC-Overview/Servo-Controls