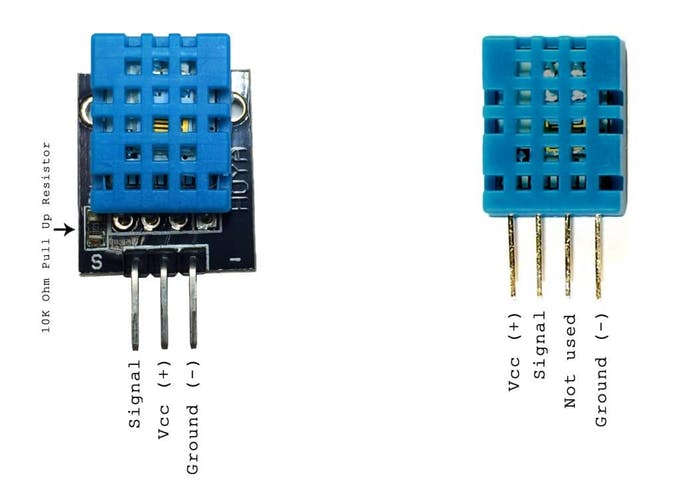
Thumbnail

Depthsensor

by Avatarptp

This ARC plugin enables customize angle calculations, publish the calculations to variables, and control servos.

How to add the Depthsensor robot skill

  1. Load the most recent release of ARC (Get ARC).
  2. Press the Project tab from the top menu bar in ARC.
  3. Press Add Robot Skill from the button ribbon bar in ARC.
  4. Choose the Misc category tab.
  5. Press the Depthsensor icon to add the robot skill to your project.

Don't have a robot yet?

Follow the Getting Started Guide to build a robot and use the Depthsensor robot skill.

How to use the Depthsensor robot skill

This ARC plugin enables customize angle calculations, publish the calculations to EZ-Script variables, and control servos. Supported Hardware: Kinect Xbox 360 (Kinect for Windows Runtime 1.8 - https://www.microsoft.com/en-us/download/details.aspx?id=40277) Asus Xtion Pro (OpenNI 2 and NITE 2) Kinect One (Kinect for Windows Runtime 2.0 - https://www.microsoft.com/en-us/download/details.aspx?id=44559)

Addional Setup Notes for Asus Xtion: Please confirm the following windows environment variables:


OPENNI2_REDIST=C:\Program Files (x86)\OpenNI2\Redist\
NITE2_REDIST=C:\Program Files (x86)\PrimeSense\NiTE2\Redist\
PATH=...;C:\Program Files (x86)\PrimeSense\NiTE2\Redist\;C:\Program Files (x86)\OpenNI2\Redist\;

Create a NITE.INI file with the following content:


[General]
DataDir=C:\Program Files (x86)\PrimeSense\NiTE2\Redist\NiTE2

[Log]
; 0 - Verbose; 1 - Info; 2 - Warning; 3 - Error. Default - None
Verbosity=0
LogToConsole=1
LogToFile=1

save in your ARC location e.g. C:\Program Files (x86)\Synthiam Inc\EZ-Builder\

Plugin Main Area: User-inserted image

Left: The picture panel where is displayed the skeleton tracking. Right: Run-time variables (checked for preview) values Top: Configuration button. Selected Device (Configuration Form) Connect Checkbox (dis)connects the selected device Servos Attached Checkbox (dis)connects the servos (previous configured)

Configuration Form: User-inserted image

*** Do not forget to press Save Button ***

Expressions: User-inserted image

Active - Enable or disables the expression Preview - if checked the value is displayed in the main form Publish - the variable is created and updated and can be used with EZ-Scripts Type - There are 4 types of variables: double, Vector2 (X,Y), Vector3(X,Y,Z) and Quaternions (X,Y,Z,W) Expression - C# expression to be compiled, evaluated and assigned to a variable. Board, Port, Min, Max - When all specified a servo Position command will be executed using the value (double) from the expression.

Grid lines: Drag and drop is allowed Multiple line selection is allowed Right Button presents a context menu option to delete expressions.

Template: There is a default template [R]Angles, press Load template to populate the JD's upper body expressions. Specifying a name allows to save a Template (Expressions plus last body values). Loading a template will override the existent expressions.

For each Joint there are two variables one for Position and another for the Rotation.

Each device returns a specific number of joints (check the device tabs), if not supported the Joint variables will be zero.

Position is a Vector3(x,y,z) representing the distance from the sensor point of view. The unit values are in meters.

Rotations is a Quaternion(x,y,z,w) is possible to obtain the Euler Angles (roll,pitch,yaw). I'm still working to unify the results, some sensors the rotations are absolute, others are relative.

For each Joint two variables are defined - For SpineBase: SpineBase (Vector3) QSpineBase (Quaternion)

if you want to use the SpineBase depth distance you use SpineBase.Z

Available Functions: Vector2 ToVector2(double x, double y) Vector3 ToVector3(double x, double y, double z) Vector3 GetEuler(Quaternion q) double AngleBetween(Vector2 v1, Vector2 v2) double AngleBetween(Vector3 v1, Vector3 v2) double Normalize(double value, double start = 0, double end = 360) double Abs(double value) double Min(double a, double b) double Max(double a, double b) double Pow(double a, double b) double Sqrt(double d) double Cos(double a) double Sin(double a) double Tan(double d) double Cosh(double a) double Sinh(double a) double Tanh(double d) double Acos(double d) double Asin(double a) double Atan(double a) double Atan2(double y, double x)

*** Do not forget to press Save Button ***

Simulator User-inserted image

Calculations are evaluated based on the Grid input: Joint's Position values (Px,Py,Pz) Quaternion values (Qx,Qy,Qz,Qw) only required if the used in the expressions.

User-inserted image

User-inserted image

User-inserted image

For additional feedback, questions use the following thread:

https://synthiam.com/Community/Forum/Thread?threadId=9289

Unfortunately the time is not enough..., feel free to point text/info errors, create a tutorial or exploring the plugin.


ARC Pro

Upgrade to ARC Pro

Unlock the true power of automation and robotics by becoming a proud subscriber of Synthiam ARC Pro.

Netherlands
#1  

DJ: I have installed https://synthiam.com/Software/Manual/DepthSensor-15873 also, added the plugin to ARC, added the DepthSensor to my project. After setup the kinectv1 in this module and enabled 'Connected' I see in the preview window this:

FPS: 30 seq: 7632 #:14845  (both numbers are counting up fast). But how can I add positions, movements or whatever ?

Don't see any graphics...  (when I look SKANECT window when enabled: I see my self ;-)

PRO
Synthiam
#3  

Murphy, you didn’t mention if the instructions were followed. It seems ptp wrote instructions in this plugin. Did you follow the instructions?

PRO
Canada
#4  

FYI plugin no longer loads in latest version of ARC 2021.01.06

PRO
Canada
#5  

anyone get the same error as me? User-inserted image

PRO
USA
#6   — Edited

@Nink: The plugin requires a new update to support the last ARC's changes.  I'll update soon.

which sensor you have ?

PRO
Canada
#7  

Thanks PTP. I am using the original v1 Kinect 360 but I could wander over and borrow the v2 off the kids xbox.