
Dual-camera server with servo control for stereo VR; includes C# test app and Unity (Oculus Quest 2) bindings for headset, hands and controllers
Requires ARC
v2
(Updated 1/3/2025)
Compatible with:
 Windows
How to add the Dual Camera Servo Server robot skill
- Load the most recent release of ARC (Get ARC).
- Press the Project tab from the top menu bar in ARC.
- Press Add Robot Skill from the button ribbon bar in ARC.
- Choose the Virtual Reality category tab.
- Press the Dual Camera Servo Server icon to add the robot skill to your project.
Don't have a robot yet?
Follow the Getting Started Guide to build a robot and use the Dual Camera Servo Server robot skill.
How to use the Dual Camera Servo Server robot skill
A server for DIY usage that allows a client to control servos and sends two camera streams to the client for stereoscopic view. This allows a custom VR app to use two cameras for stereoscopic view.
C# .Net Win Forms Test App
We have provided an example C# .Net test app demonstrating how a client can connect to this robot skill server. The app can be downloaded here: Dual Camera servo Test App.zipUnity VR App
The ideal custom VR app can be created in Unity. If using an Oculus Quest 2, we have a Unity example to demonstrate how to bind the hand, controller, and headset positions to servos. In addition, the left and right camera images can be assigned to a Raw Image game object.Download the C# .Net Win Forms Test App from the link above and copy the Comm folder to your Unity asset project. This folder contains the StreamClient that will be used to connect to this robot skill, receive both camera images, and transmit servo positions.
using Assets.Comm;
using Synthiam_Unity_Common;
using UnityEngine;
using UnityEngine.UI;

namespace SceneRobotView {

  public class RobotView : MonoBehaviour {

    StreamClient _streamClient;
    bool _initialized = false;
    bool _isClosing = false;

    volatile byte [] _toDisplayLeft = new byte[]{ };
    volatile byte [] _toDisplayRight = new byte[]{ };

    RawImage _leftImage;
    RawImage _rightImage;

    void Start() {

      _leftImage = GameObject.Find("Left Eye Image").GetComponent();
      _leftImage.texture = new Texture2D(1280, 720, TextureFormat.RGB24, false);

      _rightImage = GameObject.Find("Right Eye Image").GetComponent();
      _rightImage.texture = new Texture2D(1280, 720, TextureFormat.RGB24, false);

      _streamClient = new StreamClient();
      _streamClient.OnLeftImageDataReady += _streamClient_OnLeftImageDataReady;
      _streamClient.OnRightImageDataReady += _streamClient_OnRightImageDataReady;
      _streamClient.OnStop += _streamClient_OnStop;
      _streamClient.OnStart += _streamClient_OnStart;
      _streamClient.OnError += _streamClient_OnError;
      _streamClient.Start("127.0.0.1", 8082);
    }

    private void _streamClient_OnError(System.DateTime time, string logTxt) {

    }

    private void _streamClient_OnStart() {

    }

    private void _streamClient_OnStop() {

      if (_isClosing)
        return;
    }

    private void _streamClient_OnLeftImageDataReady(byte[] imageData) {

      if (!_initialized || _isClosing)
        return;

      lock (_toDisplayLeft)
        _toDisplayLeft = imageData;
    }

    private void _streamClient_OnRightImageDataReady(byte[] imageData) {

      if (!_initialized || _isClosing)
        return;

      lock (_toDisplayRight)
        _toDisplayRight = imageData;
    }

    private void OnDestroy() {

      _isClosing = true;

      _streamClient.Stop();
      _streamClient.Dispose();
    }

    void Update() {

      _initialized = true;

      if (_isClosing)
        return;

      if (Camera.current == null)
        return;

      lock (_toDisplayLeft)
        if (_toDisplayLeft.Length > 0)
          (_leftImage.texture as Texture2D).LoadImage(_toDisplayLeft);

      lock (_toDisplayRight)
        if (_toDisplayRight.Length > 0)
          (_rightImage.texture as Texture2D).LoadImage(_toDisplayRight);

      if (_streamClient.IsRunning && OVRManager.hasInputFocus) {

        // https://developer.oculus.com/documentation/unity/unity-handtracking/
        // https://github.com/handzlikchris/Unity.QuestRemoteHandTracking/blob/master/HandsDataSender.cs
        // Hand_WristRoot = 0 // root frame of the hand, where the wrist is located
        // Hand_ForearmStub = 1 // frame for user's forearm
        // Hand_Thumb0 = 2 // thumb trapezium bone
        // Hand_Thumb1 = 3 // thumb metacarpal bone
        // Hand_Thumb2 = 4 // thumb proximal phalange bone
        // Hand_Thumb3 = 5 // thumb distal phalange bone
        // Hand_Index1 = 6 // index proximal phalange bone
        // Hand_Index2 = 7 // index intermediate phalange bone
        // Hand_Index3 = 8 // index distal phalange bone
        // Hand_Middle1 = 9 // middle proximal phalange bone
        // Hand_Middle2 = 10 // middle intermediate phalange bone
        // Hand_Middle3 = 11 // middle distal phalange bone
        // Hand_Ring1 = 12 // ring proximal phalange bone
        // Hand_Ring2 = 13 // ring intermediate phalange bone
        // Hand_Ring3 = 14 // ring distal phalange bone
        // Hand_Pinky0 = 15 // pinky metacarpal bone
        // Hand_Pinky1 = 16 // pinky proximal phalange bone
        // Hand_Pinky2 = 17 // pinky intermediate phalange bone
        // Hand_Pinky3 = 18 // pinky distal phalange bone

        OVRPlugin.HandState handState = default(OVRPlugin.HandState);

        if (OVRPlugin.GetHandState(OVRPlugin.Step.Render, OVRPlugin.Hand.HandLeft, ref handState)) {

          _streamClient.SendPacketLeftHand(
            Utilities.MapToByteHalf(handState.BoneRotations[5].x),
            Utilities.MapToByteHalf(handState.BoneRotations[5].y),
            Utilities.MapToByteHalf(handState.BoneRotations[5].z),

            Utilities.MapToByteHalf(handState.BoneRotations[8].x),
            Utilities.MapToByteHalf(handState.BoneRotations[8].y),
            Utilities.MapToByteHalf(handState.BoneRotations[8].z),

            Utilities.MapToByteHalf(handState.BoneRotations[11].x),
            Utilities.MapToByteHalf(handState.BoneRotations[11].y),
            Utilities.MapToByteHalf(handState.BoneRotations[11].z),

            Utilities.MapToByteHalf(handState.BoneRotations[14].x),
            Utilities.MapToByteHalf(handState.BoneRotations[14].y),
            Utilities.MapToByteHalf(handState.BoneRotations[14].z),

            Utilities.MapToByteHalf(handState.BoneRotations[18].x),
            Utilities.MapToByteHalf(handState.BoneRotations[18].y),
            Utilities.MapToByteHalf(handState.BoneRotations[18].z),

            Utilities.MapToByte(handState.RootPose.Position.x),
            Utilities.MapToByte(handState.RootPose.Position.y),
            Utilities.MapToByte(handState.RootPose.Position.z));
        } else if (OVRInput.GetControllerPositionTracked(OVRInput.Controller.LTouch)) {

          var controller = OVRInput.GetLocalControllerPosition(OVRInput.Controller.LTouch);

          var thumbStick = OVRInput.Get(OVRInput.Axis2D.PrimaryThumbstick, OVRInput.Controller.LTouch);

          var indexTrigger = OVRInput.Get(OVRInput.Axis1D.PrimaryIndexTrigger, OVRInput.Controller.LTouch);

          var handTrigger = OVRInput.Get(OVRInput.Axis1D.PrimaryHandTrigger, OVRInput.Controller.LTouch);

          var buttonA = OVRInput.Get(OVRInput.Button.One, OVRInput.Controller.LTouch);

          var buttonB = OVRInput.Get(OVRInput.Button.Two, OVRInput.Controller.LTouch);

          _streamClient.SendPacketLeftController(
            Utilities.MapToByte(controller.x),
            Utilities.MapToByte(controller.y),
            Utilities.MapToByte(controller.z),
            Utilities.MapToByte(thumbStick.x),
            Utilities.MapToByte(thumbStick.y),
            Utilities.MapToByteHalf(indexTrigger),
            Utilities.MapToByteHalf(handTrigger),
            (byte)(buttonA ? 1 : 0),
            (byte)(buttonB ? 1 : 0));
        }

        if (OVRPlugin.GetHandState(OVRPlugin.Step.Render, OVRPlugin.Hand.HandRight, ref handState)) {

          _streamClient.SendPacketRightHand(
            Utilities.MapToByteHalf(handState.BoneRotations[5].x),
            Utilities.MapToByteHalf(handState.BoneRotations[5].y),
            Utilities.MapToByteHalf(handState.BoneRotations[5].z),

            Utilities.MapToByteHalf(handState.BoneRotations[8].x),
            Utilities.MapToByteHalf(handState.BoneRotations[8].y),
            Utilities.MapToByteHalf(handState.BoneRotations[8].z),

            Utilities.MapToByteHalf(handState.BoneRotations[11].x),
            Utilities.MapToByteHalf(handState.BoneRotations[11].y),
            Utilities.MapToByteHalf(handState.BoneRotations[11].z),

            Utilities.MapToByteHalf(handState.BoneRotations[14].x),
            Utilities.MapToByteHalf(handState.BoneRotations[14].y),
            Utilities.MapToByteHalf(handState.BoneRotations[14].z),

            Utilities.MapToByteHalf(handState.BoneRotations[18].x),
            Utilities.MapToByteHalf(handState.BoneRotations[18].y),
            Utilities.MapToByteHalf(handState.BoneRotations[18].z),

            Utilities.MapToByte(handState.RootPose.Position.x),
            Utilities.MapToByte(handState.RootPose.Position.y),
            Utilities.MapToByte(handState.RootPose.Position.z));
        } else if (OVRInput.GetControllerPositionTracked(OVRInput.Controller.RTouch)) {

          var controller = OVRInput.GetLocalControllerPosition(OVRInput.Controller.RTouch);

          var thumbStick = OVRInput.Get(OVRInput.Axis2D.PrimaryThumbstick, OVRInput.Controller.RTouch);

          var indexTrigger = OVRInput.Get(OVRInput.Axis1D.PrimaryIndexTrigger, OVRInput.Controller.RTouch);

          var handTrigger = OVRInput.Get(OVRInput.Axis1D.PrimaryHandTrigger, OVRInput.Controller.RTouch);

          var buttonA = OVRInput.Get(OVRInput.Button.One, OVRInput.Controller.RTouch);

          var buttonB = OVRInput.Get(OVRInput.Button.Two, OVRInput.Controller.RTouch);

          _streamClient.SendPacketRightController(
            Utilities.MapToByte(controller.x),
            Utilities.MapToByte(controller.y),
            Utilities.MapToByte(controller.z),
            Utilities.MapToByte(thumbStick.x),
            Utilities.MapToByte(thumbStick.y),
            Utilities.MapToByteHalf(indexTrigger),
            Utilities.MapToByteHalf(handTrigger),
            (byte)(buttonA ? 1 : 0),
            (byte)(buttonB ? 1 : 0));
        }

          _streamClient.SendPacketHeadset(
            Utilities.MapToByte(Camera.current.transform.localRotation.x),
            Utilities.MapToByte(Camera.current.transform.localRotation.y),
            Utilities.MapToByte(Camera.current.transform.localRotation.z));
      }
    }
  }
}

Hello DJ,
great, of course I tested it right away with 2 MS LiveCams HD-3000
First, there seems to be an error:
have changed it:
Works now, both cameras are transferred and displayed on the two RawImages.
Now about the stereoscopic display, have you tested it with the Oculus?
What I did, first set Per Eye Cameras for the OVR Camera Rig (Thanks DJ, I forgot to mention it).
created 2 new layers 1x left image, 1x right image
assign the respective layer to the two RawImages
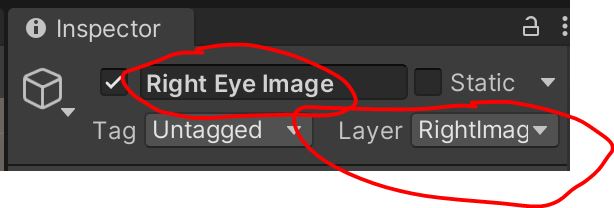
Set the two RawImages to the same position, camera aligned.Camera "LeftEyeAnchor" culling mask changed, layer rightimage switched off (correspondingly switched off on the rightEyeAnchor leftimage)
That's how I did it in my previous tests, with the difference that I didn't use a RawImage but a GameObject (Plane).
And this is exactly where I got problems, both RawImages are displayed on both cameras (leftEyeAnchor rightEyeAnchor). I've tried everything, it doesn't seem to work with a canvas element.
So changed a bit:
Instead of the 2 RawImages I created 2 GameObjects (Plane) and adjusted the code
Otherwise the same as described above.
Is working!
You just have to align the two cameras very precisely (distance approx. 7cm), horizontal is particularly important, otherwise the brain will not be able to put the two images together.....
The PC must also be powerful enough, with my Rock Pi you have a mega delay with only one cam and the two cams are not syncronous, but that's another topic....
That's fantastic feedback - thanks; I'll update the details.
As for synchronizing, the camera images are only updated in the Update() method - so that should have them synchronized.
I wonder why there would be a significant delay? Does a lower resolution help with the delay? I'm wondering if the delay is bandwidth limited or CPU limited.
Oh, also using GAmeObject.Find() might be too slow to use in the Update() method. Perhaps use GameObject.Find() in the constructor and assign the result to a global variable. That way, the global variable holds a reference to the gameobject, so Find() is not needed in Update.
I still have to test more with the Rock Pi, I only tested one cam with it and it had a very large delay. I just got it last week and set it up over the weekend, still have to test it a little...
Yes, I already thought about the GameObject.Find(), you had a corresponding comment in the other code. I just didn't get it, Unity and especially c# is new to me, I'm a bad copy paster (uhhhhh)....
My best thanks for this super skill, it brings me a good deal closer to my ideas!
If you want to force a synchronization heavily, it can be done by modifying these two event methods...
First, add two global boolean variables that will keep the state change of the update.
Next, modify the event methods...
Lastly, in the Update() method, change only to update the textures when both image data have been updated. Your changes to using a Plane will need to be updated in my example below...
This will ensure the textures are only updated once the camera image has been updated
understand, very nice, will insert it
one more question, should the display in ARC of the two cameras already be displayed synchronously?
I don't need it, but I noticed the delay of the two cameras with the Rock Pi, so I immediately continued with my gaming PC and put the Rock Pi aside...
Arc receives the image data as it is streamed from the usb device. Because computers run linear, even "threading" isn’t synchronized at the hardware level. ARC will display the incoming video frame as fast as it arrives and send it over the wire to the oculus.
You can limit the video output frame rate in the camera device settings. That will limit how often the video screen is updated, but will not affect the send to oculus. It is under the advanced tab in the camera device settings.
As for synchronizing on the oculus, the method we provided with global Boolean variables will work, as they wait for both cameras to be updated.
We can go a bit deeper and use stop watches in c# to expire old frame data. But that will have a cost of lowering the framerate.