
Bluetooth control for UBTech Alpha1 servos via ARC: map Vx to servo IDs, enable servos, and integrate with ARC movement & LEDs.
How to add the Ubtech Alpha 1 Bluetooth robot skill
- Load the most recent release of ARC (Get ARC).
- Press the Project tab from the top menu bar in ARC.
- Press Add Robot Skill from the button ribbon bar in ARC.
- Choose the Movement Panels category tab.
- Press the Ubtech Alpha 1 Bluetooth icon to add the robot skill to your project.
Don't have a robot yet?
Follow the Getting Started Guide to build a robot and use the Ubtech Alpha 1 Bluetooth robot skill.
How to use the Ubtech Alpha 1 Bluetooth robot skill
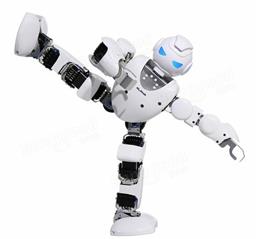
Control UBTech Alpha robot via bluetooth and control servos. The Virtual Servos in ARC will control the UBTech Alpha robot servos. Use the configuration button on this skill to configure what servos are to be used. The Vx servos in ARC correspond to the servo IDs of the UBTech Alpha robot.
For example:
Main Window
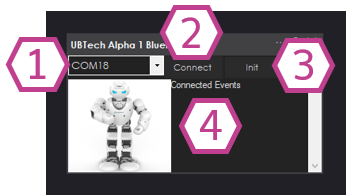
1. COM Port Drop-down Select the Bluetooth COM port that corresponds with the Alpha1 robot connected to your PC.
2. Connect Button Once the proper COM ports is selected, press the Connect button to connect ARC to the Alpha1 3. Init Button Initiates communication with the Alpha1 robot.
4. Status Display Displays text corresponding to what actions are happening with the skill.
Configuration
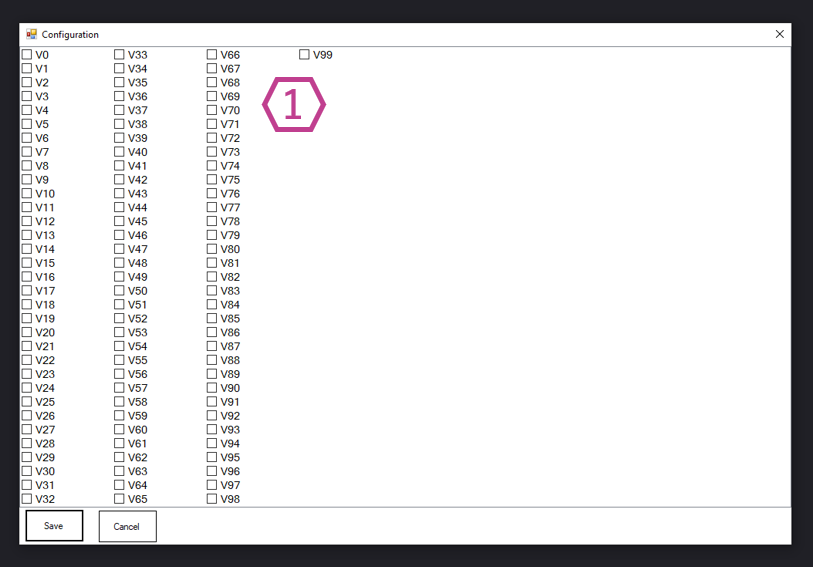
1. Virtual servo Checkboxes Check (enable) each virtual servo that corresponds to the servo ID's you have on your Alpha1. If you would like to control the servo, it will have to be enabled.
How to Use UBtech Alpha1 Bluetooth Skill
Connect your PC to the Alpha1 robot via Bluetooth.
Add the UBtech Alpha1 Bluetooth skill to your ARC project (Project -> Add Skill -> Movement panels -> UBtech Alpha1 Bluetooth).
Select the Bluetooth COM port for the Alpha1 robot and select CONNECT.
Use the configuration menu of this skill to select the servos you wish to control. Place a check in the box beside each servo to control.
Now that you have the skill configured, you may use any skills in ARC that support servos to move the Alpha1 robot. This includes Auto Position, Camera, Joystick, and more.
*Note: When editing scripts in other skills, use the Cheat Sheet or right-click in the editor to see available ControlCommand of this skill. You may connect, disconnect, and control LEDs.

Hi DJ. I installed and tested the plug- in with a slider. ( your post #21). It works well . Response is very quick. When robot is switched on, the servo goes to its center position (0). No handshake needed. Slider effect : all at left: -90, CCW all at right : +10, CW Handshake : goes to center position. Moving the slider now, the limit positions return as above.
Try this latest plugin (Version #9). Connect to the robot and assign Vx servos. Use servo controls to move them.
Tell me if you get the correct range of servo movement.
It doesn't connect !...the button at left of "connect" button is blank , it can't be written , it only turns blue or white. What's it for ?
Oooops - forgot to load the port list in the drop down. Try the latest version #10
OK, plug-in works. Servos perform whole range . -90 : ezb=1 0 : ezb= 72 (about) +90 : ezb= 147 . Exceeding this value servo stalls and may release (internal protection ?) Init centers all servos correctly.
previous test was done moving servos with"real time update " in auto movement control (frames programming). I created 2 frames and an action with them , but execute, jump, transition don't work.
Try version #11 and let me know about the ranges.
ezb=90 : center (exact) ezb=180 : turns CW : + 90 (exact) ezb=0 : turns CCW : almost -90 ( not exact, maybe 87-88 )
Actions not working, as said in post #30.