
Arduino Genuino Uno by Arduino
Firmware
EZ Wheel Encoder firmware for Arduino UNO integrates with Synthiam ARC Wheel Encoder Counter for interrupt-driven encoder tracking and EZB commands.
Convert an Arduino Uno into an EZ-B with DJ's firmware to control servos, read digital ports and PWM.
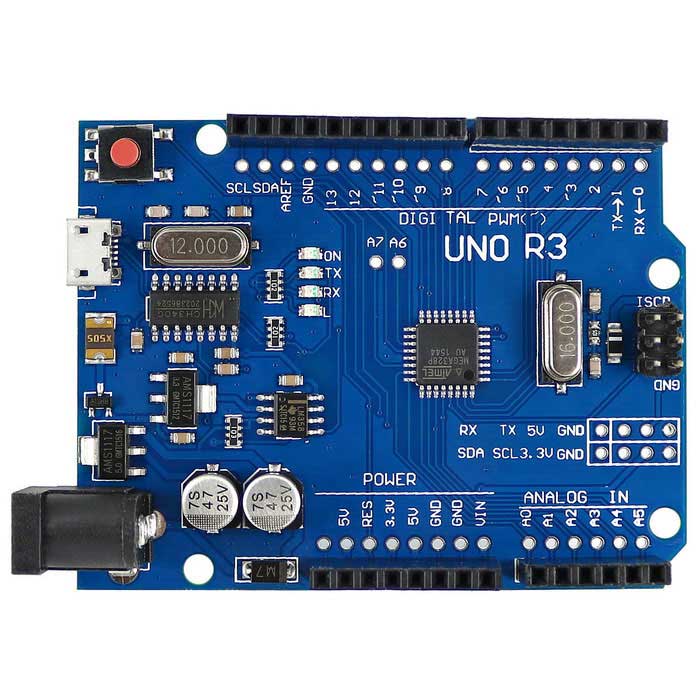
The Arduino / Genuino Uno is a small microcontroller board based on the ATmega328P. A microcontroller is like a tiny computer that can read sensors, turn outputs on/off, and control motors and LEDs. The Uno is one of the most common Arduino boards, which makes it a great choice for beginners because there are lots of examples and community support.
The Uno includes:
- 14 digital pins (labeled D0–D13) for on/off input and output
- 6 analog input pins (labeled A0–A5) for reading changing voltages from sensors
- 6 PWM-capable pins (a special type of digital output used for dimming LEDs or controlling motor speed)
- USB port for connecting to your computer (programming + often power)
- Barrel power jack for an external power supply
- Reset button to restart the program on the board
- ICSP header (advanced programming/pin access; most beginners won’t need this)
When used with Synthiam ARC, the Uno can be loaded (flashed) with EZB firmware. This firmware lets ARC communicate with the Uno so ARC can control the pins (read sensors, set digital outputs, use PWM, etc.) from your ARC project.
Follow the step-by-step tutorial here: Tutorial to compile and upload the firmware
Understanding PWM (for beginners)
PWM stands for Pulse Width Modulation. PWM pins turn ON and OFF very quickly. By changing how long the signal stays ON vs OFF, the Arduino can simulate “partial power.”
- Common uses: dim an LED, control DC motor speed, control some types of buzzers
- Not the same as Servo control: servos use a different style of pulse timing (ARC handles servo signaling depending on your setup/controller)
- PWM frequency is how fast the ON/OFF switching happens. Different boards/pins have different default PWM frequencies.
| Board | PWM Pins | Default PWM Frequency |
|---|---|---|
| Uno, Nano, Mini | 3, 5, 6, 9, 10, 11 | 490 Hz (pins 5 and 6: 980 Hz) |
| Mega | 2 - 13, 44 - 46 | 490 Hz (pins 4 and 13: 980 Hz) |
| Leonardo, Micro, Yún | 3, 5, 6, 9, 10, 11, 13 | 490 Hz (pins 3 and 11: 980 Hz) |
| Uno WiFi Rev2, Nano Every | 3, 5, 6, 9, 10 | 976 Hz |
| MKR boards * | 0 - 8, 10, A3, A4 | 732 Hz |
| MKR1000 WiFi * | 0 - 8, 10, 11, A3, A4 | 732 Hz |
| Zero * | 3 - 13, A0, A1 | 732 Hz |
| Nano 33 IoT * | 2, 3, 5, 6, 9 - 12, A2, A3, A5 | 732 Hz |
| Nano 33 BLE/BLE Sense | 1 - 13, A0 - A7 | 500 Hz |
| Due ** | 2 - 13 | 1000 Hz |
| 101 | 3, 5, 6, 9 | pins 3 and 9: 490 Hz, pins 5 and 6: 980 Hz |
Quick start checklist
- Connect the Arduino Uno to your computer using a USB cable.
- Use the firmware tutorial to compile and upload the EZB firmware: HERE.
- Open ARC and connect to the Uno using the appropriate ARC connection method for your firmware/controller setup.
- Test a simple function first (example: toggle a digital pin with an LED, or read a sensor value) before wiring motors or more complex electronics.

So besides robot stuff, you are a photographer?
nah, just documenting my builds
You have to copy and paste the URL @EzAng if you click on it Synthiam parses the URL and only sends you to Flickr main page.
Nice Builds @TerryBau I love your B9. Amazing work
Oh I see Nick, thought I was only to click on the link like all the others links
I tested - I copied and pasted to my word pad - clicked ctrl and clicked the link went to his robot
copy and past takes me to his robots
just not off this page
Weird that flicker uses the @ character in a url without encoding it. https://stackoverflow.com/questions/19509028/can-i-use-an-at-symbol-inside-urls
oh i see the browser is decoding it. well isn't that something...
@DJ.
Can the ARC Arduino Uno support this Arduino Uno Sensor Shield... https://www.jsumo.com/arduino-uno-sensor-shield if so how many servo port can the Uno use?
Thanks in advance.
That is merely a breakout board for the uno so it’ll work. I don’t know how many servos an uno can do. I’m guessing one for every digital port according to documentation - but not all will have hardware accuracy. There’s information at the top of this page about that
Thanks for checking DJ. Looks like 6 servos or 6 PWMs, What are the other 6 used for quoted on the top of this page..."Number of servos 12" but it does not say which port used for 12 servos. Unless I read it wrong.
Thank you!