
Remote web control of ARC desktop: live screen interaction, movement control, camera list, EZ-Script/ControlCommand console with remote execution.
How to add the HTTP Server robot skill
- Load the most recent release of ARC (Get ARC).
- Press the Project tab from the top menu bar in ARC.
- Press Add Robot Skill from the button ribbon bar in ARC.
- Choose the Remote Control category tab.
- Press the HTTP Server icon to add the robot skill to your project.
Don't have a robot yet?
Follow the Getting Started Guide to build a robot and use the HTTP Server robot skill.
How to use the HTTP Server robot skill
The ARC HTTP Server robot skill lets you control the ARC application (and view your ARC desktop window) from another device using a normal web browser (Chrome, Edge, Safari, etc.). This is useful for controlling your robot from a phone/tablet/laptop on the same network.
http://192.168.1.25 into their browser.
Setup (Step-by-Step)
- Add the skill: In ARC, add the HTTP Server robot skill to your project.
- Open settings: Click the skill’s Config button.
-
Choose a TCP Port:
- The default HTTP port is
80. - If another program is already using port
80(for example IIS, Apache, NGINX, another web server, etc.), ARC will show an error in the status window when you try to start the server. - If that happens, pick another common port such as
8080or8000, save, then restart the HTTP Server skill.
If you use a port other than 80, you must include it in the browser address, for example:http://192.168.1.25:8080 - The default HTTP port is
- Set usernames/passwords: Add the username(s) and password(s) you want to allow to log in. This is how the web pages authenticate users before allowing control.
- Start the server: Start the skill and watch the status/log area for messages indicating the server is running and which port it is using.
-
Connect from another device:
- Find the IP address of the ARC computer (example:
192.168.0.1). - From a different device on the same network, open a browser and go to:
http://<ARC_IP_ADDRESS>(orhttp://<ARC_IP_ADDRESS>:<PORT>if not using port 80). - Log in using the username/password you configured.
- Find the IP address of the ARC computer (example:
Main Menu Features
-
Remote Control:
View the ARC screen and interact with it using left mouse clicks.
Important: Do not use Remote Control from the same PC that is running ARC. It will mirror/control itself and quickly become unusable. Only use it from a separate device.
-
Movement:
Provides a simple movement page (buttons/controls) that sends movement commands to whichever Movement Panel you have added in your ARC project.
- If you do not have a Movement Panel in the project, movement options may not work as expected.
- This page is meant for quick driving/testing—especially on phones and tablets.
-
Camera List:
Shows the cameras currently added to your ARC project and provides links to view their live streams/pages.
- Only cameras that are already added and configured in ARC will appear here.
-
Script Console:
A page where you can send EZ-Script commands to ARC.
It also helps you interact with other robot skills and controls using
ControlCommand(). -
Session List:
Displays which clients are connected to the HTTP Server, including their IP Address and username.
- This can help you confirm that your phone/tablet is connected.
- About: Shows information about the ARC HTTP Server and ARC.
Remote Script Execution (Running EZ-Script from a Browser)
The HTTP Server can run EZ-Script commands remotely. This can be as simple as printing text, moving servos, or even starting actions in other robot skills using ControlCommand().
The Script Console page includes built-in help text, and the sections below explain what you’re seeing.
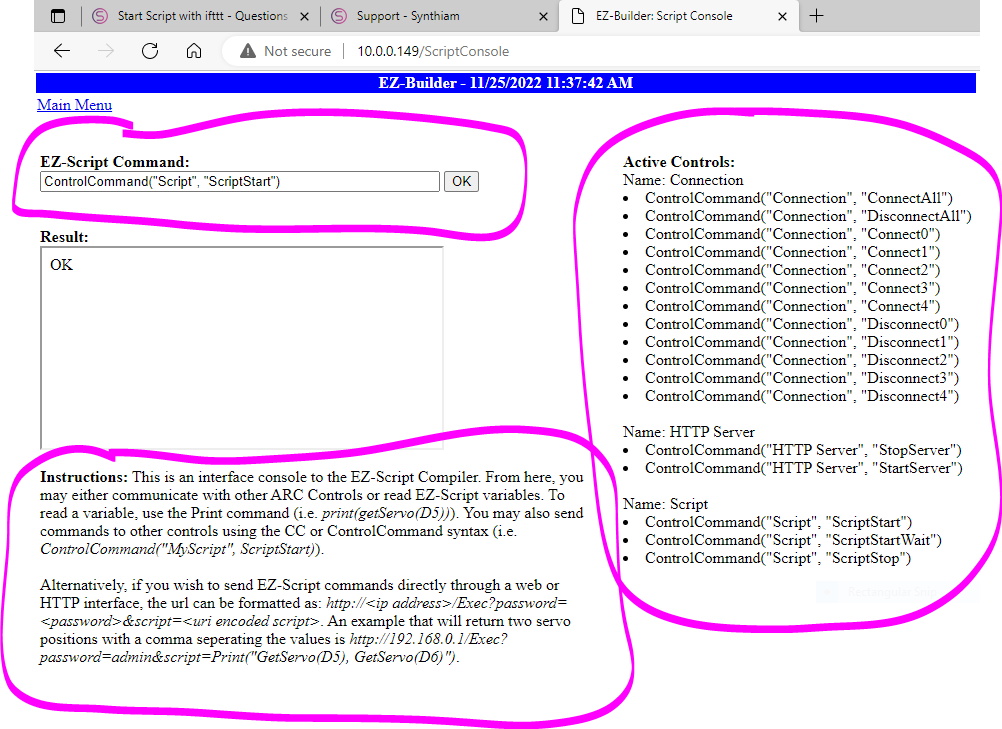
-
Manual command entry (top textbox):
Type an EZ-Script command into the textbox and click OK.
ARC will immediately receive and execute the command.
Example commands you might try:
Say("Hello")Servo(D0, 90)Print("Battery: " + GetBatteryVoltage())(if your project supports it)
-
Available Control Commands (right side list):
This area lists Control Commands for the robot skills and controls in your project.
- These commands are provided for convenience so you don’t have to memorize them.
- Copy a command from the list, paste it into the input textbox, and click OK to run it.
ControlCommand()is commonly used to trigger features inside other skills (for example: start/stop, change modes, run an action, etc.).
-
Remote webhooks / URL execution instructions (bottom section):
You can run a script by calling a specific URL. This is useful if you want another app/service to trigger your robot (for example: Node-RED, Home Assistant, a custom phone app, or a button on a web page).
Use this format:
http://<ip address>/Exec?password=<password>&script=<uri encoded script>Example (prints two servo positions separated by a comma):
https://192.168.0.1/Exec?password=admin&script=Print("GetServo(D5), GetServo(D6)")Beginner tip: URLs cannot contain certain characters (spaces, quotes, etc.) unless they are URL/URI encoded. If your script has special characters, encode it before placing it in thescript=field.
Internet Access (Accessing from Outside Your Home Network)
To access your ARC HTTP Server from the internet (outside your local Wi‑Fi/LAN), you must configure your router using port forwarding.
- Follow your router’s manual for “Port Forwarding” or “Virtual Server”.
- You will forward your chosen TCP port (example: 80 or 8080) to the local IP address of the ARC computer.
Custom Web Pages
This HTTP Server skill provides a set of built-in (static) web pages for controlling ARC. If you want to build your own custom web pages and custom endpoints, use the separate skill: HTTP Server (Custom).

It looks like this is being replaced by the Remote UI App. I wish it would hurry up and pass a review from Apple. It's been almost two months, maybe longer!