
Use camera-detected printed cue cards (direction, pause, start) to record and run stored movement sequences for ARC robots.
 Source Code
How to add the Programming With Pictures robot skill
- Load the most recent release of ARC (Get ARC).
- Press the Project tab from the top menu bar in ARC.
- Press Add Robot Skill from the button ribbon bar in ARC.
- Choose the Camera category tab.
- Press the Programming With Pictures icon to add the robot skill to your project.
Don't have a robot yet?
Follow the Getting Started Guide to build a robot and use the Programming With Pictures robot skill.
How to use the Programming With Pictures robot skill
Using the camera, this skill will allow you to add programming commands by holding up pieces of paper with images printed on them. The concept is to allow programming instructions using visual representations. Each card has an image that represents a specific command, such as move forward, turn right, turn left, or reverse. Using cue cards, the robot can be programmed for specific movements to navigate a maze, for example. The order in which the cards are shown to the robot are stored in memory and determines the path the robot will take. When you're ready to run the program, show the robot the Start card and the program will begin!
*Note: This skill is in experimental stage and is released as proof of concept only. There will be future enhancements to the skill in the future.
Main Window
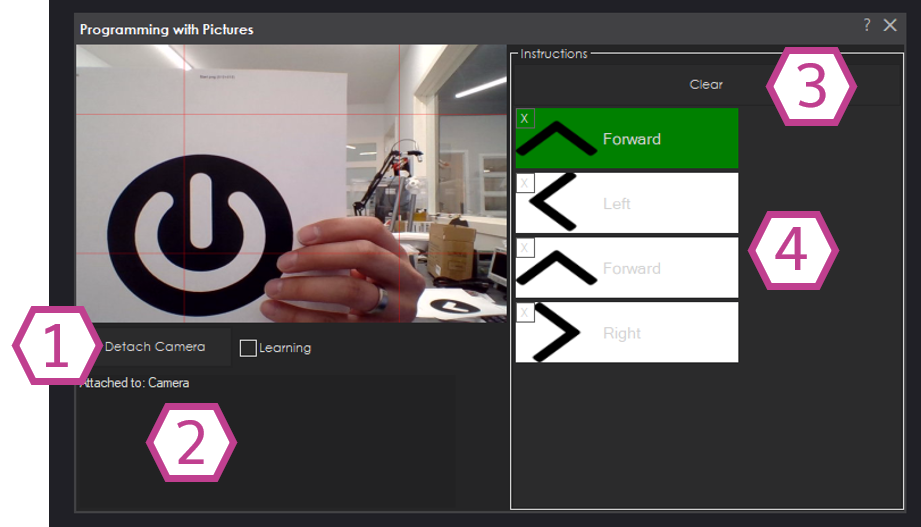
1. Attach/Detach Camera Button This button will attach/detach the camera configured in the camera device skill to the program with pictures skill window.
2. Status Field This field will display the status of the connection to the camera device skill and any errors that occur.
3. Clear Button This button will clear the program that has been added to the program field.
4. Program Field This field will display the detected command images in top-down order. It will also highlight the active command in green when the program is executed (START image recognized).
How To Use Programming with Pictures
Print the images below on full sheets of paper
Add a Camera Device skill to your ARC project (Project -> Add Skill -> Camera -> Camera Device).
Connect to the robot AND to the camera of your robot.
Add a Programming with Pictures skill to your ARC project (Project -> Add skill -> Camera -> Programming with Pictures).
Press the ATTACH button on the Programming with Pictures skill. This will attach this skill to the camera device skill. You will now see a mirror of the camera's video stream in this skill.
Show an DIRECTION (UP, DOWN, LEFT, RIGHT) or PAUSE image to the camera and the commands will be added to the program list.
Show the START image to the camera and the program will run.
Images to Print for Programming
Direction Image - hold the image in any direction you wish the robot to move (Ex: Arrow pointed up to move forward)
Pause Image - robot will pause for 2 seconds between commands

Start Image - the program will begin running when this image is detected


Hi
I followed your instructions, all went well
Where is the code that it generated?
When I click on the source code I get:
https://github.com/synthiam/Behavior_Control_Programming_with_Pictures
Thanks again
Angelo