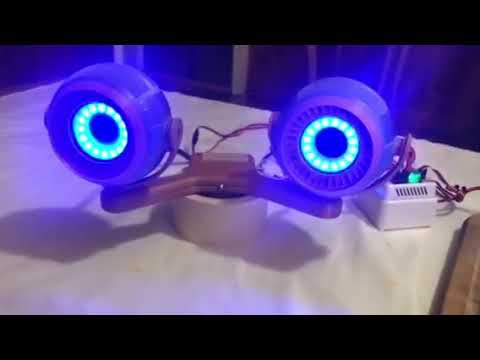

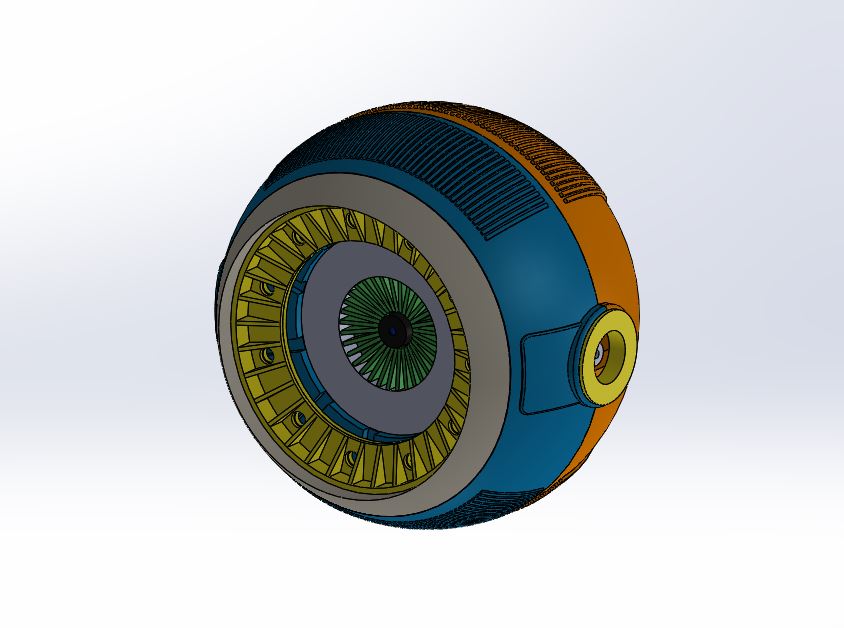
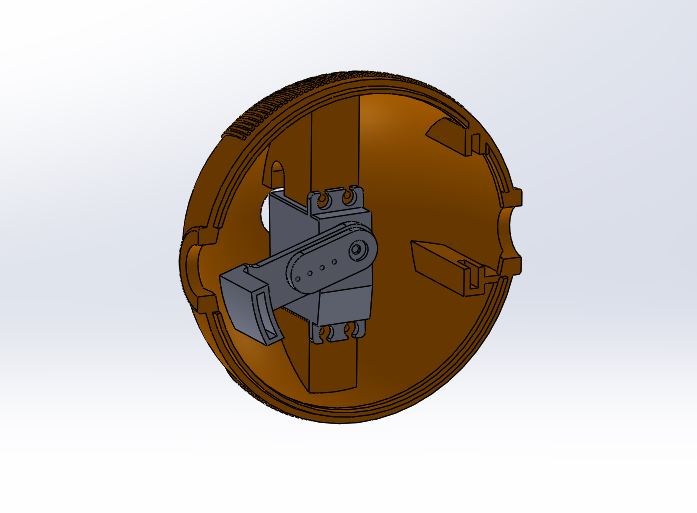
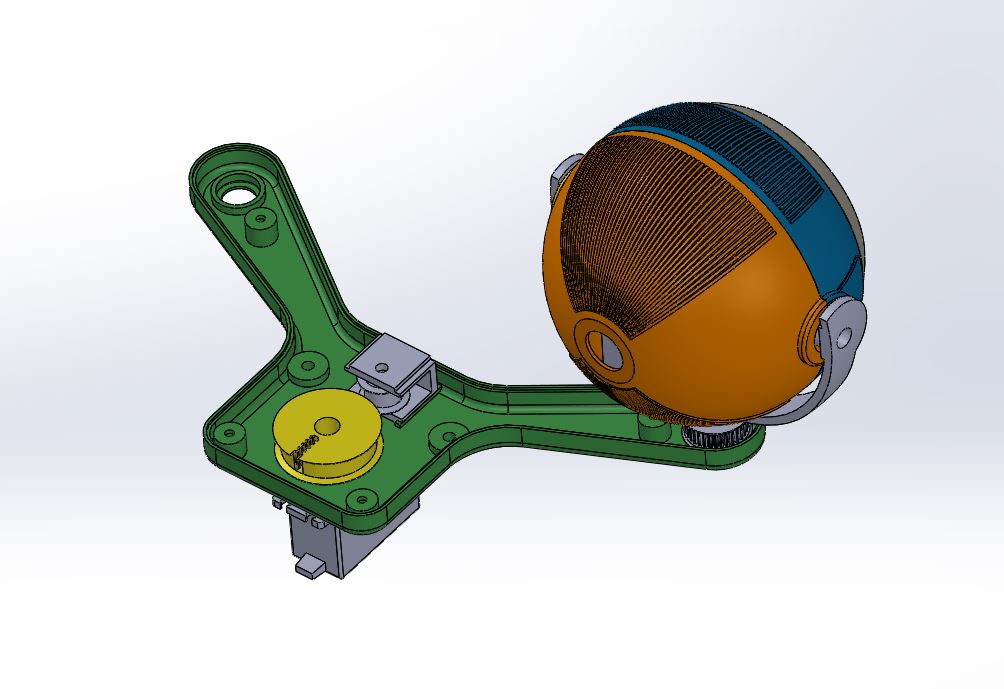
Hello, Now that I have moved on from my Inmoov I have been itching for a project. I would really like something unique and I have been enjoying the design aspect of it. Since I never properly named my Inmoov I am starting with a name. It is Scratch. Because I am sure it will get it's share of dings and scratches but also because I am starting this design from scratch. A singe eye is where I will start. I wanted a gimbled eye that looked kinda cool. It needs to move in the X and Y direction. I wanted it to have some form of interactive feature that could be used to help emote. So a blinkiing iris type of eyelid it will be. I also wanted a camera and a neopixel ring in the eye.
So here we go;

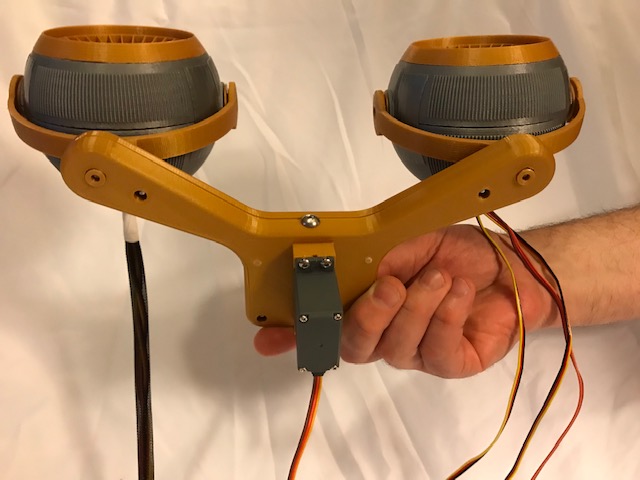
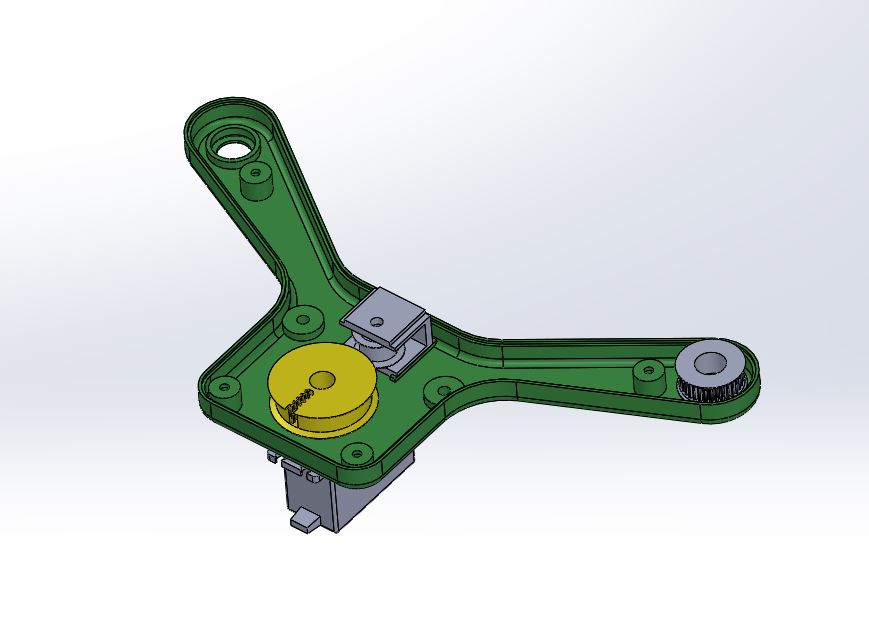
I needed a way to traverse the eyepod and I was considering two eyes for some configurations. So I designed this cross mount. It uses 3D printer belts and printed pulleys. I needed the whole assembly to move extremely smoothly and the linkage arrangements I tried were too jerky. This moves really smoothly.
I am not quite sure where this is going. I was thinking maybe a replacement head for inmoov for people that want something a little different. Maybe it will be part of a walking robot, who knows. I'll post some more information and videos before too long.
Other robots from Synthiam community
Putt's Shorty
Ezang's Robot Arm PCA 9685 Arduino On ARC

Out of CAD and into the real world.
I can't wait to see what the rest will look like.
Looks like a fun project Perry, nice work on the eyes. I'll be watching for your updates.
@Perry, Very nice work on the eyes, from the photos the print quality looks excellent!
The size looks really big given your hand in the photo as a reference? How big will be the head?
As others have said, watching for updates.
Again fantastic work!
Very cool looking, thanks for sharing Perry! Definitely watching for updates as well
Thanks all, I am having fun.
@cem each eye is 100mm in dia. I was thinking this should be an appropriate sized humanoid head for something the size of an inmoov.
It will be bigger than a human head. The way I am looking at this is funny. Inmoov is designed by humans to look mostly human. Mostly but not exact. I am seeing this from the side of an alien race! This design represents what the alien designed as a 3D printed robot to look mostly like them. It's making it fun.
@Perry that's a great idea using printer belts and printed pulleys. would you be willing to share the STL files for the pulleys, that could be most useful in Robot design. I have been working on a female Robot head and I think printer belts and pulleys would be very useful. the Head is normal human size but has the look of an android.
I am starting to get accustomed to the belt and pulleys. I use the 2GT standard. You can find a lot of stuff on Thingiverse or just design your own by looking up the parameters on Google. I did the latter.
Here is a quick vid showing some of the basic eye controls. Mostly a EZR servo touch pad. Have the blink function in there which rapidly closes and opens the iris
Se a few things to fix but holding up pretty good for now.
Wow, looks great!
Your eye balls look great ! I did have a question for you, with the rotation of the eyes from right to left, are both servos connected to a Y harness and to one port on the EZ-B, or are they connected to two separate ports on the EZ-B ? They look really good for right and left rotation.
Hi rsmith, Each eye has it's own Y servo. THey are controlled from seperate ports. IT was the cleanest way I could fit the servos in there. The X motion is controlled by a single servo by the belts and pulleys.
@Perry_S What software are you using to design this? Fantastic quality!
I am using Solidworks. In the past I have used Pro/E, Inventor, and Solidworks. They are all pretty much the same with different mouse clicks. All parametric modelers.
That Iris shutter is so cool! Now I want to build one myself! Never crossed my mind! They are actually pretty big, they could probably just be the head of a small sized, one eyed robot...like the one I am building!
@Mickey666Maus Thanks. I am seeing a lot of cool uses for the eye. The front page on Thingiverse shows a big hex walker. A Single eye would look awesome on that. There is room inside for a battery and IOtiny so technically you could just carry around a single interactive web connected eye.
I'll put the design up on Thingiverse before too long. Need to clean up a few details.
@Perry_S: Cool design... Reminds me the Johnny Five eyes (without the lights)
Are these files shared? I'd love to print one of these and have it on my desk!
Need a bit of cleanup then I will put them up on Thingiverse. I'll post a link here when done.
I can't wait to get these and show them off on The First Layer. Will these fit the InMoov head?
It would be more of a whole head replacement that would fit on an inmoov. I am thinking of taking it that direction.
Or as Richard has said, one could build a 4 meter inmoov and put them in as is. That would be cool.
They look fantastic. I do think you should use some faster servos for the irises, or maybe change the lever system so the servos need to travel less to fully open/close the irises. For expression of emotion they may be fine, but the eye blinking is a little slow IMO. But great work!
Have you gotten any closer to publishing the design files on thingiverse for us yet? I'm super eager to 3d print this and use them for demoing vision recognition features.
Sorry, I have been too busy complaining about your pink sites lack of new content to create any new content of my own. JK and LOL. but I have a Christmas where I do not have to post new software updates for customers so maybe I will just sit down and finish it up. Every design has something ugly you want to hide.
Perry
That’ll be great! Looking forward to having a set of these eyes for my own thanks!
Where's my eyes?!
I do remember making a promise during the webcast. I'm putting them up now.
Had to make a few test prints but I am finally getting this up on Thingiverse. Starting with the mount until the EyePod prints are finished. I need to add more info and hardware descriptions but the files are up.
https://www.thingiverse.com/thing:3356733
Wooo!!! Perfect timing . Thank you very much! I return to Calgary at the end of the week and will be able to start printing this weekend
DJ - I will try to get the rest of the files up by then. Anxious to see your color choices.
Awesome - thanks! So what’s the next project on the list? Any ideas?
I've made my adjustments and uploaded the files for the EyePod here. I'll probably have to provide some instructions.
Here you guys go; https://www.thingiverse.com/thing:3314268
As for next projects I might finish off the rest of this alien robot head. I have been experimenting a lot lately with actuators lately so maybe something big that walks.
Wooow! It's like christmas . I fly home tomorrow morning and hopefully I'll have time to start printing the parts

I'll write a tutorial manual on how to stream your own live event. It would be fun to watch your robot building and experimenting as well!