Scratch

Perry_S

USA
robot video thumbnail

Hello, Now that I have moved on from my Inmoov I have been itching for a project. I would really like something unique and I have been enjoying the design aspect of it. Since I never properly named my Inmoov I am starting with a name. It is Scratch. Because I am sure it will get it's share of dings and scratches but also because I am starting this design from scratch. A singe eye is where I will start. I wanted a gimbled eye that looked kinda cool. It needs to move in the X and Y direction. I wanted it to have some form of interactive feature that could be used to help emote. So a blinkiing iris type of eyelid it will be. I also wanted a camera and a neopixel ring in the eye.

So here we go;

User-inserted image

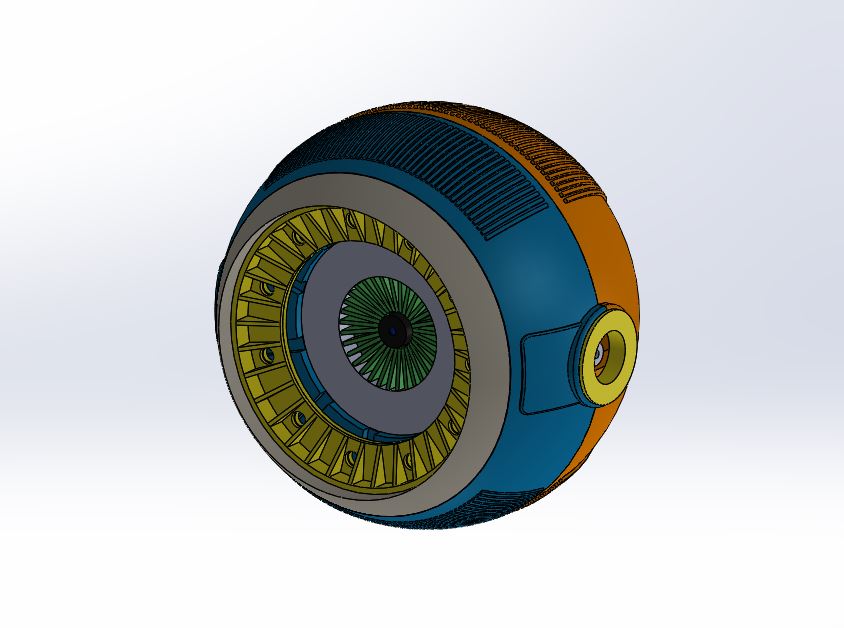
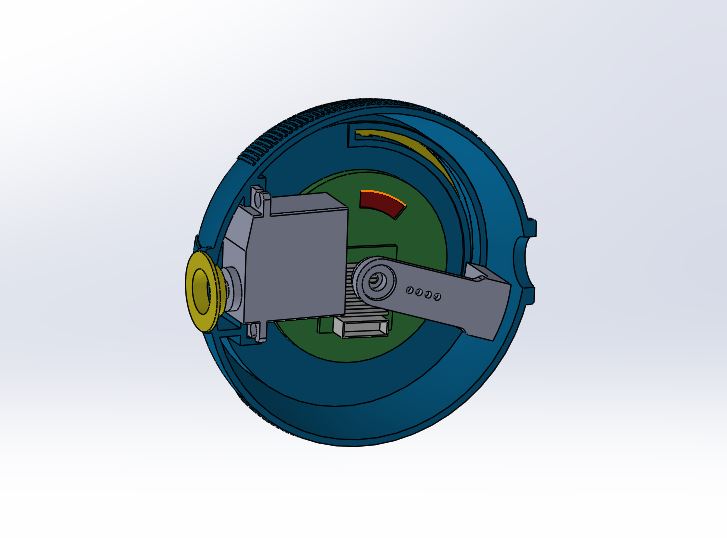
The iris is open here. You can see the white ring houses the neopixel ring and the EZR camera is at the center. I tried some surface detailing to make it cool. At this point I think it is an eyepod!

User-inserted image

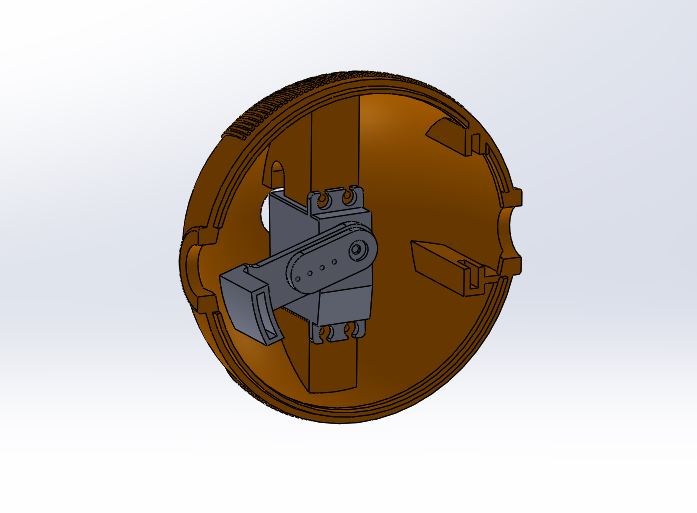
Here you can see the servo arm that will actuate the iris. The camera is visible as is the servo that provides for Y elevation. It was quite the ordeal fitting all the functions in there.

User-inserted image

This is the rear half. The servo is for the iris function. You can also see the features I put in to secure the Y servo.

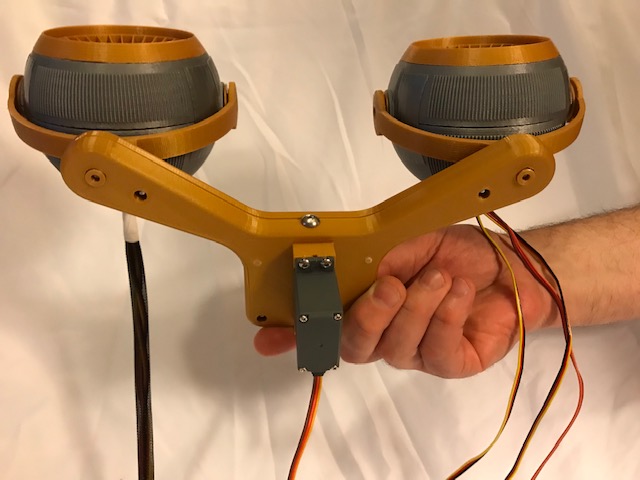
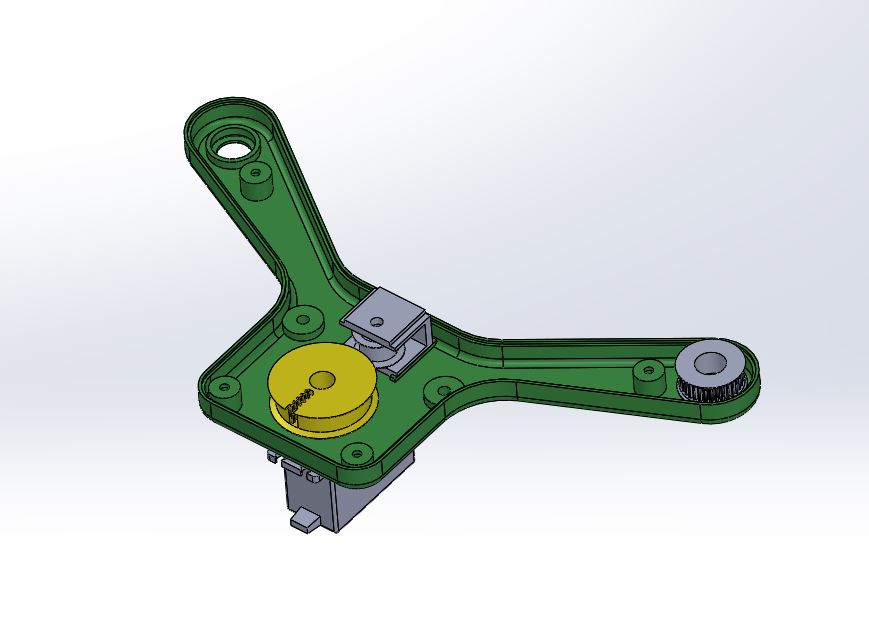
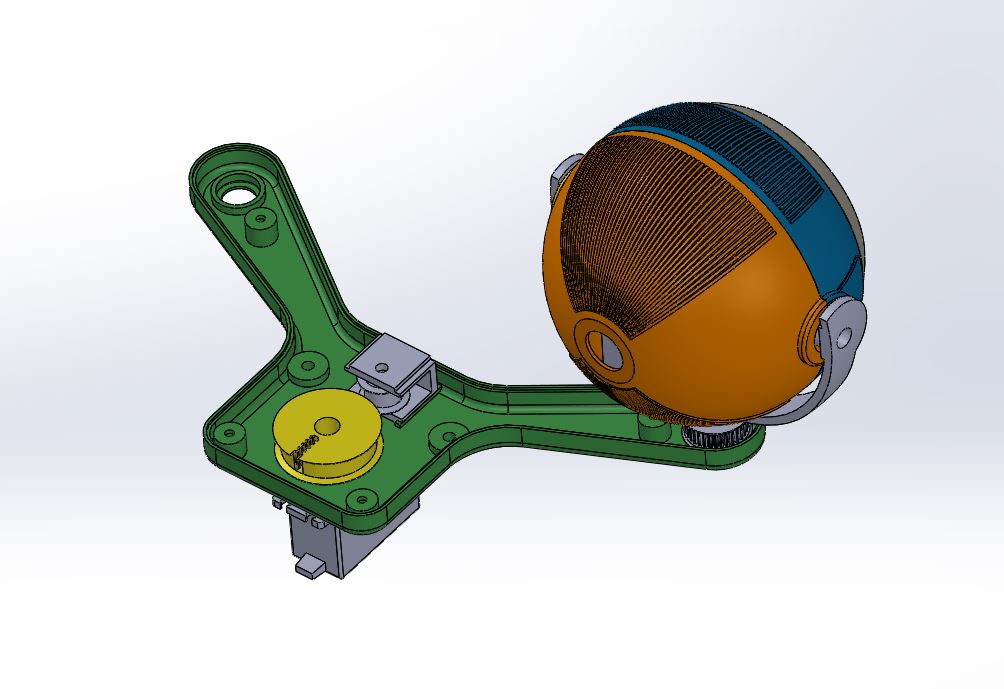
I needed a way to traverse the eyepod and I was considering two eyes for some configurations. So I designed this cross mount. It uses 3D printer belts and printed pulleys. I needed the whole assembly to move extremely smoothly and the linkage arrangements I tried were too jerky. This moves really smoothly.

User-inserted image

User-inserted image

I am not quite sure where this is going. I was thinking maybe a replacement head for inmoov for people that want something a little different. Maybe it will be part of a walking robot, who knows. I'll post some more information and videos before too long.

By — Last update

ARC Pro

Upgrade to ARC Pro

Subscribe to ARC Pro, and your robot will become a canvas for your imagination, limited only by your creativity.

#1  

Out of CAD and into the real world.

User-inserted image

User-inserted image

#2  

I can't wait to see what the rest will look like.

#3  

Looks like a fun project Perry, nice work on the eyes. I'll be watching for your updates.

United Kingdom
#4  

@Perry, Very nice work on the eyes, from the photos the print quality looks excellent!

The size looks really big given your hand in the photo as a reference? How big will be the head?

As others have said, watching for updates.

Again fantastic work!

PRO
Canada
#5  

Very cool looking, thanks for sharing Perry! Definitely watching for updates as well:)

#6  

Thanks all, I am having fun.

@cem each eye is 100mm in dia. I was thinking this should be an appropriate sized humanoid head for something the size of an inmoov.

It will be bigger than a human head. The way I am looking at this is funny. Inmoov is designed by humans to look mostly human. Mostly but not exact. I am seeing this from the side of an alien race! This design represents what the alien designed as a 3D printed robot to look mostly like them. It's making it fun.

#7  

@Perry that's a great idea using printer belts and printed pulleys. would you be willing to share the STL files for the pulleys, that could be most useful in Robot design. I have been working on a female Robot head and I think printer belts and pulleys would be very useful. the Head is normal human size but has the look of an android. :P

#8  

I am starting to get accustomed to the belt and pulleys. I use the 2GT standard. You can find a lot of stuff on Thingiverse or just design your own by looking up the parameters on Google. I did the latter.

Here is a quick vid showing some of the basic eye controls. Mostly a EZR servo touch pad. Have the blink function in there which rapidly closes and opens the iris

Se a few things to fix but holding up pretty good for now.

#10  

Your eye balls look great ! I did have a question for you, with the rotation of the eyes from right to left, are both servos connected to a Y harness and to one port on the EZ-B, or are they connected to two separate ports on the EZ-B ? They look really good for right and left rotation.

#11  

Hi rsmith, Each eye has it's own Y servo. THey are controlled from seperate ports. IT was the cleanest way I could fit the servos in there. The X motion is controlled by a single servo by the belts and pulleys.

#12  

@Perry_S What software are you using to design this? Fantastic quality!

#13  

I am using Solidworks. In the past I have used Pro/E, Inventor, and Solidworks. They are all pretty much the same with different mouse clicks. All parametric modelers.

#14  

That Iris shutter is so cool! Now I want to build one myself! Never crossed my mind!:D They are actually pretty big, they could probably just be the head of a small sized, one eyed robot...like the one I am building!:D

#15  

@Mickey666Maus Thanks. I am seeing a lot of cool uses for the eye. The front page on Thingiverse shows a big hex walker. A Single eye would look awesome on that. There is room inside for a battery and IOtiny so technically you could just carry around a single interactive web connected eye.

I'll put the design up on Thingiverse before too long. Need to clean up a few details.

PRO
USA
#16  

@Perry_S: Cool design... Reminds me the Johnny Five eyes (without the lights)

PRO
Synthiam
#17  

Are these files shared? I'd love to print one of these and have it on my desk!

#18  

Need a bit of cleanup then I will put them up on Thingiverse. I'll post a link here when done.

#19  

I can't wait to get these and show them off on The First Layer. Will these fit the InMoov head?

#20  

Quote:

"Will these fit the InMoov head?"
Sure if you increase inMoov's head size by about 3x... :)

#21  

Quote:

"Will these fit the InMoov head?"

It would be more of a whole head replacement that would fit on an inmoov. I am thinking of taking it that direction.

Or as Richard has said, one could build a 4 meter inmoov and put them in as is. That would be cool.

Belgium
#22  

They look fantastic. I do think you should use some faster servos for the irises, or maybe change the lever system so the servos need to travel less to fully open/close the irises. For expression of emotion they may be fine, but the eye blinking is a little slow IMO. But great work!

PRO
Synthiam
#23  

Have you gotten any closer to publishing the design files on thingiverse for us yet? I'm super eager to 3d print this and use them for demoing vision recognition features.:D

#24  

Sorry, I have been too busy complaining about your pink sites lack of new content to create any new content of my own. JK and LOL. but I have a Christmas where I do not have to post new software updates for customers so maybe I will just sit down and finish it up. Every design has something ugly you want to hide.

Perry

PRO
Synthiam
#25  

That’ll be great! Looking forward to having a set of these eyes for my own:) thanks!

PRO
Synthiam
#26   — Edited

Where's my eyes?!:D

#27  

I do remember making a promise during the webcast. I'm putting them up now.

#28  

Had to make a few test prints but I am finally getting this up on Thingiverse. Starting with the mount until the EyePod prints are finished. I need to add more info and hardware descriptions but the files are up.

https://www.thingiverse.com/thing:3356733

PRO
Synthiam
#29  

Wooo!!! Perfect timing:D. Thank you very much! I return to Calgary at the end of the week and will be able to start printing this weekend

#30  

DJ - I will try to get the rest of the files up by then. Anxious to see your color choices.

PRO
Synthiam
#31  

Awesome - thanks! So what’s the next project on the list? Any ideas?

#32  

I've made my adjustments and uploaded the files for the EyePod here. I'll probably have to provide some instructions.

Here you guys go; https://www.thingiverse.com/thing:3314268

As for next projects I might finish off the rest of this alien robot head. I have been experimenting a lot lately with actuators lately so maybe something big that walks.

PRO
Synthiam
#33  

Wooow! It's like christmas:D. I fly home tomorrow morning and hopefully I'll have time to start printing the parts:D:D

I'll write a tutorial manual on how to stream your own live event. It would be fun to watch your robot building and experimenting as well!