Project Armadeus

Jim Milan

USA

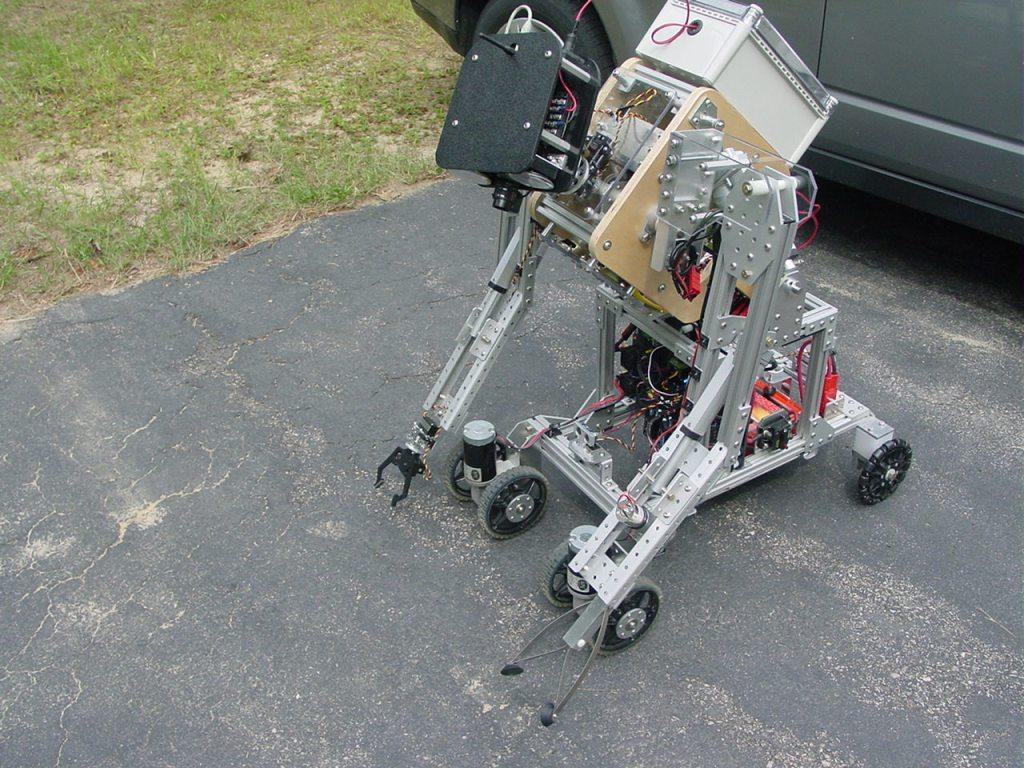
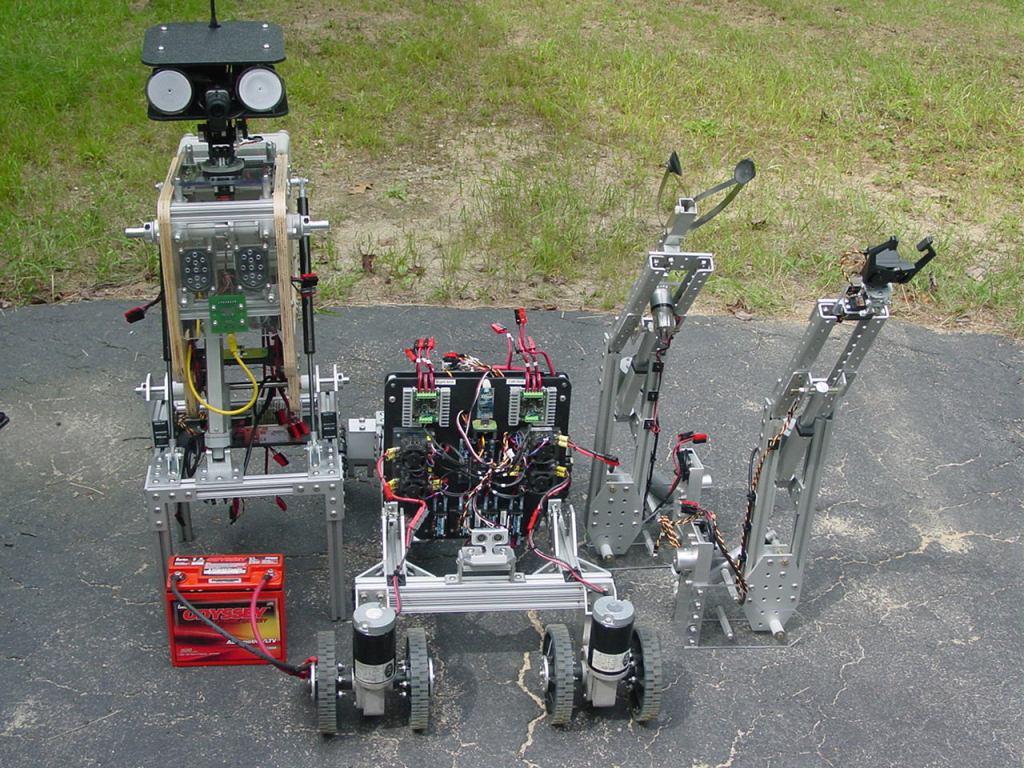
For the last decade or more I've been working on a series of large robots with articulated arms. I just finished the latest version, ARMadeus Mk7. Considered mid-size compared to some of its descendents, it measures 48" tall and weighs 112 pounds. Some of the main components include:

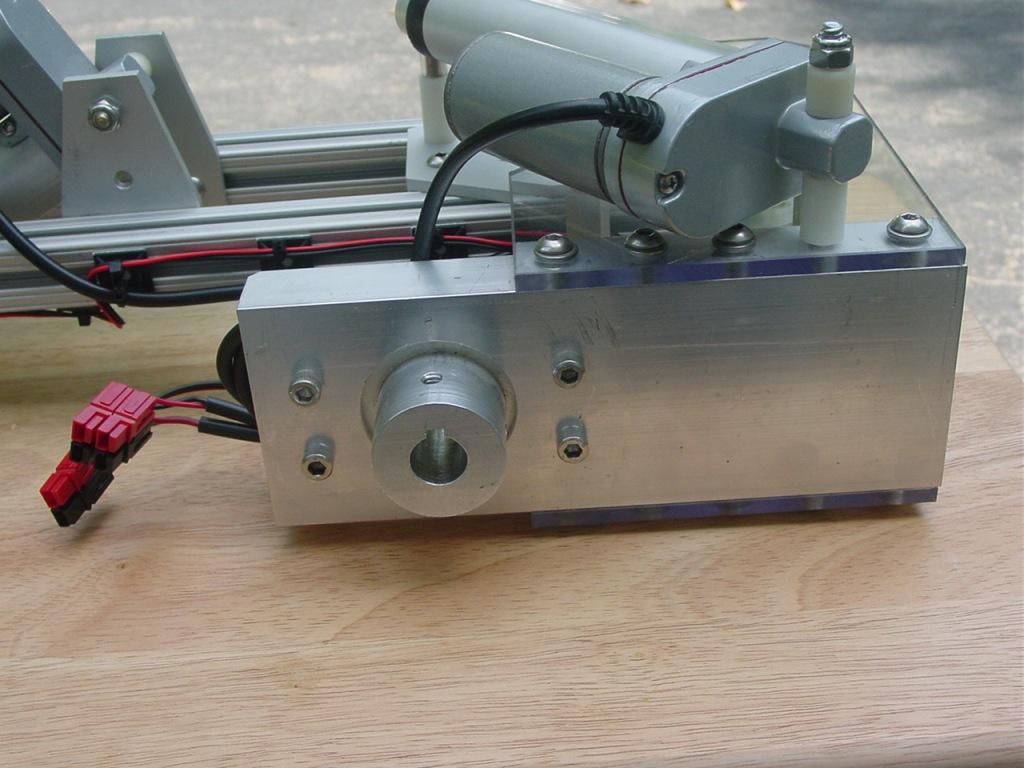
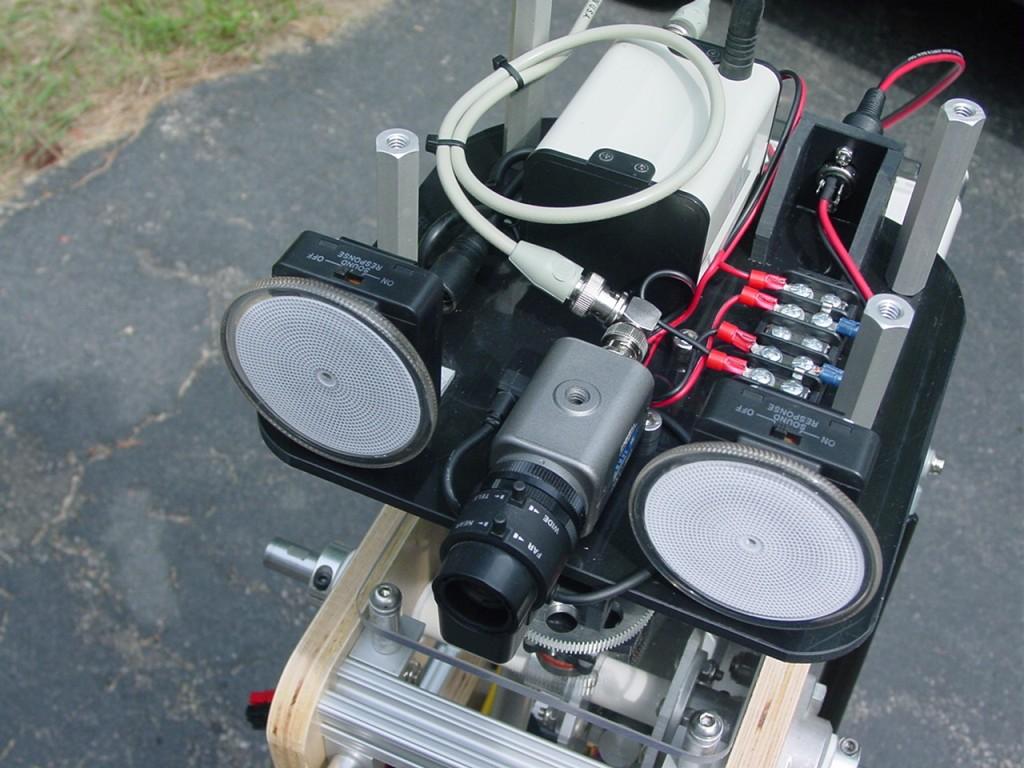
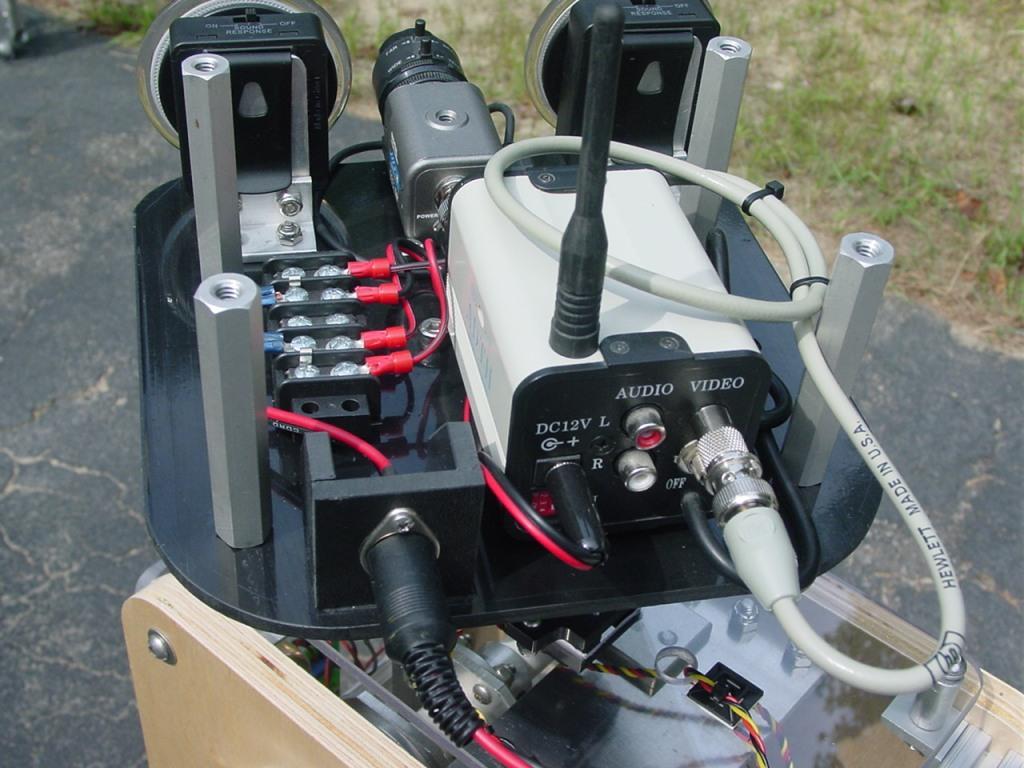
(3) 12V DC gear motors (4) Servos (6) 12V linear actuators (4) IFI Victor 12V speed controllers (2) Sabertooth 2x12 speed controllers (2) IFI Spike H-Bridge relay modules (1) Audio player (1) video camera w/ 2.4GHz transmitter

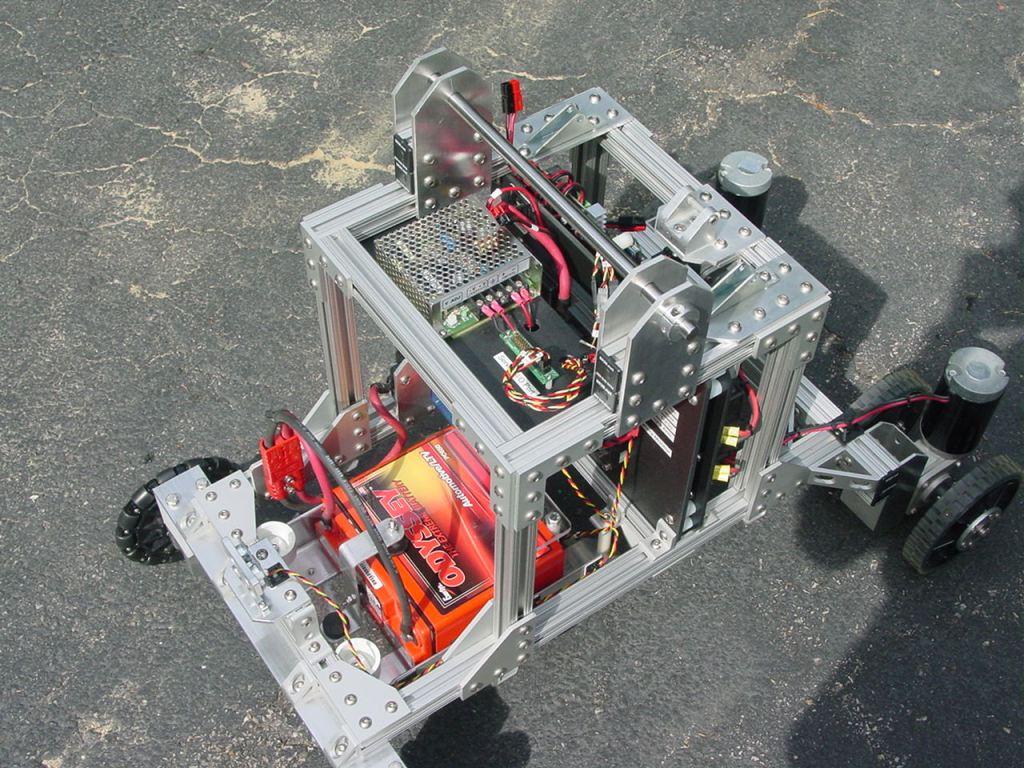
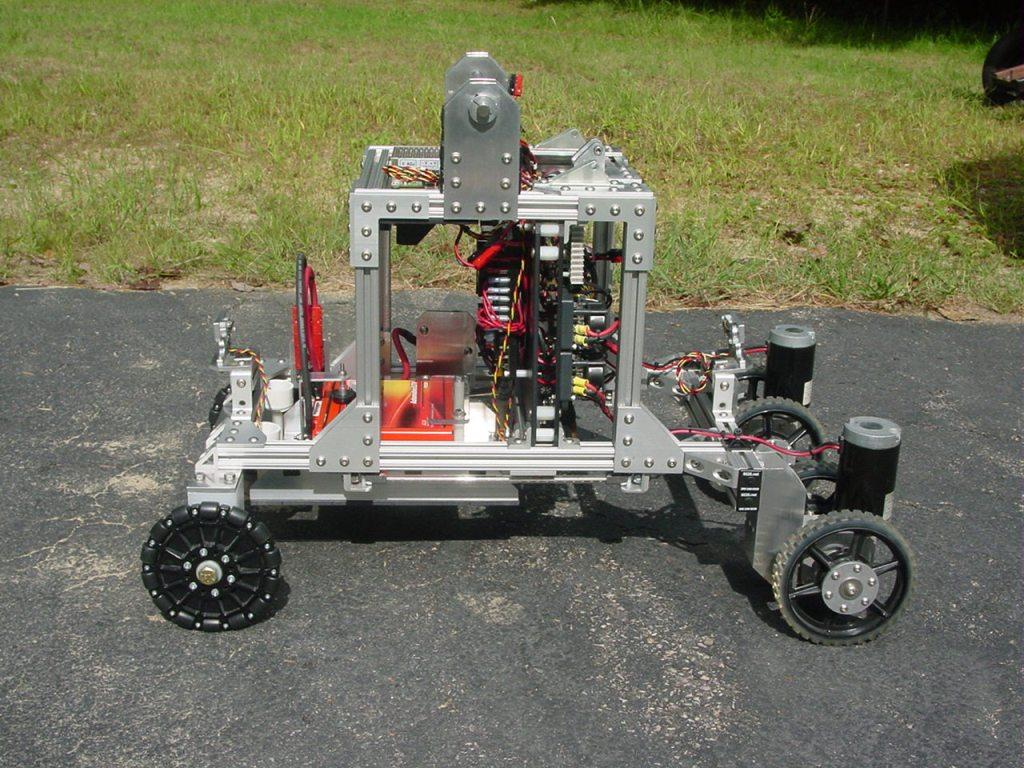
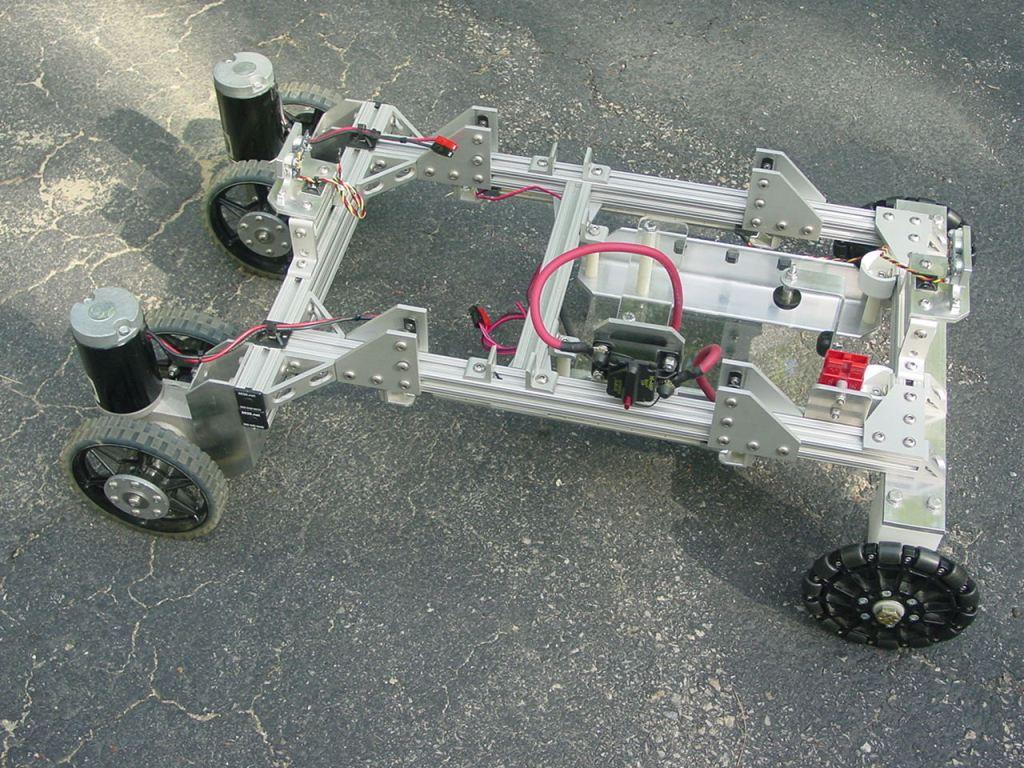
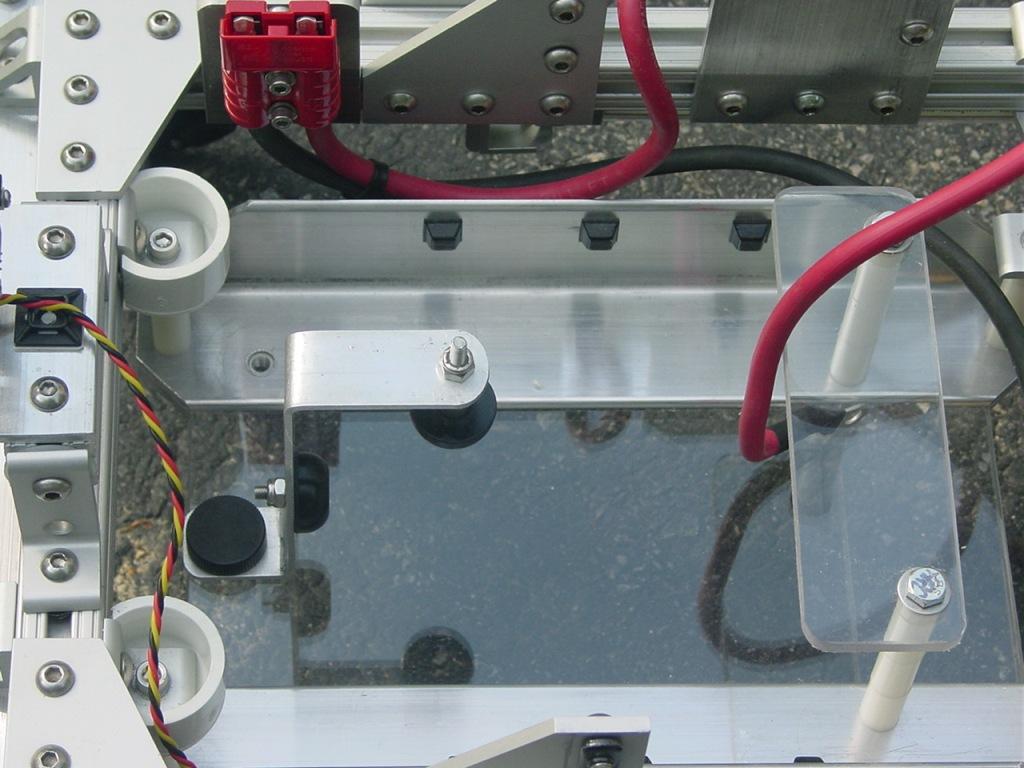
There are two common features that I consider essential when designing large-scale robots, adjustability and modularity. All of the ARMadeus robots have been built using 80/20 aluminum t-slotted extrusions and joining plates. It allows for flexibility in repositioning parts without having to drill holes. The first picture shows the lower 21" wide x 32" long lower chassis and drive train.

User-inserted image

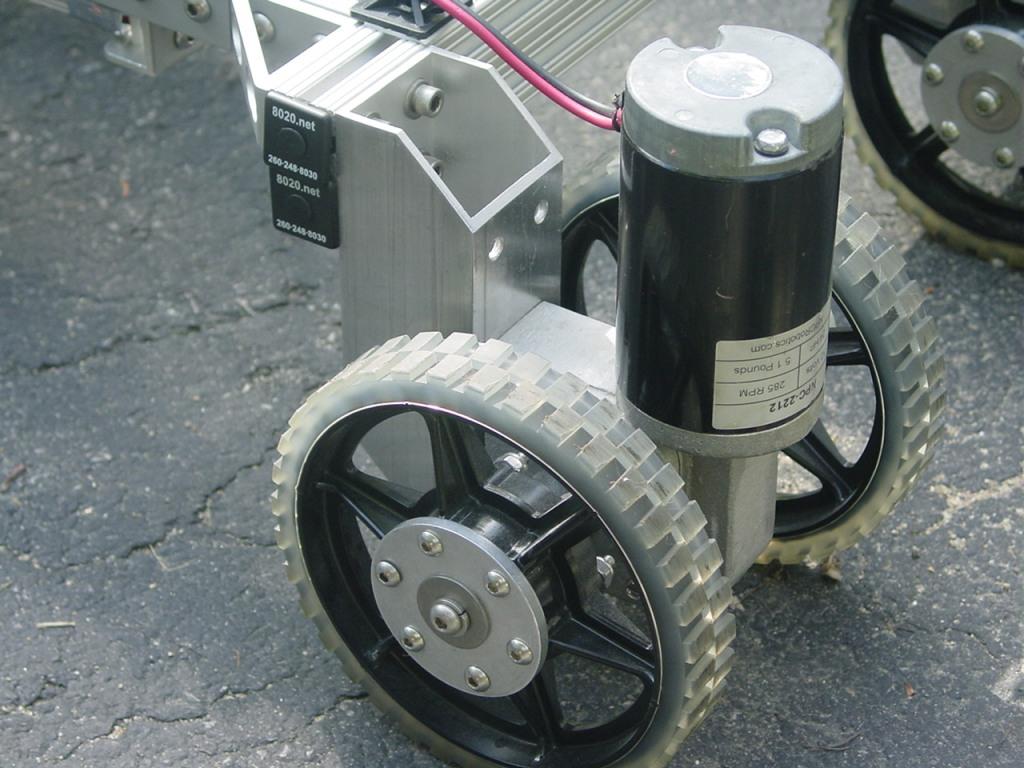
Here's a closeup of one of the drive units, consisting of an NPC 2212 12V 285 rpm gear motor and 2 AndyMark 6" HiGrip wheels.

User-inserted image

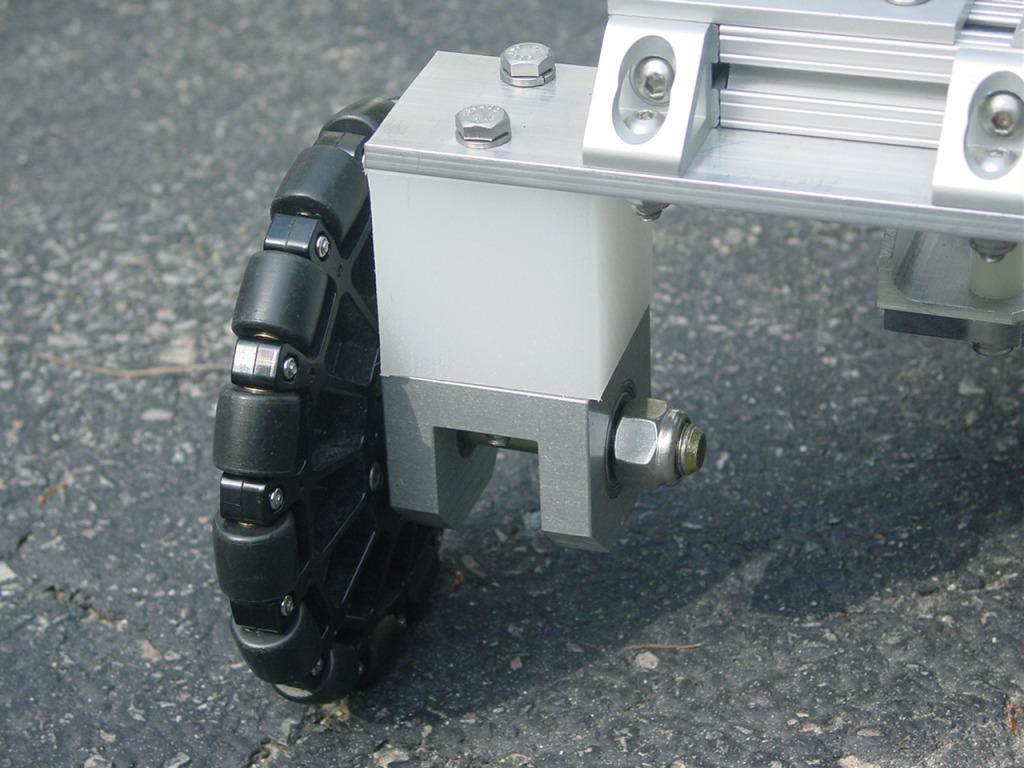
The rear wheel assembly uses an AndyMark 6" Omni wheel.

User-inserted image

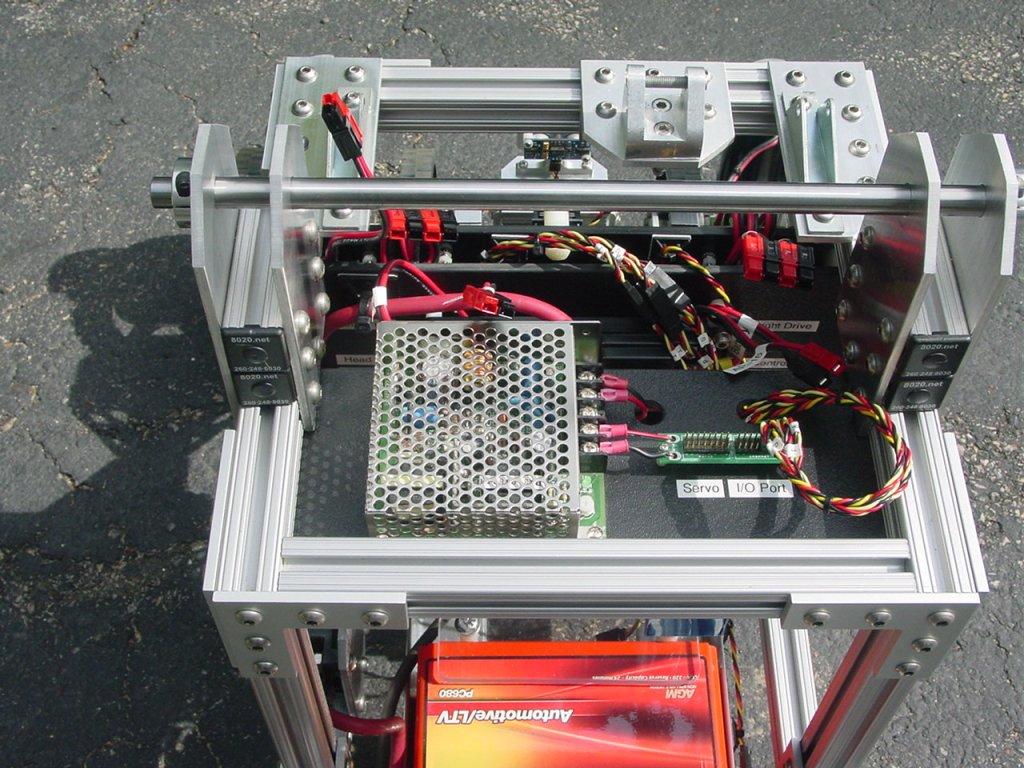
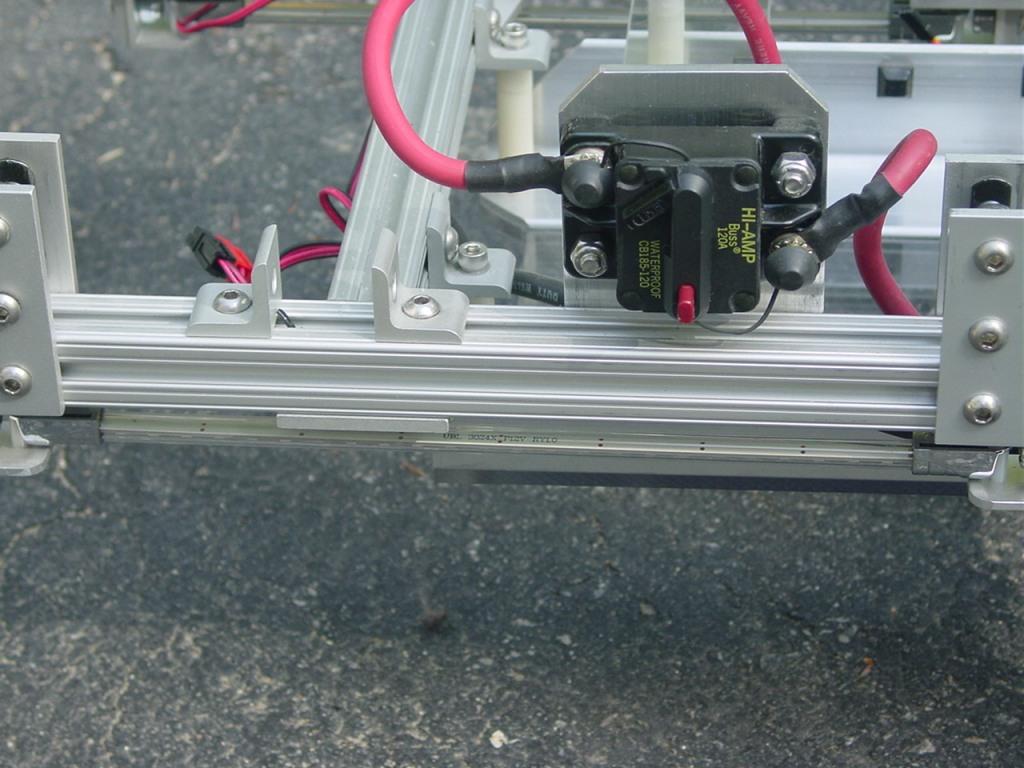
On one side of the chassis is the main power switch/120 Amp circuit breaker. A blue LED light tube for effect lighting can be seen just under the chassis rail.

User-inserted image

The robot is powered by 12V 17AH Sealed Lead Acid battery. The 15 lb battery is mounted horizontally on a tray near the back of the robot and acts a counterweight when the robot arms and torso are fully extended.

User-inserted image

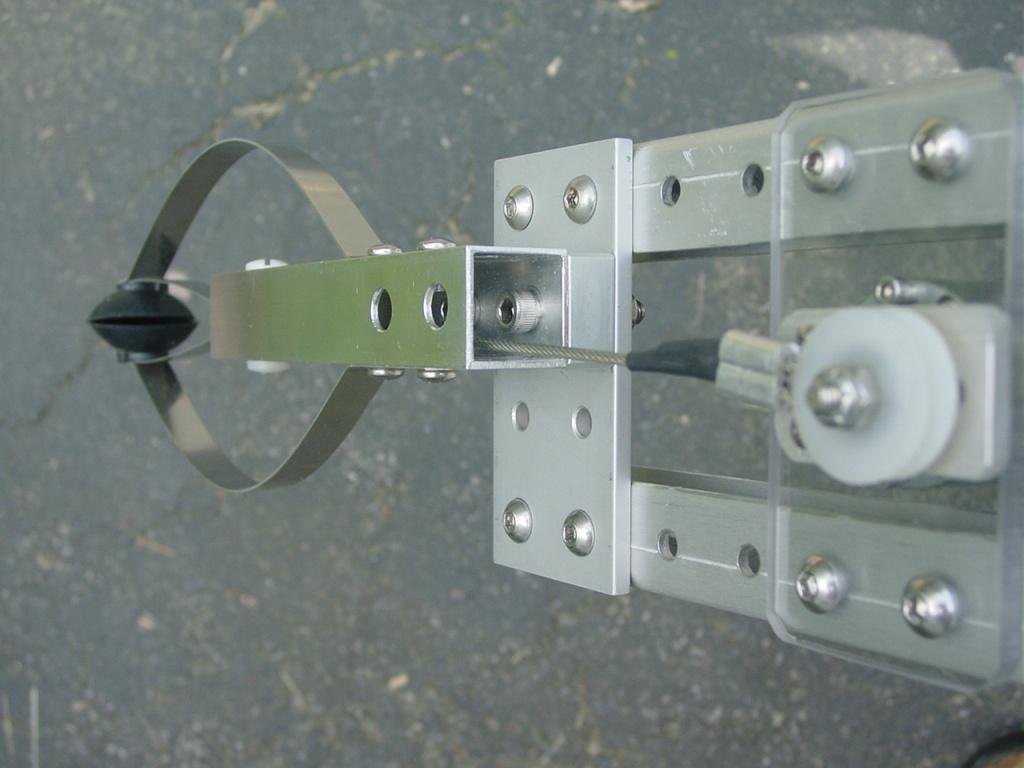
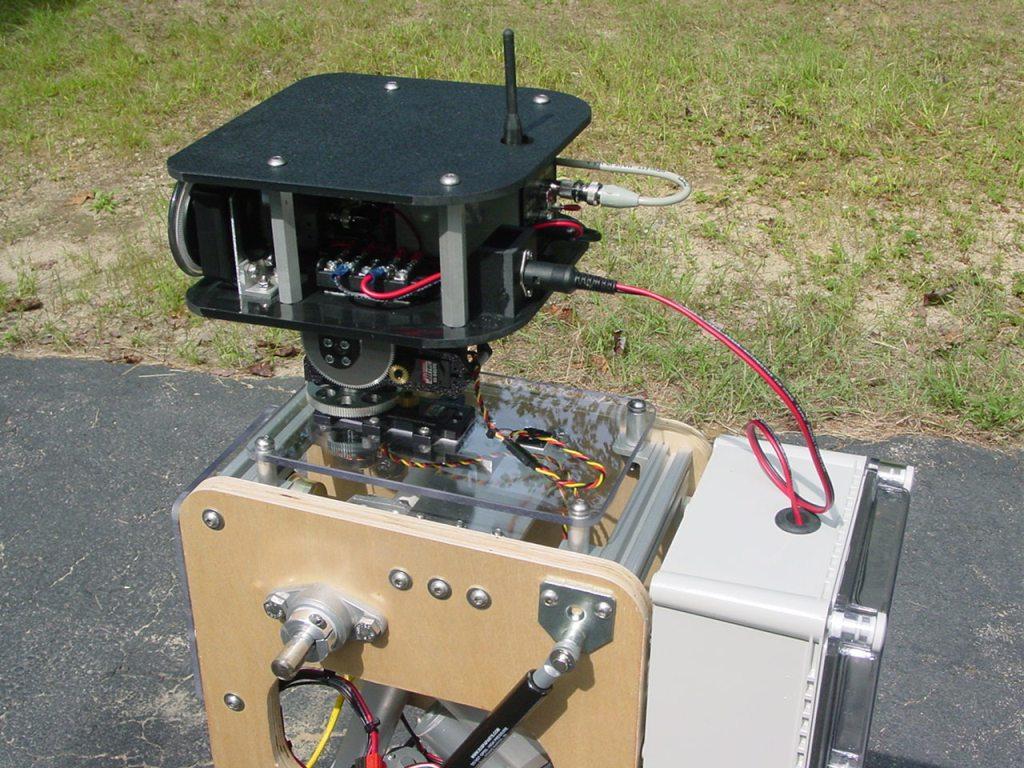
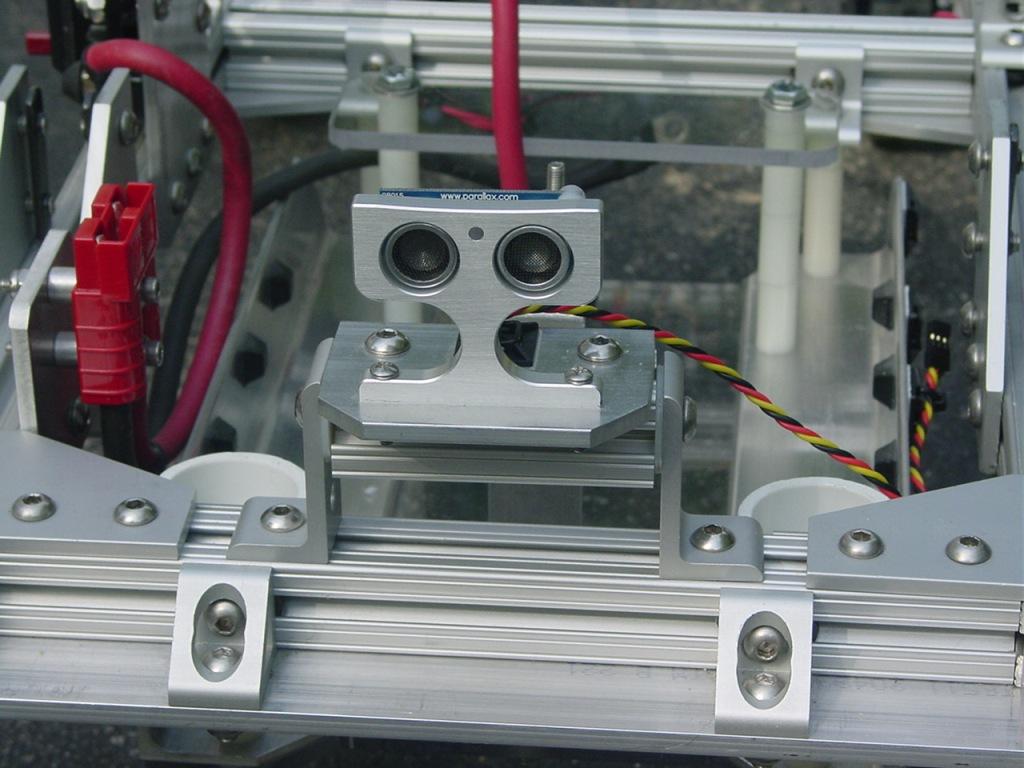
Front and rear Parallax PING sensors are mounted on tilting brackets as shown below.

User-inserted image

I will post pictures of the remaining subsystems and the completed robot during the next few days.

By — Last update

ARC Pro

Upgrade to ARC Pro

ARC Pro is your gateway to a community of like-minded robot enthusiasts and professionals, all united by a passion for advanced robot programming.

#1  

Let me be the first to say "wow"!

Can't wait to see the rest.

#2  

Sweet,.it's like the adult version.of erector set. I bet that guy will be heavy. I love pictures, hope to.see them soon.

#3  

oh cool were did you get the power source eek

#4  

The drive motors and battery are available from Robot MarketPlace.

Spain
#5  

Excellent construction, I can see steel screws on the frame, good choice, I'm looking forward to the rest of the body.

#6  

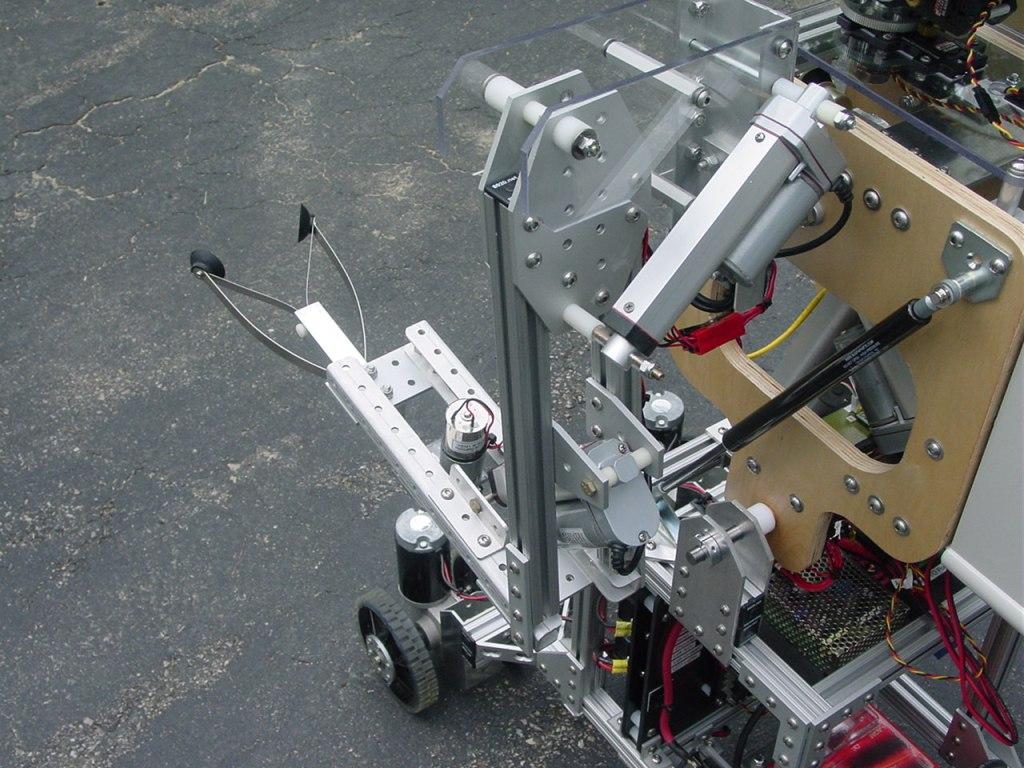
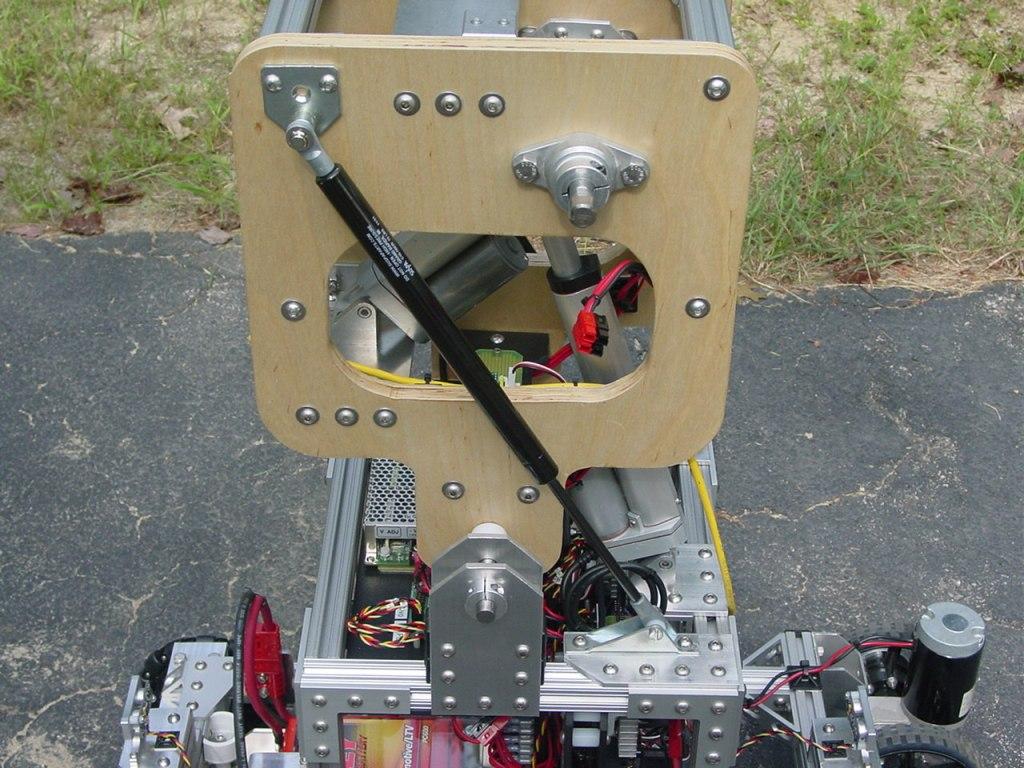
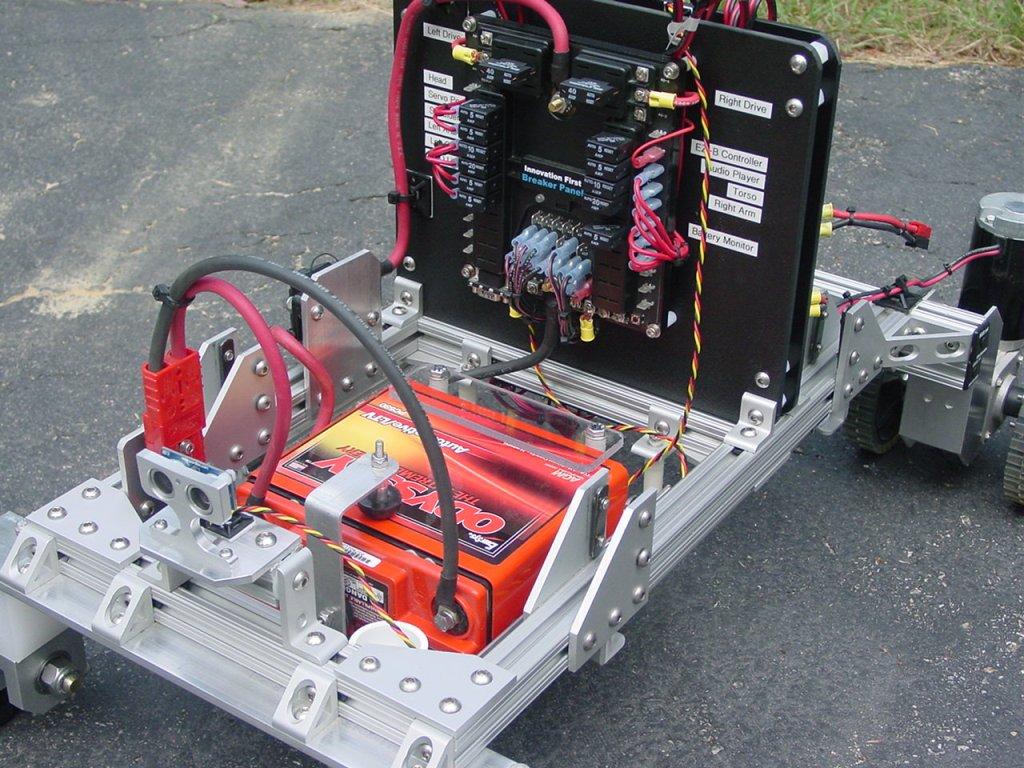
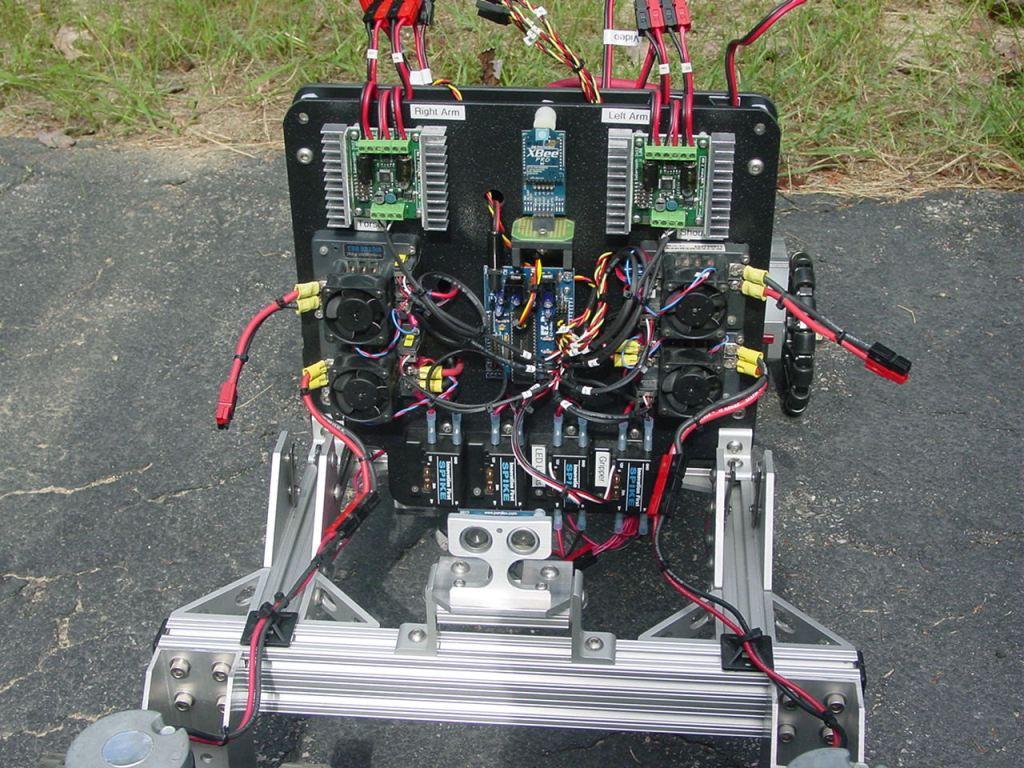
Here is the second installment of the ARMadeus Mk7 build report. Two panels made from 1/4" thick ABS sheets, mounted back to back with 3/4" long threaded nylon spacers, form the electronics module. The rear panel houses a power distribution circuit breaker assembly which feeds 12V power from the battery to the branch circuits for the actuator controls. The front actuator circuits panel contains the six electronic speed controllers and two H-Bridge relay modules along with the EZ-B controller. These components are arranged in a star pattern. The power inputs to the actuator controls are placed towards the center of the panel with the power outputs at the outer edges. Power wires to the actuator controls are routed between the two panels. This keeps the wires short and out of the way. Anderson Powerpole connectors are used extensively for connections to the motors. The whole electronics module drops in place on the lower chassis frame rails between pairs of right angle brackets. The construction method allows the electronics core to be assembled and tested independently of the robot frame.

Rear view of the robot showing the main battery connections to the power distribution panel. Each branch circuit has its own resettable circuit breaker ranging from 5 to 40 Amps.

User-inserted image

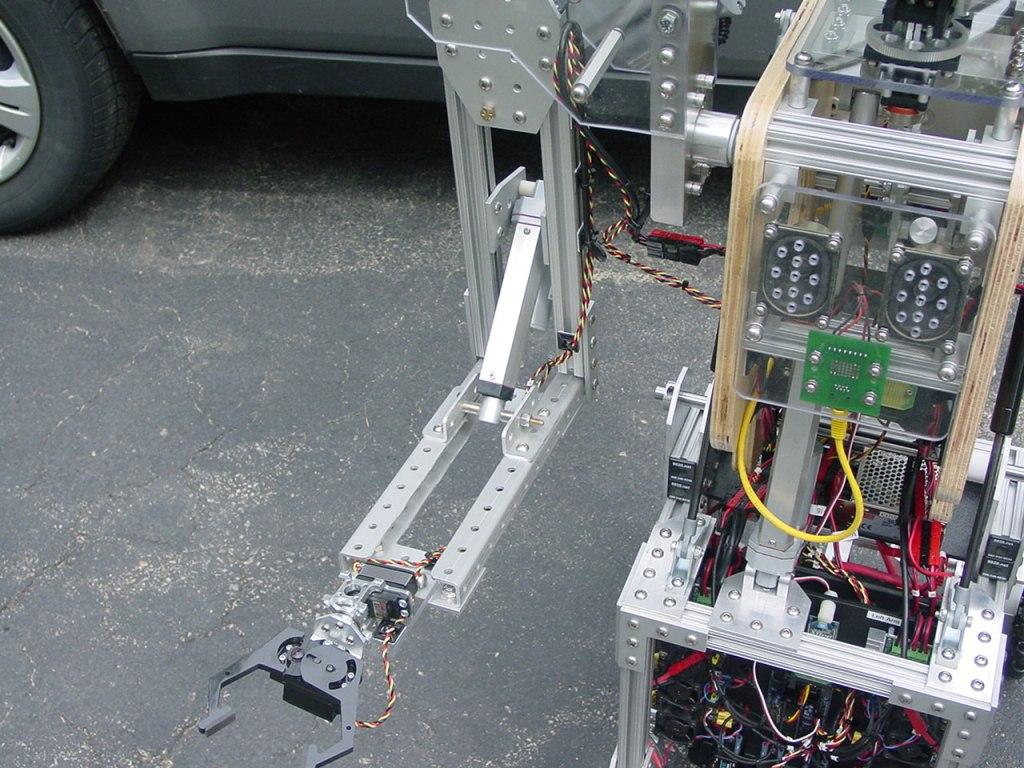
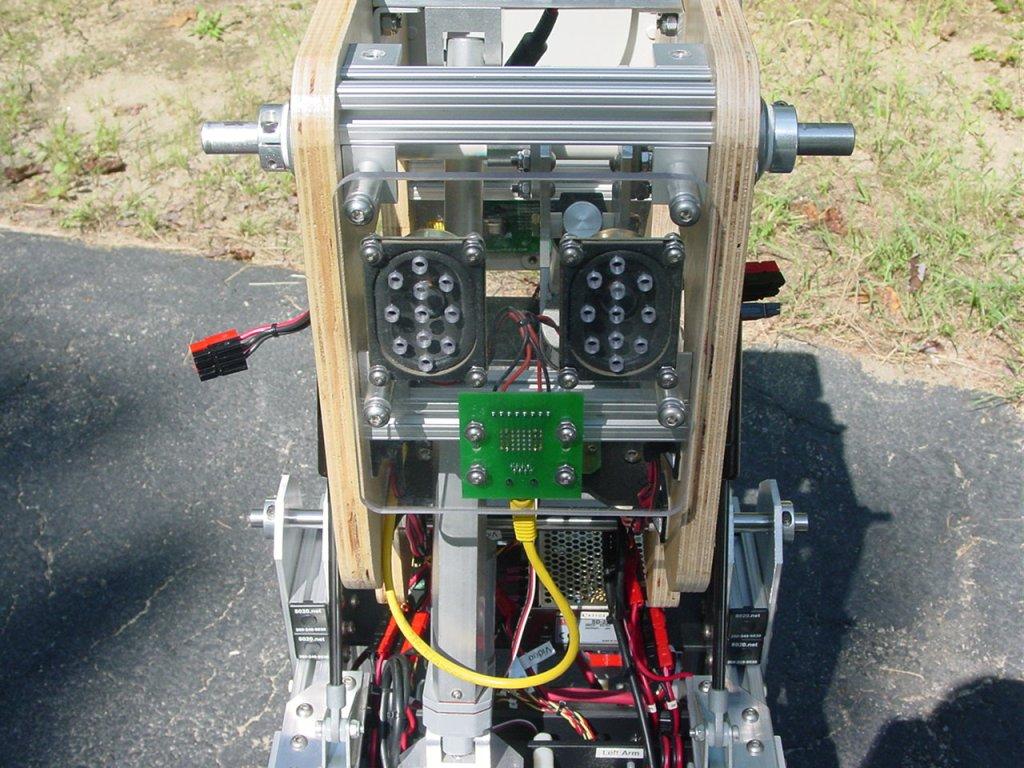
Front view of the robot showing the actuator control panel of the electronics module. This is where the magic happens. Kudos to DJ and all the folks at EZ Robot. Because of the EZ-B I was able to achieve this much functionality. I am using 17 of the 20 Digital ports and 1 ADC port. I did replace the Bluetooth controller with a longer range XBee Pro. There are 2 Sabertooth 2x12 units at the top of the panel. One is operated in serial mode the other in RC mode. Below the Sabertooths are the vintage IFI 12V Victor 883 speed controllers. The IFI Spike H-Bbidge relay modules are mounted at the bottom of the panel. Two are being used, the other two are spares for possible future expansion.

User-inserted image

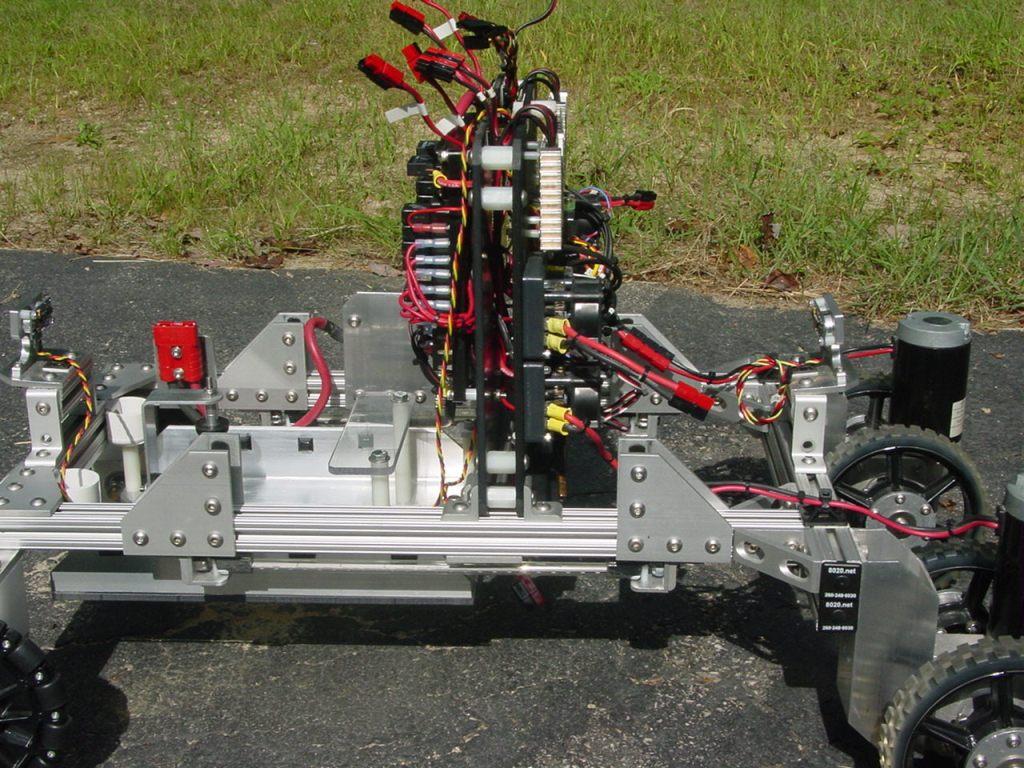
A side view of the robot showing the completed electronics module mounted to the frame.

User-inserted image

The next installment will detail the upper chassis featuring a servo power supply and the hip joint between the frame and the torso.

Spain
#7  

Totally amazing! This construction certainly pass a homologation for marketing, also seems out of a robot factory! :)

#8  

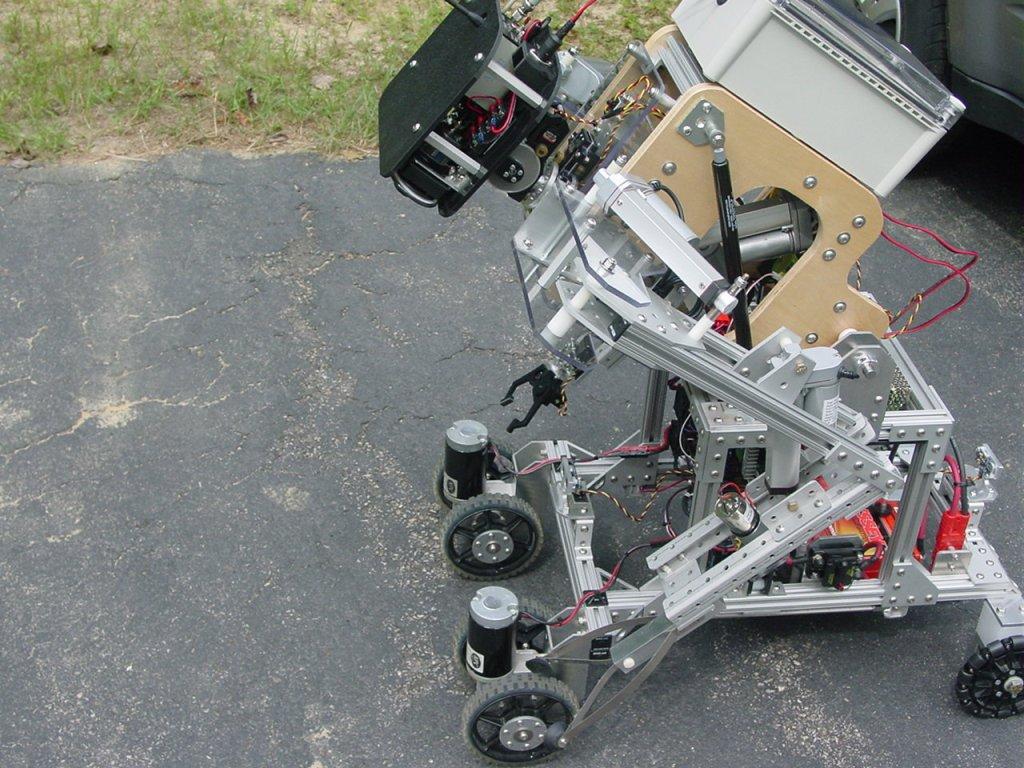
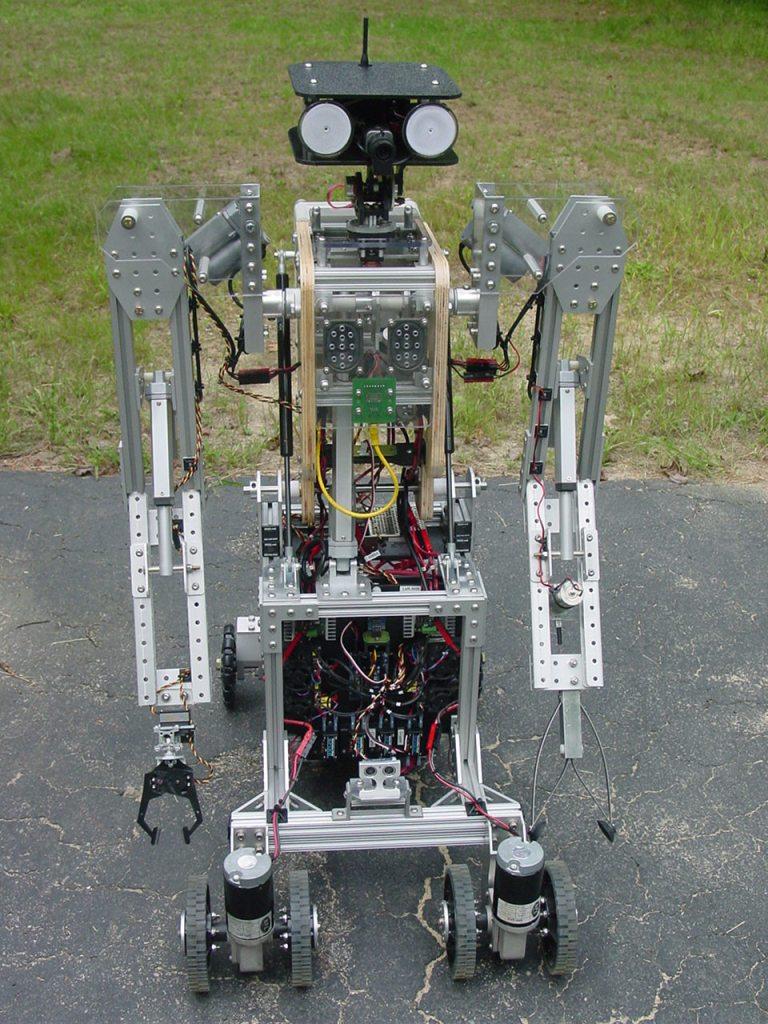
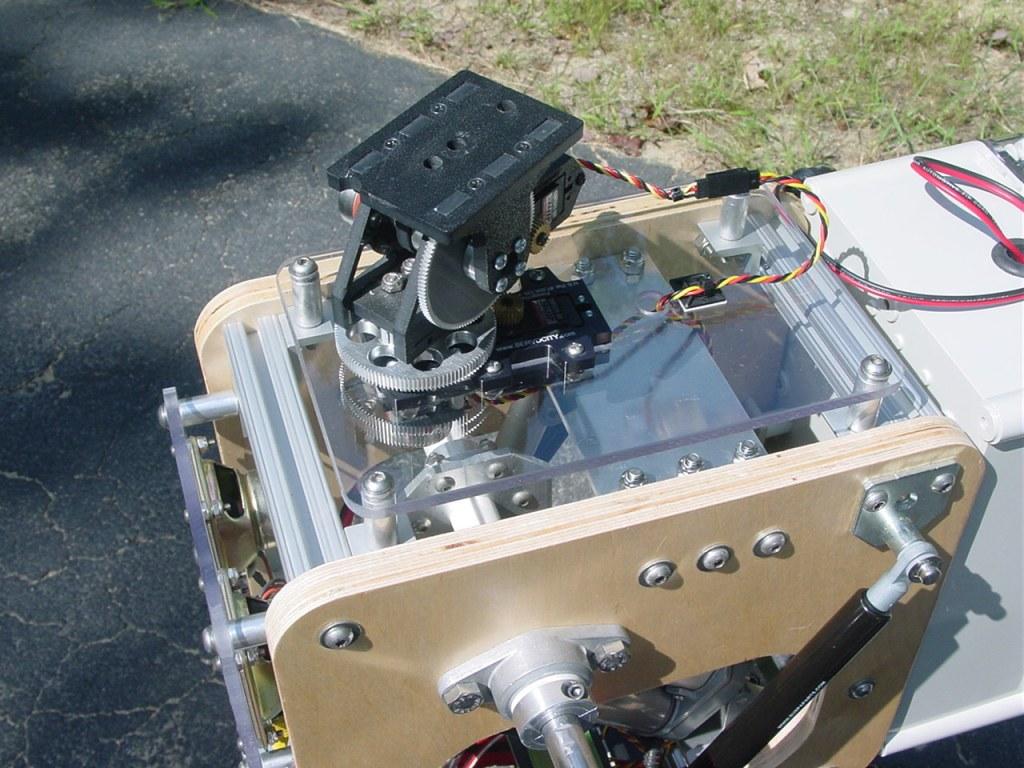
The upper chassis is essentially a cube, 12" on a side, constructed of 80/20 aluminum extrusions and "L" shaped joining plates. It drops into the four pairs of plates on the chassis rails. The hip joint for the torso is made from four 3/16" thick aluminum plates and a 1/2" diameter stainless steel shaft. This where the adjustable nature of the 80/20 system justifies itself for large scale robot projects. It allowed me to easily experiment with and fine tune the positions of the upper chassis and hip joints for optimum range of motion, center of gravity, and clearance with the electronics.

User-inserted image

At the back of the upper chassis, I mounted a 5V/5A DC to DC converter on an ABS panel. This supplies more than enough isolated servo power. It also provided an easy access point for servo connections near the geographic center of the robot.

User-inserted image

The next photo shows a side view of the completed chassis with a weight of 64 pounds so far.

User-inserted image

Up next I will document the torso construction where things start to get interesting with the introduction of moving parts.

#9  

...And now for something completely different. As a departure from all the aluminum used so far in building the chassis, the torso was constructed from 3/4" birch plywood. Two 12" x 16" side panels were cut, shaped, and sanded. The two panels were taped together and drilled on a drill press, ensuring perfect hole alignment between the two sides. The ends of four 6" lengths of 80/20 extrusions were tapped with 1/4-20 threads and used as spacers. A center cutout in each side reduced the weight without sacrificing structural integrity and provided ready access to the interior. In keeping with the modular theme, right angle corner brackets were fastened to the spacers with threaded inserts crimped on the bracket's open side. This allowed attachments to be easily mounted to the front, rear and, top of the torso.

A 5/8" diameter fully-keyed steel shaft supported by aluminum flanged bronze bearings serves as the common shoulder joint for both arms. A 3" stroke linear actuator with over 100 pounds of force drives the shoulder through 90 degrees of rotation. A 6" stroke linear actuator mounted between the torso and upper chassis allows the entire torso to rotate from 10 degrees back to 45 degrees forward.

User-inserted image

Some backlash in the torso's linear actuator and its mount caused the torso to move slightly when the torso was in the normal vertical position. I found this objectionable since a video camera was to be mounted on the head. The solution was simple and addressed two issues. I added a gas shock with 15 pounds of force to each side of the torso. The gas shocks absorbed the backlash and kept a constant force on the torso. The gas shocks also eased the burden on the linear actuator by providing additional lift when raising the torso from its full forward position.

User-inserted image

A Dimension Engineering dual axis, 6G accelerometer was installed over the hip joint shaft and provides tilt position telemetry back to the PC through an ADC port on the EZ-B.

User-inserted image

Initially, I mounted an EFX-TEK AP-16+ .wav file player to a polycarbonate (Lexan) plate on the back of the torso. I soon realized that the sound board would be dangerously exposed in this location. Besides, I generally don't mount sensitive electronics to polycarbonate, as it too readily holds static charges. As an alternative I installed the sound board on an ABS panel inside a covered project box. This backpack module also houses a 4 channel video mux slated for future use.

User-inserted image

A speaker panel was added to the front of the torso. An interface board to the speakers also contains a 12dB audio attenuator, since the stereo amplifier on the sound card was rated at 20W/channel but the small speakers were only good for 5W.

User-inserted image

A ploycarbonate plate with servo City 5:1, pan and tilt units was added to the top of the torso. Both units use Hitec HS-645MG servos.

User-inserted image

The next three photos are views of the head that mounts on top of the pan/tilt assembly. The head contains a color video camera with a 2.9-8mm auto-iris lens and a 2.4 Ghz video transmitter. During initial video tests, the video transmitter caused interference with the XBee communication. Setting the video transmitter to higher frequency channel fixed the problem. For no other purpose than to look cool, I installed two 3" diameter blue plasma disks in the head as eyes.

User-inserted image

User-inserted image

User-inserted image

The final two installments will detail the grippers and arms, and pictures of the completed robot.

#11  

Wow ,.that is a really big robot , is he small enough to navigate your.home?

#12  

Folks, thanks for all the favorable comments. I hope the pictures and text are providing the right level of detail to those following this thread. Considering the diverse audience, it's difficult to know where to draw the line. If anyone has any questions, feel free to ask.

With the arms down by its sides the robot is about 26" wide at the shoulders and easily navigates though a normal doorway. Obviously, I have to severely restrict its speed indoors. A 100+ pound robot rapidly accelerating (F=ma) can do a lot of damage in a very small period of time, as demonstrated by some unplanned modifications I made to a plastic shelving unit in my basement.

The Mk7 is actually one of the smallest members of the ARMadeus family. An earlier Mk3 model was nearly 6 feet tall, weighed 165 pounds and, was prone to face plants if its speed and direction changed suddenly. It was much less modular in nature and never spent much time outside of my basement. More than anything else these robots provide an opportunity to improve my design and construction skills, allow me to explore multiple areas of science and engineering and, create something truly unique. All of my robots have a very short lifespan. Almost as soon as the current version is completed, I start thinking about improvements and modification for the next one. Mmm...What could I do with a second EZ-B?

#13  

Lol , second ezb , twice as much as the first. My 3ft tall robot Jarvis is using two boards. All the sensors and motors control on the first and all the neck and arm servos on the second. This la my very first robot so I learn from.pictures and descriptions of them. My thread is like 185 pages of discussion and pics of mods and no one is complaining so take as many as possible =)

Spain
#14  

Jim Milan: your work is spectacular, feel free to add a video or many videos from your robot in motion, I'm sure that will be pleasing to all. :)

#15  

Oh yes , videos for sure. Show us how it works

Australia
#16  

Looks like it could survive a building collapsing on it - one tough looking robot..

#17  

WOW

Very impressive Jim! Great work. Do I count 6 motor controllers? I'm still saving for just 1 Sabertooth 2x25 ... lol Being retired has some advantages (more time for robots) and disadvantages (a lot less funds).

Question: It looks to me the front wheels are stationary. How does it turn?

Really looking forward to seeing this one in a video.

Herr

#18  

Herr,

Yes, 6 physical motor controllers. The sabertooths are dual for a total of 8 individual controllers. There are 2 drive motors and 6 linear actuators that need motor speed control. One smaller motor for the left hand gripper is controlled by a relay. 4 servos handle the rest of the movement functions.

The robot uses front wheel drive. The two front drive motors have a common keyed shaft that comes out both sides of the motor's gearbox. A pair of wheels are mounted on keyed hubs that mate with the shafts. Driving the two drive motors in opposite directions along with the unpowered rear omni wheels allow the robot to turn easily.

#19  

I don't.understand how this guy.turns

#20  

Both wheels on the drive unit turn together because they are on the same shaft that runs through the right angle transmission. I could have easily just removed the two inner wheels, one from each motor. I didn't want to cut the half of the shaft off, so I left it intact. The inner wheel provides a little extra traction and equalizes the load on the output shaft. Turning is no different than a smaller bot using continuous rotation servos with wheels mounted at the front. The rear omni wheels simply act like casters allowing the back end swing around as the robot turns. This wheel arrangement allows the robot to make tight turns in the front, pivoting at a point halfway between the two drive units.

#21  

Meanwhile, back at the ranch. The plan was always to make both arms identical in construction but, use different style grippers. The left hand gripper was used successfully before on other ARMadeus models, thus becoming a viable organ donor. The basic gripper mechanism was hacked from an extended reach gripper available at many hardware stores for $10 or less. I saved the steel springs and rubber cups and mounted them in a larger 1" square aluminum tube. The first picture shows the hacked gripper before I shortened the mounting tube for the Mk7.

User-inserted image

The gripper is actuated by pulling on the cable causing the spring fingers to contract. I used a ServoCity 12V 10 rpm motor with a crank mechanism attached to the motor shaft. The motor rotation is translated into linear motion. The fingers open and close in sync with the rotation of the motor. The rubber cups and spring fingers make this a highly compliant gripper. The following two photos show a closeup of the motor and crank and, the gripper fingers in the closed position. One of the Spike H-bridge relays controls the direction of the gripper motor.

User-inserted image

User-inserted image

I debated about which gripper to put on the right hand. My original thought was to build a universal jamming gripper, the type that uses a vacuum pump and a balloon filled with ground coffee. I will save that idea for another day. The next thought was to use a VEX claw and servo. All I had to do was fabricate a simple polycarbonate plate for attaching the claw to the end of the forearm. Since I already had one in my collection, I would try it. It is pictured below.

User-inserted image

In the end I decided on a gripper that also had a rotatating wrist. A ServoCity servo block and a Hitec HS-7955TG servo provides 180 degrees of wrist motion. A Robodyssey gripper with a Hitec HS-985MG servo completes the assembly.

User-inserted image

The next installment will detail the arm construction and a collection of photos of the completed robot.

#22  

Here is the final installment of the ARMadeus Mk7 build report. Each arm weighs 11 pounds. Both arms are connected to a common shoulder. A linear actuator inside the torso rotates the 5/8" diameter shoulder shaft 90 degrees. A keyed aluminum hub connects the arm to the shaft. Each arm uses two independent 3" stroke linear actuators, one to swing the upper arm outwards and another to extend and retract the forearm. To gain some mechanical advantage when raising the arms, much of the upper arm assembly was located one side of the axis of shoulder rotation with the forearm on the other side. This counter balance greatly reduces the load on the shoulder rotation actuator.

The next two photos illustrate the arm hub and upper arm assembly.

User-inserted image

User-inserted image

Next is a picture of the complete left arm and compliant spring gripper.

User-inserted image

Here are two views of the complete right arm and servo gripper.

User-inserted image

User-inserted image

Several builders have asked for a video of the robot. I don't have one yet and it may be awhile. For the time being I offer a series of still pictures showing the range of torso and arm motion of the completed robot.

User-inserted image

User-inserted image

User-inserted image

User-inserted image

User-inserted image

Here are front and rear views of ARMadeus Mk7 at rest.

User-inserted image

User-inserted image

Finally, here is a picture of the robot disassembled for transport. Thanks to the modular design, it takes me about 3 minutes to break the completed robot down to these 5 components and only slightly longer to reassemble it.

User-inserted image

Well that's it for now. Will there be a Mk8? Indubitably. I suspect the redesign may not be as drastic as some of the others have been. Now that school has started, much of my spare time will be directed to supporting a local FIRST robotics team as an engineering mentor. Any future personal robot projects will have to wait until next spring.

#23  

Thanks very much for showing the steps you performed in this thread, it certainly opens the engineering mind to more creativity in this realm of robotics.

#25  

Do you have a list of the specs? what cpu, what mpu? that sort of stuff. Maybe what sensors.

:-)

#27  

@MovieMaker What specific information would you like that isn't listed in the text? I'll be glad to share any technical details of the robot. Some of the components that I used are now obsolete but, there are functional equivalents available. Wherever possible I try to use only off the shelf parts, especially if the shelf is in my basement. If an exact part is not available, I will modify an existing one to meet my needs, such as the compliant spring gripper. Any parts that I need to fabricate have to be made with a drill press, band saw and hand tools. With the exception of the arm hubs there are no custom precision made parts on my robot. A machinist friend made the arm hubs for me years ago for another project. They were too good to not use. But I could have purchased a similar 5/8" finished bore hub from AndyMark if I needed to.

Sensors: (2) Parallax PING))) Ultrasonic Distance Sensors w/ Protector Stands (1) Dimension Engineering DE-ACCM6G2 Accelerometer

CPU: (1) EZ-B controller with XBee-PRO RF Module and Parallax XBee SIP Adapter (#32402)

Audio: (1) EFX-TEK AP-16+ Audio Player

Video: (1) Sony MV-3310 Color Video Camera with Fujinon YV2.7X2.9LA-SA2 Lens (1) Xavien X-QVC-EM Quad Video Controller Engineering Module (...to be used for future expansion)

Motor Control: (2) Sabertooth 2 x 12 Motor Controllers (4) Innovation First 12V Victor 883 Speed Controllers (...Discontinued model) (2) Innovation First Spike Relay Modules

Power: (1) Odyssey PC680MJ 12V 17AH Battery
(1) Innovation First Breaker Panel (...Discontinued model) (1) Mean Well SD-25A-5 5V/5A DC-DC Converter (...for servo power) (1) Datel Digital Voltage Monitor, DMS-20PC-0-DCM-B-C, (...for real time battery monitor)

Belgium
#28  

Hi,

I've been on holiday and guess what... I come back and immediately check out the community and find a very impressive robot, unlikely to what we've seen here before. Congratulations Jim ! A fine piece of engineering. This is what I call a real robot ! I hope you post some videos soon.

Greetz,

PhG

Canada
#29  

Very impressive and inspiring. My build desires do tend toward squat tank styles, but this is giving me ideas. I love how you used that suction cup spring gripper... I now have to steal my mom's away from her and hack it :)

#30  

Hi Jim, Very impressive robot. What range and quality do you get out of the video transmitter?

Spain
#31  

Your robot is awesome, amazing quality construction. I can not see your pictures again and again! :)

#32  

@rgordon My video transmitter is close to 15 years old but has worked well with both b&w and color cameras. The resolution is more a function of the camera. I have never tried anything more than a couple of hundred feet in range.

Germany
#33  

Johnny 5 is alive! What an awesome robot - just like the others, I cant wait to see a video of the robot in action! Very impressive work! Thanks for sharing with us!

#34  

HOLY COW! Super impressive! Really well made! I bet it was a dent in the wallet to get it that good. :)

#35  

Jim, that is Utterly Incredible! You answered my questions with the additional posts. Thanks,

#36  

WOW! I know I don't have talent like that. Awesome job!

#37  

I'm glad other builders like this project. I am equally inspired by the work of others. I diligently follow all the project showcase posts in the endless search for new ideas and sources of parts. It would have been impossible to fund a project of this magnitude all at once. I've been working on different versions of ARMadeus since 2000. Each year or so I'll recycle parts from earlier versions and add a few new ones. This helps keep the incremental costs under control.

Like all its ancestors ARMadeus Mk7 is destined for a short life. I'm already making plans for it to morph into the Mk8. I want to maintain much of the arm functionality but reduce the overall weight by 25-30 pounds. To accomplish this I'm considering trading the overall Johnny 5ish appearance for something more orthogonal Dalek like. The tentative plans include:

-Removing the torso, head, dual upper arm segments and 3 linear actuators. Majority of weight savings -Extending the height of the upper chassis. Now the hip joint becomes the shoulder joint -Creating a single 8" wide center upper arm with 2 independent forearms. Approximately 10 lbs savings -Increasing range of motion of each forearm -Attaching a video camera to each forearm. Video mux is already installed in the backpack -Adding text-to-speech and audio mixer to the sound system -Adding an extra DOF to the servo gripper. Reuse head pan servo gearbox for wrist pitch movement

These modifications will allow me to keep the drive train and chassis intact while freeing up interior space and extra digital ports for things I haven't even thought of yet. I might even be able to keep pace with the improvements DJ is constantly making to the EZB but, I doubt it.

#38  

Looks super cool. Hope to see videos of it or Mk8.

#39  

Sweet jim , I look forward to you making him more compact. :)

#40  

It looks like you have a few linear actuators. What was the model and price and where did you get them?

The rest seems pretty standard stuff. But, BOY do you have talent!

P.S. Sorry, my bad. You listed it earlier. Duh!

:D

#41  

Hello, I wanted to know how you did to connect the module xbee on controller ez-b. And on computer ? How to program ?

#42  

Kalinox,

Replacing the Bluetooth with an XBee Pro was relatively simple. On the EZ_B side I used a Parallax XBee SIP Adapter (#32402) with one of the XBee Pro modules. I made a simple 4 conductor cable for interfacing the SIP adapter to the Bluetooth module connector on the EZ-B board. The Parallax Adapter can handle the extra power required when using the 60mW XBee pro modules.

Connect V+ on the EZ-B to the +5V pin of the SIP adapter Connect Gnd on the EZ-B to the GND of the SIP adapter Connect Tx on the EZ-B to the DOUT pin of the SIP adapter Connect Rx on the EZ-B to the DIN pin of the Sip adapter

On the PC side (Windows 7) I used a Sparkfun XBee USB Explorer board with the other XBee Pro module. The Sparkfun site has links for the USB drivers and the X-CTU Configuration & Test Utility Software from Digi. Install the USB drivers first, then run the X-CTU software. I followed the instructions in the X-CTU user guide and things went smoothly. If you change any of the default parameters you need to make identical changes to both modules, with one module at a time connected to the PC side. I did change one of the ID parameters. The documentation from Digi is excellent.

The only problem I had with the XBee setup was when I needed to update the EZ-B firmware from V15 to V16. I had to temporarily reinstall the Bluetooth module to update the firmware, then replace the Bluetooth with the XBee and reconnect. I also had to change the channel on my 2.4GHz video transmitter to the highest frequency to avoid interference with the XBee.

Good luck with the conversion.

Jim

#43  

Thanks for the explication :-) I see things more clearly. Can you recommend me a xbee pro module particularly ?

#44  

Kalinox,

I'm using the 60mW XBee Pro with the chip antenna at the EZ-B end on my robot and a 60mW XBee Pro with a wire antenna on the PC side. I have not tried any other module configurations. This combination works well for me.

Jim

#45  

@Jim Milan

What range do you get with the XBee? Thanks.

#46  

@rgordon

I haven't really tested the range anywhere near the theoretical limit. So far it has worked fine over a distance of several hundred feet with the PC indoors and the robot outside.

Jim

#47  

motors you are using look like ones i bought for full size R2-D2 using ,i know they take a lot of power\

NICE job on your design too