
Not a fan of the autoposition, but I had to tackle it for the drink robot because unlike servo recorder, I needed the robot to precisely grab a cup and repeat positions over and over. Which he does.
First of all I have read every "?" by every button and slider and I still dont get most of whats happening.
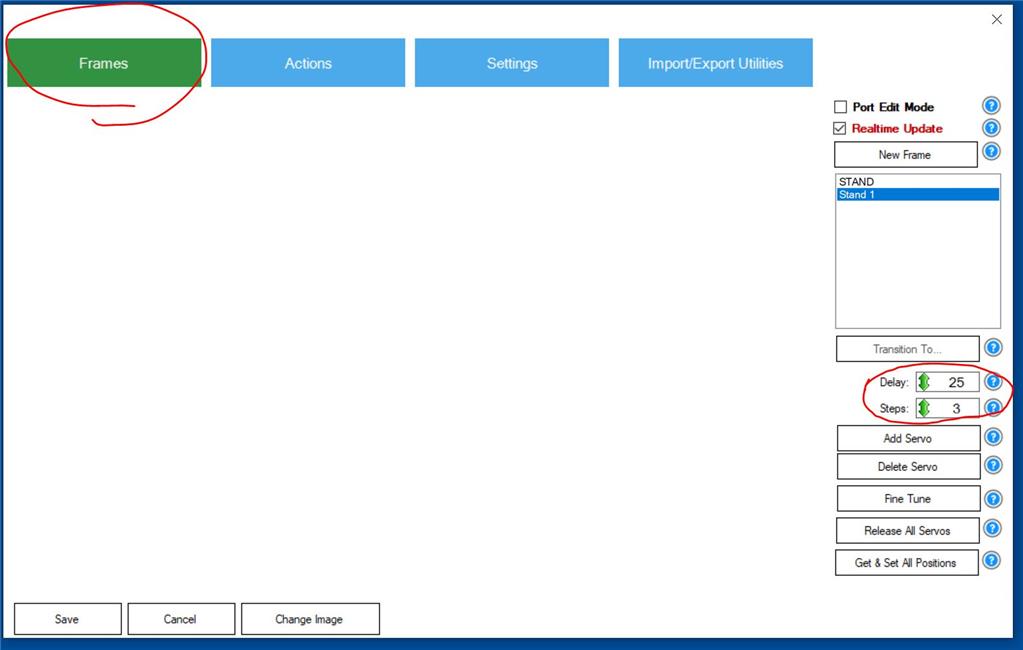
My issue is understanding the redundancy of different speeds and steps in all the windows and how that affects the servos in each one. Of the three windows I understand "Frames" window the best as this is where you begin and can see the effects on the servos.
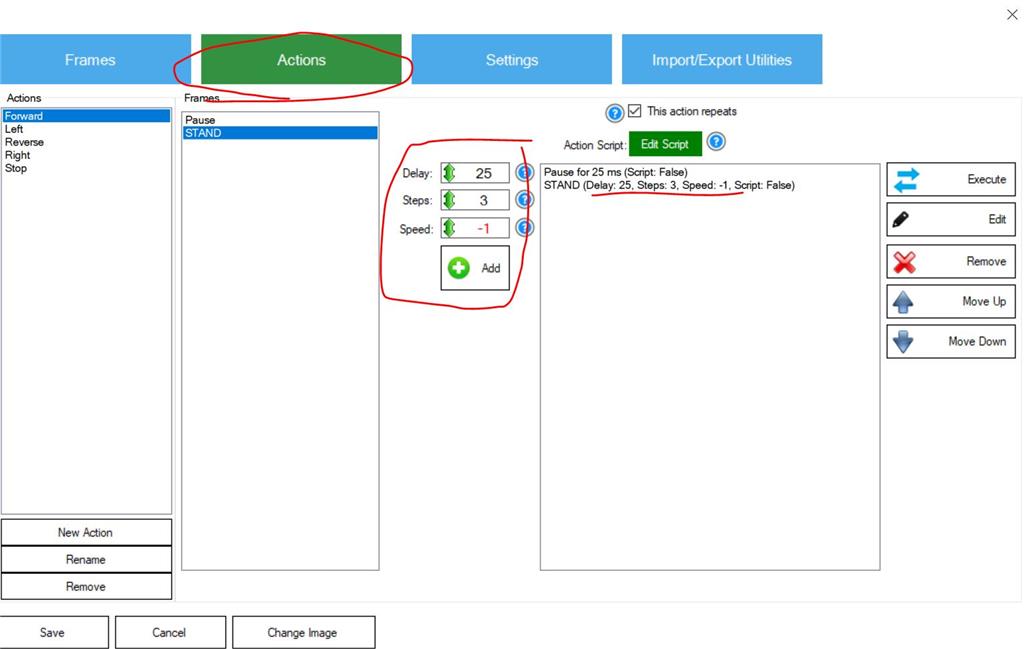
But as I move on to the "Actions" tab I am again shown delay and steps and now speed. The speed here goes from -1 to 20. I understand I can change this for each frame, but after I set the motions and then decide to go back and edit the speed button on the right, there is no noticeable speed change to my animation ( i also understand that the higher the number the slower the motion)
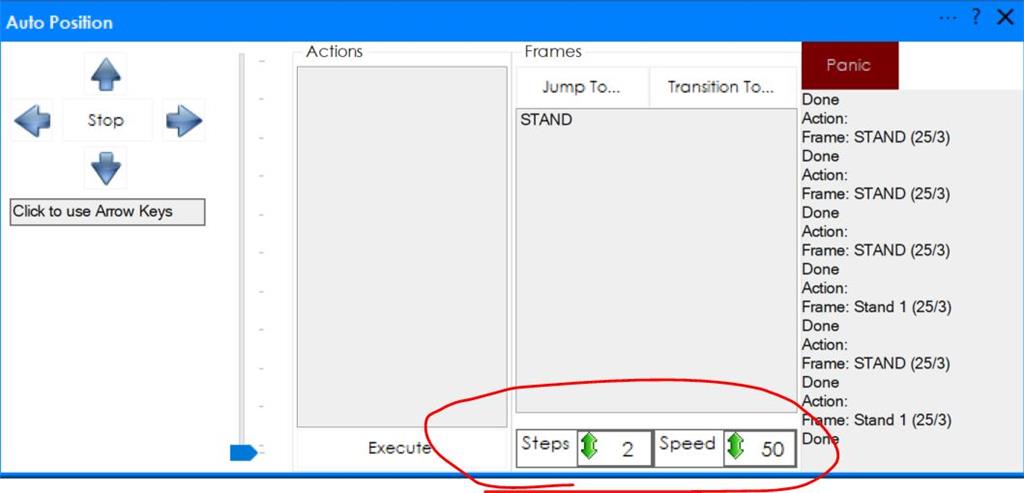
Finally, when actions are set up and you go to the main window for Auto Position I am again presented with another STEP and SPEED, this time the speed goes to 0-50. Why?
Yesterday I broke part of the drink robot because I am struggling with this animation system. Its ok if you are playing with a toy sized robot, but when programming a lifesized robot, things can go expensively wrong, when disaster strikes or worse someone gets hurt.
Please take the time to explain to me how this redundancy is supposed to work.
Related Hardware (view all EZB hardware)

Related Robot Skill (view all robot skills)

I would agree this is an area where improved documentation would be helpful. Each of these items has been covered in different forum discussions or tutorial videos over the years, but if you are new to using them, or even want to do something different than you have done before there is not a single comprehensive place to go to understand each element of the skill.
I have used AutoPosition a lot, since it was introduced, and I still have basically all the same questions you have. That is why I test out concepts on a small EZ-Robot Revolution robot (typically the Roli) before ever thinking about going large scale, and I have a ton of spare servos since I bought the upgrade kits for Six and Roli when the hdd servos came out so I consider them disposable and test things that might stress the system with them first (I have been trying to get Roli to throw a ball for about 3 years and still can't get it quite right).
Alan
Which part of the Auto Position manual isn’t documented? I had checked and every option is documented. Hmm, Alan could you tell me what’s missing?
Unfortunately Will’s questions are documented in the manual. So his question doesn’t help improve the documentation. Let me know what documentation of the Auto Position is missing from the manual and I’ll improve it.
Adding some context, we update the manuals and support section a few times per day based on questions. Also, the ARC software is updated about once or twice a week as well.
Ps, I edited this question and selected the appropriate Auto Position robot skill.
So this is your answer?
So far that’s my answer I’m on my phone and out of the house this Saturday. If I had more time, I usually write longer responses to help users on the community forum.
OK for digestion later when you have time.
The documentation may be thorough but its unclear and confusing. I doubt I am the only person feeling this way. I'll highlight the areas of confusion by copy and pasting from the manual.
1
On the video from the skill page (demoing the hexapod) you say at time code 4:43
Why is the speed not controlled by the speed? How do the modifiers control the speed? You do not explain.#2 Unclear when to use (Frame window): But if you uncheck realtime update then the servos no longer move on the robot, so how can you use this function live?
#3
(Frame window) Again if transition to... is selected I can only do this when realtime update is unselected? How do I use this if the when robot is not moving? How does delay and steps effect the speed.#4
(Action window) So these supersede the motion settings from the frames set up???#5
(Main AutoPosition window) I am at a loss of words for even understanding this....does this also override the settings from the action window?#6
(Main AutoPosition window) I understand this works with the step and speed from question #5, but once again does this override from the action window?#7
This is pose key animation and saying its IK is misleading.I believe the summary of your questions is regarding the "Transition To" and "Jump To" buttons. Those buttons have absolutely no relationship with actions. Also, the values of Delay, Speed, Steps on the Frames page have no relationship to actions either. Those are for testing frames while editing frames. I'll add a sentence to the manual that expands something along the line of "These buttons can be used for testing frames....".
*Edit : added some screenshots to expand on the "Transition to" and "jump to buttons below here:
In the below image, there are arrows pointing to the word "Frames" and a box that goes around the options. In Windows or User Interface, that's a Titled Group Box. The options within the group box are associated with that title. In this case, it's Frames. The Jump to & Transition To will use the selected frame and transition or jump the robot into that frame using the values in that groupbox.
There is a bug in the Transition To that you outlined in the question. It seems the Transition To button is not highlighted when the Realtime Update is unchecked as it's supposed to. I'll have that fixed for the next update. Generally, people have real-time update enabled when editing frames.
#1
The video you are watching does not cover everything. The manual will be the best bet. Not all videos will cover absolutely everything, unfortunately. In this case, the video apparently does not explain what you're asking - it's not the fault of the video. I try to cover as much as I can in videos, but mostly I can't cover everything - the manual is good for explaining because it covers every feature and can be updated easier. It's more difficult to update a video vs a manual, which is why the manual is recommended.
#2
As the text reads, "this will transition the servo positions into the selected frame". Your screenshot has no selected frame, however. To select a frame, position the mouse cursor over the frame in the list, and press the left mouse button. The frame will be highlighted as per a windows Listbox. Once selected, the Transition To button will be enabled. (This paragraph describes expected behavior. There is a minor bug affecting this button that will be fixed in next update)
#3
The real-time update would need to be un-selected for the Transition To button to be enabled. I do not understand "how does delay and steps affect robot speed" related to this question. Perhaps that's a different question and is covered in the Auto Position manual and question marks.
#4
Again, the manual states that the delay, steps and speed values on the Frames page are for the transition button during testing. The options on the frame page are for testing the frames. There is no relationship between that and the values added to the action.
#5
In ARC, since conception, the lower the speed value for servos, the faster the speed. It's because the speed value is actually a delay. It's documented in all uses of the ServoSpeed command for scripting. The value is a delay between positions, so a higher number is a higher delay. That's a global ARC parameter.
#6
The references to Jump To and Transition To work for selected frames, not actions. You can't "Jump to an action". An Action is a collection of frames. You can't jump to a collection of something.
#7
Incorrect. The Auto Position uses inverse kinematic calculations to transition into frames. Documented in videos and the manual - Each joint is a servo, therefore it's easy for the algorithm to calculate the movement steps to achieve a timely transition of all joints to the destination positions. If you wish to use pose key animation, there is not a robot skill that i am aware of for that - so you would instead need to write scripts using servo positions. However, the challenge with writing scripts to direct servo positions is unless the servos have feedback, you won't know when they have reached their desired position. And, if you want to create frames based on external input, such as physically moving servos, your servos need to be bidirectional. There’s a few tutorials that explain that attached to the Auto Position control manual. The button you use is documented in the manual as well.
*note: I’m avoiding writing duplicate information from the manuals.
Here is the actual full text from the portion you had copied
Hope this helps - I'll add that sentence that the transition and jump to buttons are used for frames only and testing or transitioning or jumping to frames. And I'll make a few UI changes for it to be more clear for you
I organized the parameters in UI titled groupboxes for clarity