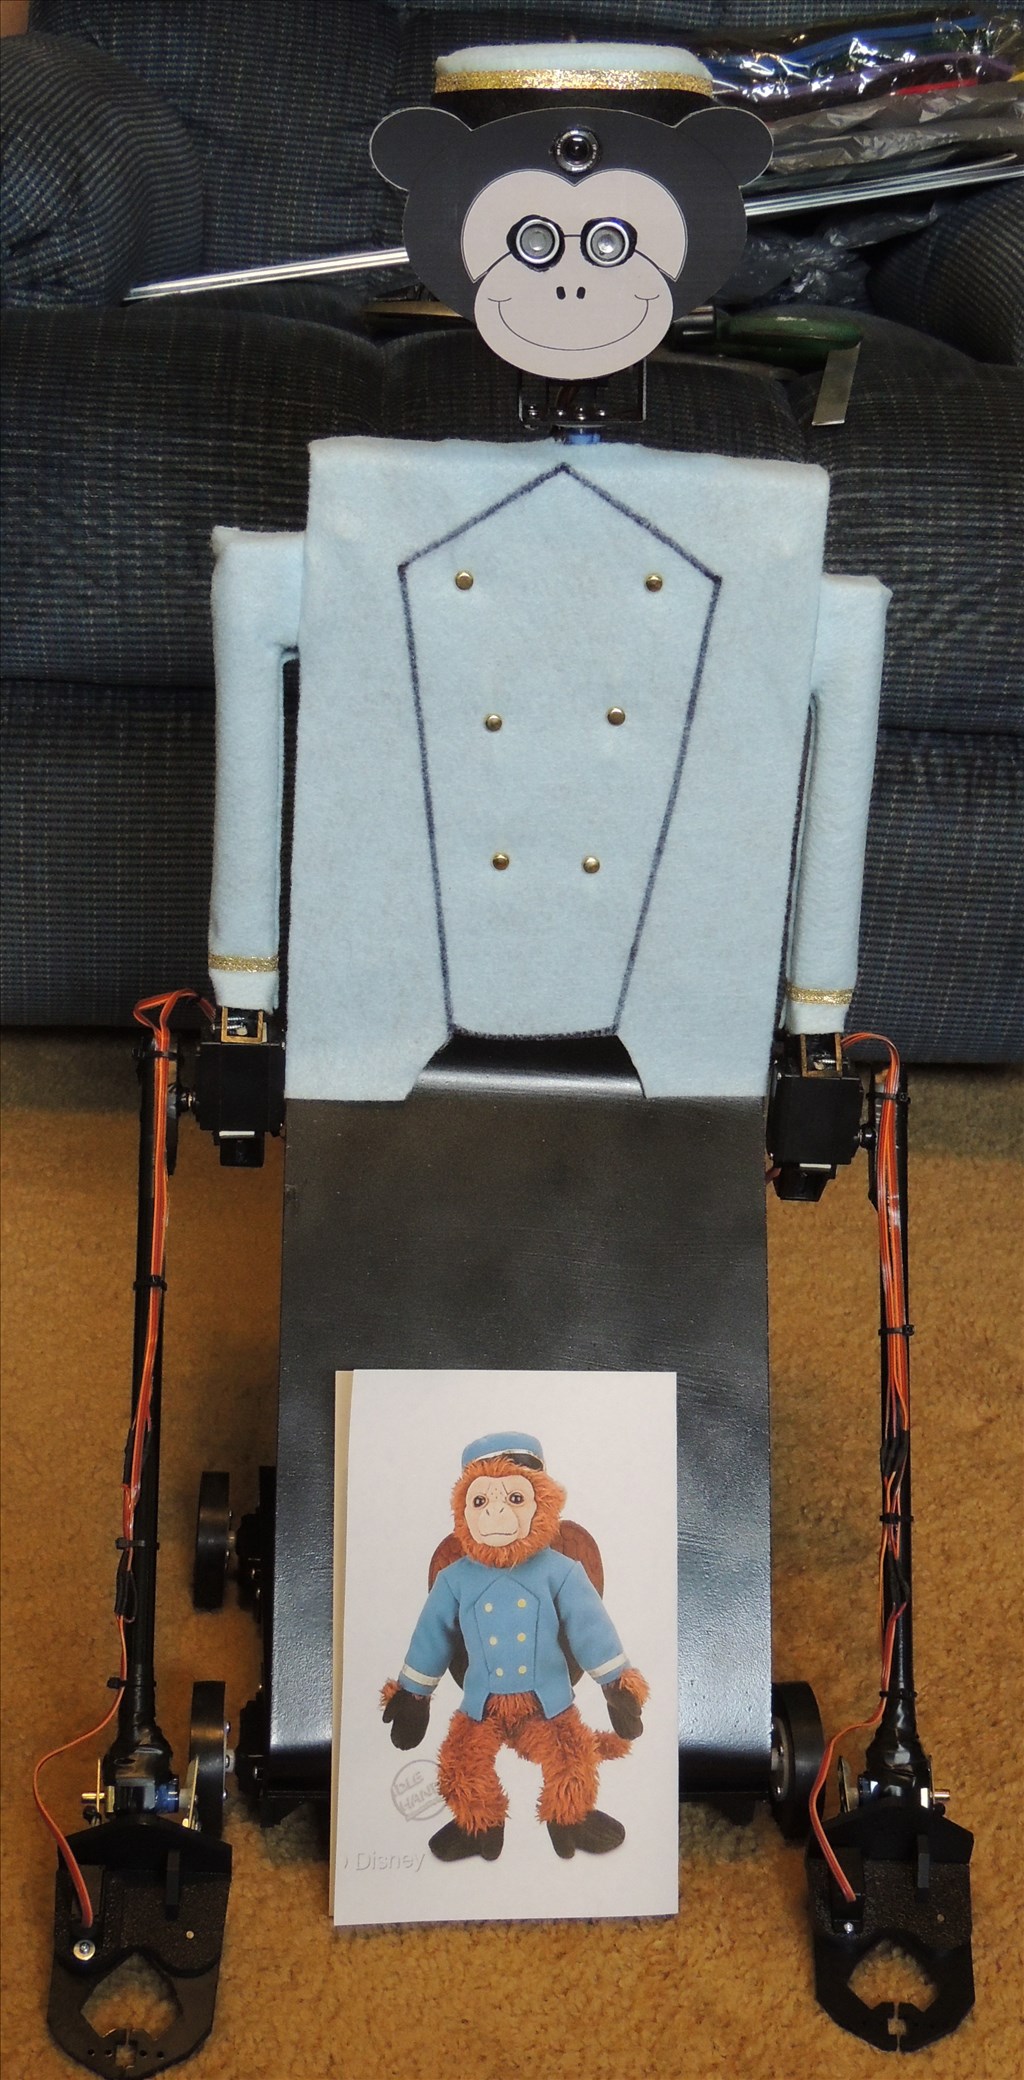
Robot Name: Finley Named after Finley the flying monkey assistant in the movie "OZ, The Great and Powerful", https://oz.wikia.com/wiki/Finley The name is also a Gaelic boy's name meaning - Fair Warrior https://babynamesworld.parentsconnect.com/meaning_of_Finley.html
Height: 28" Weight: unknown Power: 7.2v 6800 mAH, NiMH Controller: EZ-B v.3 Total Number of Servos: 12 Drive Servos: (4) Parallax, Inc. continuous rotation Drive servo Mounts: (4) from www.BudgetRobotics.com Wheels: www.BudgetRobotics.com X Wheels Wrists: 2 (1 for each hand) Tower Pro (blue) 9g servos with custom made brackets Grippers: 2 - micro grippers from www.tbaumg.com Elbows: 2 (1 for each arm) Tower Pro MG995 metal gear servos Neck: Dagu Mini Pan/Tilt with 9g servos - https://www.robotshop.com/productinfo.aspx?pc=RB-Dag-29&lang=en-US Sonar Eyes: Parallax, Inc PING sonar module Camera: wireless (like the one from EZ-Robot, but purchased on eBay) LEDs: 2 R/G/B 3way LEDS with common cathode (covered by clothes)
Head: A blue square plastic container from Family Dollar store. The PING sonar eyes are mounted inside the container with hole drilled for the eyes to stick through. The face is a custom sized monkey graphic I found online with the "eyes" removed from the image so I could place the holes for the PING sonar where I wanted them. The face was printed into sticker paper and placed onto cardboard and trimmed to size, with holes cut for the PING sonar eyes and camera lens. The face is mounted to the plastic container head via double sided tape.
Hat: A blue round plastic container from Family Dollar store, covered with light blue felt via hot glue, with a black felt band and gold trim. A hole was drilled in the top of the hat for the camera antenna to stick through and a front slot was cut in the plastic to go around the top of the camera lens. The hat is easily removed.
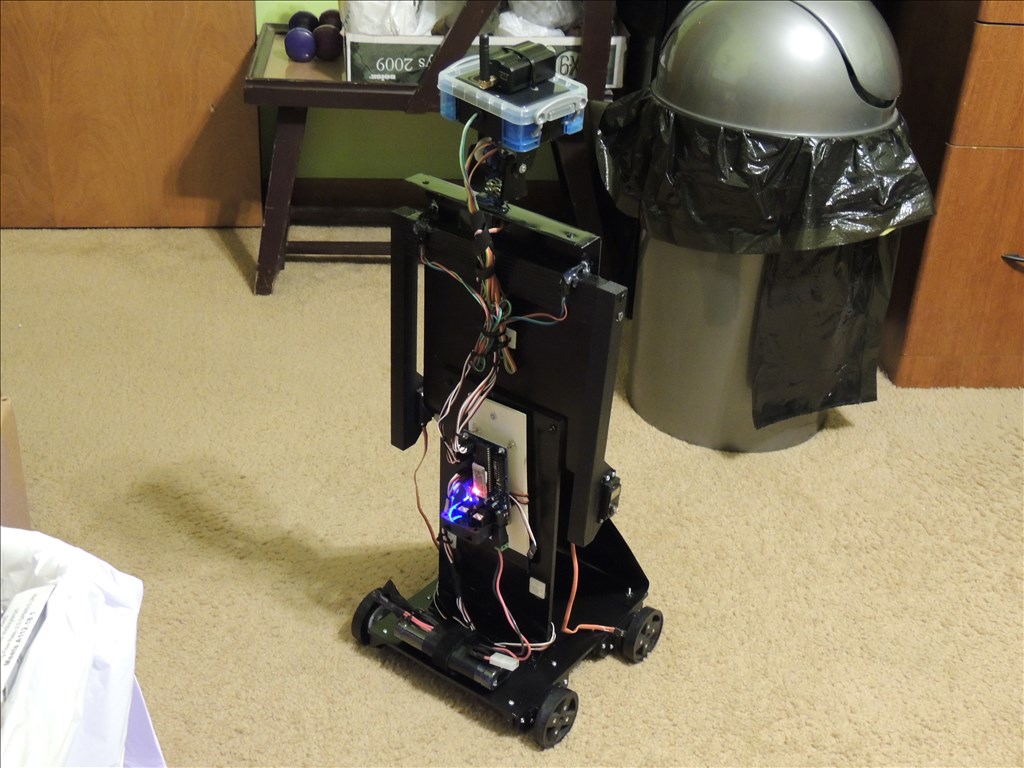
Body: Sheet metal precut from Lowes hardware store, size 8" wide by 24" (22GA) by Steel WorkS item #1804 (Hill#11773). The sheet metal was bent in the middle and on the ends to create edges for mounted. The thickness was just thin enough to still be able to bend by hand via a fair amount of force. A piece of 12"x12" sheeting from Budget Robotics was cut to 12"x6" to make the back brace of the body where the EZ-B controller is mounted. Overall the body was made to look like a large J2 robot from www.J2RScientific.com. The "clothes" are designed to look like the blue bell hop uniform worn by Finley from the movie "OZ, The Great and Powerful". They are made from light blue felt, hot glue, brass paper tacks and gold ribbon.
Base: 2 sheets of 8"x10" sandwiched together. The drive servos are mounted via servo mounts from www.BudgetRobotics.com
Arms: The upper arms are stationary and made from wood. The lower arms are made from round metal tubing (the kind from Harbor Fright grabber tools).
LEDs: These can not be seen currently but there are 4 red segment LEDs mounted under the head to create a Johnny 5 type mouth (these will not be used now). There are also 2 R/G/B three way LEDS with common cathode mounted through the body around the shoulders. These will still shine through the clothes. They are wired to emit red or blue from each and green at the same time from both LEDs.
Misc: wire, hot glue, sheet metal screws and nuts, 12" servo extension cables from ebay, wire ties, heat shrink, double sided tape, black electrical tape (for aesthetics), Velcro (to hold the battery)
Project Background: I started out with the goal to simply build a larger J2 robot with an overall look like Johnny 5 from the movie "Short Circuit". However a design goal I had was to make the robot reach objects on the ground and pick them up to hand to me at a higher level (or throw objects, like a ball). Long story made short, I ended up with arms that looked long like monkey arms. After seeing the movie "OZ, The Great and Powerful" I wanted to create a Finley inspired or themed robot, so my large J2 became Finley.
Lessons Learned: 1.) When buying multicolor LEDs like R/G/B, make sure you select common cathode (common ground) not common anode (common positive). 2.) Watch that hot glue, don't assume a glob is dry and touch it! 3.) Hot glue really does hold almost anything. 4.) Lowes has tons of neat little hardware pieces to make your own brackets in the hardware "drawers" section. 5.) DO NOT USE thin dinky wire when connecting a 7.2V 6800mAH battery to something. Instead use 14 gauge wire to avoid a tiny tragedy with smoke and melted plastic stink. 6.) When picking 14 gauge wire from the hardware store, do not assume that because the wires are placed together that they are all "strained" conductor instead of solid. 7.) Solid 14 gauge wire is hard to bend and solder! 8.) Never use felt or cloth for a project if you don't (a) know the name of the color (For example light blue will not due with their are 50 shades of light blue.) and (b) you don't have enough for any possible future additions!
Future Plans: 1.) Max out the features of the ARC software to create an interactive Finley 2.) Add sensors to the grippers, probably IR 3.) Add a battery sensor 4.) Add a compass 5.) Add a tilt sensor 6.) Add a link between my own AI software developed in .NET to the ARC software 7.) Post some tutorials as I see areas I can share some knowledge 8.) Keep having fun with EZ-Robot!
Update: 8/20/13 Finley gets a tail Finley with his new removable back cover and tail (as you can see he is much happier):
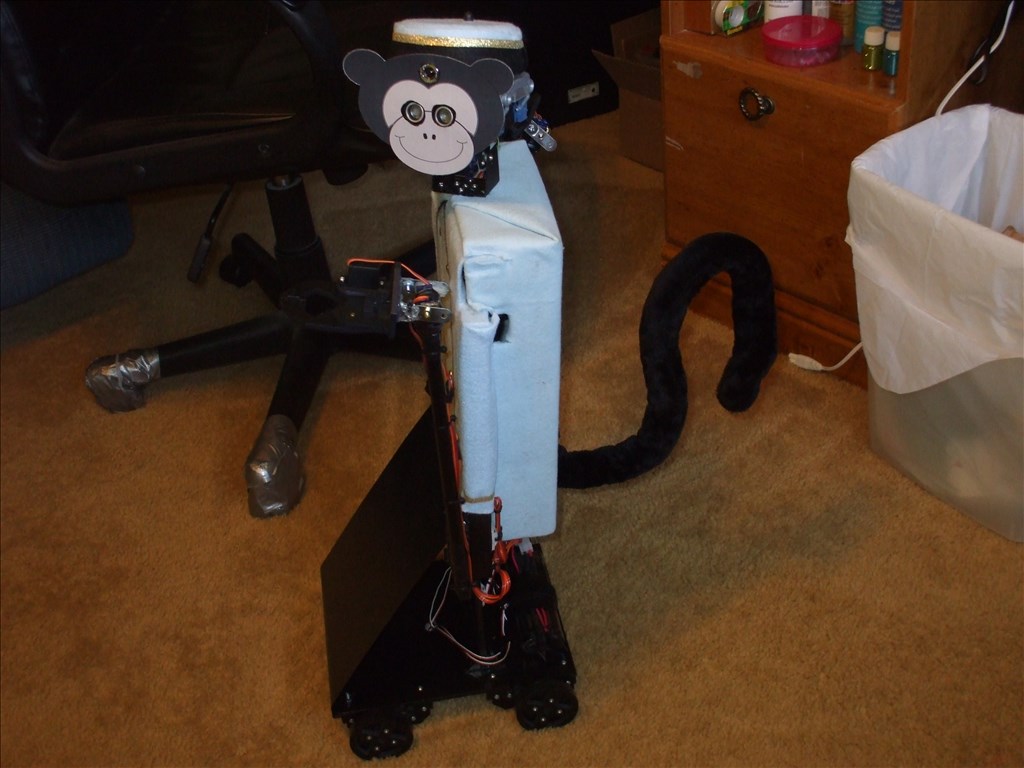
The back is constructed from a cardboard box cut down to size and notched to fit up snug against the back. The notches allow the back to cling to the main body. I can easily pop the back off to access the electronics mounted to the inside of the main body. The cardboard was covered in felt matching the front, arms and hat of Finley. The tail is wire tied to the back cover. I got the tail from eBay. It is a Halloween costume accessory, listed as a cats tail with a stiff internal flexible wire. I can bend his tail to any shape I want, though not motorized to move on its own. The base of the back is left open to clear the fan I mounted to help cool the voltage regulators. I think Finley looks much better with a back cover and tail. It took me a while to track down the felt color. The felt I originally used was just something I called "light blue" from a variety pack on sale at a local craft store. It indeed was not "light blue" it was "snow blue".
Other robots from Synthiam community
Davidh's BOB
PEEK's SAM Inmoov Robot


Justin, Very cool robot build. I can tell you put plenty of thought into the different features. Am I right in thinking the arm movement is towards the center of the robot? I sure like the grippers, and the theme is well presented. Finley is neat, looking forward to a video.
Steve S
Very Nice!
What fun! Any way you can take a video? I'd love to see how it works.
WOW ...Great monkey business! @Justin Very unique and a great Project out line.....Also looking forward to a video
I agree! This is a great way to post (as a first post) about our projects. As the project evolves I can edit the first post.
That is a cool project! I used to have Nightmares about those flying monkeys when I was five. I am over it now(not really.)
eek
Are you going to put the wings and a tail? that would be neat.
:)
Thank you for the nice comments! I do plan to post a video soon.
@Steve S you are correct about the arms. I started to make arms with proper sholder motors, but I could not see a good way to accomplish that given the length of the arms and keep my design goal of having the arms reach the ground to pick up objects. So the arm movement starts at the elbow and is in center of the robot.
@MovieMaker I have a pair of angel wings I picked from a halloween clearance, but they looked so ugly on Finley I never mounted them. I would like to add flapping wings and some sort of tail in the future.