

-636348381130562972.jpg)


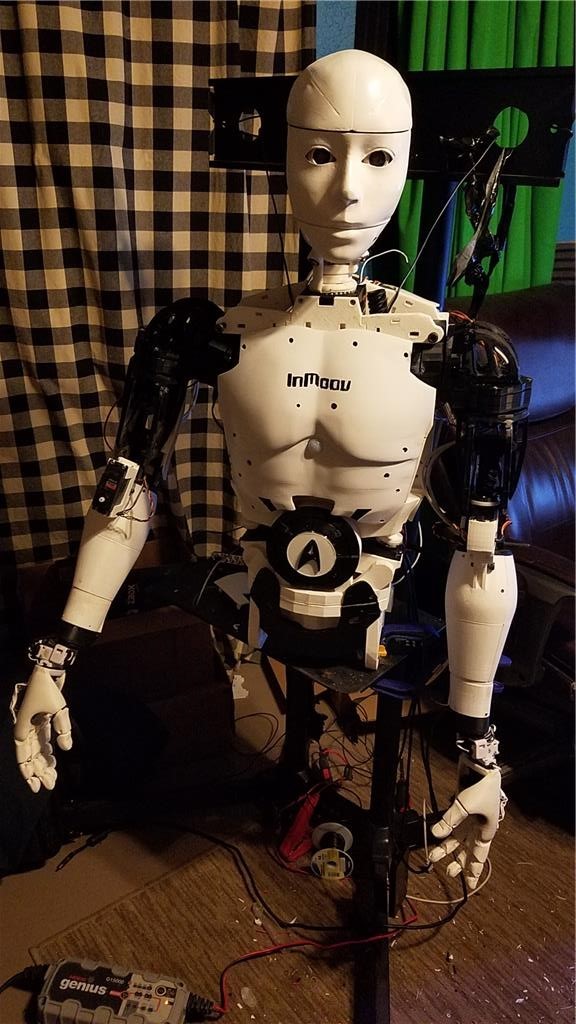
I have decided to start my InMoov project. I think I will call him Spock out of respect to Leonard Nimoy who passed away on the day that I started this project.
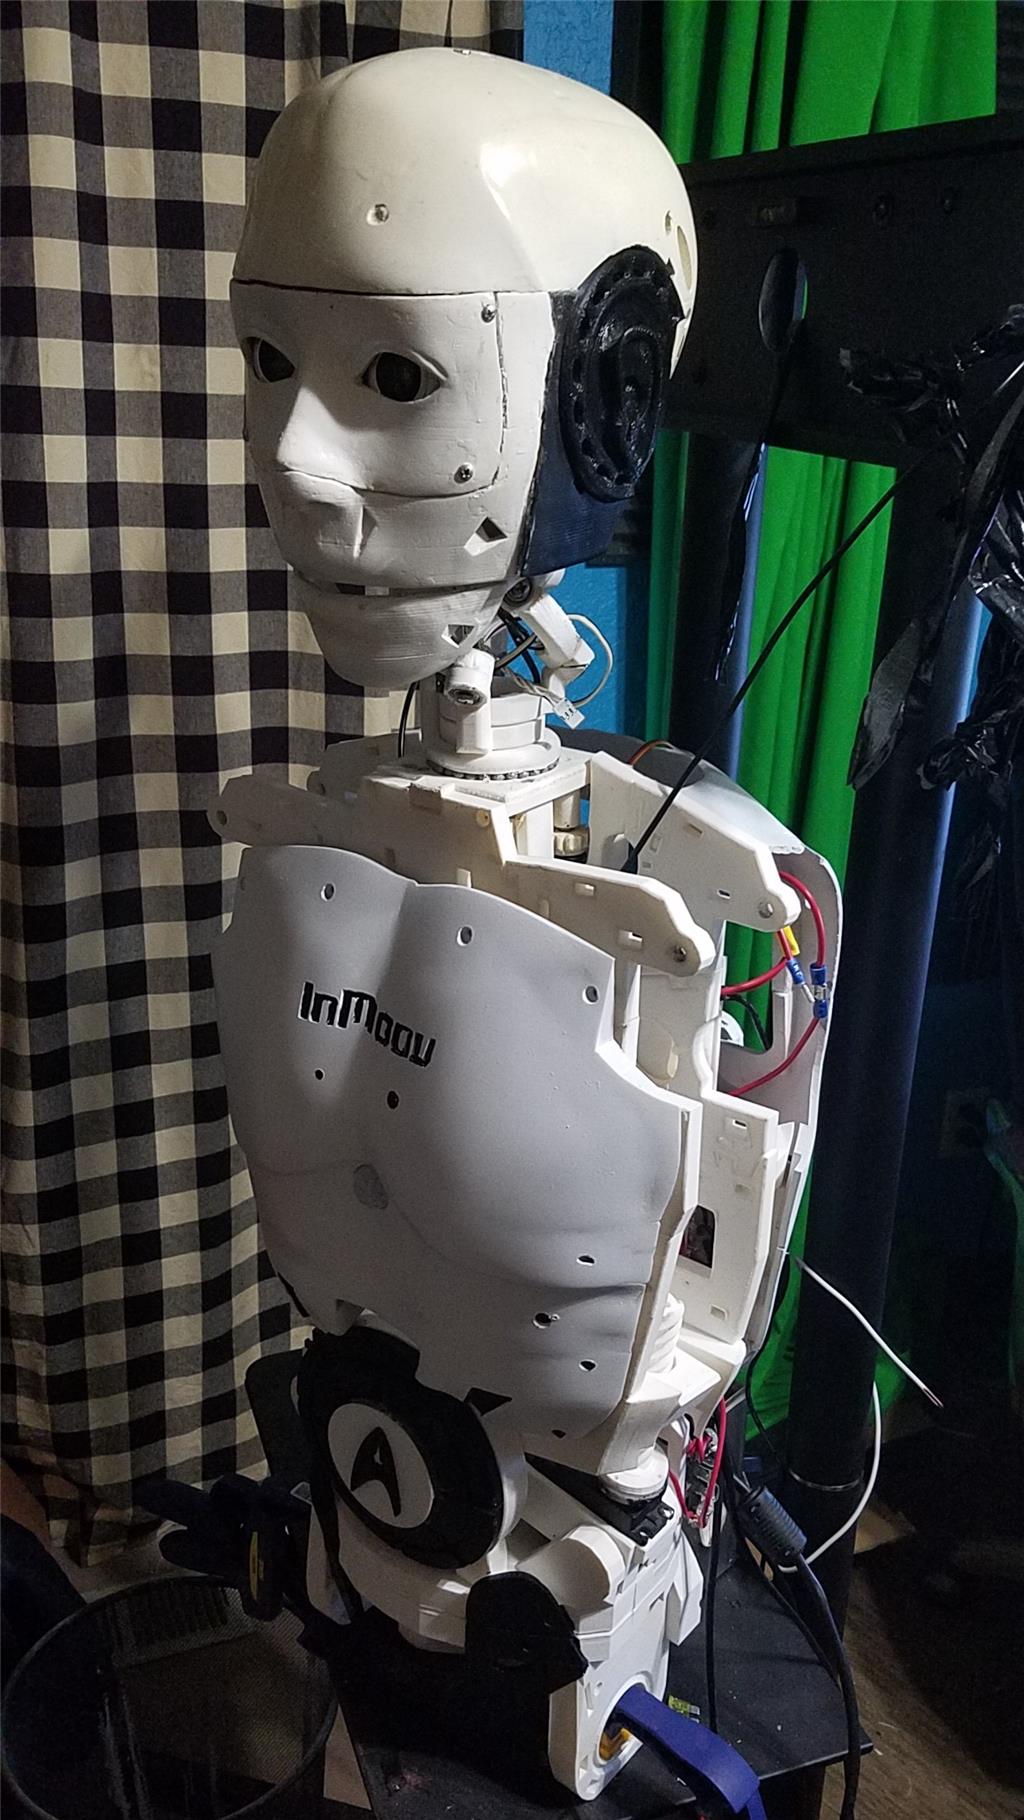
I am editing this post so as not to confuse people with the current configuration. I continue to update this post with the latest photos. If you are reading this for the first time, don't be confused. There have been a lot of changes to the InMoov over the past couple of years including starting over.
https://synthiam.com/Community/Questions/7398&page=21 Post 203 starts the rebuild of the InMoov.
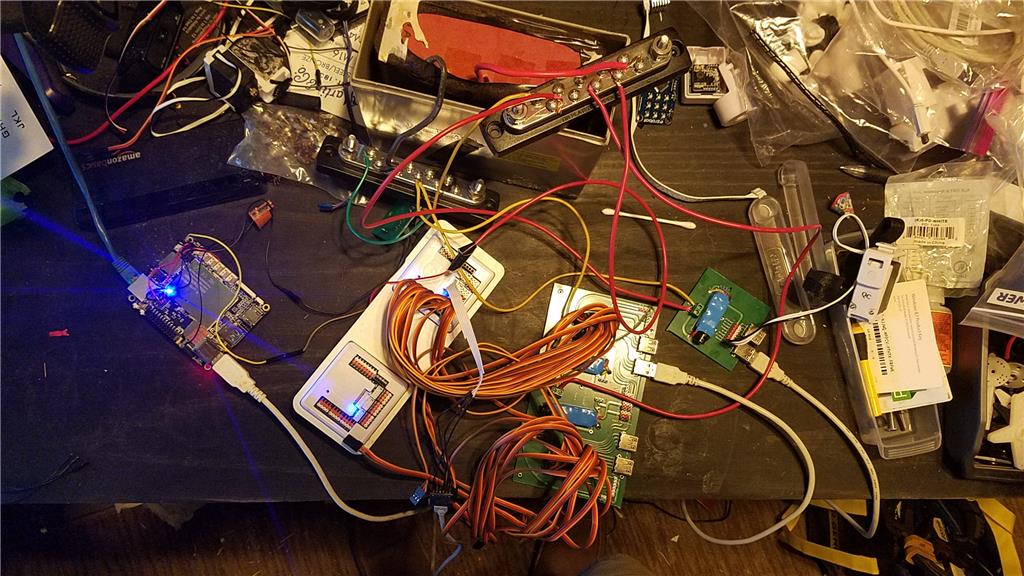
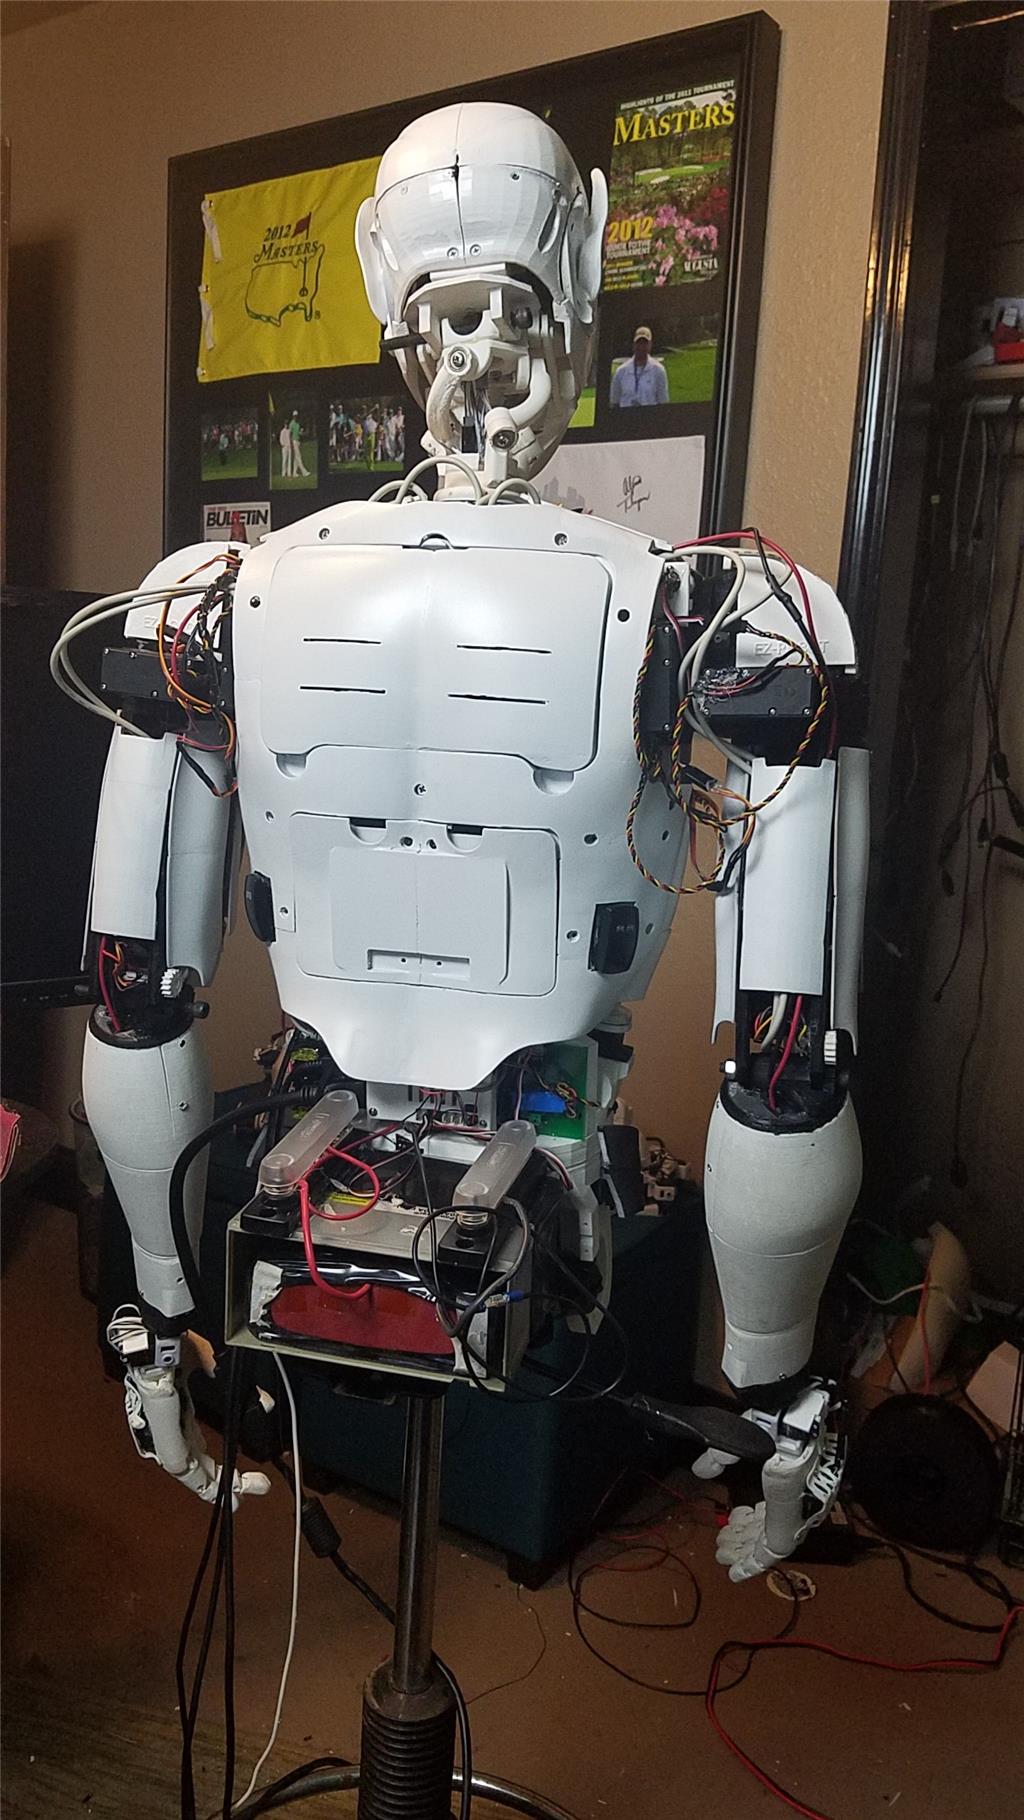
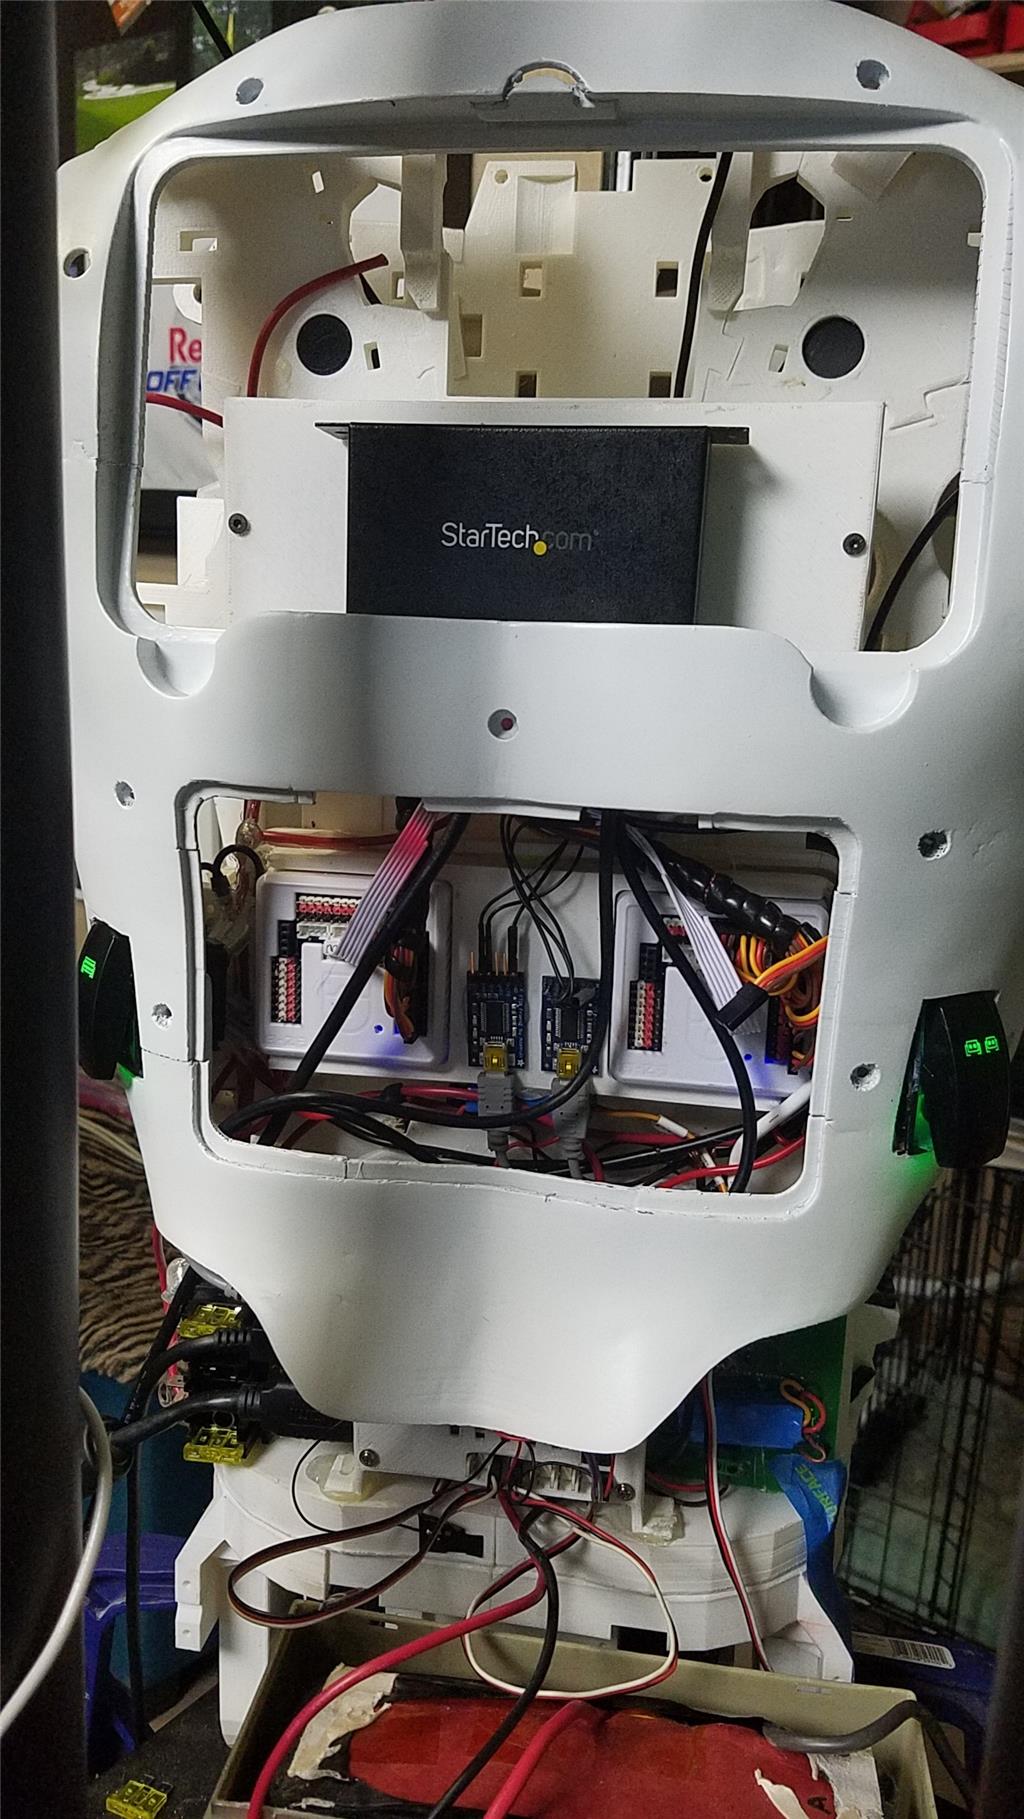
I have decided to use an onboard computer. I chose the Latte Panda due to it having an onboard arduino Leonardo and also because it uses little power.
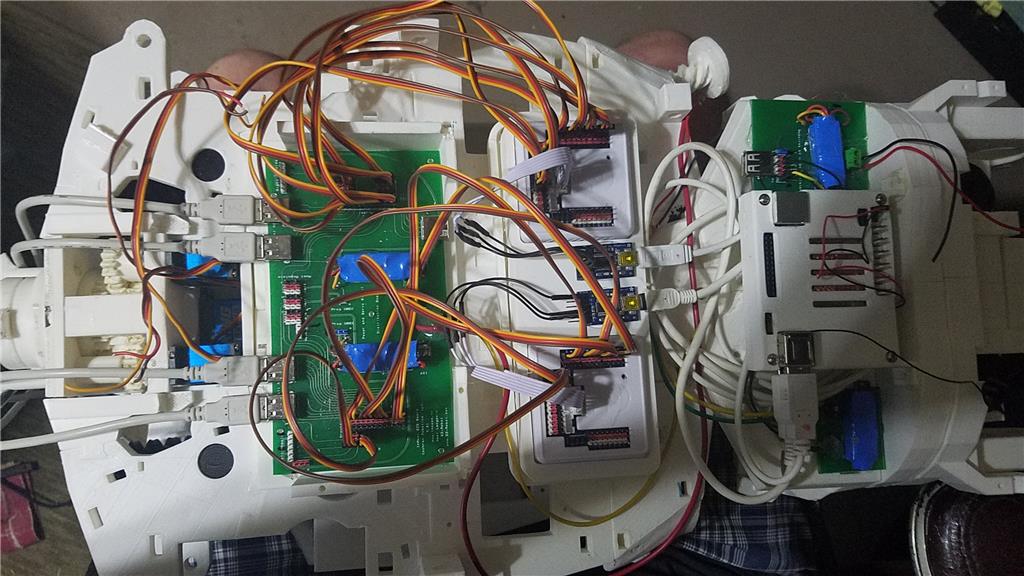
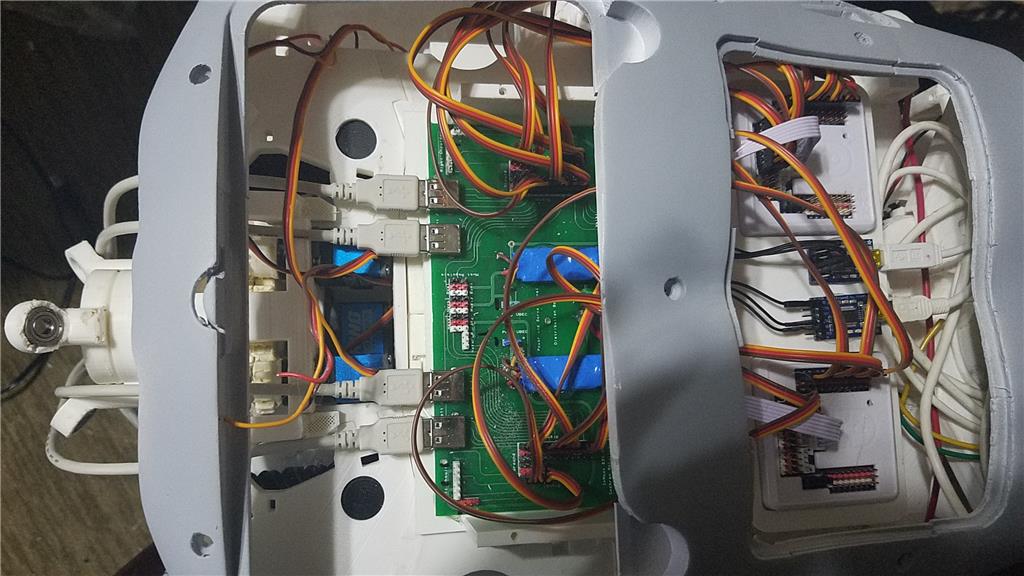
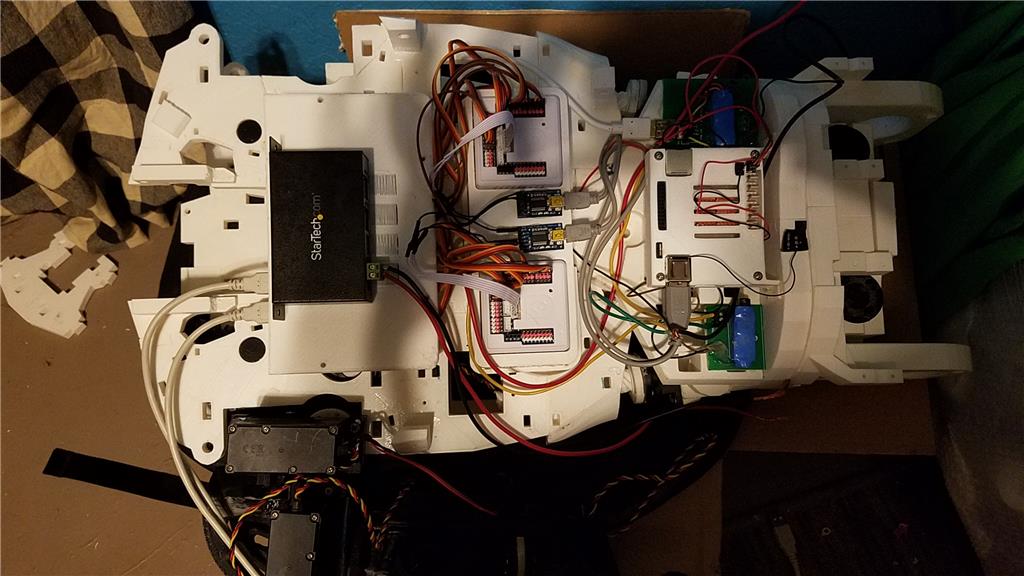
I used 2 EZ-B controllers connected via the camera port to Adafruit FTDI friend boards. This allows the Latte Panda to have a non-wifi dependent connection to the EZ-B's. I use a powered USB hub connected to the USB3 port on the Latte Panda to attach other items.
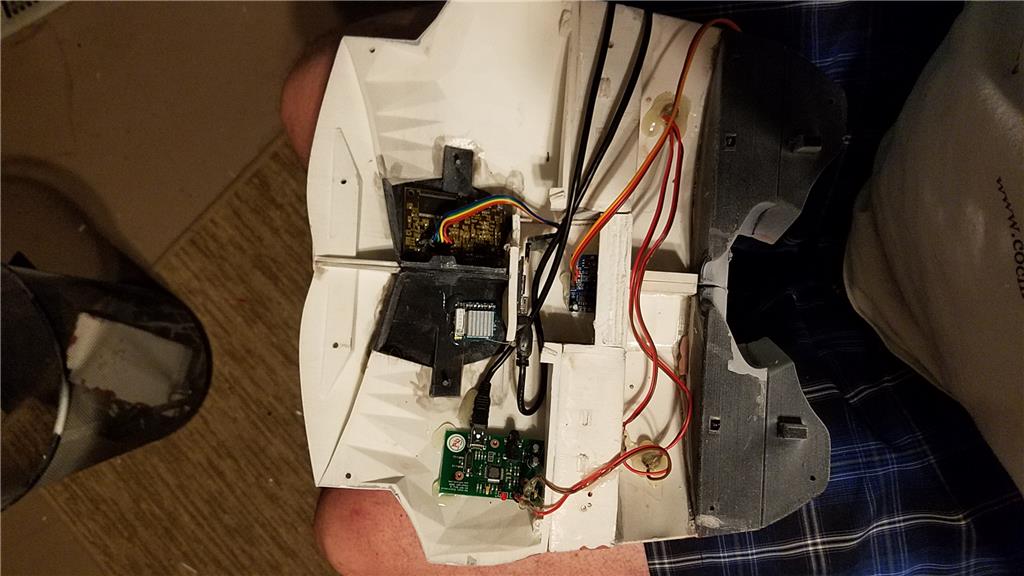
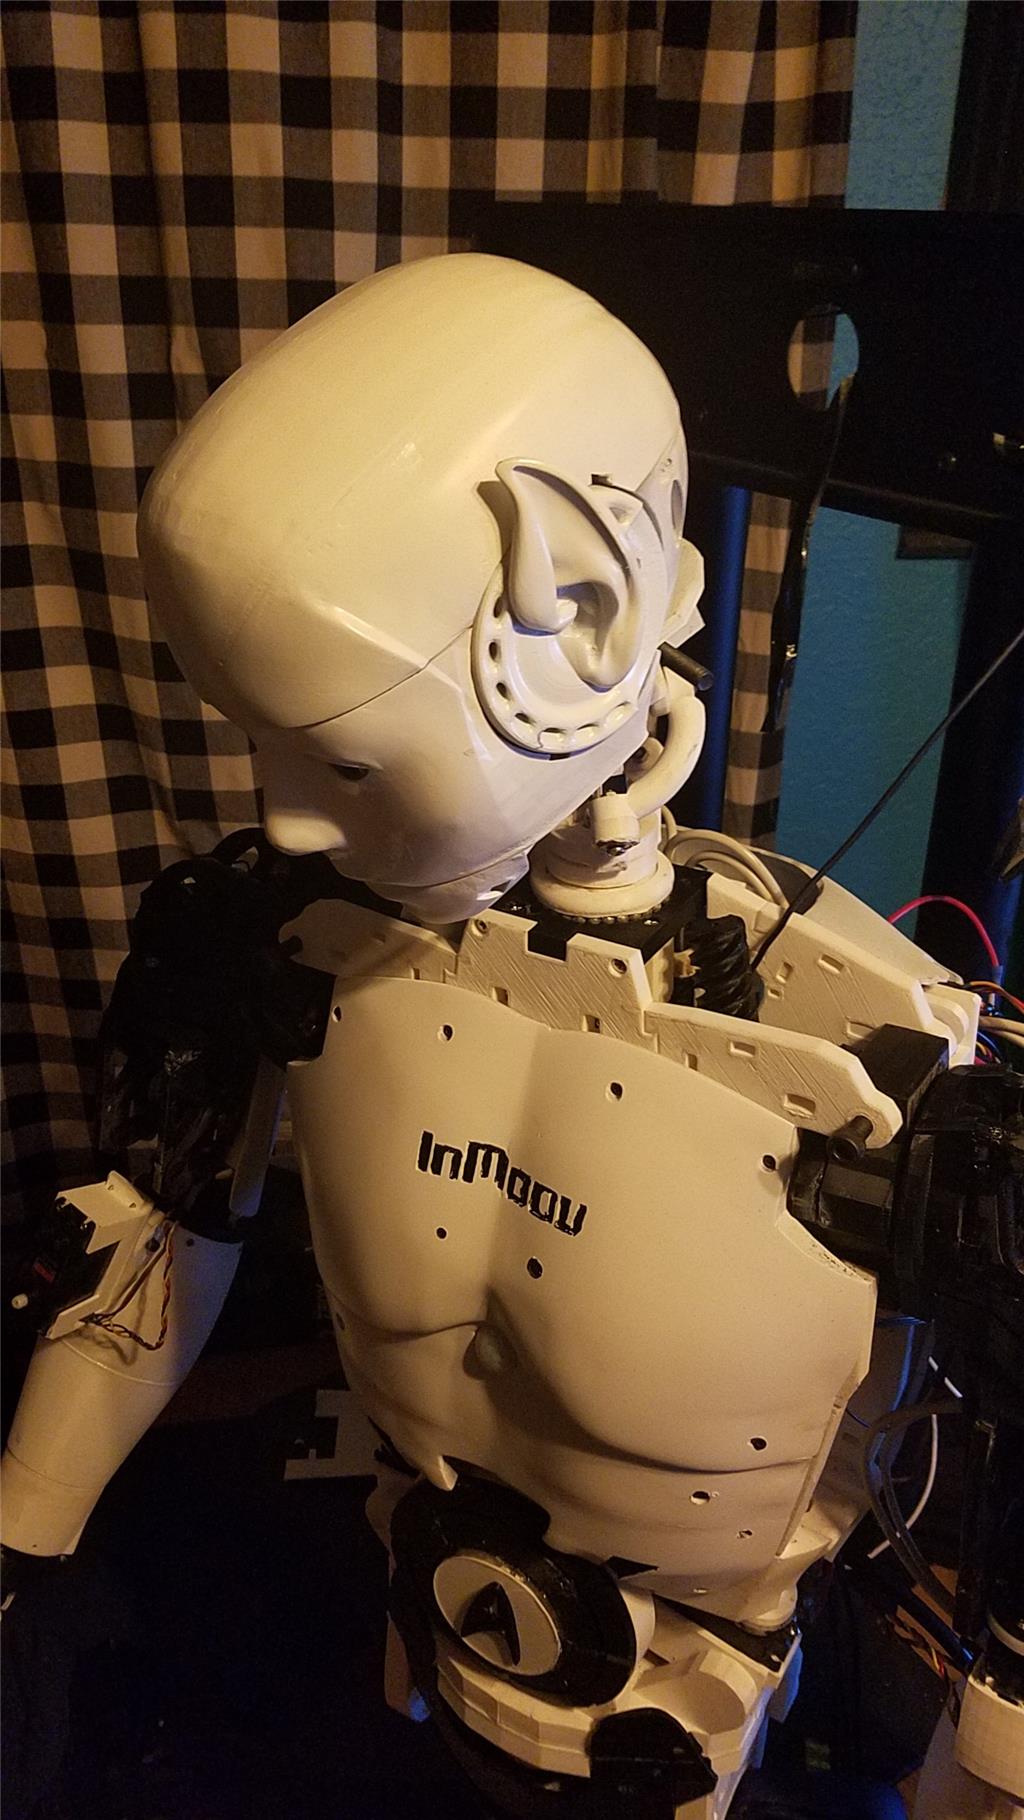
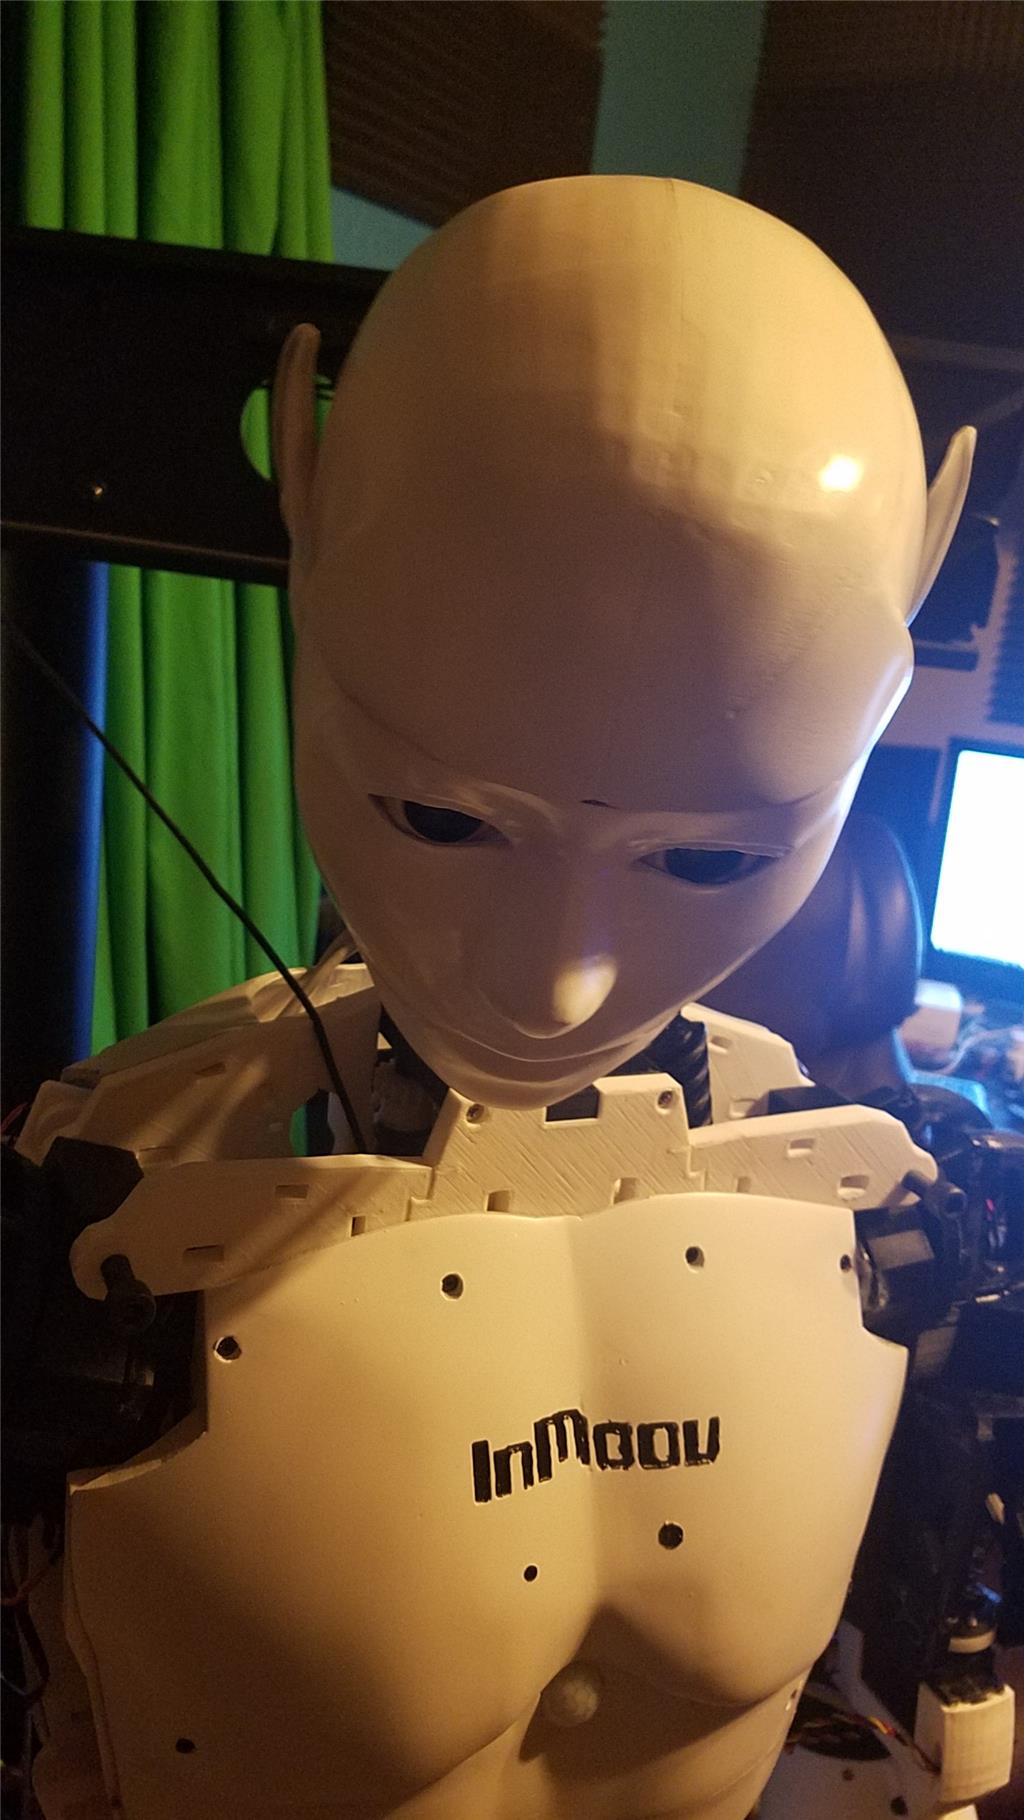
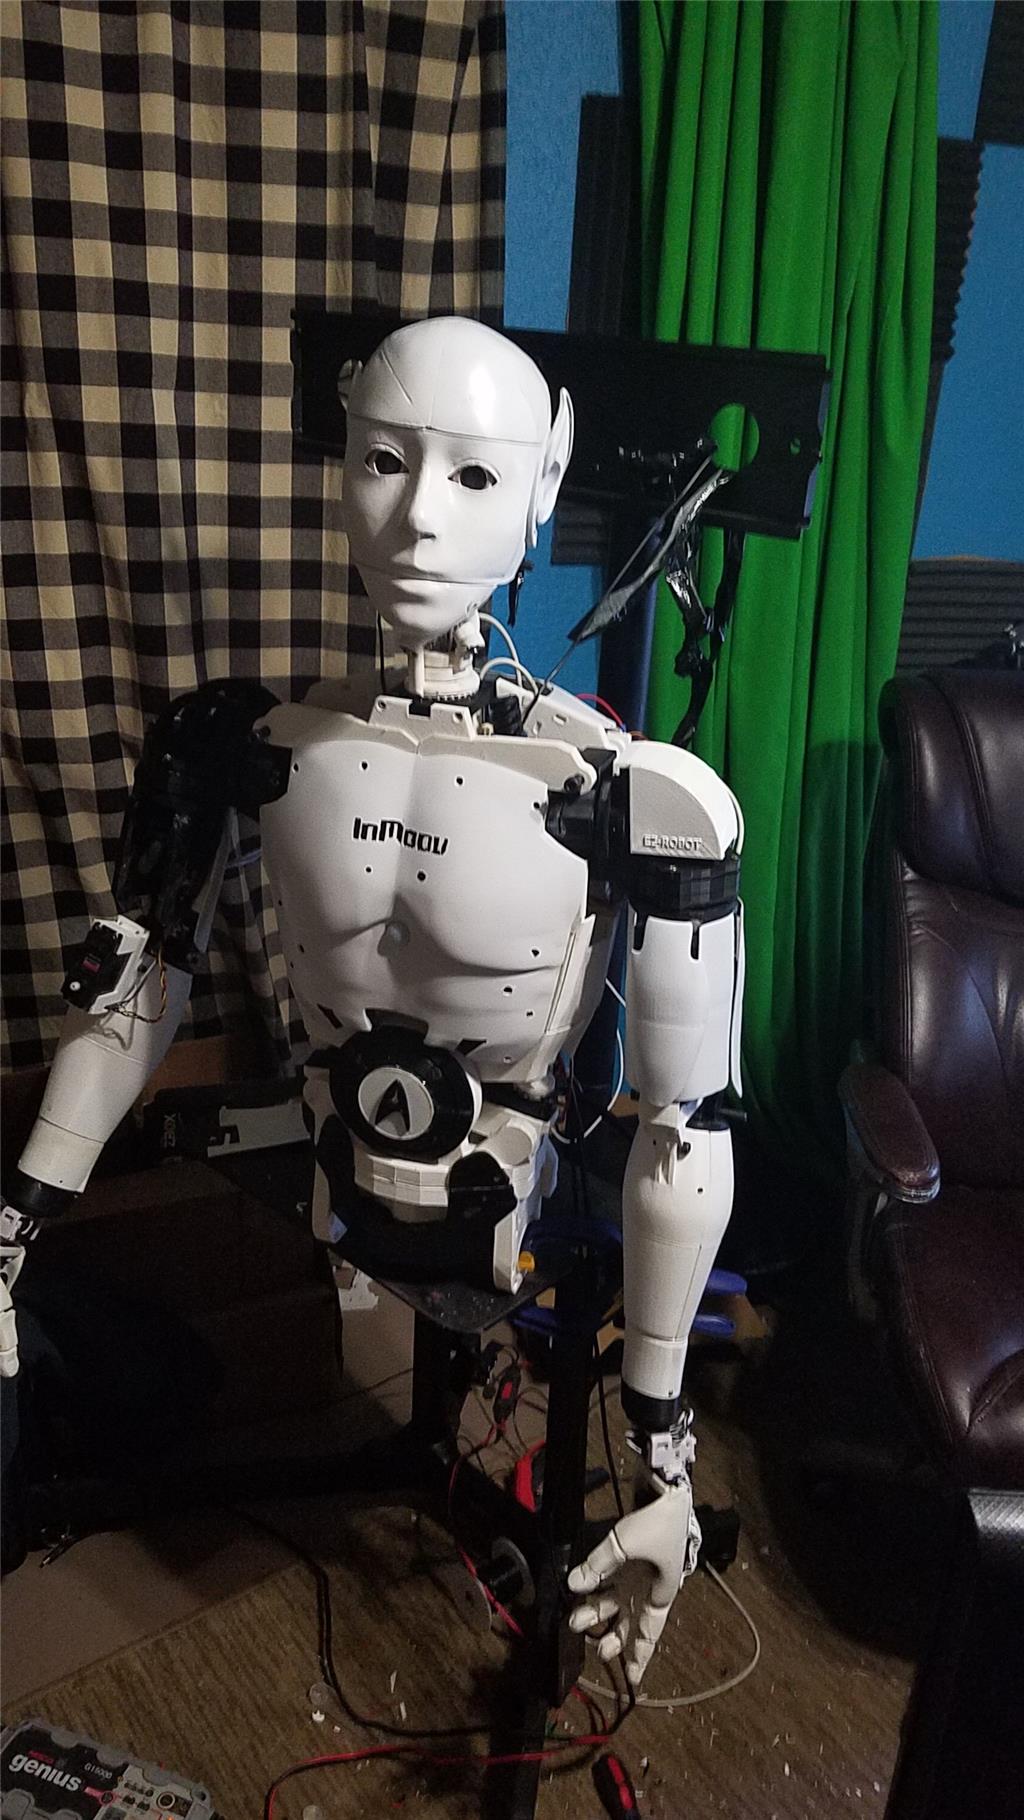
The Omron HVC-P is used to identify people, emotions, human bodies, hands, age and gender. It is attached to the Latte Panda via an FTDI friend which is then connected to the powered USB hub. It is mounted in the chest of the InMoov. I also use a 3 element microphone which is a MXL AC-404 microphone. It is disassembled and the board and microphone elements are mounted in the chest of the InMoov. This mic board is connected to the Latte Panda via a usb cable which is attached to the powered USB hub. There is a USB camera in the eye of the InMoov which is connected to the Latte Panda via the powered USB hub.
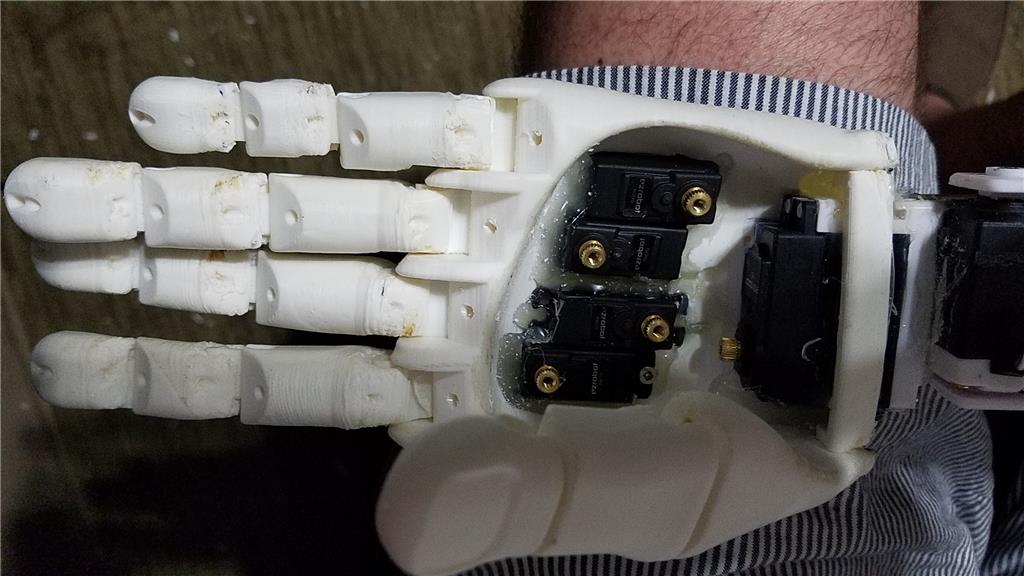
I chose to use the Flexy hand with the InMoov. The design is far more rugged than the original hand and works very well. There are 4 EZ-Robot Micro Servos in the palm of each hand which controls the main fingers. The thumb is controlled by an EZ-Robot HD servo. The wrist waves and uses an EZ-Robot HD servo to do this motion. I use the standard Rotational wrist.
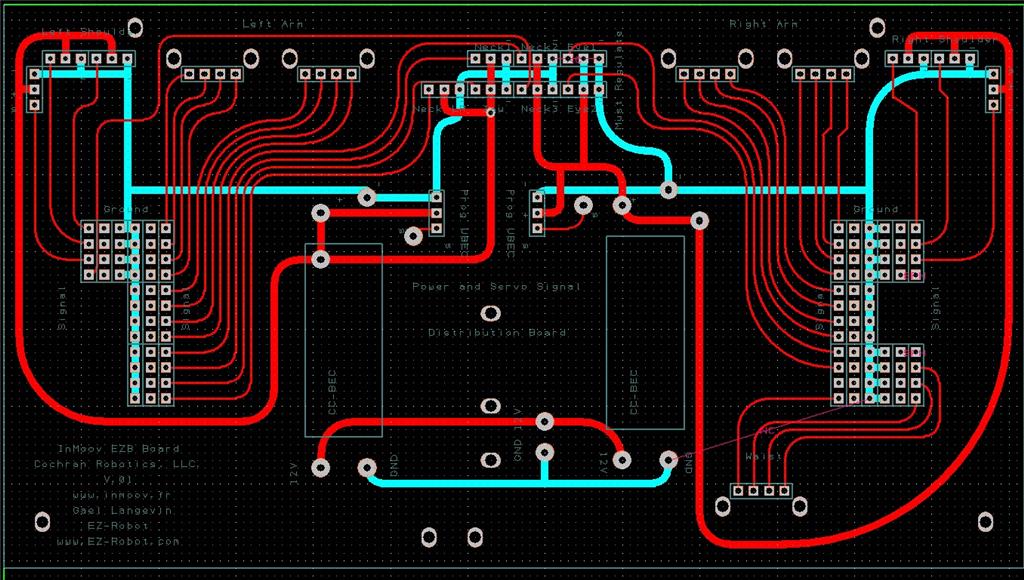
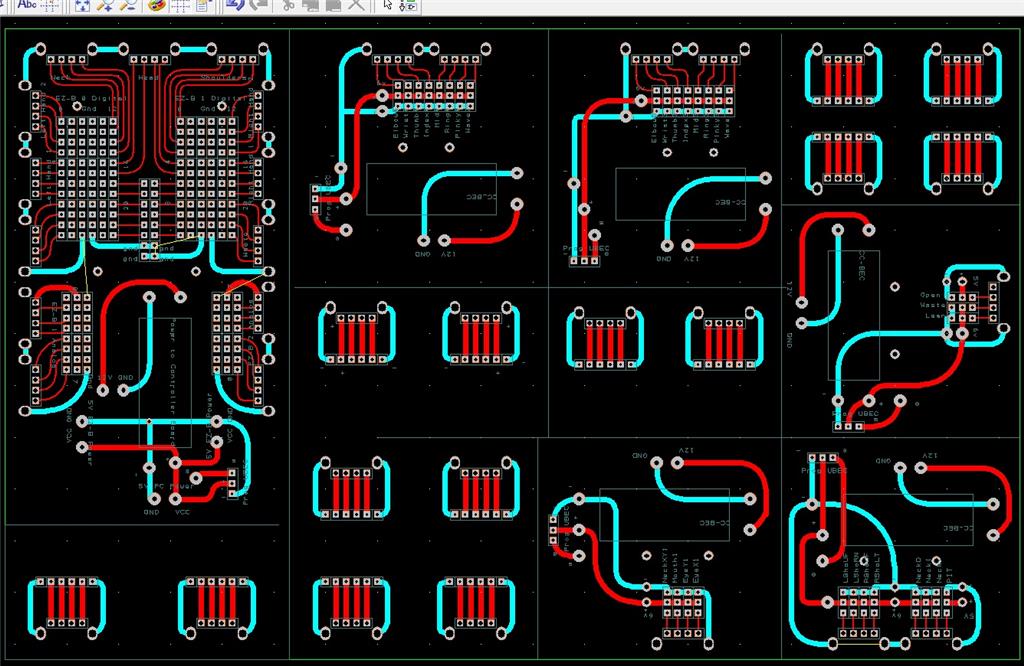
I have castle BEC's for power in the following locations set to the following voltages. Forearm's - 6.2 V - Controls fingers, wrist and elbows Custom power distribution board (2) set to 6.2 V controlling head, neck and Shoulder servos. EZ-B's - set to 6.1 V - it is mounted in the controller mounting plate and connects to the EZ-B fused power boards from a power base. Latte Panda - Set to 5.1 V and is mounted to the EZ-B controller mounting plate. Waist - set to 6.2 V and is mounted in the lower right side of the back. This provides power to the lean and pivot waist motors..
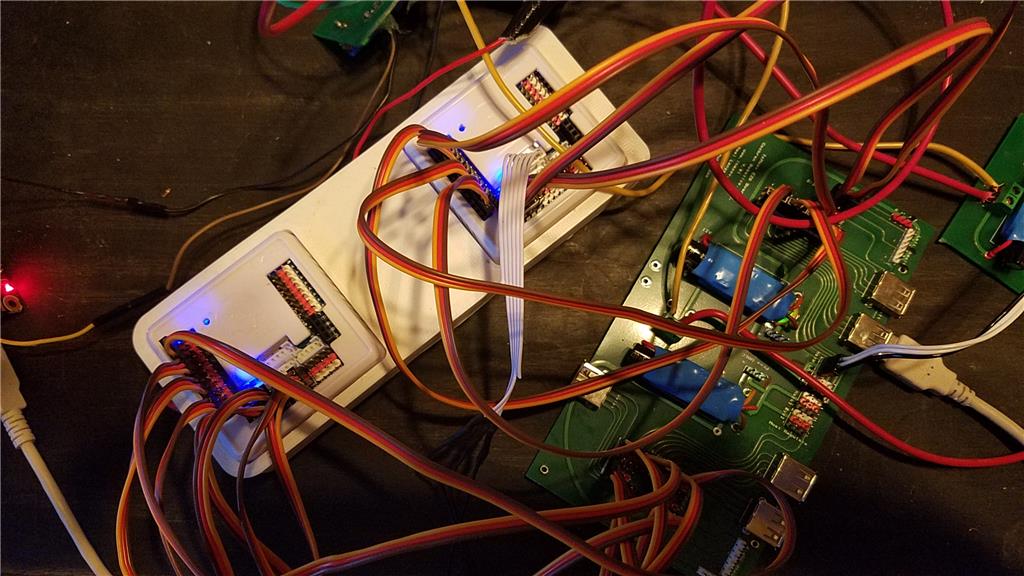
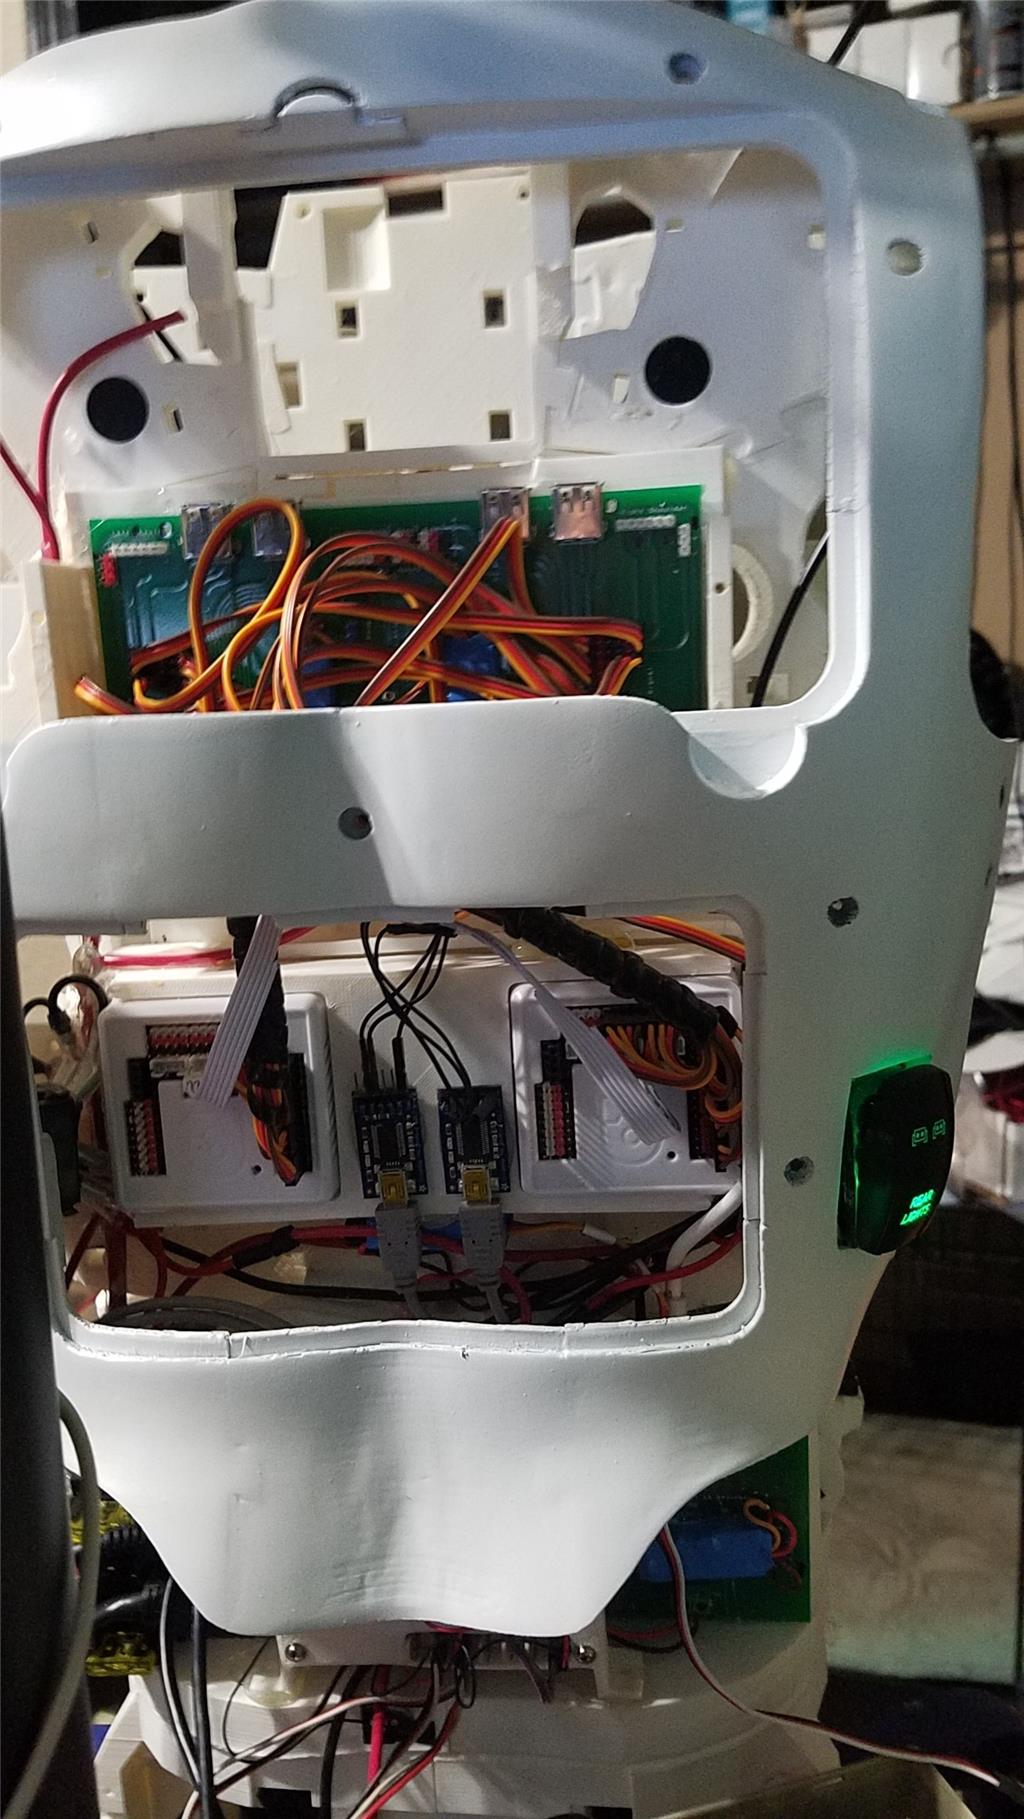
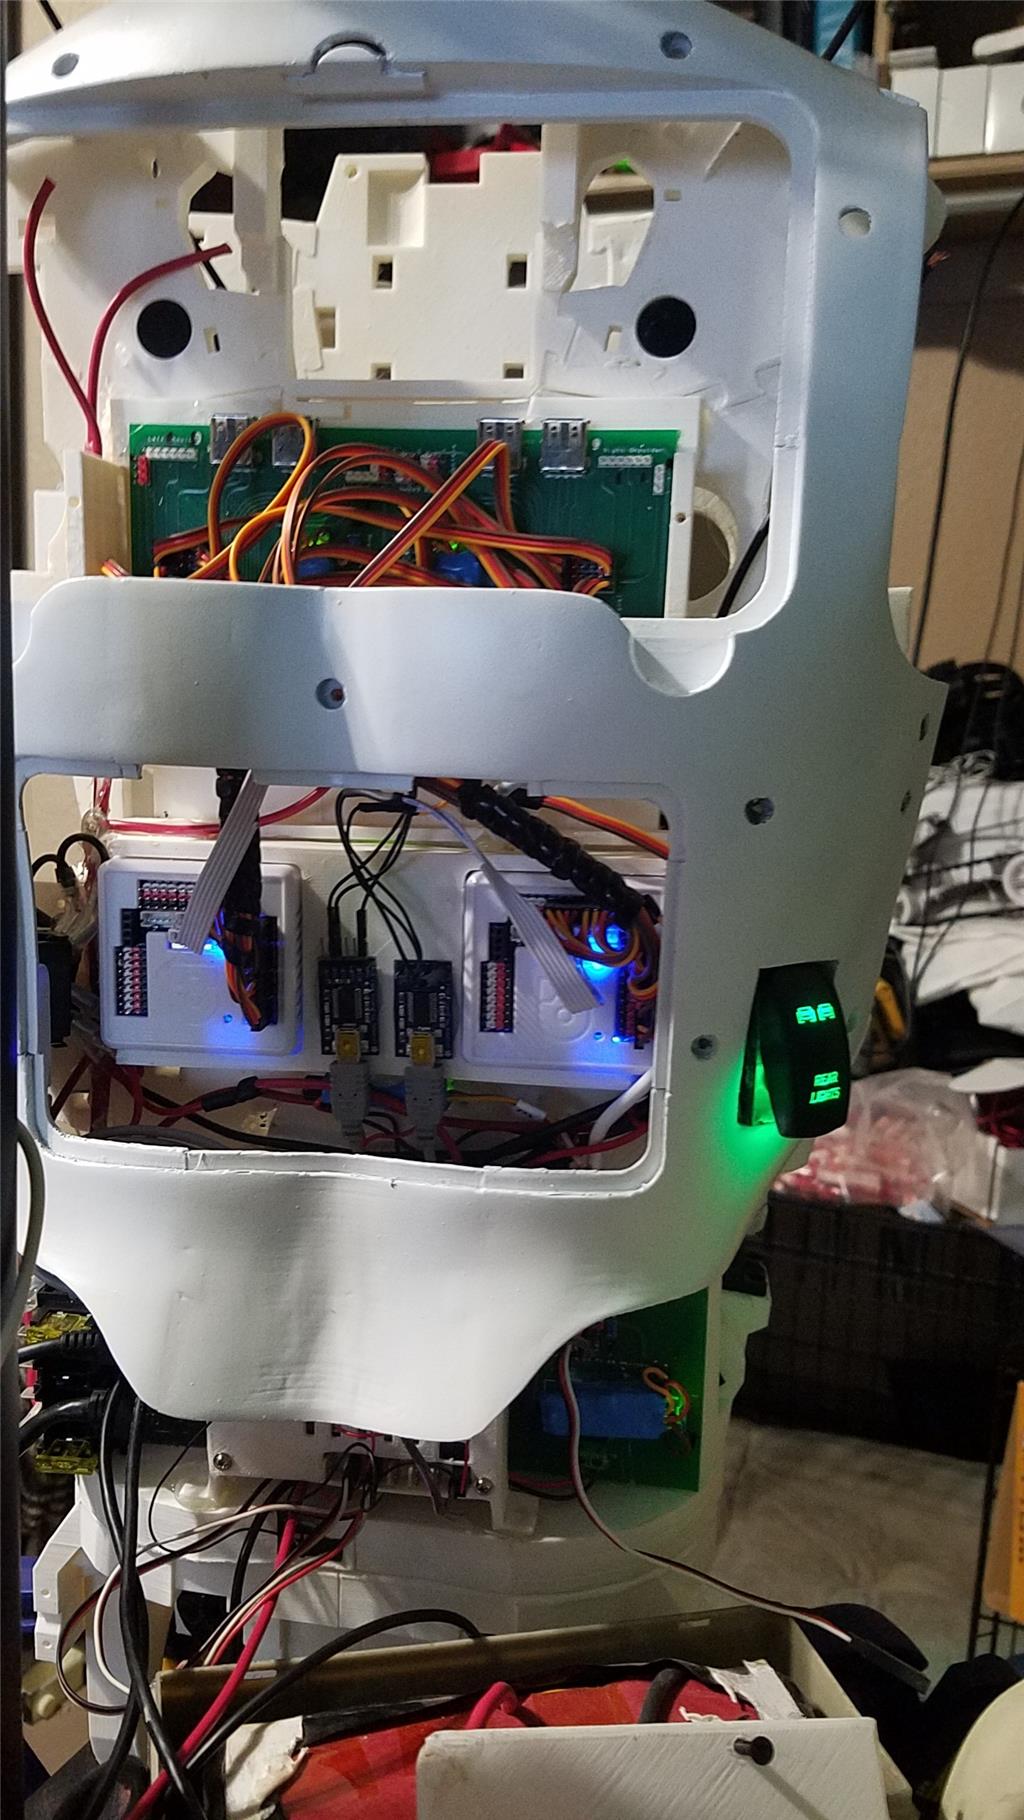
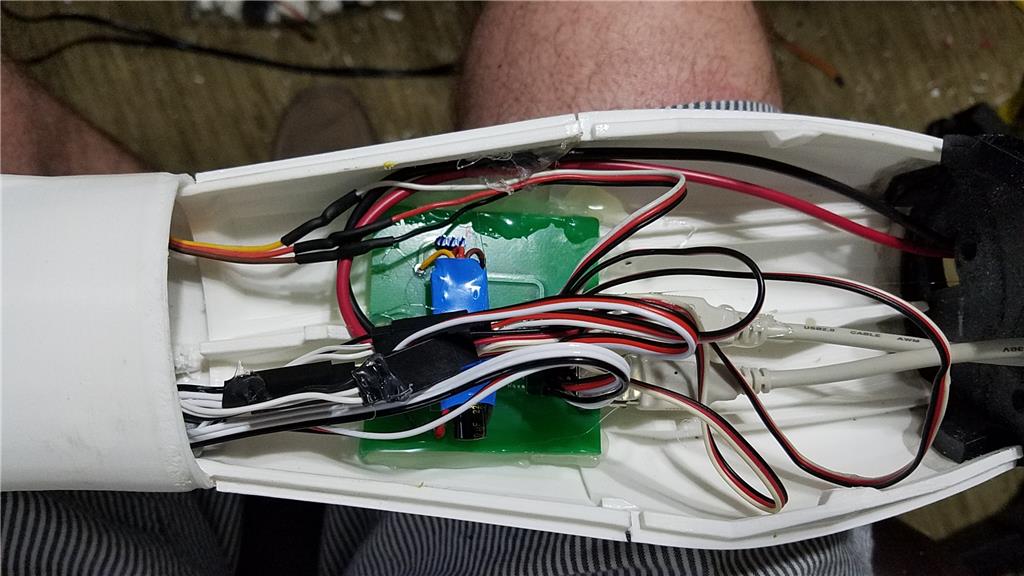
There are some custom power and signal distribution boards. These are in the forearms, lower back and in the upper back. The upper back or main board connects to these distribution points via USB cables to provide signal to the other boards for servos. The main board also has servo connector pins that are for the neck, head and shoulders. This allows the power to be distributed between multiple BEC's and also allows the servo signal cables to be shorter and more protected via the USB cables.
For power I use a LiFePo4 battery that is rated at 30 amps. It has the balanced charging circuit built into the battery and also has a low voltage shutoff built into the battery. This protects the battery and allows the battery to be charged with standard car chargers.
I put switches on the back on the InMoov which are rated at 20 amps at 12 volts. These are rocker switches that allow the user to pretty much slap the switch to turn it off. There are two of these switches. The servos for the elbows and fingers are on one switch. The latte panda, neck, shoulders, EZ-B's, waist motors and some lighting is on the other switch.
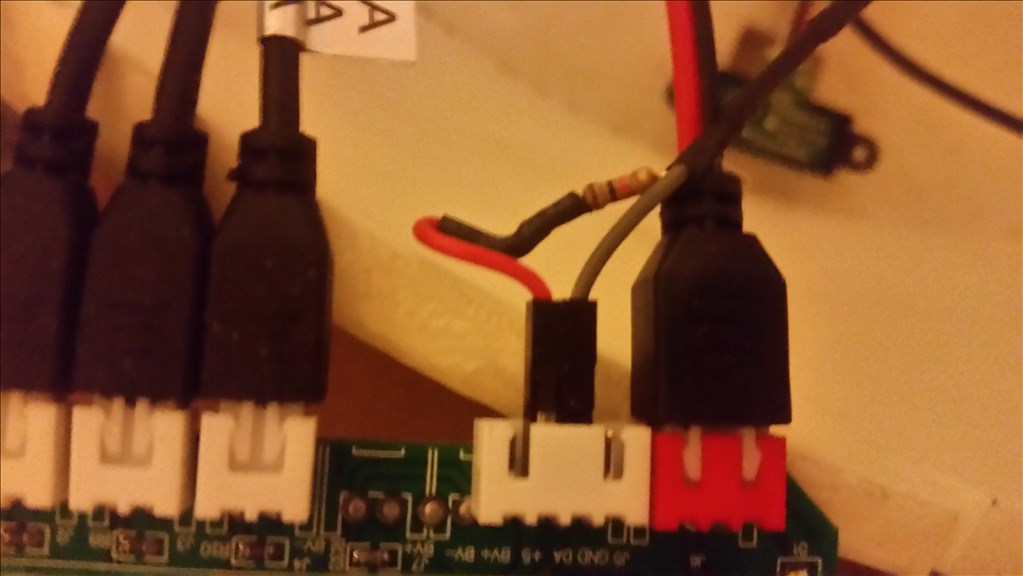
I also added a fuse block. This allows 20 amp fuses to be put in line to help protect things. The switches above drive the fuses for each of of the motors listed in that section.

-636348716348649435.jpg)

Discover more robots
Mcjeff0125's Robie Sr, Dr. Theopolis Hybrid
Edbot's RE3D The ROBOT Has Been Watching Too Much...

Hi Dave, That looks really good. I like the way you have mounted the sensors in the chest. I am starting to think the eyes are not the best place for the camera and have been playing with relative tracking to accomplish this. I have had some success thanks to the recent flurry of tracking posts here.
I know you probably have a lot of controllers around to run the neopixel code but you may want to look at the Adafruit pro trinket. I can confirm it works, it's tiny, and it cost $11.
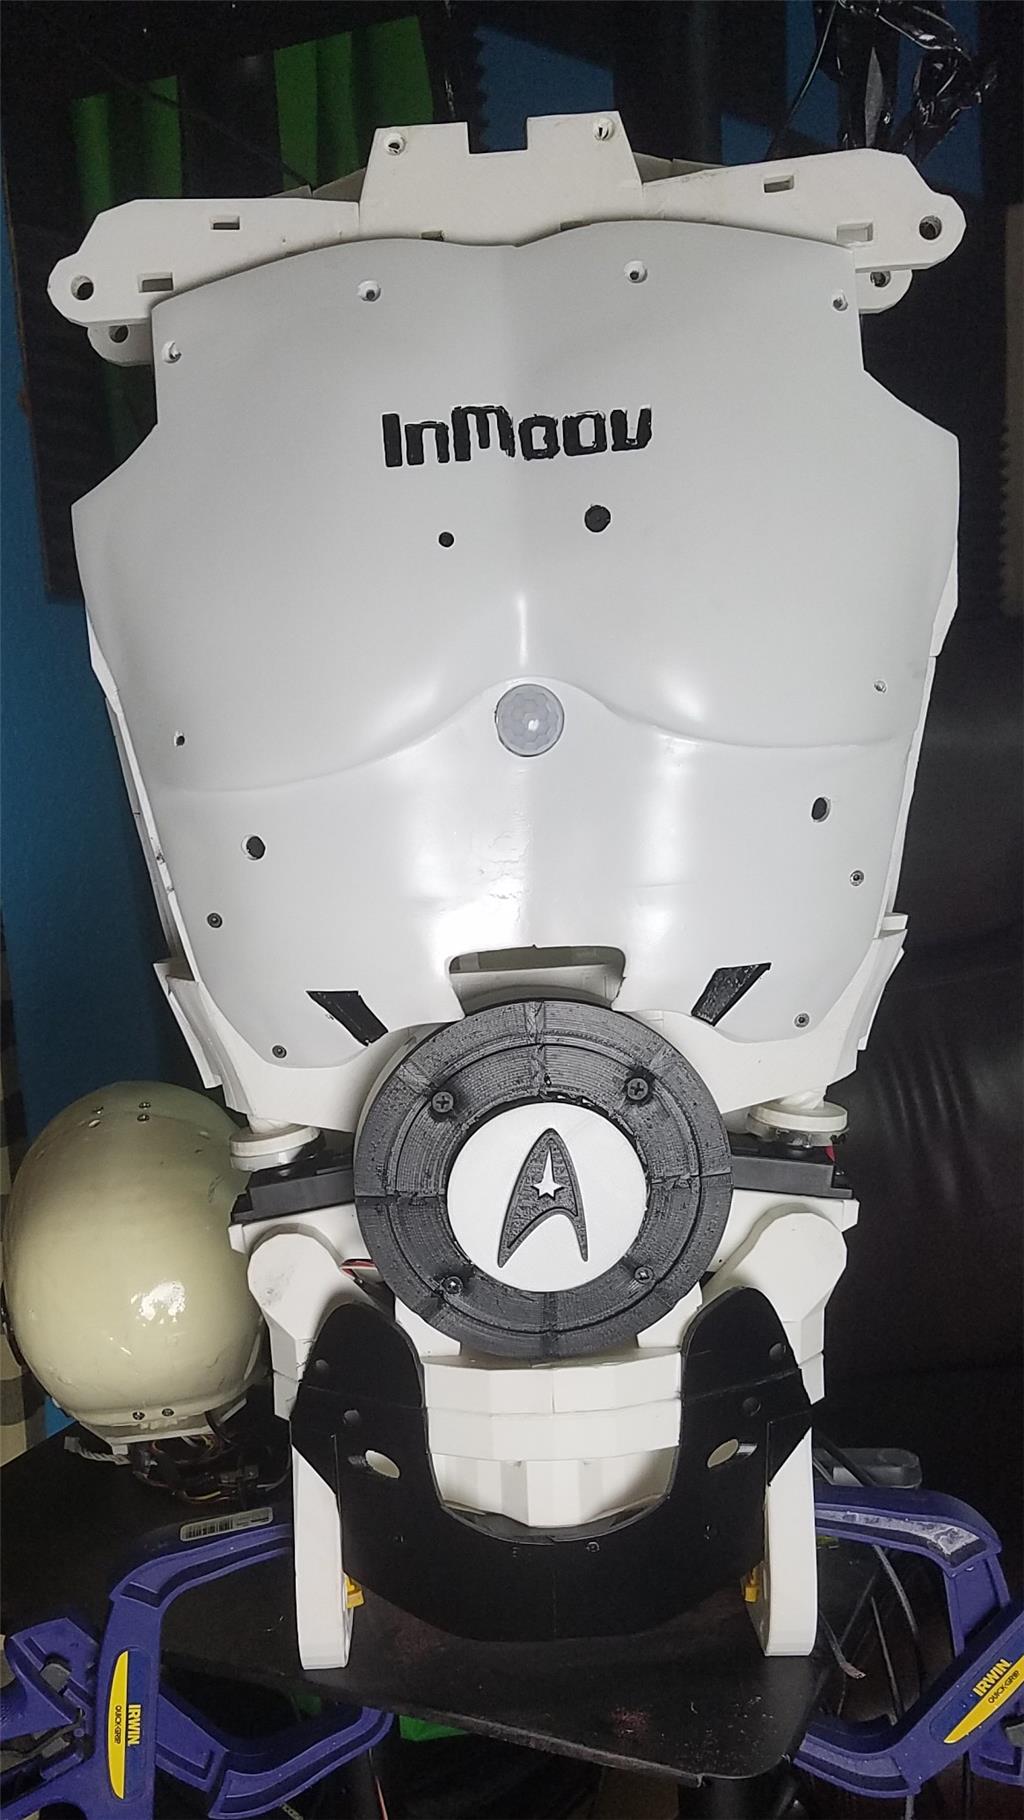
You definitely need a stand. I used an old office chair, cut it down and mounted a steel pipe to it. This way I can roll it around freely. The pipe extends up to the inmoov stand in the lower waist.
Keep the pics coming, you are giving me a lot of good ideas.
Perry
The onboard Latte Panda has an onboard Leonardo so I don't have to use the small arduino's for the neopixles. I like having one less thing to power even though they don't take much power.
Today I was able to do some programming. I got a 16 and 24 LED Neopixel working in the stomach. The 16 LED Neopixel is being used for more background lighting effects while the 24 LED Neopixel is being used more for information.
I had to make a small change on the python script used to run the Omron. It didn't quite have enough delay in the script to allow all of the information to be gathered from the Omron for my weak computer. Also, I found that running at 115200 baud was more reliable than the 921600 that I had been running this device at.
I added the cognitive emotion, API.AI, Pandora bot, cognitive image recognition, Omron plugin, Microsoft Speech Recognition service, a camera control for the camera in the eye and some scripts to tie it all together.
Right now, if the omron picks up an emotion from someone, the 24 LED neopixel changes to show what it sees. For example, when someone is happy, a green smiley face is displayed on the larger Neopixel with a green background. If someone is angry, the background switches to a strobing red and the larger neopixel changes to a bright red. Each emotion has its own pattern. If no emotion is detected (or nobody is detected) it goes back to a faint red strobe background with a light white ring around the outside of the stomach circle. If the omron detects a face, but is unable to determine the emotion, I assume this is caused by the angle of the face, so I then try to use the cognitive emotion plugin (using the camera in the eye which is at a different angle to the user) and try to get the emotion from that plugin.
Right now, I have the speech recognition plugin picking up spoken text automatically. When it hears something loud enough, it passes the results of what it heard to API.AI for processing. If API.AI can use it, it tries to. If it doesnt know what is being said, I pass the recognized speech off to Pandora bot. Pausing the speech recognition controls at the right time is probably the most difficult part of getting this setup, but it isn't bad.
If the Omron recognizes someone, it jumps to random greetings in a script. If the person has already been greeted, it doesn't try to greet them again for a little while.
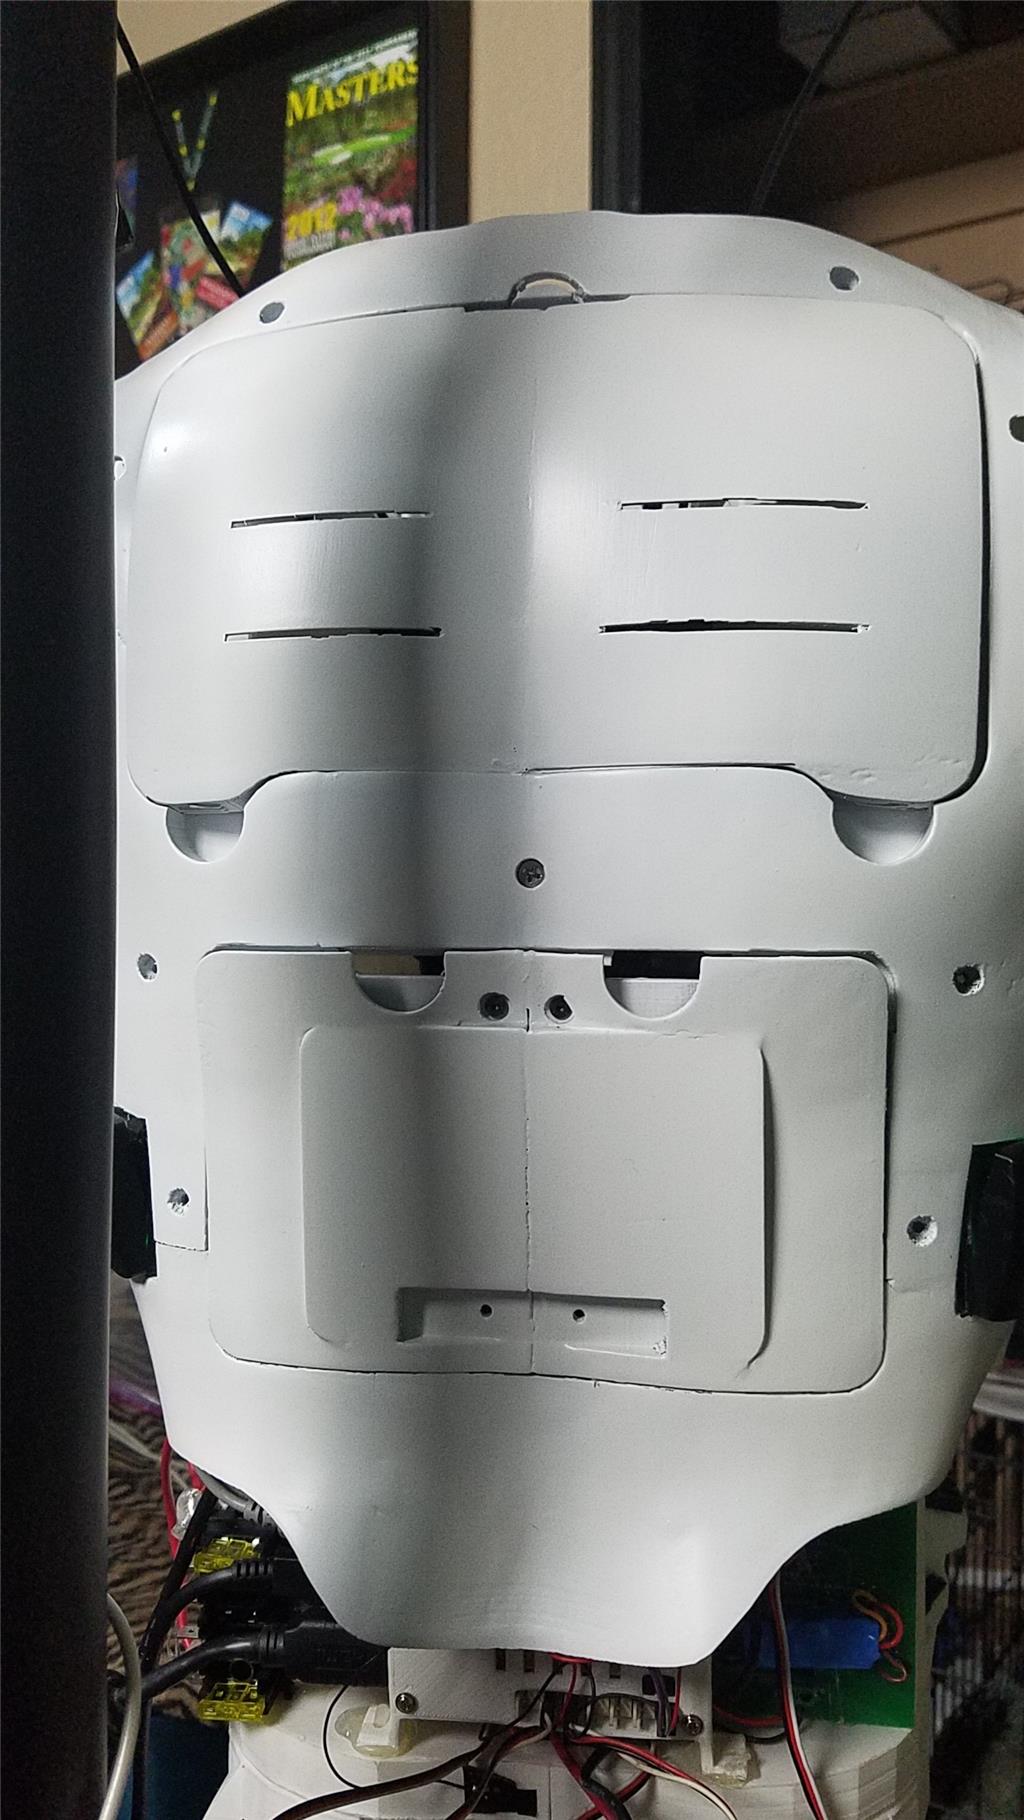
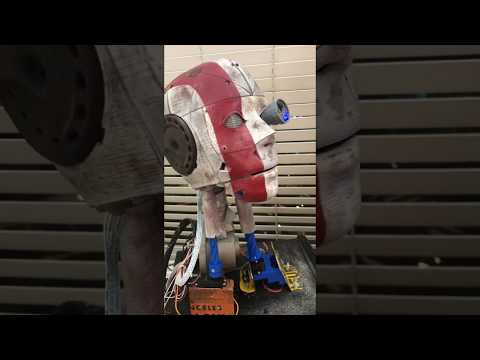
The neck isn't completed yet. I am to the point that I need to finish getting all of the motors in the robot and add the power switches and such to have stable wiring for power. Right now hot glue is keeping the ends of the wires from contacting anything dangerous. I need to finish the build of the inmoov so that will be my main focus. I won't have a video of the above things for a while. I finished it up and got it working pretty well and am afraid to move him around to much due to the power wiring mess that I have going on. I don't think I will have a good handle on that until after I complete the build and can figure out how I need to route all of the wiring.
I have decided that I want to replace the EZ-Robot camera that is in the chest with a third microphone element. I think it will help pickup the sounds a little better, not that what is there is bad by any means. It just requires me to speak louder and more direct at the robot than I would like.
Hopefully soon I will be able to finish up the build and get back to the programming side. That was a lot of fun. I forget how easy it is to do things in ARC sometimes. Also, the Latte Panda performed great. I did have one lockup of ARC, but it was when I was trying to see how high of resolution I can take the camera that is in the eye. I took it to 720P mode and caused the lockup, which isnt surprising seeing as the Latte Panda is a very light weight computer running on 5 volts. I am impressed with how it performed through everything I threw at it.
That being said, I have turned off everything that isn't essential on this computer. It reminds me of running Windows 95 now, but is Windows 10 Pro. All of the improvements to the user experience have been removed along with Cortana and all unnecessary applications. It runs very well that way and handles ARC (except for the screen real estate issue) very well.
All he needs now is his own reality show.
Speaking of shows, are you taking a break from your show?
I had a horrible month at work. I had to work 2 weeks ago, last week I was out of town and today I got called to Dallas to go through post mortem meetings for the issues at work this month. I just got home and am hitting the bed. I am glad this month is over.
Dang that's crazy! Get some rest!
I was able to get the right arm wired and working from the elbow to the fingers. Next is to get the pots in the shoulder and then start on the other arm and hand. My granddaughter and grandson ended up with two of the left hand fingers, so it looks like I will be reprinting those before going much further on the left hand. I will probably do the left shoulder before working on the left hand. There is plenty to do between getting the shoulders and waist running smooth and making a stand for him to use. Right now he is on a TV stand that I use for trade shows. It works but isn't the most stable platform for me to use.
Still need to get by the store to get the screws for the joints in the neck. I doubt the small store that has a million different size screws will be open tomorrow and work is keeping me busy again today, but soon enough, I will have time to take the 3 mile drive to the store and get these bolts/nuts.
I was also able to clean up the power wiring issues. Up one side of the back is the VCC wire. Up the other side of the back is the ground wire. The C-BEC's are attached to these wires at different points. This keep the short risk to a minimum I think and is a pretty clean install.
I ordered some 12v 20a power switches for the back. They should be in tomorrow. Here is the link to what I got. https://www.amazon.com/gp/product/B01DG8802W/ref=oh_aui_detailpage_o00_s01?ie=UTF8&psc=1 I may have to do some modification to make them fit. Also, I will probably paint the bottom part black to try to get rid of the "Rear Lights" text. Anyway, I thought they would look good on the back of the InMoov. I plan to have one switch for the base when it gets built and the other switch for the upper body. I may change that up depending on the current draw when the motors are all moving.
I got the power rerun in the InMoov yesterday. This included adding a 20 amp fuse for the elbows and hands, and another for the EZ-B's (which still each have their own 20 amp fuses), Latte Panda, NeoPixel rings, Neck servos, shoulder servos, waist servos and head servos.
The switches were added also and allow me to turn off the hands and elbows separate from the other devices listed above. There was slight cutting away of some of the switch holes to allow these to fit, but nothing too major. The only issue that I see is that the back needs to be mounted now as I continue the build. This isn't ideal but is now "necessary" unless I run wiring that is longer than I would like.
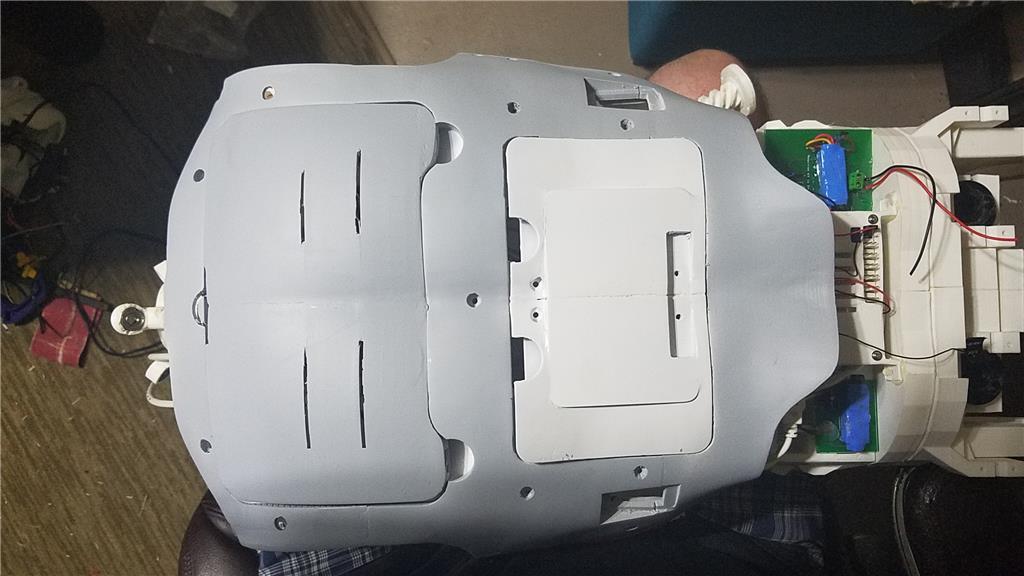
I have some painting to do on the bottom of the stomach and a little touch-up on the back from a few issues that I encountered. I hope to be able to do the painting on the back and bottom torso tonight.
I have the arms removed so that I can work on getting the pots installed and arms working right without taking the chance of damaging the chest and back. I hopefully will have time to get those installed on Friday or over the weekend.
From there, I will do what I need to do to get time to get the nuts and bolts to finish off the neck and mount the head. I plan on getting it working off of the torso before mounting it to the torso.