
PRO
RoboHappy
USA
Asked
Inverse Kinematics Guidance For Cybot3000
I have a question regarding the use of the Inverse Kinematics robot skill in Synthiam ARC. I've managed to create the general arm configuration based on the initial instructions, but I would like to know if there is a comprehensive video tutorial available, along with more detailed instructions on using this skill effectively.
For my setup, which is for the Cybot3000, I have both arms mounted in a downward position on each shoulder. Each arm consists of five servos using EZ-Robot HDD servos and grippers. I've configured them as follows:
Right Arm:
- v4 = Shoulder
- v5 = Arm
- v6 = Elbow
- v7 = Wrist
- v8 = Gripper
Left Arm:
- v11 = Shoulder
- v12 = Arm
- v13 = Elbow
- v14 = Wrist
- v15 = Gripper
Any guidance on using Inverse Kinematics with this configuration would be greatly appreciated.
Related Hardware (view all EZB hardware)

EZ-B V4
by EZ-Robot
EZ-B v4/2 robot controller: dual Cortex ARM, Wi-Fi, audio/video, 24 servo/digital ports, I2C/UART, camera and Synthiam ARC control for custom robots
Wi-Fi / USB
Servos
24
Camera
Audio
UART
3
I2C
ADC
8
Digital
24
Related Robot Skills (view all robot skills)

Camera Device
by Synthiam
Use PC or robot cameras for vision tracking: color, QR, glyph, face, object, motion; record video/data, control servos and movement, run scripts
Inverse Kinematic Arm
by Synthiam
Control robot arms with inverse and forward kinematics, converting X/Y/Z positions into joint motion and reporting end-effector location.
Requires ARC
v12

Two things, according to the debug log...
Your skill is actually titled "Inverse Kinematic Arm", not "IK Right Arm"
You're using two versions of ARC 2026.04.11.00 (which is fine because it's the latest) and 2025.12.21.00 (which is super outdated and should not be used because you'll get a million errors)
I named the skill IK Arm Test as show... IK Right Arm
This is the test example from athena as posted above....
My ARC vers. on this computer at the moment is v2026.04.11.00 I still don't see what's wrong here
Athena provided that example code and mentioned that the name of the robot skill will need to be changed in the code. This is because without a screenshot or copy of your cheat sheet, it’s impossible to guess what the name of the robot skill is.
My advice is to upgrade to the latest version of ARC - because we added a more verbose error message to handle this scenario. A failed ControlCommand now provided a very detailed message.
Secondly, Athena asked for a desktop screenshot, which would be incredibly useful. That will give her the information needed to help further with the correct syntax.
Doing that, you’ll be up and running in no time.
I hope this can be read,it's the only way I know how to show the contents of the cheat sheet athena requested
Perfect - the screenshot explains it.
What’s happening
Your skill name is
IK Right Arm, but the Cheat Sheet for that skill shows:So
MoveTobelongs to the built-in skill namedInverse Kinematic Arm, not to your renamed skillIK Right Arm.That’s why ARC says:
The fix
Use the built-in skill name exactly as shown in the Cheat Sheet:
Important note
Your custom skill title
IK Right Armis valid for commands that the Cheat Sheet shows under that title, such as:But not
MoveTo.Why this is confusing
ARC skill titles and command targets can be different:
IK Right ArmInverse Kinematic ArmSo when using
ControlCommand(), always use the name shown next to the command in the cheat sheet.What to do next
Replace your test script with:
Run it again.
If you want to control the left arm, you likely need the same idea applied there too, but I’d want to see that skill’s Cheat Sheet before guessing.
One more helpful point
The screenshot also confirms you’re in the latest ARC version, so that part is fine.
If you want, I can help you with the next step after MoveTo works - for example:
If you want, send me a screenshot of the left arm skill Cheat Sheet too, and I’ll tell you exactly which commands to use for both arms.
ok, some success. I fixed the test script, correcting my text within the sample test script. Few things happened... The Left arm proceeded to move around backwards getting caught on some wires and even broke a piece of the arm (the panic button did not help). I found I had to inverse servos and that base servo was assigned from one (was set for v11 instead of v4 in the Inverse kinematics setup). Ran it again and the arm move completely different Rotated outward then straight out but nothing broke this time).
Another thing I noticed... For all this arm testing, I am using both the Inverse Kinematics skill and my original Auto Position skill, which also used to move one servo at a time. Within the Auto Position skill, I created a Left and Right arm test. Interestingly and horribly found that the Left Arm test work ways different now because of my IK Left Arm Test and the Right Arm test no longer works. I'm assuming that the Inverse Kinematics skill overrides the Auto position, so I can not have both skills together for this project ? Shown below is my Arm Testing Project for Cybot 3000
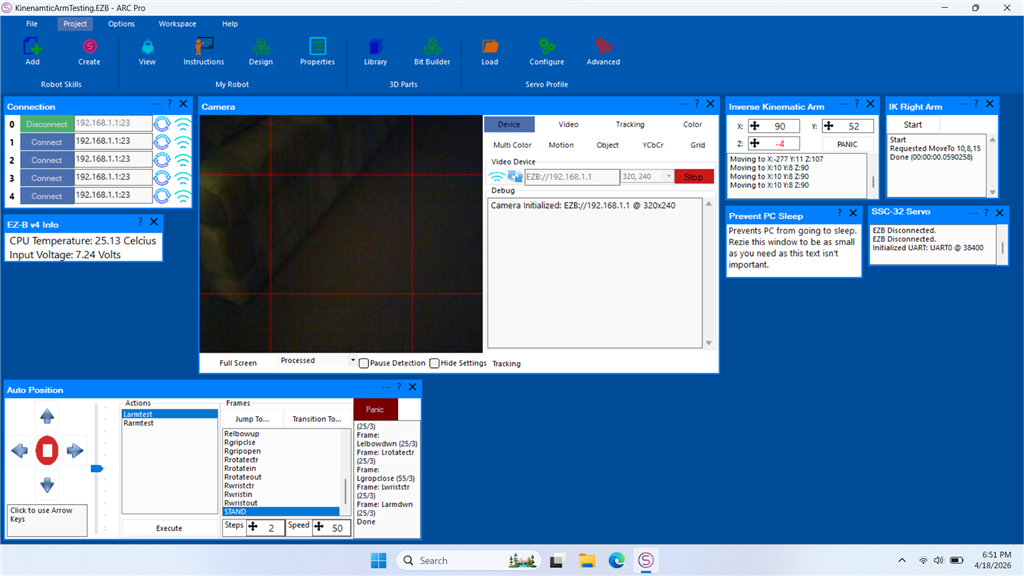
I am also interested on creating a Right Arm test ( using servos v11-v15) and how the camera gets used with this skill.Yes - what you’re seeing makes sense, and your screenshot is very helpful.
Short answer
Yes, the IK skill and Auto Position can both exist in the same project, but they can absolutely fight each other if they are both trying to control the same servo ports.
So if:
v4 - v8then whichever skill sent the most recent command will appear to "override" the other.
What I see in your screenshot
I can see:
That tells me you’re testing multiple behaviors at once, which is fine for development, but it also means you need to make sure each skill owns different servos, or you need to intentionally coordinate them.
Why the arm moved backward and hit wires
That usually means one or more of these are still incorrect:
You already found one major issue:
That’s important. For the right arm, the IK skill must be configured with the correct ports:
v4shoulderv5armv6elbowv7wristv8gripperAnd for the left arm:
v11shoulderv12armv13elbowv14wristv15gripperVery important: Auto Position vs IK
If Auto Position is using the same servos
Then yes, it will conflict with IK.
If Auto Position is only using different servos
Then it can coexist just fine.
Best practice
For now, while debugging:
That is the fastest way to stop the servo "fighting."
About the Panic button not helping
The Panic button on the IK skill should release the servos, but if:
then it may not feel like it helped.
Also, if a joint is physically pulling the arm into a bad position fast enough, the Panic may happen after the damage starts.
Recommendation
Before every IK test:
The camera and IK
The camera does not automatically drive the IK arm.
The camera is usually used in a script that:
ControlCommand("Inverse Kinematic Arm", "MoveTo", x, y, z)So the camera is a separate skill, and your script connects the two.
Why your left arm moved differently after you changed IK
That’s expected if:
Once you corrected the servo orientation, the movement changed, which means the solver is now using a different geometric interpretation.
That’s actually progress.
What I recommend next
1) Test one arm at a time
Disable Auto Position temporarily.
2) Verify right arm only
Use:
v4, v5, v6, v7, v83) Verify left arm only
Use:
v11, v12, v13, v14, v154) Do not command both arms from different skills at the same time yet
Until the geometry is correct, it gets confusing fast.
Example: right arm test script
If your right arm skill is actually named differently in the cheat sheet, use that exact command name, but the screenshot you posted earlier showed Inverse Kinematic Arm for
MoveTo.Example: left arm test script
If you have a separate IK skill instance for the left arm and it is the same skill type, it may still use the same command name pattern. The difference is the servo ports inside the configuration.
Example:
But whether that moves the left arm depends on:
Camera example concept
Once your arm is stable, I can help you make a simple camera-to-arm script like this:
But that should come after the arm is stable and safe.
Best next step
I’d strongly suggest this order:
What I need from you
To help you build the right arm test and left arm test correctly, can you tell me:
v4-v8and the left arm to usev11-v15exactly as listed?If you want, I can write you a clean test plan for Cybot3000 that tests:
That would probably be the safest way forward.
Also, don't forget that the inverse kinematic Cartesian coordinates must be within the range of your arm. What I mean is, if your arm has a total reach (from base to end effector) of 30 cm, you can't send a coordinate that bends the arm in, because 0,0,0 is the base. So any numbers smaller than the base will try to send the end effector backward toward the base.
Just imagine if your human arm (your arm, as a human) were told to position your fingers at 10, 15, and 10 cm from your shoulder, which is within your actual arm tissue. How the heck would that work? Your arm can't bend to place your fingers inside your arm. So you need to make sure the coordinates you send are not some arbitrary random value.
And that is what forward kinematics does. You do not send the arm into random Cartesian coordinates that you make up in your head. By doing that, you'll break something. Instead, you use forward kinematics. Forward kinematics means manually moving the servos using servo Robot Skills to position the end effector in a safe pose. Take note of the Cartesian coordinates in the inverse kinematic skill. You will see those numbers change when you move the end effector.
Move the servos around to get an idea of your end-effector's reach, and take note of the X, Y, and Z coordinates.
Once you have a better understanding of what the Cartesian limits are of the end effector, you will know what coordinates to send to the inverse kinematic skill.
Summary: You will break things if you're trying to learn limits by using random numbers. Move the arm around to understand its range limits better.
There is an entire section in the manual that you must follow, which tells you how to begin using this. This is an exact direct link to the instructions: https://synthiam.com/Support/Skills/Servo/Inverse-Kinematic-Arm?id=21839#testing-your-setup-do-this-before-anything-else
Oh, and lastly - DO NOT start merging multiple skills like cameras, auto position, and other scripts while you're learning how to use something new. You will break something on your robot because you've now introduced a dozen unknowns.