New Hand progress, 3d printing, Glyphs , ultrasonic, sharp IR radar, follow Autonomous, Wii, QR, augmented realty- EZB4, L298N and other things :-)

EzAng

USA
robot video thumbnail

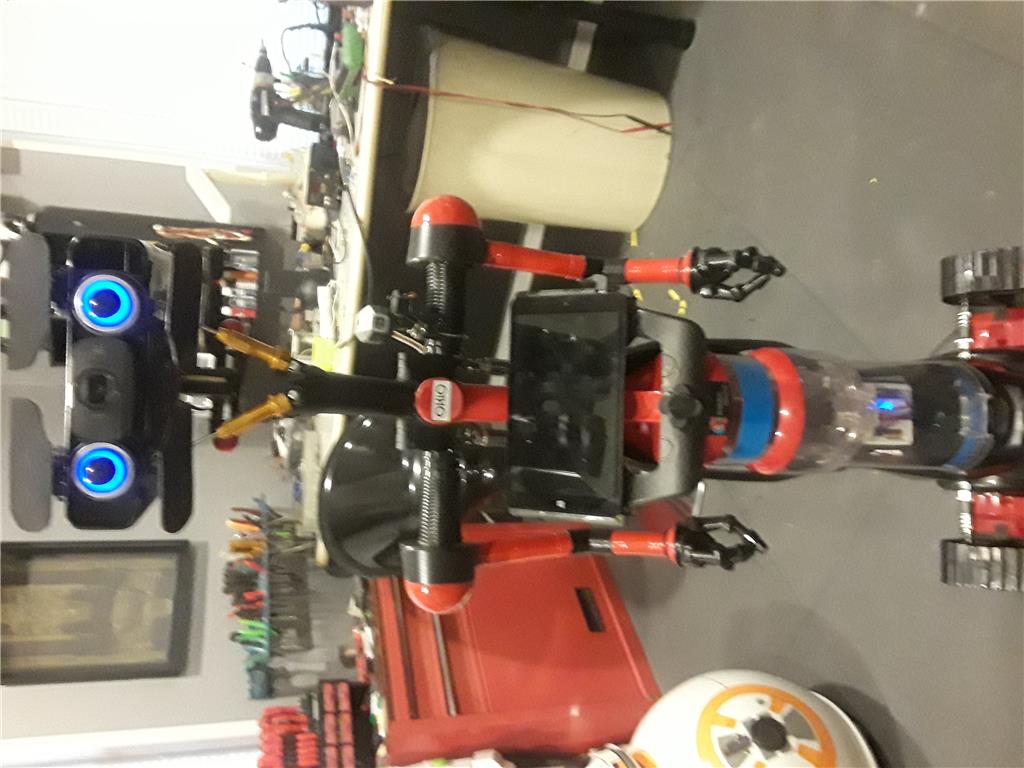
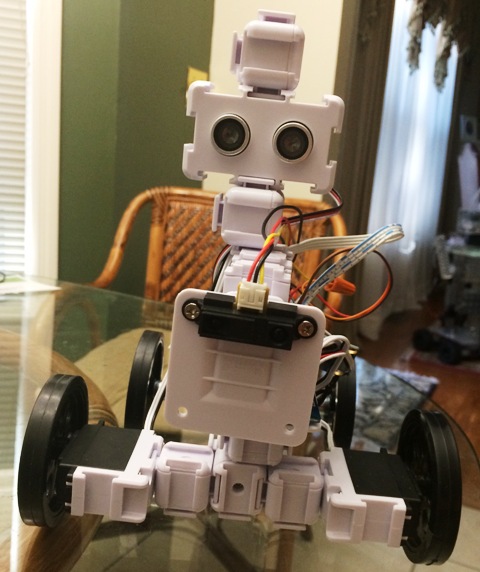
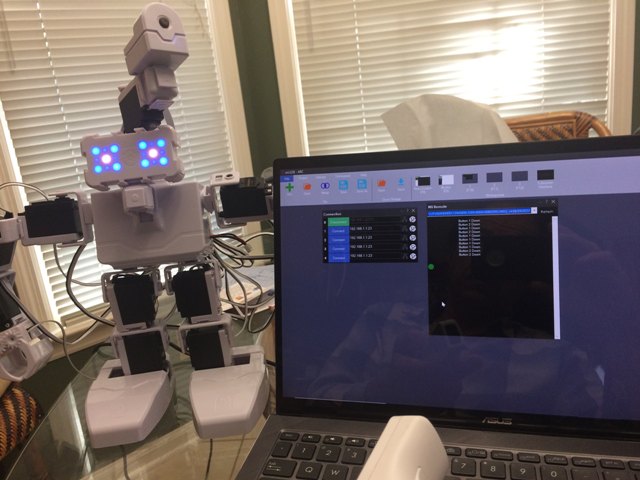
I am using ARC software with 2 iotinys controller, 2 EzB4 controllers - 3 EZ-ROBOT 1300 lithium batteries for the four Ez 360 HDD servos for the two arms, two 996R servos for the grippers, 2 DFRobot rotation hex bases for head movement and body movements. with 2 EZ-robot servos HDD, 2 RGB for the eyes - EZ-Robot HDD servo and moving camera  - still need a mouth

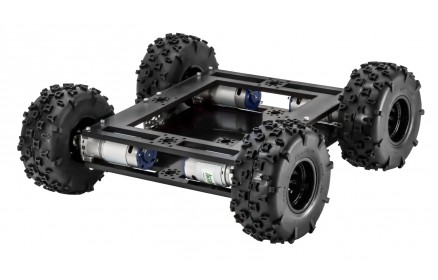
from servo City: 4 gearboxes , channels, parts, extensions, Prowler Robot Kit (wheels, 4 motors, h-bridge pwm motor controller

User-inserted image

Video will be coming of all movements

Here is a sample video

EzAng

By — Last update

ARC Pro

Upgrade to ARC Pro

ARC Pro is your passport to a world of endless possibilities in robot programming, waiting for you to explore.

#1  

Oh nice. I like how the prowler kit was installed. Love the servocity hardware, just makes for an awesome machine.

PRO
USA
#2   — Edited

Thanks RoboHappy,

Yes, servo city has the items to build any robot, the Actobotics parts are awesome.

Actobotics Attachment Ideas

https://www.servocity.com/actobotics-attachment-ideas

I would like some moving mouth or perhaps lights that flash when a sound occurs, any Ideas?

I quit showing robots that looks sort of like a human face, I found out many people do not like that and think it is creepy.

I will make a video today I hope...

EzAng

#3  

I do like the flashing lights with audio idea too. The moving mouth is still a good idea to still(with that special servo control right?) Im sorta looking at doing something like it with Hemi maybe.

#4   — Edited

I like the moving mouth as it gives more interest and is not that difficult.  I asked about having the lights flash with the voice and Will is using a voice circuit like scary terry.  and so is Dave on his B9 Robot.  I already have a scarry terry board but it is just so much more wires just to make the lights flash.  the mouth does not have to open this one is just 4 micro servos and some surgical tubing.  you just use a Disney mouth position chart to make the lips move correctly  

User-inserted image

#5  

I don’t mean to hi-jack EzAng thread.

@nallycat, is that the ERNE4.1 robot head?

PRO
USA
#6   — Edited

Nallycat, when I get time, I will try the micro servos and some tubing, looks promising, I know how to run the ARC talk servo control pretty well as I did on my Roman Head robot.  Good thought!, thanks

EzAng

#7   — Edited

@merne  Yes that is ERNE4.1 robot head.  EzAng can use the mouth idea. I forget to say there is an app for erne4.1 robot head in Synthiam,  I have not tried theis app so I am not sure it works but EzAng may want to try it.  The files to print are on thingiverse.

PRO
USA
#8  

Yes, I am trying it now, the the micro servos and some tubing, works good

EzAng

PRO
USA
#9  

Sample video in a rush - needs perfecting - mouth - next week

EzAng

#10  

Vey nice. The prowler wheels on it now. Cant wait to see more.

PRO
USA
#11  

This coming week, I will not rush, I will have a better video  - I should have the mouth moving

Thanks for all your support RoboHappy, have a great week end.

EzAng

PRO
USA
#12  

hi RoboHappy, this week I did not get a lot of robot things done, had to go to our country property and bush hog some property and other things.

Should be back to city life on Sunday or Monday. I will "start again" with my pursuit of learning robot activities.

Have a great week end,

EzAng

#13  

@EzAng

Thats cool. I myself have been a little stalled too. Had to replace the Elbow servo in HEMI's left arm , cause I burned it out when it got stuck  against the robots body while programming different Auto Positions. Even had to replace the SSC32, which also as toast from that servo. Expensive weekend it was. Im still having some control issues with my Sabertooth that I dont like, so I may look at my Roboclaw again just to prove out an issue.

PRO
USA
#14  

Monday for me is "a good day to start again",

Best of luck with your projects,

EzAng

PRO
USA
#15  

Hi RoboHappy,

Well Monday is here, just leaving my country living, heading back to city life

By tonight, I should be thinks about robot activities again -   :-)

EzAng

#16  

HAha. sounds good. Get back to buildingxD Im still diagnsong a drive control issue, with the Sabertooth and a Roboclaw. Been awhile since Ive programmed gaits too so am relearning that now.

PRO
USA
#17   — Edited

Wow, this week went fast, back at the country/ farm land again.

Hard to get too robot activities when there is so many other things to do here.

Have a nice, safe 4th of July.

Be hope to back Sunday afternoon

RoboHappy, hope are your projects going?

EzAng

PRO
USA
#18   — Edited

How is everyone?

Back from country / farm life to my city life again, one more time.

Already got my servo City Prowler Robot Kit working with ARC and the EzB-4 controller instead of the IoTiny / battery - Also a  H-Bridge PWM motor driver controller

User-inserted image

Next I will attach the robot back on to the Prowler Robot Kit for some movement.

Be well all!

EzAng

PRO
USA
#19   — Edited

another unperfected video -  I wish I had more time, lol

EzAng

#20  

@ExAng  I think your progress is great.  and I like your video.  I can't wait until you get the mouth working.

PRO
USA
#21   — Edited

Thanks nallycat,

I had the mouth moving = need to work on it in time :-)

not a lot of action on this site lately - must be summer

EzAng

PRO
USA
#22  

Hi NallyCat this is for you

EzAng

#23  

@EzAng    Thanks for the video.  and it is getting better, try two servos one at each side of the mouth with the tubing in the middle just reverse the second servo  assign to different ports or wire them together.   with two ports you can move them at different rates and make expressions.

#24  

EzAng

The new videos are awesome. The robot looks great and moves nice. Loved watching it place that item on the table.:D

PRO
USA
#25  

Thanks RoboHappy,

I plan to fine tune the robot maybe next week - maybe some auto-position moves, voice activation moves, I'll see.

How are your projects coming?

EzAng

PRO
USA
#26   — Edited

Good morning nallycat,

I did place 2 micro servos for the mouth this morning, looks a bit better - I will send pics, video when I get back to city life.

EzAng

PRO
USA
#27   — Edited

Well back to the country / farm life again, only a iPhone hot spot there - see you next week - All be well and safe

EzAng

PRO
USA
#28  

Hi RoboHappy,

What is the latest with your projects?

Still at the farm, my robot activities end here, many other thing to do.  :-)

EzAng

PRO
USA
#29  

Good morning everyone,

How goes the robot adventures?

I brought my robot to the farm, I will see what I can accomplish here.

All be will,

EzAng

PRO
USA
#30   — Edited

Well, good morning again, how are you all?

Today is Sunday 7/19/2020

I will be on my way soon, after a few things here,  back to my city life - robot activities  :-)

Plan to re-do some things on my robot - the metal one above.

EzAng

PRO
USA
#31  

Good Morning 7/21/2020

New pics, video

another video shortly

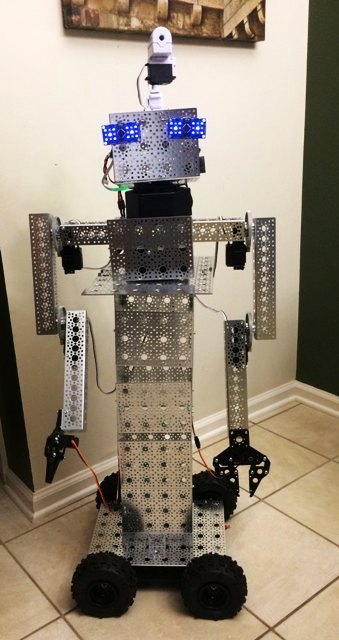
Robot Mr. Metal

New Robot 7/21/2020 Approximately 3 feet tall

Arc software: using

I am using a Ezb4 controllers, battery, 7.4 V EZrobot 1300 with four Ez 360 HDD servos for the two arms with 4 servo City gear boxes 4 servo City channels for arms.

I am using 2 iotiny controllers / batteries, 2 EZrobot 1300 7.4v for camera and camera servo, 2 RGB lights for eyes and two 996R servos for the 2 servo City grippers. For movement, a servo City Prowler Robot Kit (wheels) with one of the EzB-4 controller and an H-Bridge PWM motor driver controller.

2 Micro servo Motors for the mouth and a 996R servo for the DF-Robot rotation hex base for the head.

Many servo City plates, screws, nuts, extensions

EzAng

PRO
USA
#34  

Finally- Head - mouth -  arm movements

I cam move arms all the way up if I want

Mr. Metal

EzAng - good bye

#35  

@EzAng  Great Job, and I really like the new mouth, The movements are very well done.  love it.

PRO
USA
#36   — Edited

Thanks nallycat -

I think Roman is upset

EzAng  lol

#38  

Loving this ! Great job. Mr Metal is cool. The vids are fun to watch. :-)

PRO
USA
#39  

Thank you all my fellow robot creators!

EzAng

PRO
USA
#40   — Edited

Good morn all,  7/24/2020

One more video soon, then back to my country / farm life for a few days.

All be well and safe.

a little hard to hold the iPad and video while controlling ARC -  Will try to perfect this next week, see ya!

EzAng

#41  

Also enjoying this one a lot!!

Just for the rekord!!:)

#42  

@EzAng I have the same issue,lol cant hold the phone and control Hemi at the same time. My video editing skills are nill to begin with,lol

PRO
USA
#43   — Edited

RoboHappy, I plan to perfect my videoing skills soon, lol

How are your projects coming along?

I have been gone to my country / farm property - just got back to city life.

nice to see some action on this forum again, for a while it has been too quiet.

I see the few of us that are always here, you know who you are, thanks for being there...

Want to thank RoboHappy for help and information for servo city items and thank nallycat for the mouth idea

Thank again to all you robot creators

EzAng

PRO
USA
#44  

I have been playing around with the ultrasonic radar scan Anyone use this?

EzAng

PRO
Belgium
#45  

hi ezang

here an excample off a two micro servo mouth.

PRO
Belgium
#49  

love the eyebrows.put an ezbv4 in and some ez robot servo's.perfect

#50  

Yes I like the mouth also looks like one servo is the upper lip and the other is the bottom lip, the eyes are like inmoov except a camera is in one eye, in Inmoov  one IoTiny would be enough to run that head.  The head looks like it is made of blue acrylic.  easy to cut out with my laser.   STOP this I don't need any more projects.  the only one I would make would be if Will decided to sell his .STL files for Alan.

PRO
Belgium
#51  

hi nallycat

haha stop no more projects,thats a good one. the alan robot is fabulous design,love the voice to an the female one.

here's is oh bot in the sky.

PRO
USA
#52   — Edited

very nice guys, looks good, video is cool, flying, lol

Nallycat, I am still waiting to see your mouth, eyes in a video, by the way, do you have the  STL file for them?

I started this tread with "the ultrasonic radar scan" anyone using this? -  good videos here - https://youtu.be/XneX8EIL_qk https://youtu.be/U_xIYUk4qag

This is the back of the robot with the ultrasonic radar scan facing you

User-inserted image

ended up with ohbot, go figure, lol.

Haven't seen DJ around, he must be doing exciting things.

EzAng

PRO
USA
#53   — Edited

A break from Mr. Metal.

Here is my example of the ultrasonic radar scan, distance and collision:

A litter boring, but it is just a sensor, lol

these are just tests

Had it set for 35 in.   45 in. works better  - in the minimum distance before turning

EzAng

#54  

@EzAng  I Like it alot,  yes your distance is to far limits the room it can move maybe one foot would be better.  I have several ultrasonic sensors. I may try using one on COG.   Is it fixed or does a servo keeps rotating the sensor left and right?

PRO
USA
#55  

Hi nallycat, I set it up that servo keeps move right to left scanning.

I will do a few more tests on the pinging  - "minimum distance before turning" situation.

I will test nearer and then farther.

Thanks

EzAng

PRO
USA
#56   — Edited

My ultrasonic may not be up to the task for these tests

Here are the things I observed:

need correct lighting minimum distance before turning - noticed it works best starting pinging at 35 in. tried  smaller ranger 10, 12, 20, in. does not work  speed of the wheels - the slower the better certain colors it can't recognize, example stainless steel, black...others

make sure you use the same D - example D2, or whatever, for the trigger port and the echo port in settings in a 3 wire ultrasonic

Will keep testing later

Thanks EzAng

#57  

@EzAng  question why should the color matter it is using sound waves, I can see the stainless steel being a problem as it is very reflective.  I will have to investigate further, and is it worth using? the camera may be enough to detect objects in the robots path.

PRO
USA
#58   — Edited

I only can report what I found.

for whatever reason, it crashed into certain colors, not avoided them - will test again when I get a chance.

The ultrasonic is not the best - :-)  Yes it can be used, not trusted

I will try the Sharp IR Radar  later next.

https://synthiam.com/Docs/Skills/Infrared-Distance/Sharp-IR-Radar?id=16103

I will see what happens

EzAng - (Ang = Angelo by way)

PRO
USA
#59  

I did test the Sharp IR Radar, way more sensitive.

The Ultrasonic radar scan is working better, tweaked some settings

EzAng

PRO
USA
#60  

Here is a pic of where I put the sharp IR radar and the position of the ultrasonic radar scan

All seems to be working :-)

User-inserted image

EzAng

PRO
USA
#61   — Edited

Practice on "follow the blue line" -

not that exciting but it accurately following the line :-) EzAng

PRO
Belgium
#62  

Ezang that is lookin good.you can adjust two thing that wil make the line tracking better. first is the speed.the lower the speed the more accurate the bot will follow the line. second is the angle off the camera.amaging that you are on a bicicle lookin in front off, your front wheel.the chance you will hit somethin is very big,cause you cant see in the distants. just like your camera angle,its straight in front .by lift the camera a very little can be a huge diff. its all about how fast your ezb can calculate the full procces.

PRO
USA
#63   — Edited

Hi Nomad, thanks for your input, I agree slower speed helps,

How are your projects coming?

I have been busy with my country / farm place, I am getting my solar energy and military generated perfected beside trying to tame the wilderness :-)

My wife and I just came back from a bike ride.

thanks EzAng

PRO
Belgium
#64  

ezang

great to hear you have good time.projects goes slow but good.:D

PRO
USA
#65  

Hi Nomad, I do have another project going on, but now I am digging a whole for my wife's new plant , lol

EzAng

PRO
Belgium
#66  

ezang

its good to ad the words ( new plant ) haha els it would arkwart.lolxD

PRO
USA
#67   — Edited

Hi Nomad,

Today,  we planted many things today, wood chips, dirt, plants ...

Maybe back to robot stuff after a shower, need to clear up -  lol

I am back trying to get JD to serve :-)

EzAng

PRO
USA
#68  

Wii Controller and ARC

User-inserted image

PRO
USA
#69   — Edited

reading QR code and Glyph videos coming  :-)

EzAng

PRO
USA
#70   — Edited

Reading 2 QR codes I made: the wrong way - the right way

Thanks

EzAng

PRO
USA
#71   — Edited

I don't know if I will be back this week from our country / farm life for more robot adventutres

How is everyone doing?

EzAng

PRO
USA
#72   — Edited

Using my phone hotspot now :-)

At the country / farm world

Had my solar system serviced - replaced a solar panel and other things, lots to bush-hog out there, lol  "Taming the wilderness" my new book, lol

Should be back to city life after voting Thursday for more robot activities

EzAng

PRO
USA
#73   — Edited

Good afternoon all:

The L298N Motor Drive Controller Board Module and the EZB4 with battery

My connections to the servo City - Prowler Robot Kit Chassis that I use with my Mr. Metal robot

My settings for the L298N  and the EzB4

The L298N can handle up to 3 amperes at 35 Volts DC, which is suitable for most hobby motors

  1. Connect L298N VCC to either your battery supply positive (red) or EZ-B power (red) on pin D0

  2. Connect L298N GND to either your battery supply negative (black) or EZ-B (black) on pin D0

  3. Connect ENB - L298N to EZ-B Signal Pin D0 (white) All on the EZB4 pin D0

  4. Connect L298N IN4 to EZ-B Signal Pin D1 (white)

  5. Connect L298N IN3 to EZ-B Signal Pin D2 (white)

  6. Connect L298N IN2 to EZ-B Signal Pin D3 (white)

  7. Connect L298N IN1 to EZ-B Signal Pin D4 (white)

  8. Connect L298N ENA to EZ-B Signal Pin D5 (white)

  9. Connect L298N OUT1 to Motor 1

  10. Connect L298N OUT2 to Motor 2

Servo City Motor Specs:

quantity 4 motors

313 RPM HD Premium Planetary Gear Motor These are Brushed DC or you can use Brushless DC (which are better and last longer, a little more expensive)

Output Shaft Style D-shaft Motor Type Brushed DC Output Shaft Support Dual Ball Bearings Gear Material brass primary, nylon secondary, steel tertiary Weight 11.6 oz (328g) Voltage (Nominal) 12V Voltage Range (Recommended) 6V - 12V (I am using the EZ battery  7.4V) Speed (No Load @ 12VDC) 313 rpm Current (No Load @ 12VDC) 0.52A Current (Stall @ 12VDC) 20A Torque (Stall @ 12VDC) 417 oz-in (30 kgf-cm) Gearbox Style Planetary Connector Type Male Spade Terminal Gear Ratio 27:1

A short video to show it works!

User-inserted image

#74  

Nice setup:)  It moves awesome .

PRO
USA
#75   — Edited

Thanks RoboHappy for viewing buddy...

EzAng

PRO
USA
#77  

Well today is 8/12/2020

recovering from being a litter sick = not Covid 19  - should be back to robot adventures by next week.

Maybe the Kinect next again, Microsoft Xbox 360 with the processing program,

I might go over the cognitive emotion, face, vision controls.

there are so many great controls that DJ created -  need to speak about them again (or out of sight, out of mind)

everyone be well --

EzAng

PRO
Belgium
#78  

EzAng

get well soon.seeya next week.;)

#79  

Feel better soon EzAng.  Look forward to the next project.

PRO
USA
#80   — Edited

Thanks Nomad and RoboHappy,

Feeling better today- about 98%

Looking forward to everyone next project :-)

EzAng.

PRO
USA
#81  

Good morn,

Hope everyone is ok.

I tried to help on the LED escapade and a few other things  :-)

Should be back Monday in full swing, I hope.

Mr. Metal is just staring at me, I hope to redo a few things on him.

What are you guys up too?

Have a great weekend,

EzAng

PRO
USA
#82  

Good morning all, hope you are well...

Here we are Monday 8/24/2020

I have been exploring different controls I never used before like servo recorder, servo pad and servo summary. Seems like it might make smoother moves for the arms. I will try them on my metal robot today.

What are you all up too?

EzAng

PRO
Belgium
#83  

hi ezang

workin on my lewanbot.

PRO
USA
#84  

Great build, servos move good

thanks

EzAng

#85  

@Nomad 6R    I think your robot looks really good.  have you tried walking yet?

PRO
Belgium
#86  

hi nallycat

no walkin gait yet.need for a backpack. the servo config is similar like darwin mini robot.

PRO
USA
#87  

Have any of you guys used the servo recorder, servo pad and servo summary?

I can't find any info on the servo summary control.

EzAng

PRO
Belgium
#88  

no i didn use the servo recorder. can you find info when click on the question mark (?).

PRO
USA
#89  

the question mark just goes to a site with no info

I guess I will just test myself and figure it out,

Has anyone seem DJ lately?

thanks,

EzAng

PRO
USA
#91  

I know, sad, :-(

We shall push on

EzAng

PRO
USA
#92  

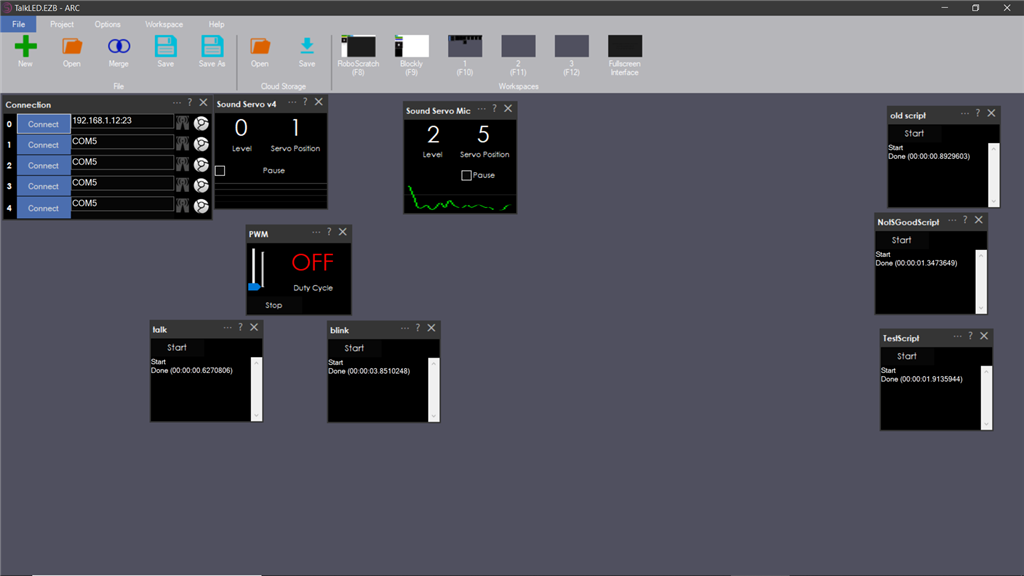
I got the sound servo working, with a LED, flashes in sync with the script I wrote.

Also I wrote a script for it just to blink

EzAng

PRO
Belgium
#93  

ezang

can you post yourre script ?

good work.;)

PRO
USA
#94   — Edited

Sure

first script:

You can say anything, I write in a script:

SayEZBWait("Good evening.") sleep(80) SayEZBWait("Almost time for dinner.") sleep(80) SayEZBWait("Are you hungry?") sleep(80) SayEZBWait("What are we having?.") sleep(80) SayEZBWait("some thing lite I hope.") sleep(80) SayEZBWait("I am still full from lunch.")

The blink:

ServoSpeed(d0, 2)

:loop

Set LED On

pwm(d0, 100)

wait some time for the pwm to do its ramping thing

sleep(1000)

#set LED Off pwm(d0, 0)

wait some time for the pwm to do its ramping thing

sleep(1000)

goto(loop)

I have opened the PWM,  sound servo(PC)and sound servo(EZB) controls.

here is my screen: ignore the scripts on the right

User-inserted image

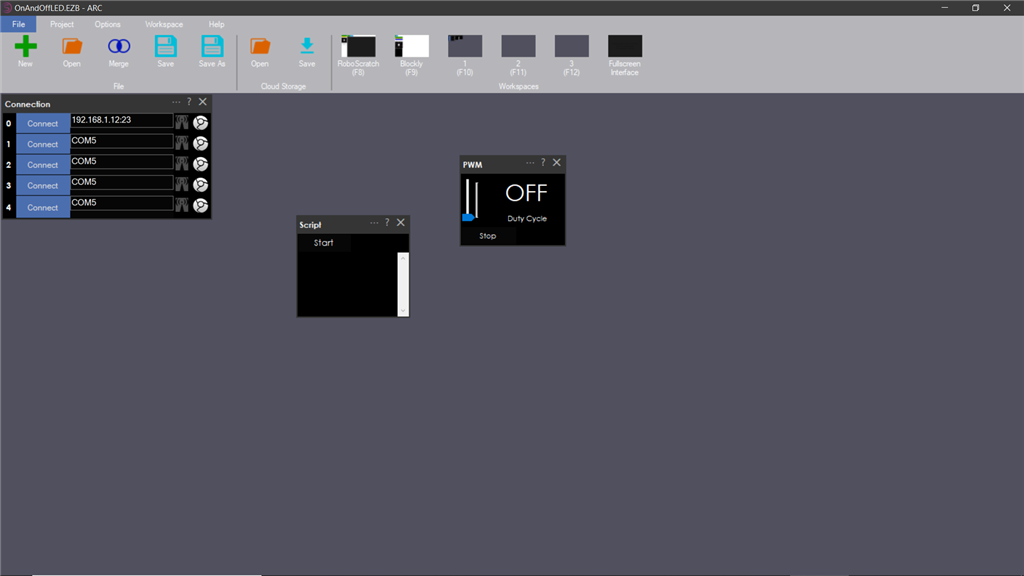
On a Blink on and off

set the servo speed to 2

ServoSpeed(d0, 2)

:loop

Set LED On

pwm(d0, 100)

wait some time for the pwm to do its ramping thing

sleep(3000)

#set LED Off pwm(d0, 0)

wait some time for the pwm to do its ramping thing

sleep(3000)

goto(loop)

User-inserted image

EzAng

PRO
Belgium
#95  

thank you ezang

have a go with it.

PRO
USA
#96   — Edited

On the LED, or whatever you are using, attach one wire to the ground, one wire to the signal

I used two female to female wires I had to hook up the LED to my IoTiny

EzAng

PRO
Belgium
#97  

ezang

do you ad a port to soundservo mic  or soundservo v4 ?

PRO
USA
#98  

soundservo mic or soundservo v4 is a sound servo (PC)  and sound servo (EZB)

I use D0,  min 1 , max 180

EzAng

PRO
Belgium
#99  

great ,thanks for the info

PRO
USA
#100   — Edited

you are welcome my robot friend Nomad

EzAng

#103  

Very cool EzAng. I myself am at idle atm. Recently after I tried to demo HEMI for someone, the Sabertooth controller (R/C version)  decided to catch fire on me. It really did go up in flames. So I orded a new one, only to have that one short out on me  a few minutes after I got it installed and it was working great for me too. Ive since sent it back to Dimension Engineering, only to find out from them that there may be a little issue with the product at their end. Im now awaiting a replacement unit. Meanwhile still awaiting for my 3d printer to be replaced or repaired (thats another story).

PRO
USA
#104  

Good morning RoboHappy,

Sorry to hear about the fire.

It is good they say "there may be a little issue with the product at their end". Seems like Dimension Engineering will correct the problem.

As far as 3d printing, I have not made it back to explore that situation since I was sick, maybe next week.

Today I hope to do a few things with my metal robot...

Be well my robot friend, have a good day.

EzAng

PRO
USA
#105  

Another week is over, see you guys next week for more robot activities, be safe

EzAng

PRO
Belgium
#106  

ezang

have fun .seeya:)

PRO
USA
#107   — Edited

Well here we are, its Monday again, August 31, 2020.

I did a modified AIML Bot using Roman, a conversational bot. https://youtu.be/8ahAo274Kag

Also I have been using the QR code encoder.

There are only 4 glyphs to use., that's all.

Here, we can't create other glyphs - I asked the question in April, 2019 https://synthiam.com/Community/Questions/how-to-create-more-glyphs-18066

the only glyphs are here: https://synthiam.com/Docs/Skills/Camera/Camera-Device?id=16120#glyphTracking

Glyphs work like QR codes.

So why not use QR codes? You can make as many as you want.

I did a simple example in July, I made my only QR codes saying - the right way, the wrong way.

view here https://youtu.be/16SUP9afNvI

For your information:

Here is where it all started

Glyphs:

https://synthiam.com/Community/Tutorials/111?courseId=1

Detecting Glyphs & Augmented Reality

https://youtu.be/iYd3tdnln_o

QR code:

https://synthiam.com/Community/Tutorials/107?courseId=1

What are you up to today?

EzAng

PRO
USA
#108   — Edited

Good morning, today is September 1, 2020

How is everyone?

Yesterday, I did QR codes and Glyphs, I guess not that interesting.
quiet today, what are you up to in your robot adventures?

EzAng

PRO
USA
#109   — Edited

Good morning, September 2, 2020

Everyone ok?

I try to lean something new each day. I watch older videos here or ez-robot video.

Yesterday I learned about YCbCr  tracking - a camera feature. I still like multi color better.

I might try some Mr. Metal stuff.

quiet again today,

any new robot adventures yet?

Have you seen this? May 2012 Dj Sures’s positive energy

https://synthiam.com/About/News/10330

EzAng

#110  

I got my repaired DE motor controller today, so I know what I will be doing this weekend:)

PRO
USA
#111   — Edited

Thursday, Sept, 3, 2020

congrats  RoboHappy,

I  am interested to see your pics or video project advancements.  When you get a chance.

I never got try some Mr. Metal stuff, maybe next week.

be well my robot friend,

EzAng

PRO
USA
#112   — Edited

Good moring,

Thursday, Sept, 4, 2020 - I hear a cold front might be coming :-(

Anyway, this morning, figured out tracking again, new code, not so simple any more. All in the tread camera tracking glitch.

Helped in the Bing speech - PandoraBot question

long weekend is coming

Have a great weekend

EzAng

PRO
USA
#113   — Edited

Well good morning on Sept. 14, 2020

How is everyone?

I brought back Mr. Metal for a while...

I have been help people connect to ARC by simply shutting off their anti- virus first then checking their firewalls...

Last week I helped with AIML bot and Pandora Bot with Bing speech questions:

I don't know what I am going to get into yet, I want to learn something.
Be well all,

EzAng

PRO
Belgium
#114  

hi ezang

how about your printing skills?

any pics off what youve printed?

PRO
USA
#115   — Edited

lol, I have not got into 3d printing yet, maybe tomorrow

any pointers of instruction?

Also thanks Justin for viewing

Your community post was liked by 'JustinRatliff'.

EzAng

PRO
Belgium
#116  

print the excample on the  sd card.

PRO
USA
#117  

ok I will a little later, thanks

EzAng

PRO
USA
#119  

ok I will check, thanks

EzAng

PRO
USA
#120   — Edited

Another day, Wed. 9/16/2020

I have been playing around with the sound board (PC) and the sound board v4 with the speech recognition control, with the  java commands -  works well.

what are you all up too?

still have not got to 3d printing - maybe I will dedicate next week to this...

Be well all, EzAng

PRO
Canada
#121  

Preparing for a live hack this Friday and continuing documentation here in the Doc section;)

PRO
USA
#122   — Edited

Thanks Jeremie, I will be gone Friday afternoon,  until Sat. evening, have to watch the archive

EzAng

PRO
Belgium
#123  

hi ezang

am doing some fun stuff .gess what it is.xD

User-inserted image

PRO
USA
#124  

What is that?

EzAng

PRO
USA
#126  

great job - next week 3d printing

what does the back look like - the eyes?

PRO
Belgium
#127  

the eyes are 3 separt parts.white the eye itself.blue color eye . center eye a led or camera.there are many upgrades.

PRO
USA
#128  

ok, thanks

EzAng

PRO
Belgium
#129  

here some more pics.first try out 2 micro servo and two led.

User-inserted image

User-inserted image

PRO
USA
#130   — Edited

very nice, LED eye balls, lol

I think I will make some later today

EzAng

#131  

you need to put a camera in one eye

PRO
USA
#132  

ok, I will try later

EzAng

PRO
Belgium
#133  

hi nallycat

i know.but i prefer the camera on top the head. any idea where these stl are?

back plates of the eyes are missing.

inmoov

#134  

if you are using Ex-robot  camera you can get the camera mount for the eyes in thingiverse   the camera in the eye make tracking very easy and smoother.

PRO
Belgium
#135  

nallycat

found the ez robot cam for inmoove. are these ez robot servo's?

PRO
USA
#136  

Nomad, thanks for the inmoov  files try next week

EzAng

#137  

you can use any micro servo but I prefer metal gear servos , they are stronger less jerky,

#138   — Edited

Here's my EZ camera version of the inmoov eye socket. I used double sided tape to mount the actual camera board that has to be taken out of the EZRobot plastic case. I used some standard micro servos, imagine the EZ servo would work but not 100% sure.

https://www.thingiverse.com/thing:2479390

The rest of the eye parts and a tutorial on how to assemble them can be found directly on the inmoov website

PRO
Belgium
#139  

hi perry

do you have the rest also? from the eyes.

PRO
USA
#140  

See you guys Monday, the 21st

EzAng

#141  

Read my comment above nomad, all the other files are on the inmoov website. Assembly tutorial is there as well.

PRO
Belgium
#142  

hi perry/ezang

inmoov has a new wib site.

inmoov new web site

here you find the video's how to do.

User-inserted image

cool video about the eyes from inmoov.

PRO
USA
#143  

Hi guys,  3d printing in on the agender this week,  your conversations above me.

I ordered again on Amazon the Creality 3D Printer CR-10S Pro V2 with BL Touch Auto-Level, Touch Screen, Large Build Volume 3D Printer 300mmx300mmx400mm with Capricorn PTFE 2019 Newest 95% Pre-Assembled Printer

We will see what happens - starting Monday

EzAng

#144  

I have that printer. You will like it a lot.

PRO
USA
#145   — Edited

Hi Perry,

I am using PETG Filament - what do you use?

any pointers I need to know about?

EzAng

PRO
Belgium
#146  

hi ezang

if you using the ubove inmoove files.there are two files modified. they restrited the jaw movent.here two pics. first pic is a cut out for the hinges for the jaw to pass. second pic is redirect the connector for movement jaw up&down. now the jaw can open alot more.also i made a plate so you can use , ez robot HDD servo(s.

User-inserted image

User-inserted image

PRO
USA
#147  

ok, thanks Nomad for the files,

Perry said he has the same 3d printer as me, hope he give me some insight of what I am in for.

I am using PETG Filament - what does Perry use?  Perry, any pointers I need to know about?

EzAng

PRO
Belgium
#148  

hi ezang

am printing the modified jaw for testing.let you know when finisch. am sure perry and others and me will help;).

PRO
Belgium
#149   — Edited

ezang

here you see the two restritions and why they needed to modified. the jaw is in contact with the base.

User-inserted image

the connection bar is in contact with the collar (ring).

User-inserted image

compare these pics with the ubove one. also make sure the head off the screws are all the way in, and nothing off the screws may come out in the hole off the gear, cause some wires go thru there.

#150  

You do know Normad . you will not be able to stop with just the head.  you have been warned.  I built the head then I thought I should build the body plates to hold the head and neck. then this and that and before I knew it Bruce-e was born.  it doesn't stop there, lots of upgrade parts.  new neck new elbows aerious designed. new eyes new quiet jaw. Bob Houston's waste.  my new finger design with one tendon per finger. on and on.  but it's fun. by the way Normad very nice looking parts.

PRO
Belgium
#151  

hey nallycat

maybe someday i build a complete inmoov with the all new design from the web site. but for now its allreddy big job for me.lol but its fun. also am doing this to understand why parts are chaped the way they do. my living space gets over crowded with robots.xD. if i had more room,i bouth more printers.

and yourre right,it doesn stop.xD

inmoov eye lids

PRO
USA
#152  

good morning everyone to my thread -

Today is 9/21/2020 Monday:

Before I start my 3d stuff, coffee, and a few other things.

All be well

EzAng

PRO
Belgium
#153  

have a great time printing.

PRO
Belgium
#154  

hi ezang

finally got the sound servo workin.

another error i found in the stl is the eye touch the jaw hings.

User-inserted image

need to fix that.

PRO
USA
#155   — Edited

Good morning all, welcome to my thread.

how are you?

First day of "fall" here in the USA- Tuesday - 9/22/2020

Had many things to do yesterday here, a few things to do today, maybe I will get to printing today, oh well ---- ever feel "life" gets into the way of what you want to do, lol

We will see what what we will get into today.

EzAng

PRO
Belgium
#156  

ezang

problem solved jwa contacting the eyes.

User-inserted image

User-inserted image

waiting for parts.

PRO
USA
#157  

Good work Nomad,

EzAng

PRO
Belgium
#158  

hi ezang

here i modified the main gear for turning the head.

PRO
USA
#159   — Edited

looking good, nice movements, LEDs good touch - keep it going

So many things to do here, still never got to concentrate on printing.

EzAng

PRO
Belgium
#161  

ezang

good work.here's a pic from inmoov head sofar.

User-inserted image

PRO
Belgium
#162  

hi ezang

some progress inmoov head. half head takes 1 day 14 houres and 44 min to print.:(

PRO
USA
#163  

not bad, hey that was my line, lol :-)

EzAng

#164  

Great job Nomad, the inmoov head looks very good.  I reprinted most of the head parts the eyes mouth skull with Thingiverse parts. so I did not have to redesign the original inmoov head parts.  EzAng  hope you get into 3D printing soon.  just remember do not leave a print job unattended as things can go wrong and can even start a fire.  check often,  it's  just me  being a mother.

PRO
Belgium
#165  

hi nallycat

the head is glue on with locktide.

ezang

and check always that all the fan's are running.

thanks

PRO
USA
#166  

thank you guys for all your help

EzAng

PRO
USA
#167   — Edited

Hi all,

One of my best robots is my Orion SkyQuest XX14g GoTo Truss Tube Dobsonian Telescope https://www.telescope.com/Orion/Orion-SkyQuest-XX14g-GoTo-Truss-Tube-Dobsonian-Telescope/rc/2160/p/101888.uts?keyword=skyquest%2014

An enormous yet conveniently portable 14" aperture truss-tube Dobsonian telescope equipped with fully motorized GoTo object location and automatic tracking of over 42,000 celestial objects Colossal 14" aperture reflector optics collect tons of light for wonderfully detailed views of deep space objects such as galaxies, star clusters, and cloudy nebulas,

in addition to bright and detailed views of closer cosmic quarry including the Moon and planets

Orion-designed collapsible GoTo Dobsonian base AND rigid 8-pole truss reflector optical tube both break down into easily manageable components for transport in virtually any car

Closed-loop electronics forgive accidental bumps, nudges, and even manual repositioning without losing alignment of the GoTo system.

Heavy-duty clutches allow independent adjustment of motion to desired level of resistance in both axes.

The XX14g now comes Wi-Fi enabled, which means it can be controlled wirelessly from your smartphone or tablet instead of with the SynScan hand controller.

I can try to work it with ARC one day

EzAng

#168  

@EzAng    We have a lot In common.  I have been involved in astronomy since I was about 16 years old.  I built my first telescope from scratch a 12 inch Newtonian reflector. I ground the primary mirror on a barrel with Pyrex mirror blanks it took most of the summer of 1965.  I silvered the mirror myself. the telescope when finished was around 6 feet tall and weighed 250 lbs.  I am a member of the Ottawa astronomical society,  and partnered with my best friend in a company called Sky Shed. and we built all wood buildings in which the roof slid off to permanently house very large telescopes.  the designer of Sky Shed was the base player for the Canadian band glass tiger.  Astronomy is great during pandemics as it has very good social distancing. I have access to very large telescopes in Arizona through the society.  full internet control.    my problem as always is time.

PRO
USA
#169   — Edited

Great to hear nallycat, we enjoy astronomy - was looking at Jupiter and Saturn (with the ring around it) the other day.

I like outer space, so may celestial objects to view

So now we  both like guitar, astronomy, robot stuff, I wonder what else, lol

:-)

EzAng

PRO
USA
#170  

Welcome to my thread:

Can't believe it is Friday, Oct. 23, 2020, where did the week go? Too many things to do in life, lol

I hoping 3d printing will occur next week,

Be well all

PRO
USA
#172   — Edited

I found an interesting site at:  https://toptechboy.com/

again I want to say, I thank everyone at Synthiam, Ez-robot etc..

In my last 2 years, I learned so much, and I hope more to come  :-)

EzAng

PRO
USA
#173   — Edited

Nomad, what happened to your Inmov?

On the hand, what kind of gears do you use? or is it just a print?

PRO
Belgium
#174  

hi ezang

still printing parts of the head. i notest the files on inmoov sie has 3 versions. V3 OLD VERSION  V4 SECOND VERSION AND V5 HEAD. so its confusing .  sofar i have this .

User-inserted image

PRO
USA
#175  

still looking good

EzAng

PRO
Belgium
#176  

i have the mask too .tomorow i print the ear part and back lower head . i think the servo needs to be continous rotation .to be able the full lengt of the head .

PRO
USA
#177  

Great

I want to print the hands  :-)

PRO
Belgium
#178  

the palm of the hand is diff for the get out the support inside.

PRO
USA
#179  

For the pieces you need maybe thingiverse is a better place to look. you can search also

PRO
USA
#180   — Edited

I want to print a "Thing " - hand form the Adams Family show a long time ago , lol

PRO
Belgium
#181  

i started with thingeverse .there are to many inmoov parts . i use the ones on inmoov site .v4

PRO
Belgium
#182  

there is another site .cults.com also lot of print stuff.xD

PRO
USA
#184   — Edited

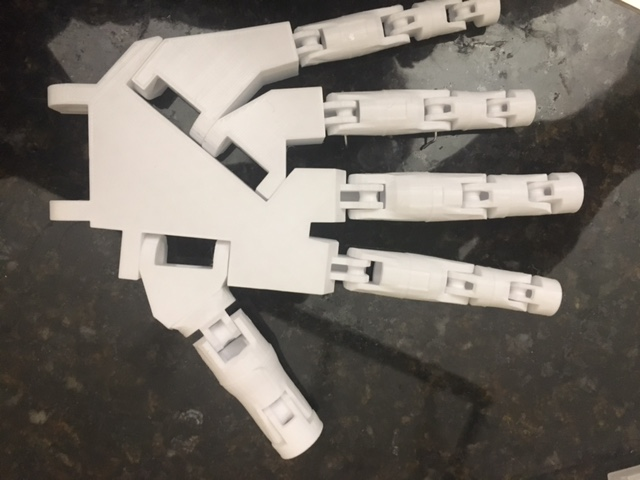
Well, it is time for me to start printing my  "Thing " - hand.

EzAng

PRO
USA
#185  

I am printing the hand :-)

Sunday 12/6/2020

EzAng

PRO
USA
#186  

Well Nomad,

Printing takes so long... but it comes out so nice :-)

Today is Wen. 12/9/2020

Printed the right hand, waiting for screws to come in to assemble.

have to print the pinky again, broke it :-(

Next is the forearm to hold the servos maybe...I'll see, or maybe do something else, have not decited.

EzAng

PRO
USA
#187  

Nomad, how many parts did you print so far?

I just finished the hand

More to come,

NallyCat is right, one piece leads into another piece :-)

User-inserted image

EzAng

PRO
Belgium
#188  

ezang

al together i print some 1100 parts .xD

PRO
USA
#189   — Edited

wow,

that is a lot of filament, time, electricity, money -- sound like anyone you may know saying this to you?  :-)  lol,

PRO
Belgium
#190   — Edited

ezang i dare not to tell howmany rolls i spilledxD . what i like is designing and lookin for flaws .

PRO
USA
#191  

How did your print come?

Just got back, seems like a lot of action here

EzAng

PRO
Belgium
#192  

hi ezang

what is the come?

#193   — Edited

Hey guys, looking crazy good on that inmoov Nomad! HA HA ,See,I can only sleep 4 hours all the time.Then I start dreaming about robot codes and have to wake up! When you done, next year you can make me one of those too,when you get good at it  I would love to buy one of those too!

PRO
Belgium
#194  

hi roborad

stil need alot of practise hahaxD .

#195  

I trust you Nomad I saw those pictures of the Daleks, really impressive! Tracking on that package saying comes after January, too excited to get it!;)

PRO
USA
#196   — Edited

Hi Nomad,

you said above 

Quote:

so i made it a little bigger and test print tomorrow 
So I asked, how did it go?

Hi robo rad,  I have to print the servo holders yet, I believe it it in the forearm

Right now I have the fingers connected by pieces of a paper clip pieces, lol  -  probably will try some nylon cords next.

I don't want to drill the finger pieces, the holes to make larger, the PETG may break, so I am trying other options.

EzAng

PRO
Belgium
#197  

ezang "so i made it a little bigger and test print tomorow"

i found the error.you have to use this plate to connect all four corners of the head in the middle . as you can see the plate in the middle ,it goes smaller to the sides .thats why i had some space . here the part . SkullTopV1.stl

PRO
Belgium
#198  

roborad

after januari .thats long waiting then.:(

#199  

Ya Nomad same everywhere this month, too many lock down restrictions so everybody mostly buying Christmas presents online and getting delivery now all the post office ,couriers too busy,too many packages they can't handle it all.

PRO
Belgium
#200   — Edited

roborad

fingers crossed .

here's the right ear inmoov .

User-inserted image

PRO
Belgium
#201  

ezang

here's another piece of the puzzle .

User-inserted image

it goes here . same on the back side . there are two .screw M3

User-inserted image

it looks like this then .

User-inserted image

PRO
USA
#202   — Edited

Looks great, how long did it take to print?

I am at the grandkids home, can't do much from here, but I will check in now and then

EzAng

PRO
Belgium
#203  

ezang

i think 3 pieces is about 11 houres on my printer.maybe your printer is faster.

PRO
USA
#204  

Look good, I don't know how fast I can print

when I get back, I need to print again the pinky for the hand, broke putting the screws into it  it  :-(

PRO
Belgium
#205  

ezang

print the normal speed that is original in your slicer . howmuch infil do you use ?  i use some 20 to 30 infill.

PRO
USA
#206  

I use 20 or same as you

PRO
USA
#207  

I have been printing the rotation wrist now for my "Thing" hand from the Addams family

Just need more time, :-)

EzAng

PRO
USA
#208  

My last piece for the wrist I upped the speed to 80 and up the nozzle heat

Turning into a printing fool , lol

PRO
Belgium
#209  

ezang

what does the box or rol filament says about temp ?

PRO
USA
#210  

My box said my nozzle  speed should be 230 to 260  (Amazon Basics) PETG,  I used 238, but you need experiment with your machine

On the bed temperature, I used 90 on a "glass" bed, sticks well. No problems=, no magigoo or any thing.

EzAng

PRO
Belgium
#211   — Edited

ezang

keep the glas bed always in same direction .i marked mine with a marker. one on the left and one in front.

User-inserted image

PRO
USA
#212   — Edited

Nomad, I believe you and I now  can give some good advice on 3d printing.

My bed has a "auto leveling" feature just before it prints with at least 25 point, basically the whole bed leveling, that works well after I use my auxiliary bed leveling (manually)

Anyway, I should get back today for a quick print :-)

EzAng

#213  

Thats some cool information guys. Looking good ! How is it to work with that PETG stuff? I have  yet to try it.  I have two printers now, my Monoprice Mini V2 for all my small stuff, love this little printer. My second one which i'm using at my job now, is  a SynDaver Axi, just released to the market this year. SynDaver makes medical parts with it. The printer can print to just over 11"x11"x11"  and can handle a massive range of materials.

PRO
USA
#214   — Edited
PRO
Belgium
#215  

ezang

haha only 616 dollarxD .your a richt man . mine cost 160 euro creality 3

robohappy

i didn try petg eather .

PRO
USA
#216  

Nomad,

I am not rich, just save up for what I want, only buy once, don't want 2 or 3 of these things, so after research, but the best one I can afford.

PETG is great,

printing tonight

Bed =  90 Nozzle  = 240 Speed = 120

I will see what happenes,:) EzAng

#217  

My new one is the Axi, from SynDaver. They only have one model right now. Got it thru 3DPrintlife, waited till black friday and got it for 2195 then:) From what I understanda, it was developed by people that use to work for Lulzbot. the only issue is they use SimpleCura online found from github, but still works pretty good.

PRO
USA
#219  

Hi RoboHappy,

Did you print anything yet?

PRO
USA
#220   — Edited

Hi RoBoHappy,

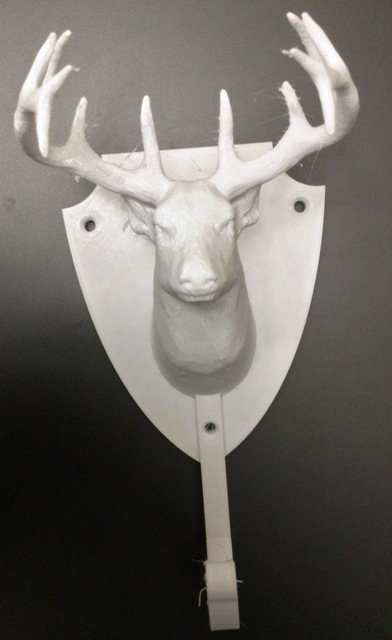
My new print - PETG

not painted brown or sanded yet

Deer Hook for clothing

User-inserted image

EzAng

#221  

@EzAng,

Love that Deer hook. Bet that took while to print.

Yeah, Since I got the AXI, I have had to print a couple of work related fixtures for our engineering  group, using the PLA, in process of printing some VESA mounts for use on test fixture in our production dept.  The AXI has been pretty good so far, and SynDavers tech support has been awesome with questions I've had on its use. Only robot related stuff has been some Actobotic end caps printed via the Monoprice Mini lately.

User-inserted image

Thats the 3D bency printing on the AXI, it has some great detail . Did the same on the Monoprice Mini,bi difference on the detail.

PRO
Belgium
#222  

robohappy

i have same boat printed on my monoprize mini .

User-inserted image

PRO
USA
#223  

RoboHappy

Will you take a picture of your printer? Like to see it.

Looks like you and Nomad have the same boat, cool stuff...

I guess the 3 of us are the main printers here, lol

EzAng

#224  

User-inserted image

The SynDaver AXI printer....

#226  

So many things I liked... the overall printing size, the multiple materials it can handle, the 25 point Auto bed leveling calibration, the fact that it is made here in the USA and not in China (mfg in Colorado in fact) and even the tech support is in in the USA. Right now though, you have to use their "SympleSlicer" online Cura Software and transfer the gcode to a mem stick as shown on the top there. It does have a USB port in the back, for then the real Cura releases its next upgrade with the SynDaver settings and can use a USB Cable ( id prefer).  And 3DPrintlife has been great with support and the handling of the return of the XYZ Super printer I had. Heck, the Syndaver was even packed way better than the xyz printer.

PRO
Belgium
#228  

ezang

i try the cura 4.8.0 and for me it was not working good .alot of warping, printing in the air . i went back to previous version .

PRO
USA
#229   — Edited

really, no problem here

Is there a better slicer then cura?

PRO
Belgium
#230  

ezang

thats is diff for averyone .for me the previous version great.

PRO
USA
#231  

Nomad, on the hand you made, what kind of cord did you use tor the fingers?  What size?

PRO
Belgium
#232  

ezang

its ordenary cutton cord from 2.MM . am still lookin for springs .

PRO
USA
#233  

I used nylon guitar strings, the B and G  strings -  seems to work well

EzAng

PRO
Belgium
#234  

ezang

happy new year . you can play guitar ?

PRO
USA
#235  

happy new year to you and your family

Yes I play Jazz, rock, blues...

PRO
Belgium
#236  

ezang

very cool you can play.

PRO
Belgium
#238  

ezang

its funny but fake .

PRO
USA
#239  

Hi Nomad,

how is your printing going?

PRO
Belgium
#240  

ezang

i just finiched the inmoov head on a stand.

User-inserted image

PRO
USA
#241  

Wow, looks great!  Good work

The stand is a good idea

EzAng

PRO
USA
#243  

Send me the link to  your channel on thingeverse

PRO
USA
#245  

I searched for you - it says No people found matching: "TD nomad".

PRO
Belgium
#246  

click on the word TD NOMAD .

PRO
USA
#247  

I tried, no luck

That's ok

EzAng

#249  

Nomad, that Inmoov head looks fantastic, like something from a horror sci Fi movie in the Future!

PRO
Belgium
#250  

ezang  the TC is from tinkercad not thingeverse.

roborad  hehe

PRO
USA
#251   — Edited

Hi Nomad I realize it is tinkercad, I am also signed in, where do I go next?

I did a search for TD nomad -  I will check

i also searched for TC nomad

I found the base of the stand  stand.stl

PRO
Belgium
#252  

ezang

as what name are you in tinkercad?

PRO
USA
#253   — Edited

EzAng I believe

I did not do anything yet there

PRO
Belgium
#254  

ezang

i too dont have nothing yet there. working on the wrist. closed the gap from servo . and lower the servo .

User-inserted image

User-inserted image

PRO
USA
#255  

Yes looks better

PRO
USA
#256  

You have the stls for this?

PRO
Belgium
#257  

yes in 15 minites .all is tested. look for the name nomad  or EDP EDP  i post the stl here

PRO
USA
#259  

Ok thanks

Did not know you put the stls on here

EzAng

PRO
Belgium
#260  

hi ezang

now you know too.xD

User-inserted image

PRO
USA
#261  

What is this?  now you know too.xD??

PRO
Belgium
#262  

look at the picture how to ad files to your topic.

PRO
USA
#263  

ok I get it,  thanks  I knew that

PRO
Belgium
#264  

hey ezang

i see you folowing the ava v2 robot . you could use the arms from a meccanoid robot to make ava v2 arms. and the chest .lot less printing .

User-inserted image

PRO
Belgium
#266  

you can use a second handed meccanoid robot . there are no stl files from meccanoid that i know of.

PRO
USA
#267  

Hey Nomad ever see this company?

http://www.garnerholt.com/

Garner Holt Productions, Inc. is the gateway to realms of incredible imagination, artistry, technical wizardry, experienced industry experts, and unmatched, proven quality. From creating the world’s finest and most lifelike animatronic figures, to design for themed attractions, museums, retail and restaurant locations and more, GHP is the most complete design and production workshop in the world.

PRO
Belgium
#268  

ezang

site looks great . something for will for sure.

PRO
USA
#269   — Edited

Reading 2 QR codes I made: the wrong way - the right way again  changed topic

PRO
USA
#270   — Edited

Hi Nomad,

I might have to change the guitar strings for something else, they may it easy to thread though the hand

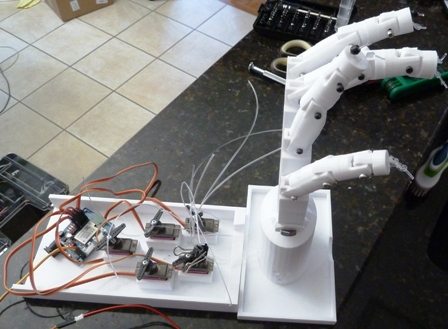
I 3d printed a platform for the hand and super glued it on

platform.stl

using ARC and an IoTiny to operate it

Here is where I am at with the hand. Here are 2 pictures

User-inserted image

User-inserted image

EzAng

PRO
Belgium
#271  

ezang

starting to look good .

PRO
USA
#272  

I will have to get back to the hand by Sunday, looking for better fishing line for the fingers.

EzAng

PRO
Belgium
#274  

ezang

the link servoHolders stl is not dowloadeble ?

PRO
Belgium
#276  

ezang

got it thanks .

PRO
USA
#278  

Nomad, did you ever get the file above =  5 micro servo holder?

PRO
Belgium
#279  

hi ezang  yes i got the file .

thanks

PRO
USA
#280   — Edited

Very good,

What are you up to in the printing world ?

I have been learning fusion 360

be well

EzAng

PRO
USA
#282  

Great, I will also

thanks

EzAng

#283  

EzAng The printed hand looks great. What will you do about the fingertips for hiding those tied string ends?

PRO
USA
#284   — Edited

Hi, RoboHappy I already printed the tips however, I did not glue the tips on yet, may change to a better fishing line, I was using nylon guitar strings  :-)

what are you up to? EzAng

PRO
USA
#285  

Hi, RoboHappy,

what are you up to? EzAng

PRO
USA
#286  

Where did everyone go?

#287  

Still here,:) Just been dealing with non robotic issues this past week, so I peek in when I can.

PRO
USA
#289   — Edited

Good to know  :-)

Nomad, I printed the IoTiny holders, I needed to drill in each corner a hole for a screw to match the IoTiny's holes.

The original IoTiny holder file had the holes in the wrong place

EzAng

PRO
USA
#290  

Nomad, what is the inmoov's reactor for?

Also did you see my post above, had to drill holes for the IoTiny holders - no problem ....

EzAng

PRO
Belgium
#291  

hi ezang

it replace the name inmoov on the chest .

User-inserted image

PRO
USA
#292  

Ok,

so you are building a "whole" InMoov :)-

rest of the body is next...

EzAng

PRO
Belgium
#293  

for now i have the head and half the torso.xD. to lid up the reactor you need this . LED reactor 

PRO
USA
#294   — Edited

Sound exciting, soon you will have a whole InMoov

I have been playing around with the ESP32 now...

Too many things to do - ARC, fusion 36, 3d printing, esp32, ROS, Linux, python, jazz guitar, telescope, etc...

lol,

EzAng

PRO
USA
#295  

I will get back tomorrow for a few days to re-do a few old projects:

Use Camera As A Button - Tutorials - Community - Synthiam  make a soundboard mp3 file play by using the camera tracking red color

detect multiple face from EZ blocky logic - Questions - Community - Synthiam  detect faces and let me know if it does not recognize a face

and a few other things :-)

PRO
USA
#296  

Nomad, what happened to your InMoov  head?

PRO
Belgium
#297  

hi ezang

the head is still on a shelf . much work . repair a femiesapien .a rs media sd card . a meccanoid arm and head finiching ,bioloid finiching .lots of stuf to do .

thanks for asking .

PRO
Belgium
#299  

hi ezang

if you uncheck the transition box .the changing of colors or diff spots goes faster . your rgb is smart .i play with the rgb also allot .

User-inserted image

PRO
USA
#300   — Edited

Thanks Nomad, I will try that

wonder if I can use just LED ? I will try later

PRO
Belgium
#301   — Edited

you cant use an LED in rgb ,but you can use an led with the black/white signal pin on the ezbv4 . and use script . the higher the sleep the longer it stays on ad visa versa .

PRO
USA
#303   — Edited

Here is a video of my LEDs matching my speech, good for the future holidays

9/15/2022

screen shot

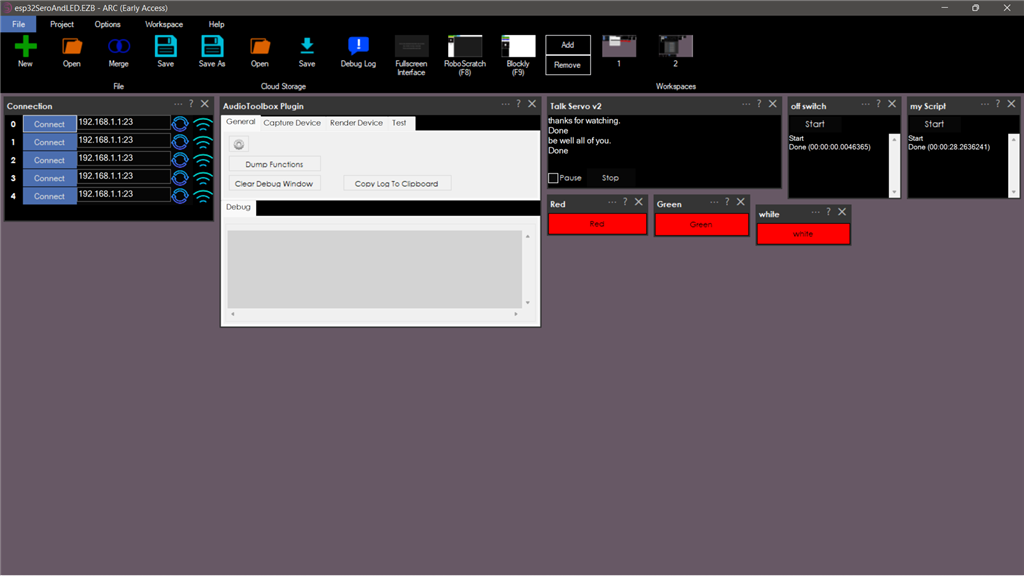
User-inserted image

PRO
Belgium
#304  

hey ezang

i love the way you test parts and settings .

PRO
USA
#305   — Edited

Thanks Nomad,

9/15/2022

EzAng

PRO
Belgium
#307  

hey ezang

yeach i saw these . they look awesome .

PRO
USA
#308   — Edited

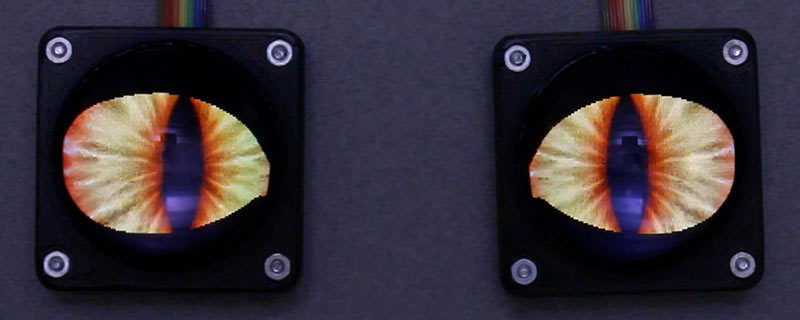
My new Robot2 with LEDs matching mouth and words    9/31/2022

I used the Talk servo V2, audio toolbox for different voices, scripts, LEDs, small servo for mouth, wires, EZB4, controller, ARC, servo city parts for stand, mask, etc...

here is a video - https://youtu.be/wcYgtyJCnvY

User-inserted image

PRO
USA
#309   — Edited

thanks Nomad, got your email

by the way, what happened to your inmoov?

PRO
Belgium
#310  

hi ezang

what you mean with my email ?

PRO
USA
#311   — Edited

I received this

Hi Angelo Bennetti, Your community post was liked by Nomad 6R. My new Robot here is a video -  https://youtu.be/wcYgtyJCnvY

PRO
Belgium
#312  

ah am just awake . brain is not fully operationel .xD

PRO
USA
#313  

Hey Nomad,

Thanks for always commenting on my work and time, I do appreciate it.

My robot - https://youtu.be/wcYgtyJCnvY

I used: the Talk servo V2, fine tuning all the adjustments audio toolbox for different voices and script Script for the audio 5 LEDs small servo for mouth, wires, tape, EZB4 controller, ARC, servo city parts for stand, mask, cut for the mouth

PRO
USA
#314   — Edited

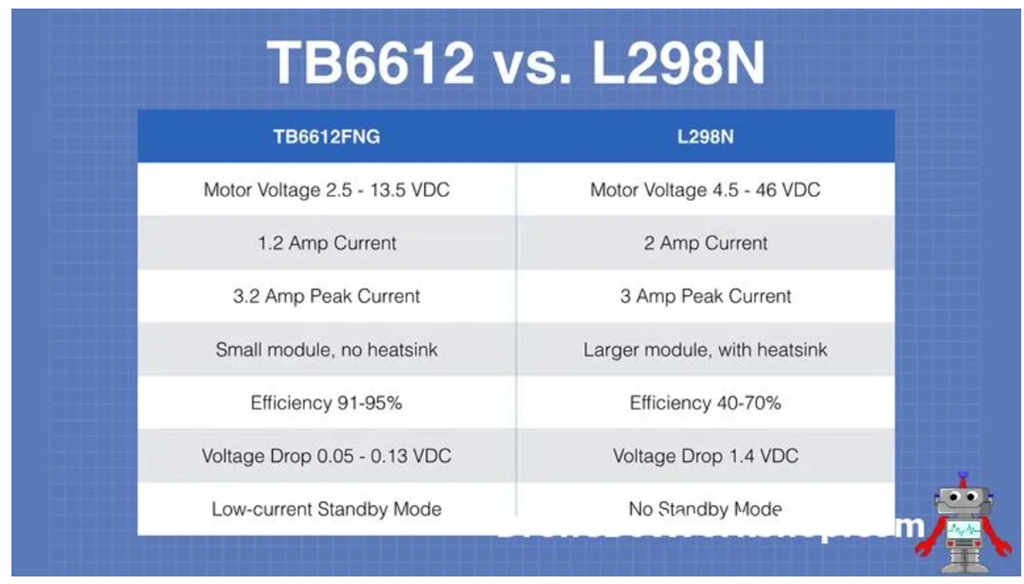
For your DC motor hobby cars: from https://dronebotworkshop.com/tb6612fng-h-bridge/

good info - https://dronebotworkshop.com/dc-motor-drivers/

Just thought I would pass along a replacement for the L298N H bridge

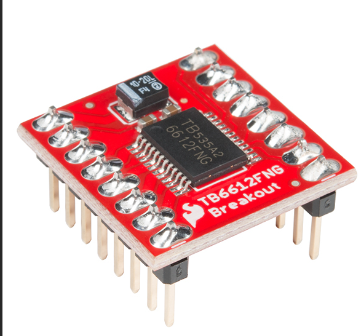
It is the TB6612FNG H-Bridge from Sparkfun

User-inserted image

User-inserted image

If you have a motor that requires over 13.5 volts then that eliminates the TB6612FNG. However, if your motor is a low-voltage (i.e. 3-volt) device then the L298N is out of the picture.

Although the L298N can handle almost twice the continuous current that the TB6612FNG does, it is about even when it comes to peak current, in fact the TB6612FNG has a slight edge.

But after that the TB6612FNG is the clear winner.

It is much smaller, in fact, most TB6612FNG modules are less than a quarter of the size of L298N modules. No heatsink, making it even smaller. However, it is a good idea to allow some airflow around the device. The efficiency is where the TB6612FNG really shines. There really is no contest here, something to strongly consider when building a battery-powered device. Virtually all of your motor supply voltage will get to the motor when you use the TB6612FNG. The L298N will drop 1.4-volts, as it uses BJTs. The TB6612FNG has a low-current standby mode that the L298N does not have.

PRO
USA
#315   — Edited

I just noticed the new:

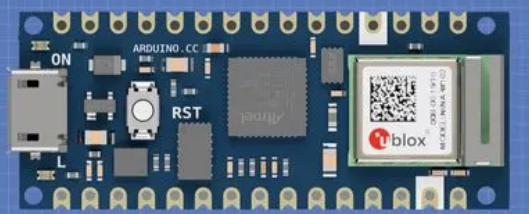
The Arduino Nano 33-IoT board. This low-cost module features a powerful 32-bit processor, integrated WiFi and Bluetooth, and IMU (Inertial Measurement Unit), and onboard RTC (Real Time Clock).

User-inserted image

ordered one

PRO
USA
#316   — Edited

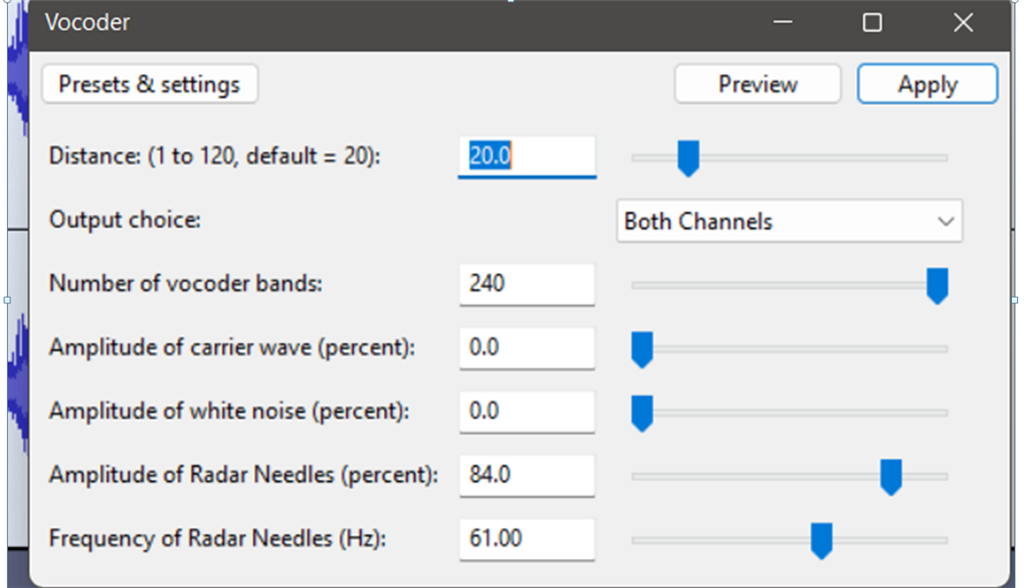
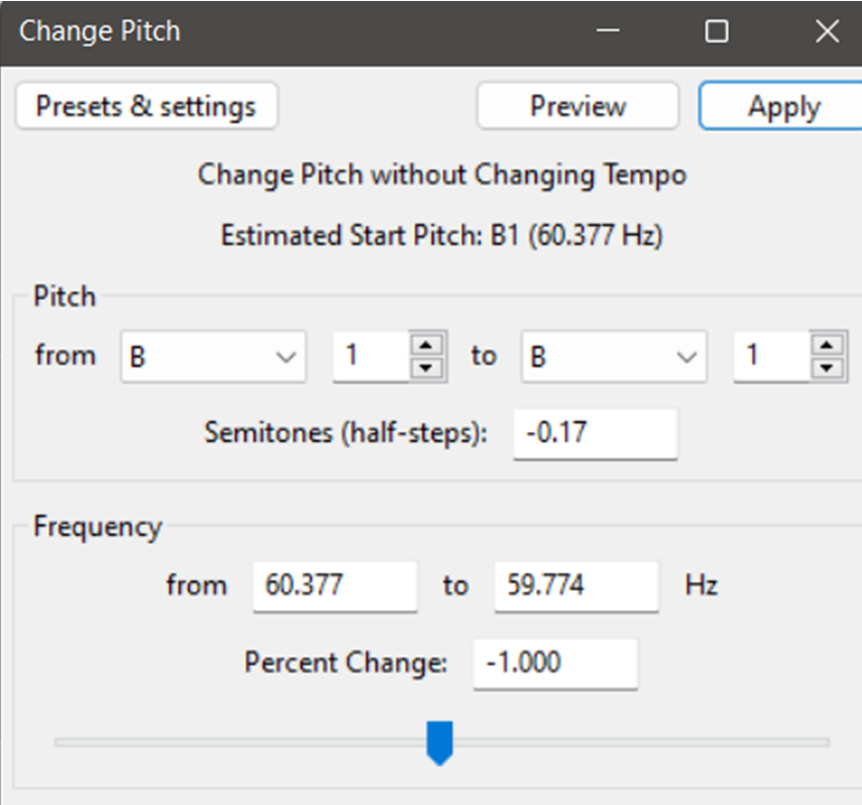
Great robot voice

Audacity

User-inserted image

User-inserted image

that's it