Magnus the 6 ft robot

rgordon

USA

Hello, My name is Rex and I am building a large robot. His name is Magnus. He is 6 ft. tall and will weigh around 300 lbs. He has wheelchair motors driving tank treads. He looks similar to the B9 robot that appeared on the old TV series called Lost in Space but , I claim no ties to Lost in Space. I will post more pictures soon. I was very excited when I found the E Z Robot kit. I want to order but have some questions. Looking forward to discussing all kinds of topics here.

Best regards,

Rex

User-inserted image

User-inserted image

By — Last update

ARC Pro

Upgrade to ARC Pro

Join the ARC Pro community and gain access to a wealth of resources and support, ensuring your robot's success.

#1  

welcome to EZ-Robot.....

and 

WOW ....6FT....... nice build.......love the tracks.......what are the features?

#2  

Awesome build so far. There are several B9 fans here. Feel free to ask any questions and we'll all be happy to point you to the answers if already here or help you figure them out if not.

Alan

#3  

Sweet! I love the base/drive section! Do you find the plywood strong enough for your purposes? I too will be building a large bot with wheelchair motors in the near future (finishing two smaller ones first - one of which is a 2' radio controlled B9 I'm hacking). What type of ply are you using? How is it joined (glue and screws?)? Do you have any drawings? Are those tracks the plastic conveyor belt stuff?

#4  

You can fiberglass that wood base and add a few.ribs and it.could easily hold up 300 pounds. You would probably fiberglass it anyways.because you can't paint strait plywood:( gotta put a easily sandable finish on it. So are you just wanting.it.to look "like b9" but be your own variation?

PRO
Synthiam
#5  

Welcome and WOW!!!! That's going to be sooooooo cool!!!

#6  

Hello Everyone,

Thanks to all who have responded so far. Thanks so much for the positive comments. I will try to address all of your questions.

This project will satisfy a dream of mine that started about 40 years ago. I am totally fascinated with robots and my skill set is now to the point that I wanted to tackle this dream. I should have started with a smaller robot but, hey what the heck! I have been actively working on this build for almost four years now. So hard to find the time to do the things one truly loves to do... now days. I'm afraid it may be turning into a mid-life crisis:) It looks a little rough so far but there is lots to do! I can't wait to get past the mechanical hurdles and get to the good stuff...the electronics and controls! I got so busy (and excited) trying to get things done, since I have so little time, that I did not get a lot documented for the build. But, now that's going to change. I am going back and making drawings, creating schematics and taking lots of pictures so I can share this with others. And oh boy..am I going to have lots of questions for you guys! Welcome to Project Magnus!

To GotRobbed and thetechguru -

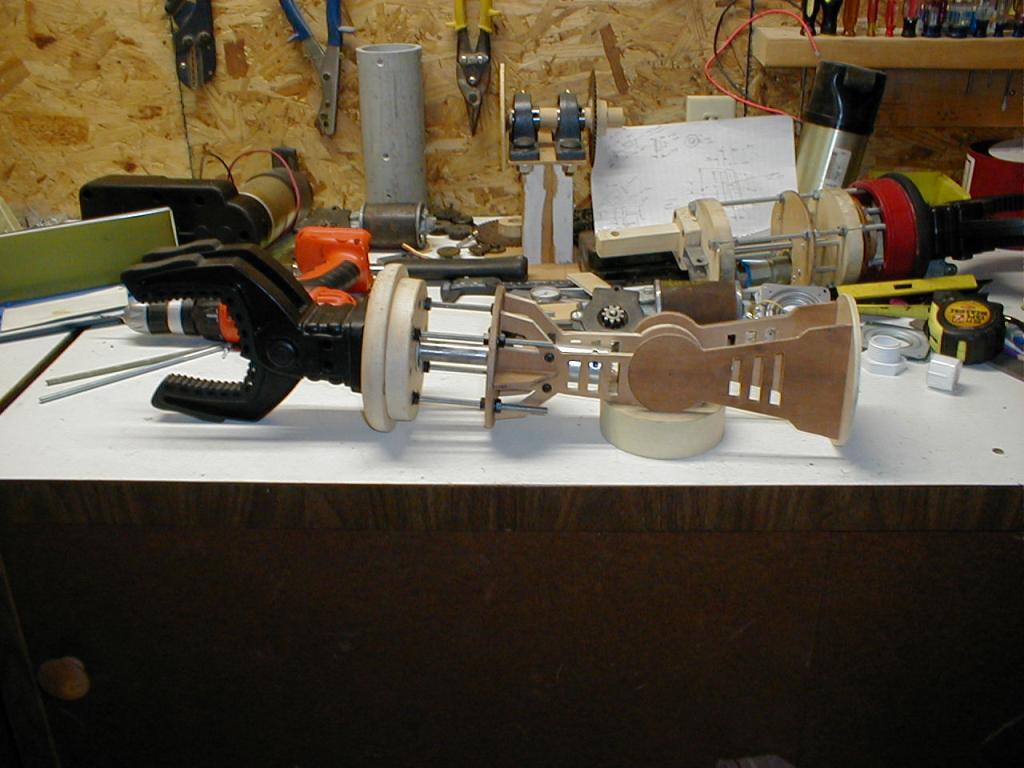
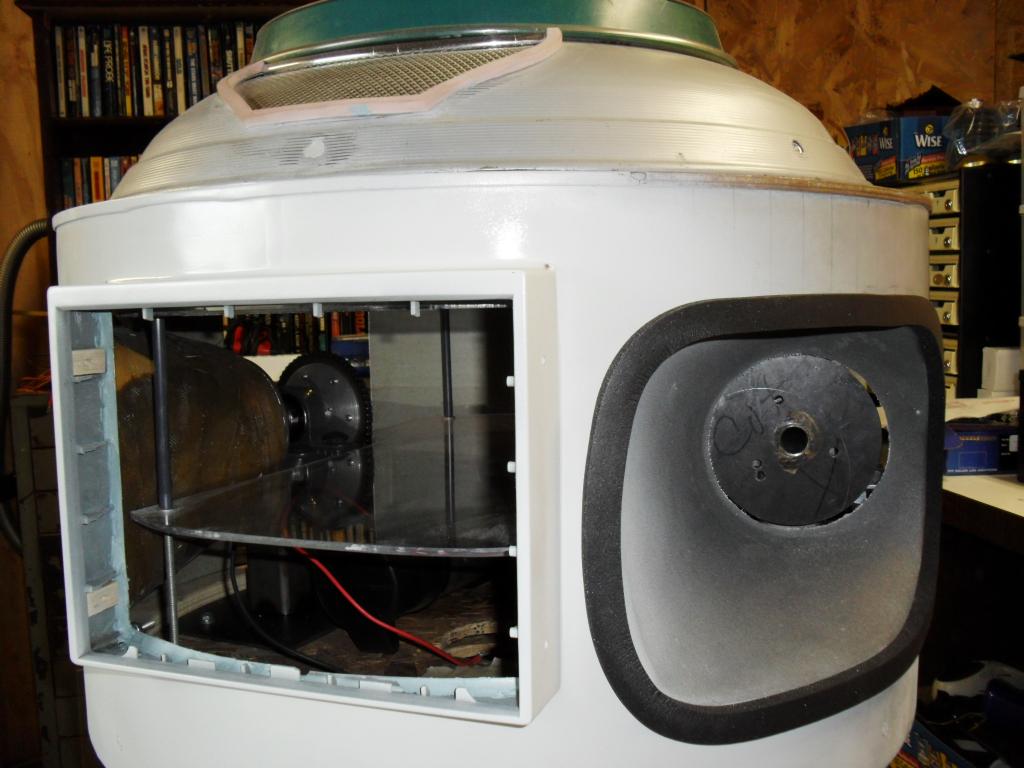
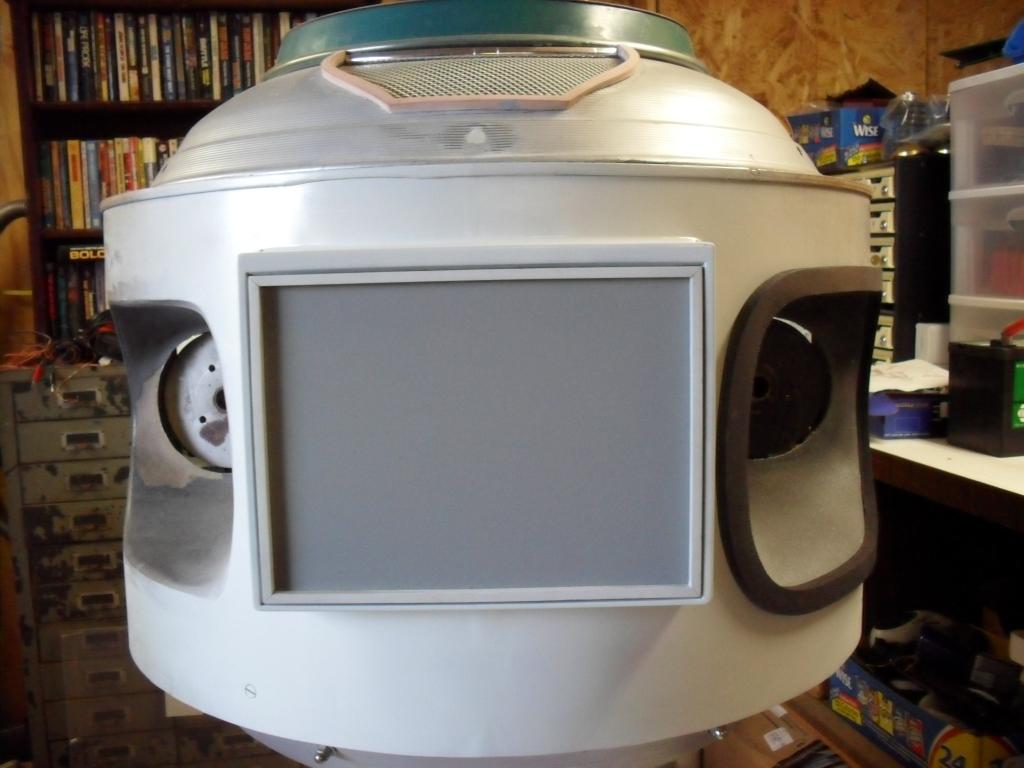
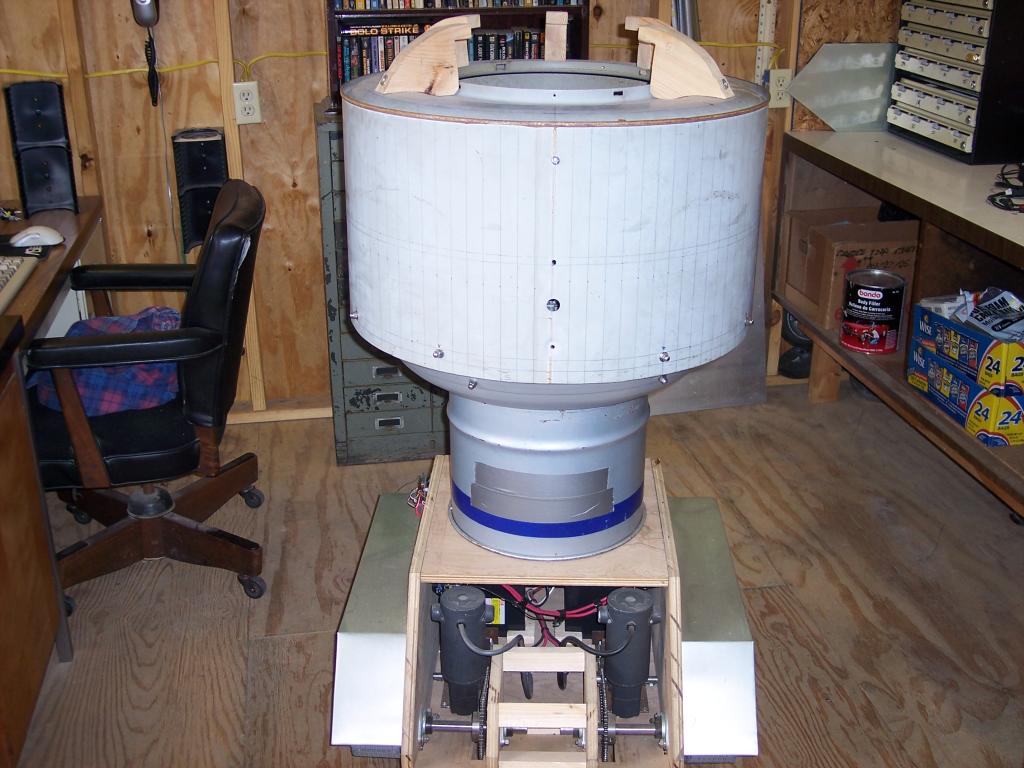
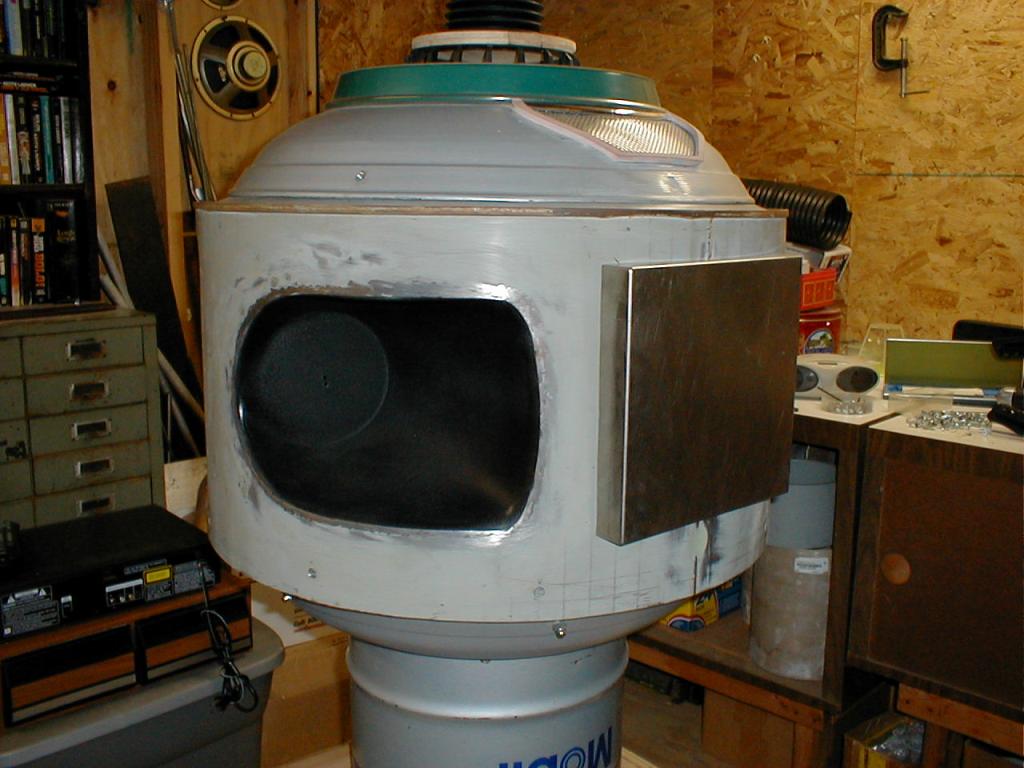
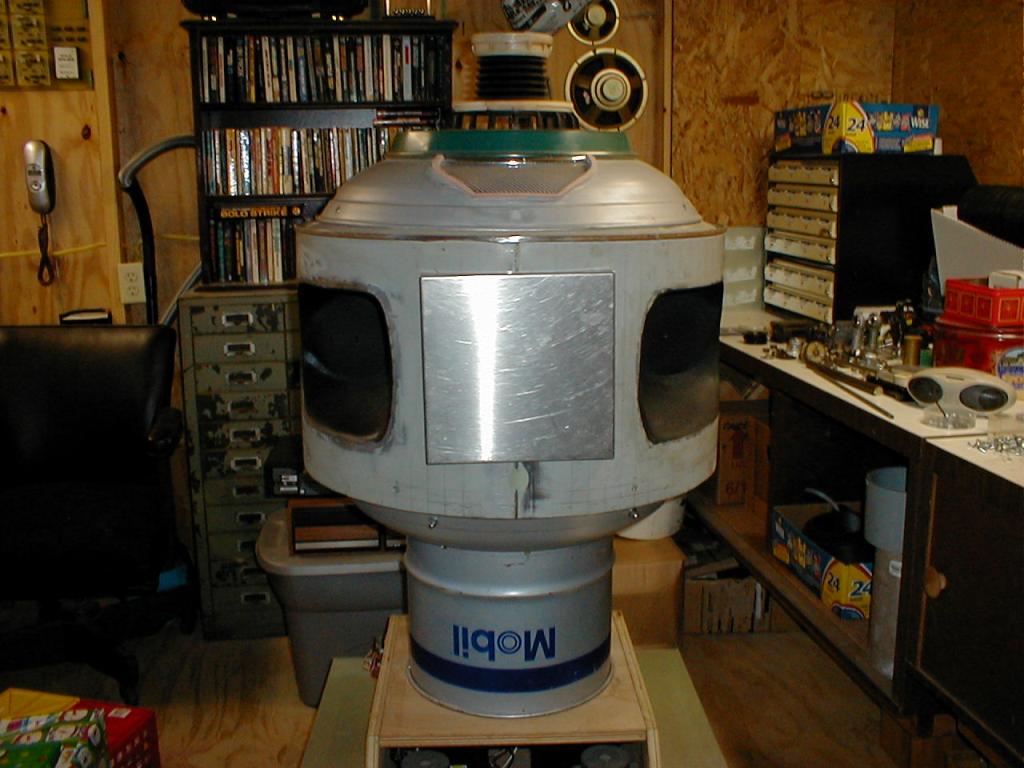
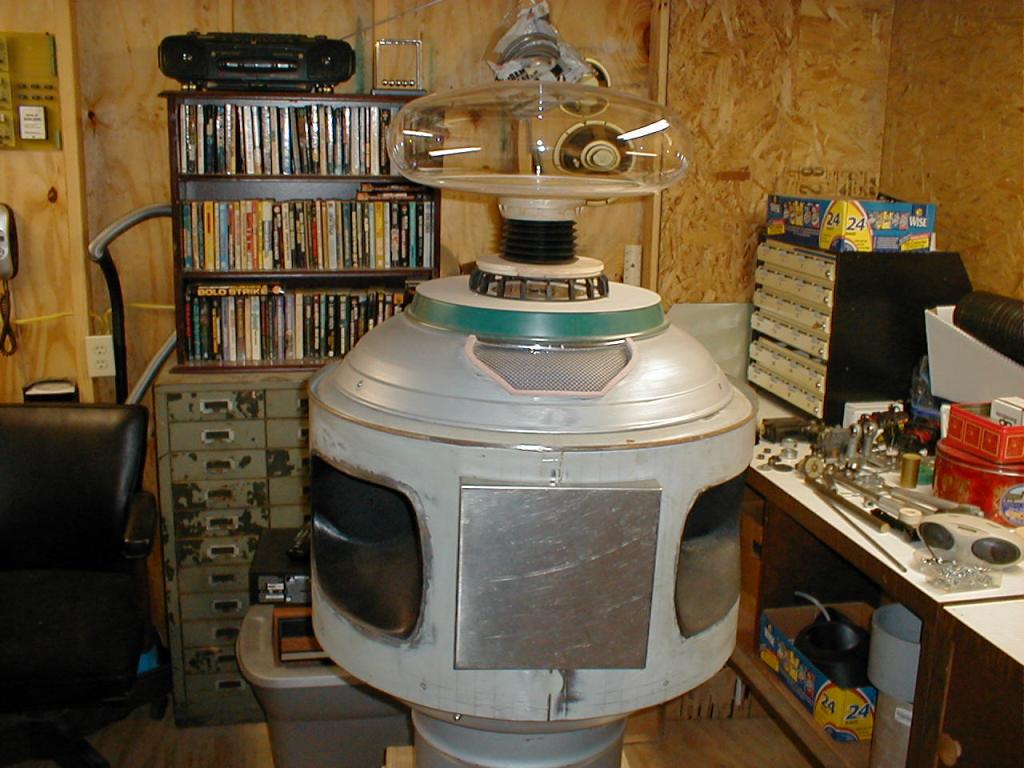
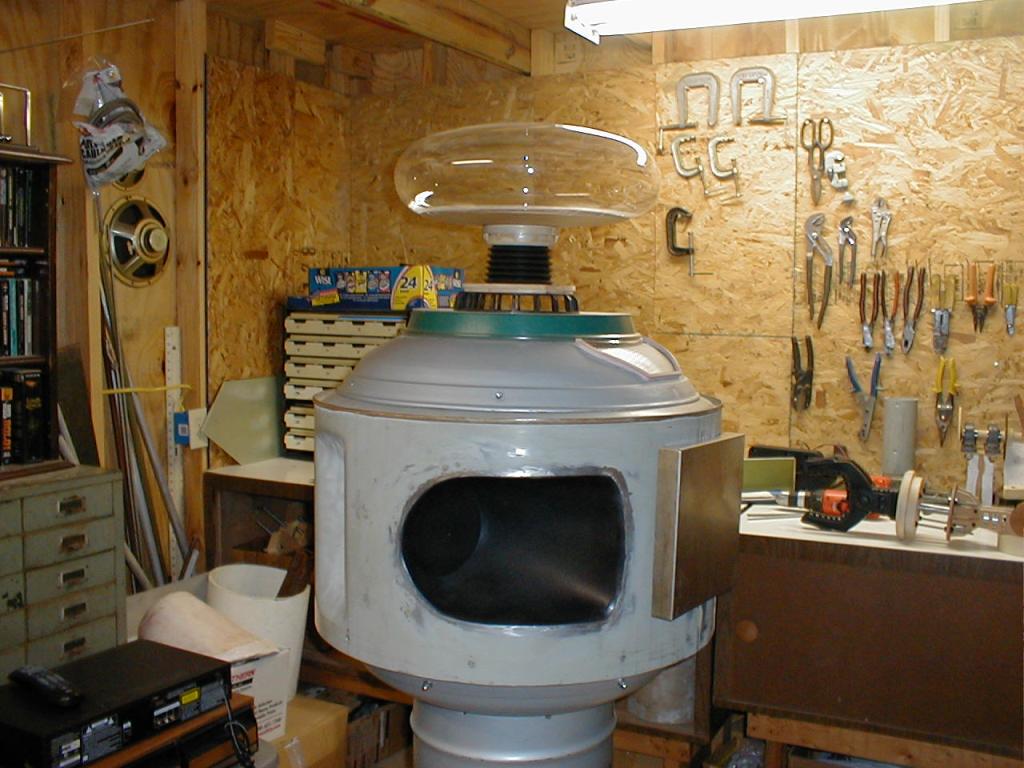
My goal is to build a large robot that will be totally remote controlled (for now). It will be approximately 6' tall with a cylinder shaped torso, two arms that each have a three finger claw, and a classic "bubble" head. This robot will be built to impress, so it must look sharp. It must emanate a presence when it enters a room. It will have a vague resemblance to the B9 Robot from an old TV series called Lost in Space but, it is actually very very different in almost all aspects. Magnus is unique and I claim NO ties to the Lost in Space series due to licensing issues. I would however, love to one day own an exact replica of the B9 Robot. He is so cool.

Features:

  1. It will have a tank tread drive system.
  2. It will have wireless video so it can be steered even when it is not in my direct line of sight.
  3. It will have sensors that will keep it from bumping into objects or people.
  4. It will have two-way wireless audio communication so that I can carry on a conversation with others "through" the robot.
  5. It will have a voice changer circuit or program that allows my voice to sound more "robotic" to make it seem or appear that the robot is operating on its own (with no one controlling it).

Certain aspects of the robot need to be automatic to allow me to control it more easily.

Examples include:

  1. After the torso has been rotated left or right, have it automatically return to the center straight-ahead position.
  2. Also perform this auto centering for the robot's head.
  3. After moving the robot's arms to a particular position, have them "return to home" or a neutral position automatically. In some cases you may want one command to move both arms in an identical manner at the same time.
  4. Collision avoidance should also be automatic.
  5. Certain other aspects of the robot's behavior need to respond to sound and motion stimuli in order to make its appearance more authentic.
  6. The robot will have a "drop dead" feature if it gets out of radio control range. (If operation of the robot becomes unstable for some reason, it will have an emergency shut down feature that an assistant or I can activate via push button. )

The robot will also have a number of special effects to enhance its presence.

These will include:

  1. Sound effects that give the impression that there are mechanical and electronic processes that are taking place inside the robot, a sort of low-level background noise.
  2. Sound effects that enhance the movements of the robot's body, arms, head, etc.
  3. Voice lights that modulate or flicker as the robot speaks.
  4. Various flashing lights on different parts of the body.
  5. An ominous "cylon" eye that strobes back and forth.
  6. Other lights that respond to outside stimuli such as sound or motion.
  7. Certain lights on the chest control panel will actually be used to monitor or indicate real robot status items (such as battery charge level).

To bret.tallent and jstarne1

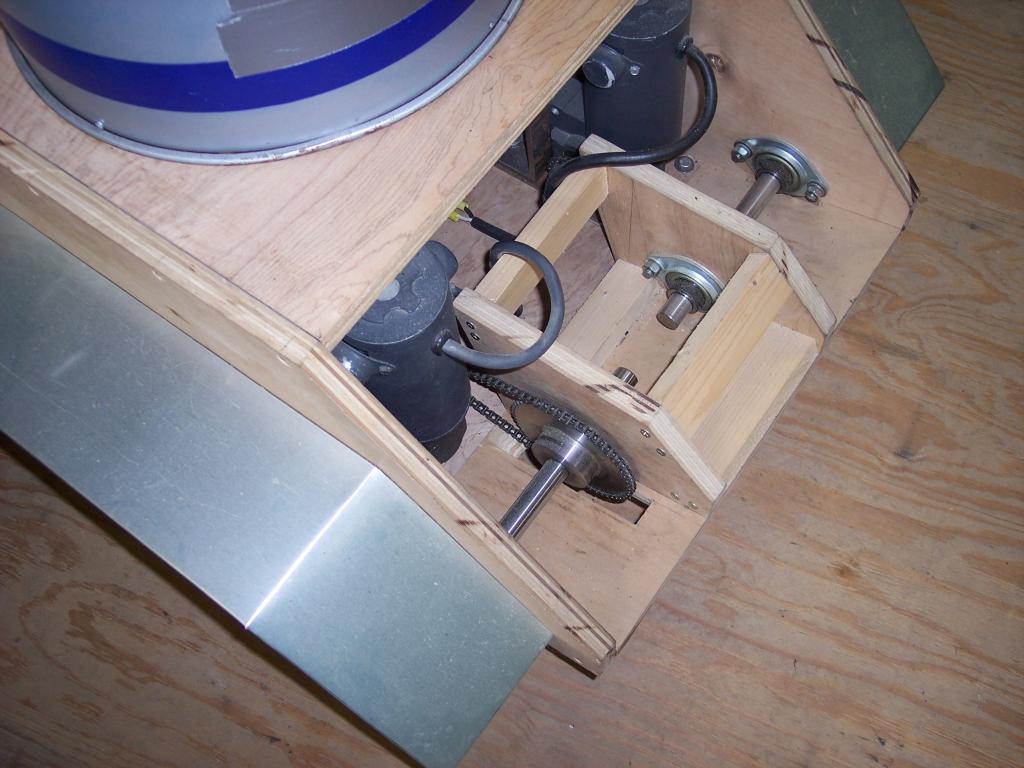
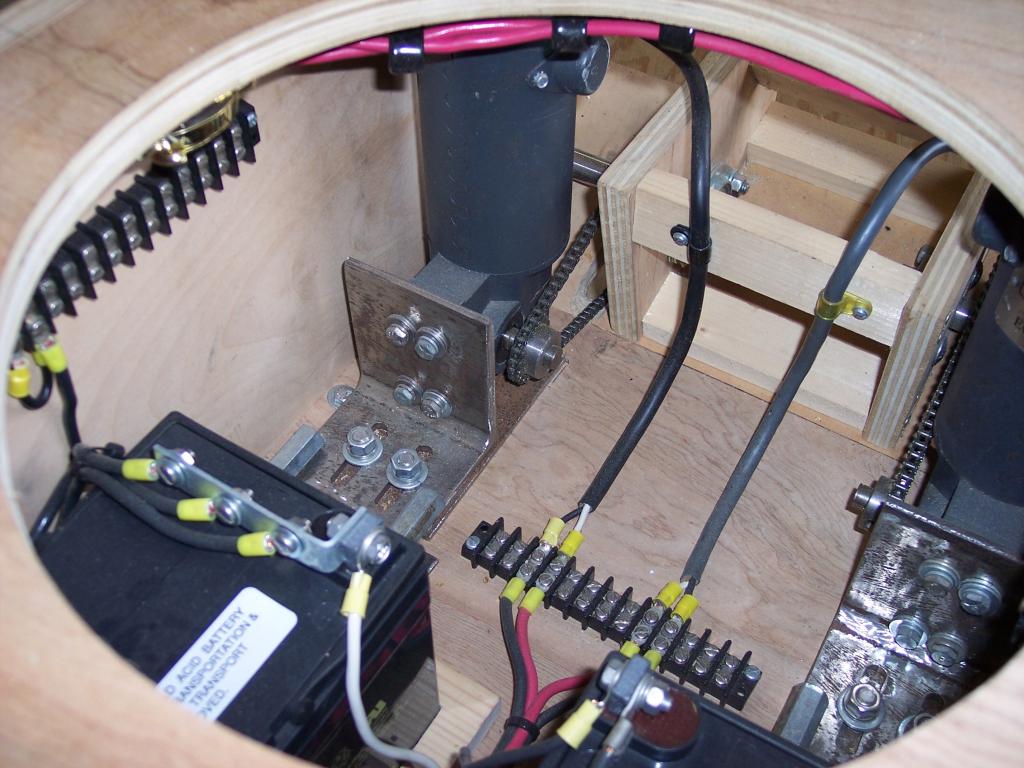
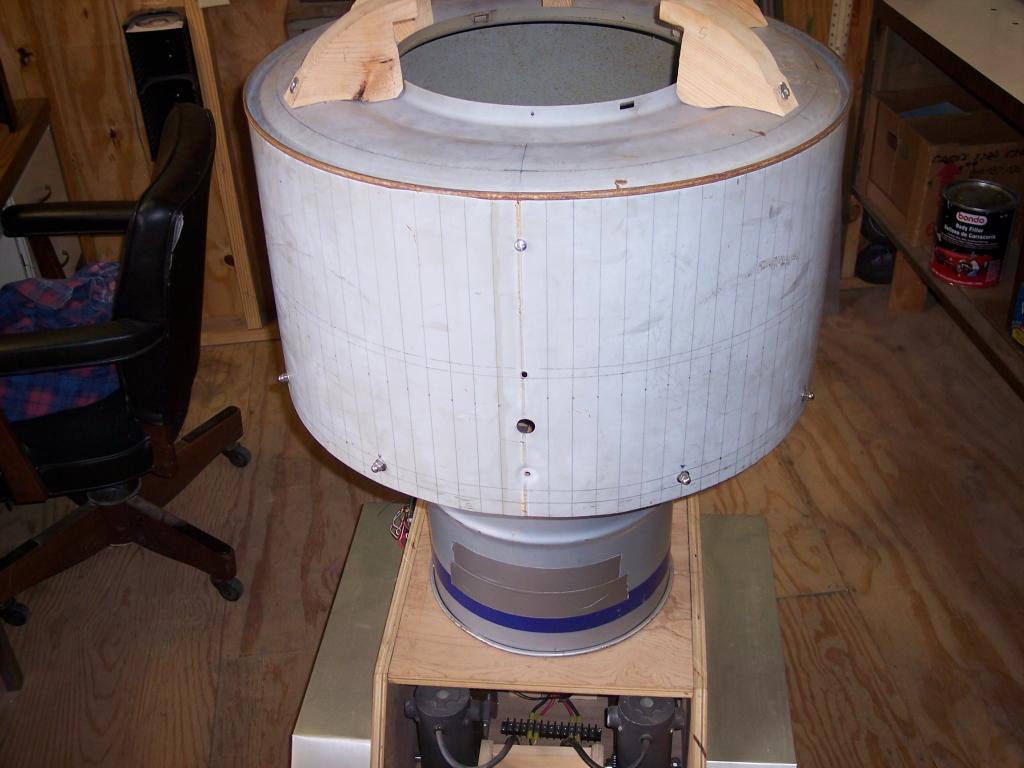
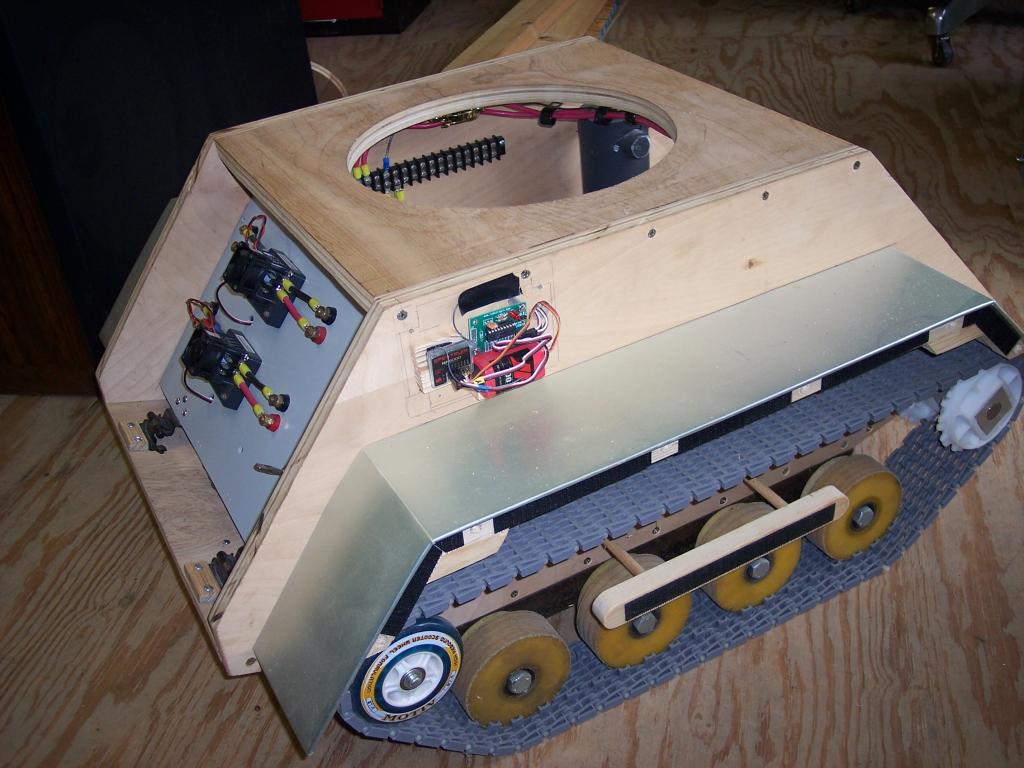
The plywood is 3/4" birch and for now is held together with drywall screws so I can take it back apart if needed. Once I get it to the point where I am satisfied I will also use glue and maybe a brace or two to make it stronger. The base weighs 135 lbs as shown in the picture and I have ridden on it with no problems. I weigh 180 ls. So load capability is good. I did find that the paint that is used to coat truck beds actually works pretty good on covering plywood if you use a good sealer first. But, I am also intrigued by the idea of using fiberglass to coat it. Thanks for the idea!

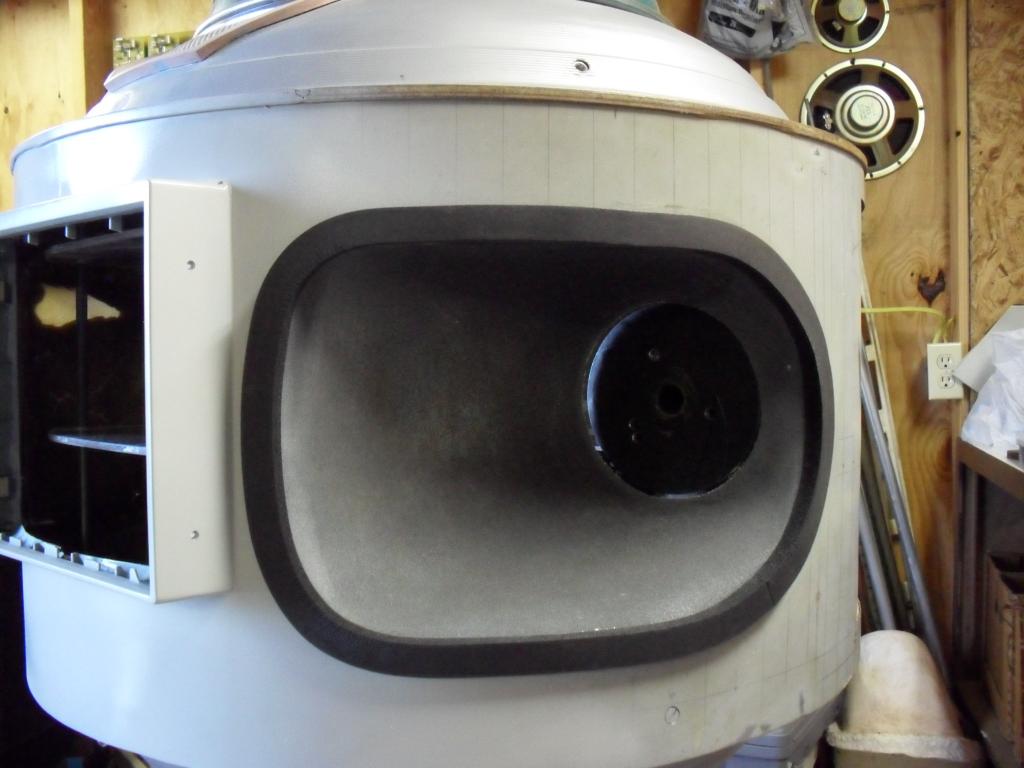
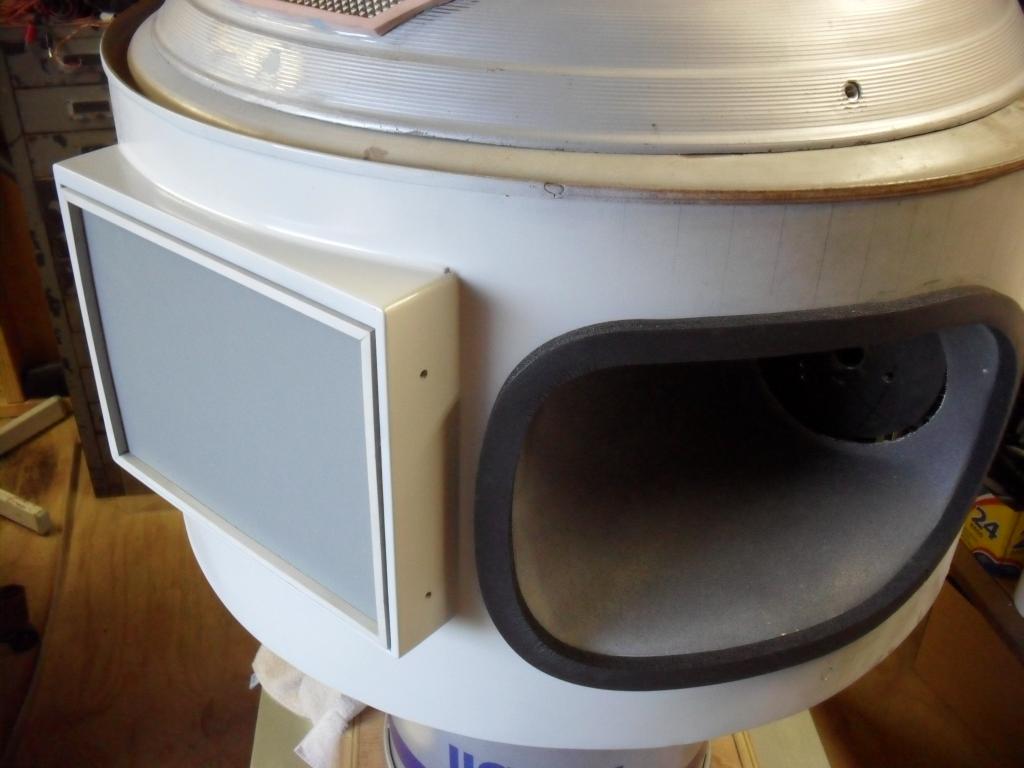
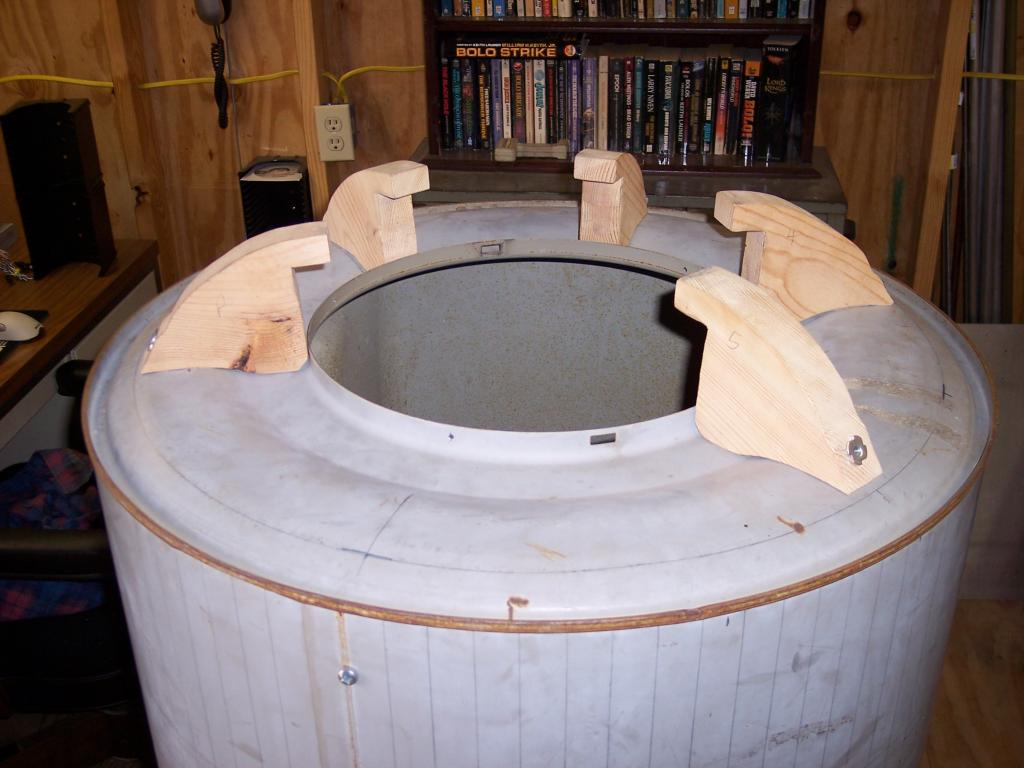
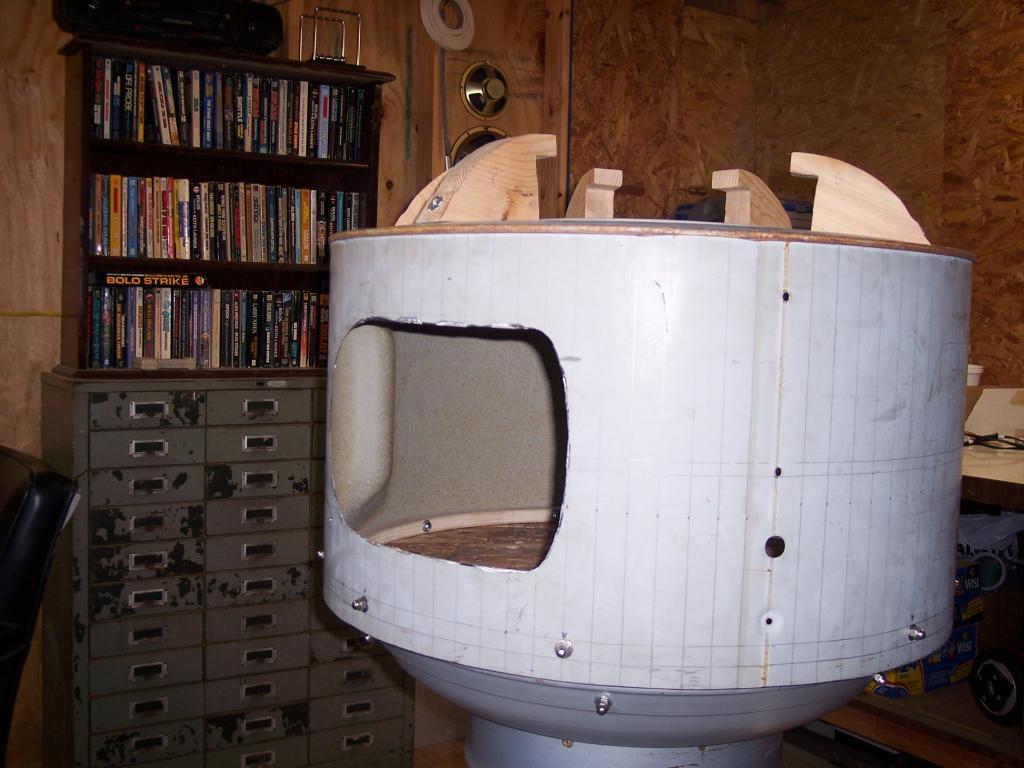
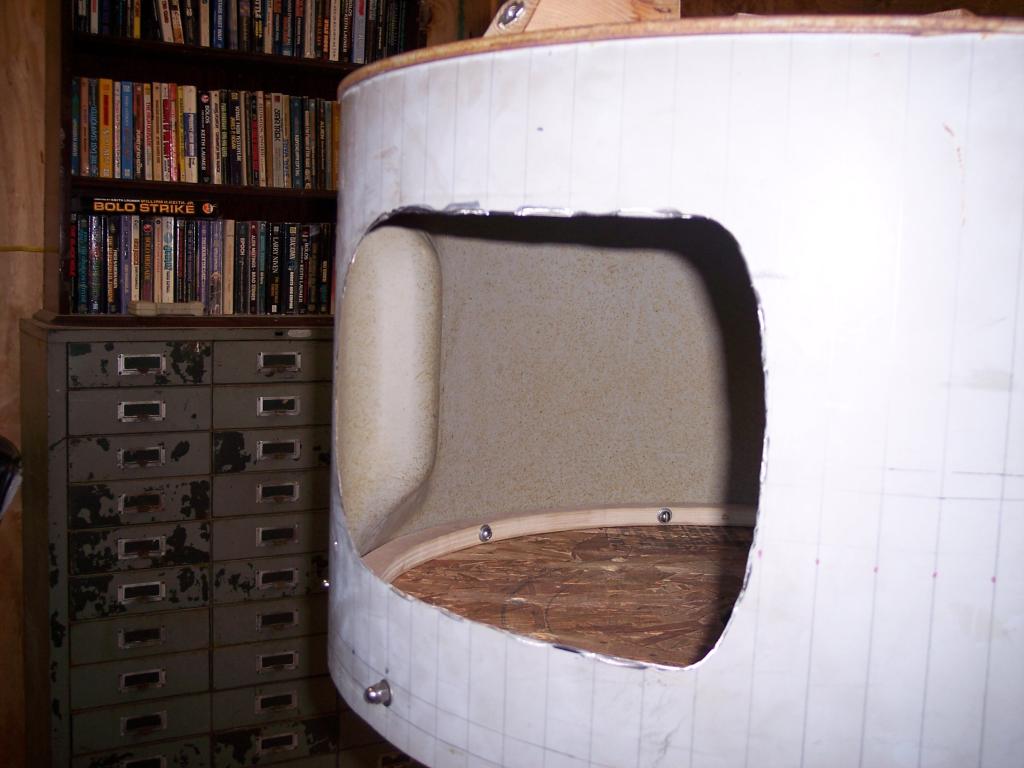
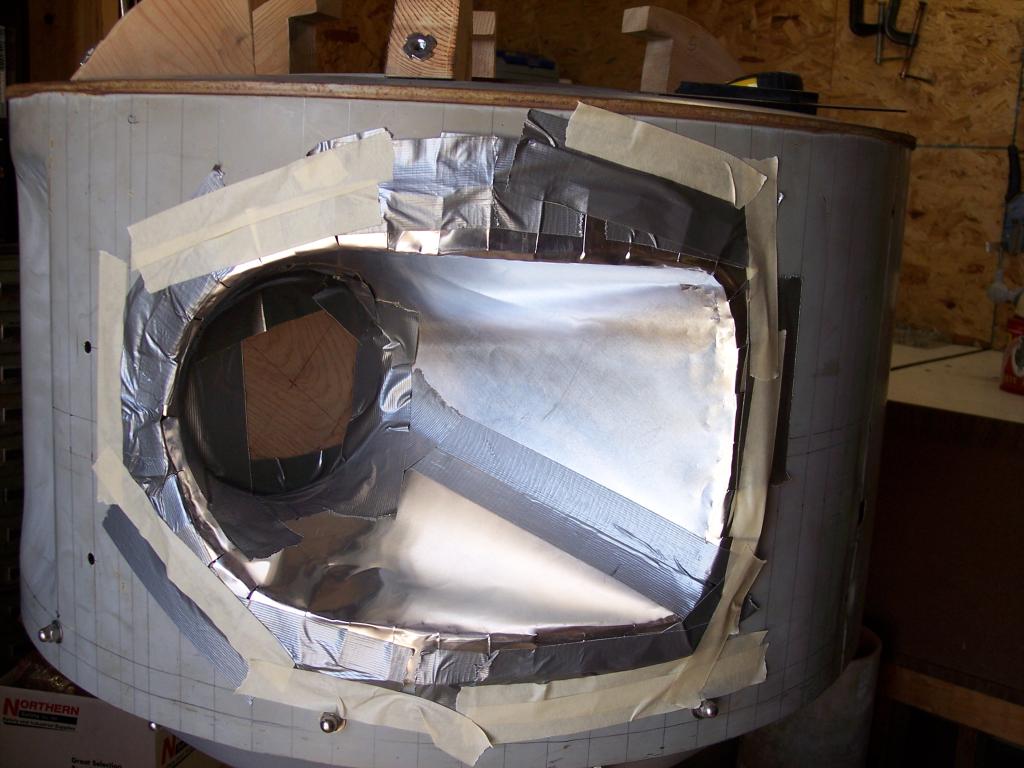
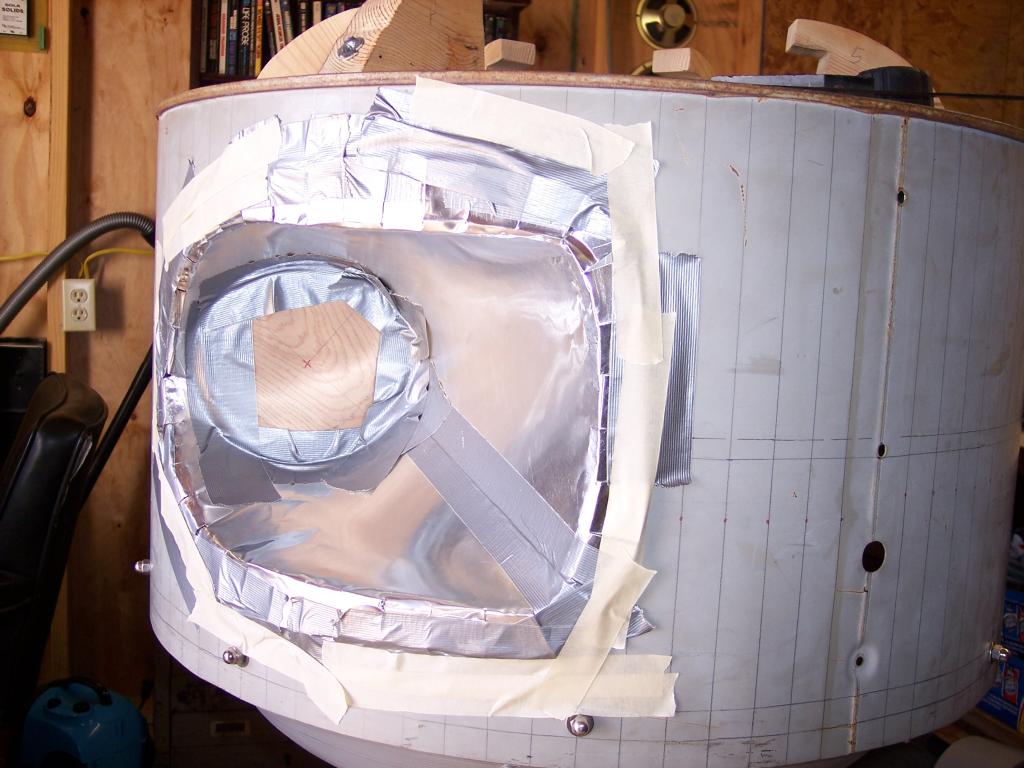
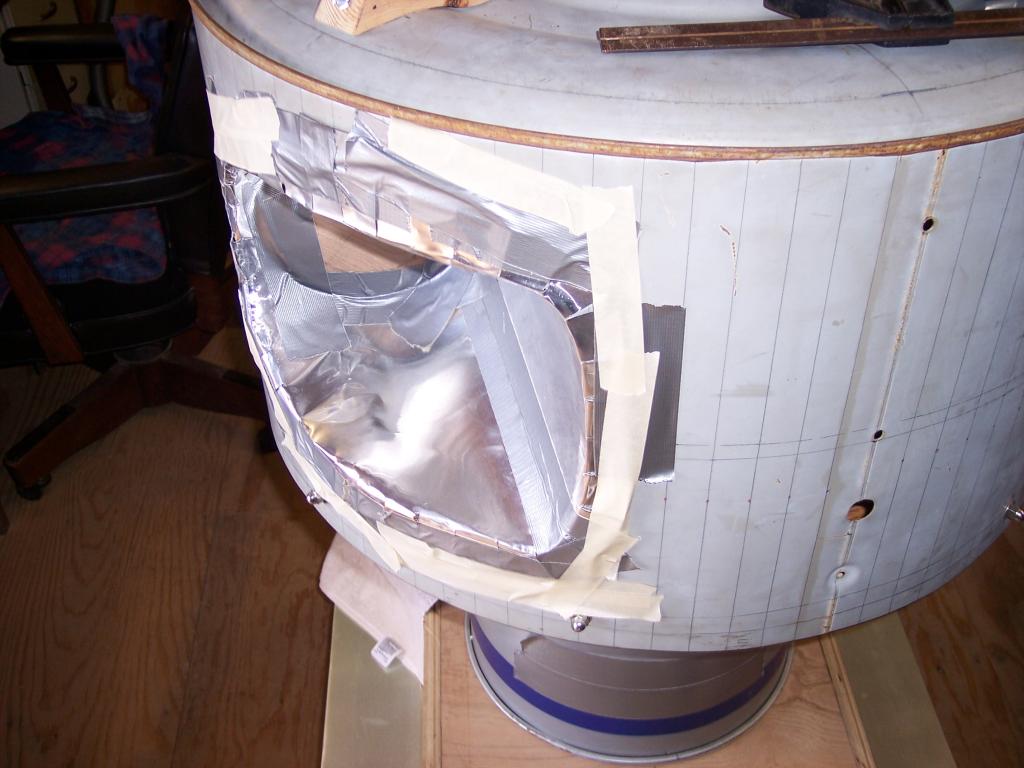
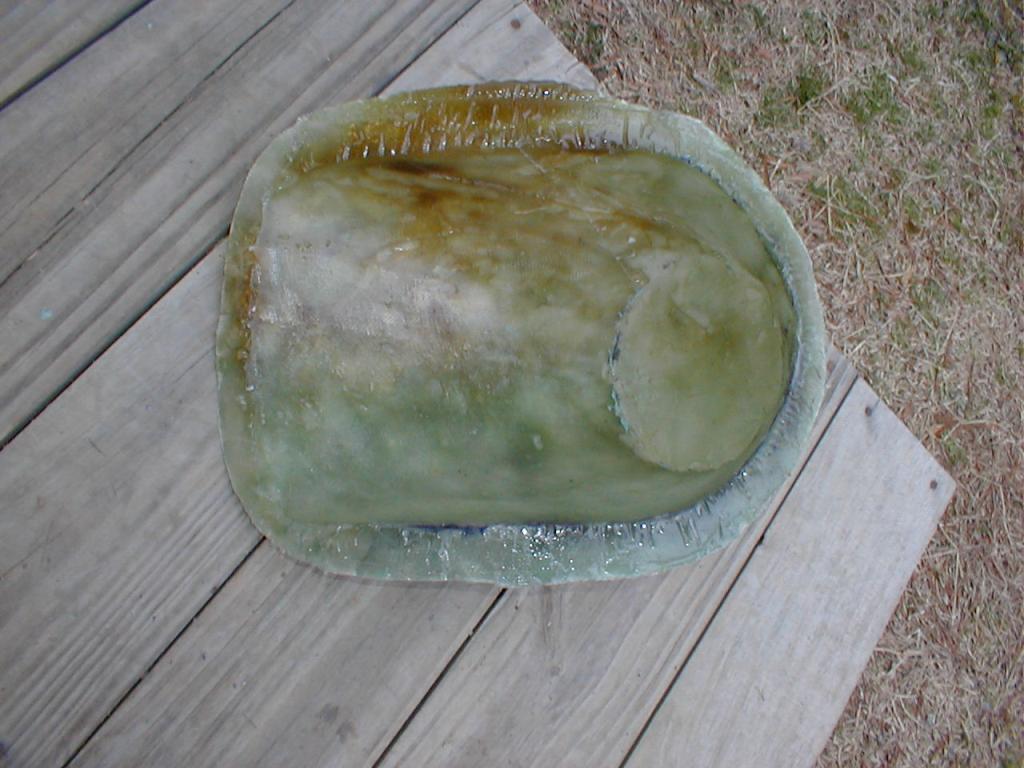
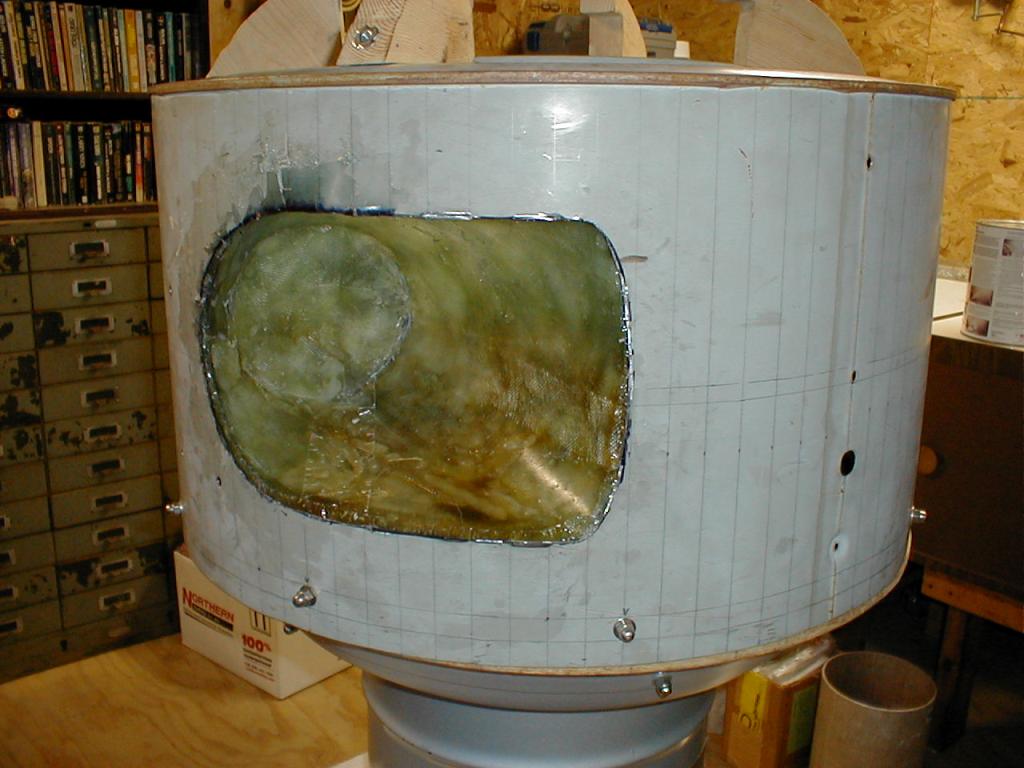
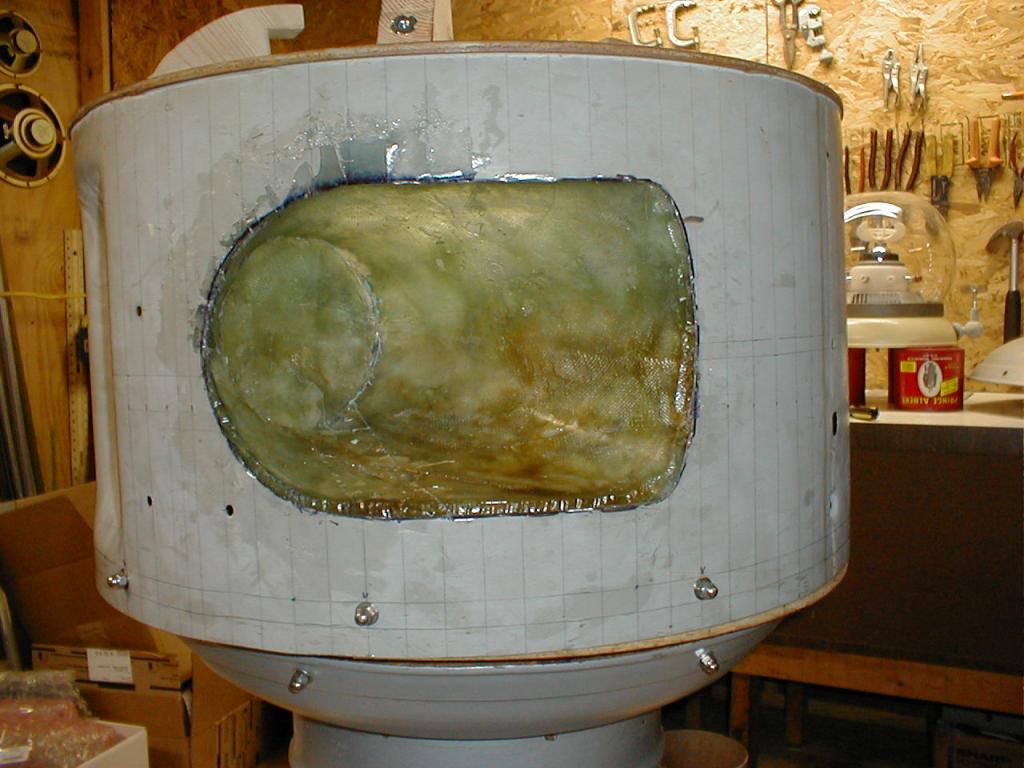
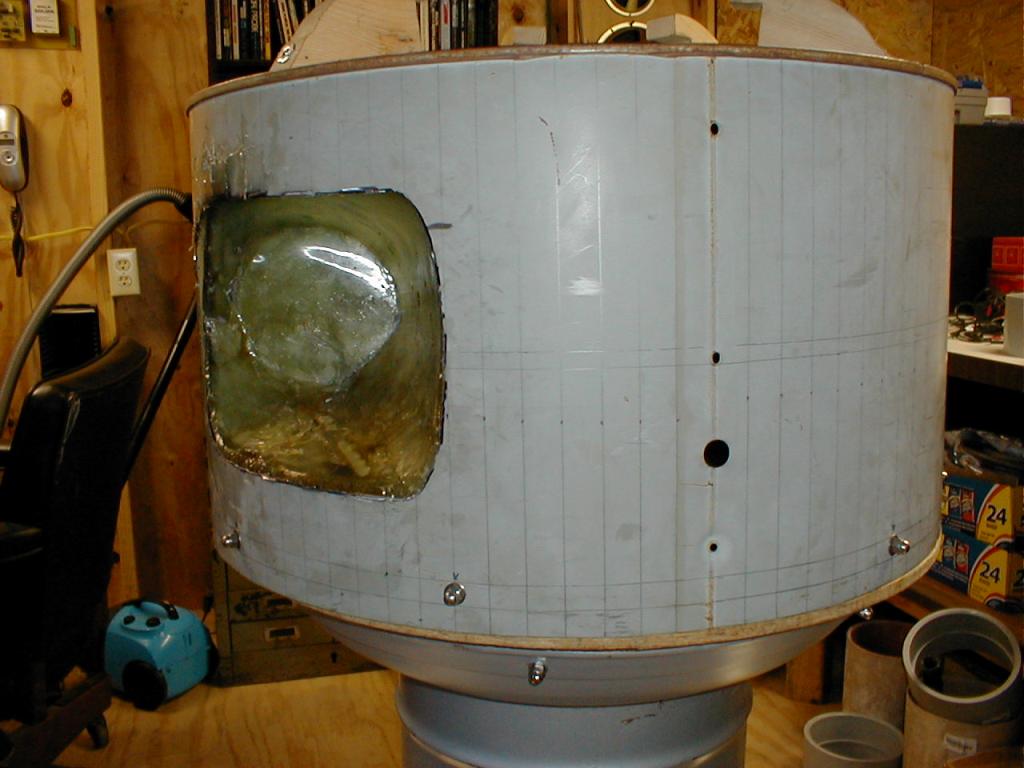
The tracks are conveyor material from a company called Intralox. They work great but, I wish they were black instead of gray. I love track drives and they are really cool but, I know that they may pose problems in the future due to the weight of the robot especially when traveling and making turns on carpet or nice shiny hard wood floors. Oh well...we'll see. The torso is made from a clothes dryer drum...hey...right size and shape and didn't have to build it from scratch. The arm sockets were tough to make though. The upper and lower domes are covers from roof attic fans:) Still working on models for the arms. Hope one day to be able to afford powerful servos but will use DC gear motors for now.

User-inserted image

To DJ Sures

Sorry for such a long post...can you tell I like robots:) ??? I am very excited about the EZ Robot kit that you have for sale and hope to purchase it in a week or two. It looks to be a dream come true. I have a couple of questions for you and the guys:

How would you rate the video quality of the camera that comes in the kit? I will need to steer Magnus when he is out of my line of sight. Is there much delay in the transmission?

Do you have any step by step tutorials coming up (or now) on how to extend the range beyond what Blue Tooth can do? I will need at least 100 ft through maybe a wall or two. Think hidden control booth made from plywood or some such. Remember, keep it simple for us old folks:)

Best regards,

Rex

#7  

now thats a claws!!!!....

very impressive build, very impressive build,....what is your timeline so far?.....

It must be great to have workspace....lol Im using the kitchen...ha ha

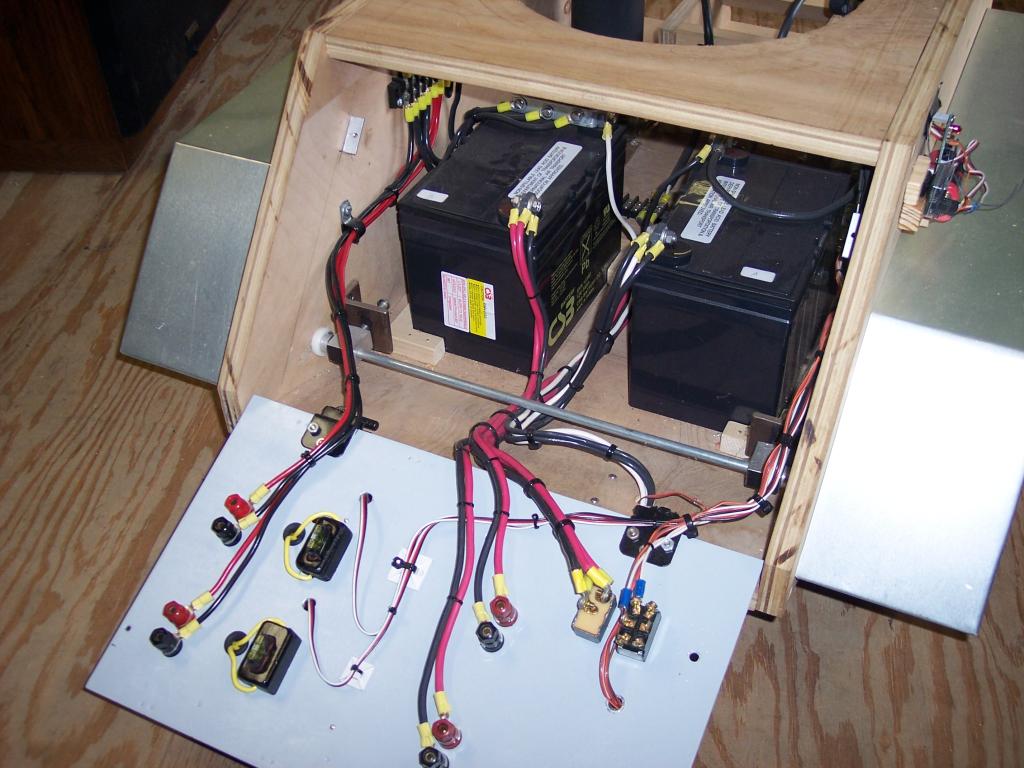
What are you using to power it? 24v system? How many fussblocks? are you custom building the gear system to move the arms and body?

I like to see pics of your electrical system setup......

great progress.....nice

#8  

Ditto got robbed , kitchen table is the work shop lol

PRO
Synthiam
#9  

I've featured your build on our Facebook page:) Congrats!

#10  

To GotRobbed-

The official Magnus Project got started about 4 years ago but, been dreaming about it for 40 years (I'm 50. I live in Virginia). I've wanted to build a robot ever since I saw the movie Forbidden Planet with Robby the Robot.

I built a dedicated robot shop 14' x 16'. I don't allow anything but robot stuff in there. Unfortunately it is not heated or air conditioned :(

BASE:

24V system (two 12V 34Ahr batteries in series)

Two automotive fuse blocks so far...one in the base and one in the torso.

The base has two surplus wheelchair motors driving sprockets and chain which turn the track sprockets.

User-inserted image

User-inserted image

User-inserted image

I built custom tension brackets to adjust the chain tightness.

ARMS:

I am custom building everything for the arms. Shoulder mechanical structure is done. I will post pictures soon. The shoulder motors are surplus. They are motors used for unfurling RV awnings. Good torque of 400 in.lbs (mu ha ha ha!... sorry... what was I saying?:) I wish I had the money to buy super servos but, they are way out of my budget. So I am sticking to using DC gear motors for now. The picture I posted is just one of the wooden prototypes I have built. I figured it best to model it in wood first to test for potential dimension problems. Had to come up with a unique way of removing the arms from the robot so I could remove the torso to be able to work on things inside. Pictures soon.

I am working on getting schematics and wiring diagrams done to share with you all. Time to do these things is hard to come by. Don't give up on me yet.

Best regards,

Rex

#11  

@Rex - Where in Virginia? I live in VA as well - Norfolk area. Actually Suffolk, but close enough. Your work is very professional looking, neat and tidy. I've been working on an omnibot as a test bed before I move on to my big bot - as it won't do as much damage should something go wrong. haha. I grew up on Lost in space and B9 has always been my idol - and Forbidden Planet is still an awesome movie. My big bot is going for more of a retro 50's look. But it would be nice to compare notes. Great work!

#12  

@bret.tallent

Thanks for the positive comments!

I live near Clarksville, VA 23927. Clarksville is located along Buggs Island Lake. Looking at the map it is located right along the Virginia / North Carolina border (about mid way).

Yeah, I would very much like to discuss and compare notes. Hope to see pictures of your progress.

As a side question: How does one change the avatar picture that shows up on the forum? I see yours is B9.

#13  

Up at the very top of the page above the main menu is a "settings" button on the right hand side. Go in there to change your avatar.

#14  

nice work shop size ,i have one at 20' by 40' with A/C only robot stuff ,plus computer design area in my house like the B9 robot

#16  

@robotmaker

Thanks for the links. I will have to digest them for awhile.

#17  

That looks great so far. I am building a full size version of the B9. Yours will look like his cousin. I am sure that we will run into some of the same issues with weight, size of parts, etc. I intend to have fully articulated arms, claws, rotating torso, the works. I bought a case of surplus windshield wiper motors for most of the movements. I also have wheelchair motors to drive him.

If it is any help, I bought these motor controllers for the drive motors, at Jstarne's suggestion. controllers

For the rest of the motors, Brett.tallent steered me towards these relays. relays

I will be setting them up as H bridge relays for forward and reverse.

It looks like we are about at the same stage of development. My build is about half way done, and I am trying to figure out how to control it as I go forward. I bought one EZ-B board and have been experimenting with it. I will need a second one before all is said and done.

I have to get some pictures online soon. I look forward to seeing more pictures of yours as you progress.

Also, I love the clothes dryer drum. One of them did catch my eye a long time before I built my torso. I did contemplate starting with one of them.

Any way, good luck. If I can be of any help, just ask.

#18  

relays not so great to control motors,first the draw alot of current ,then sometimes make a chatter that wont control the motors correct best way is a h-bridge with feedback or use mosfets that draw very little current to turn them on,plus higher current ,small size and costs

my next big big project is full size AI johhny five robot,located a few parts so far,like special tracks and eye lens that open like in the movie,his lips using VU meter,just like in the movie i do have full size stage prop for ideas and how to paint him full size johhny five design

the link i have there is the plans for it when ready

#19  

@Danger!

The dryer drum has its pros and cons.

PROS: Good and sturdy, easy to cut, right size and shape.

CONS: Weighs 14 lbs. even after trimming some off the bottom, blocks radio signals.

The top and bottom domes are covers from roof attic exhaust fans. They too are a little heavy. Not that it matters much about the weight; the wheelchair motors have plenty of pulling power.

Since I did not want antennas sticking outside all over the place, what I have decided to do is use the top dome as a mold and cast a replica out of fiberglass. Hopefully then I can place all my items with antennas inside the dome area. There will be the EZ-B (which I will order as soon as my bonus check arrives), two 12 channel remote control relay boards, and another R/C receiver to control the waist and neck and other items. The base already uses a Spektrum DX6 2.4 GHZ transmitter and BR6000 Bot Receiver R/C system (3000' range).

For the head area I did purchase the Plexiglas bubble from Fred Barton "The Robot Man" for $330 dollars. However, I am doing something completely different than the B9 brain. I'll have a few pictures soon.

I found a really neat 24 LED Cylon type eye to use:

"Cylon Eye"

What I really need is help finding out how to hook up and use the Optional XBee/Synapse/WiFi Long Distance Communication that is mentioned in the EZ Robot Kit features list.

Anyone who has done this please contact me. I would like to know how to do this. I wonder what the range is for it and if it will penetrate maybe a couple of walls.

Thanks for all the positive comments.....

#20  

Project Magnus

Torso Construction:

The torso is made from an ordinary clothes dryer drum. I cut off one end so it could slide over the central control shelves. I then cut out a 1" wide wooden plywood ring to fit inside the drum where I had cut it so that the drum would keep its round shape. The wooden blocks on top are to support the upper dome and keep it from flexing. The upper and lower domes are metal roof attic fan covers.

User-inserted image

User-inserted image

User-inserted image

Cutting the arm holes:

I used a carpenters square and marked equidistant lines all the way around the torso, starting at the dead center of the front so I would have reference lines when cutting or drilling holes. I then cut out the arm holes.

User-inserted image

User-inserted image

Making the arm sockects:

Next I scratched my head awhile until I could figure out a way to make the arm sockets. I decided to use roof flashing and make something like a funnel. Then I cut out a wooden circle to place inside the arm socket. Then I just inserted the funnel into the arm hole until it was touching all the way around the hole. Then I used a marker to mark the funnel inside the torso around the hole perimeter. After taking it back out I cut the excess flashing from the funnel leaving about 1 inch of material beyond the mark. I made cuts-every so often- around it up to the line so that I could form flaps that I could use to tape it to the torso. After making sure that it fit like I wanted, I removed it and made a small plywood platform with 12" tall legs and cut a hole in the plywood so the arm socket would hang down through the hole. I then filled the arm socket with Plaster of Paris and let it harden for a day. After popping it out of this crude mold, I sanded and sanded and sanded....did I mention sanded? After it was nice and smooth, I covered it with petroleum jelly to serve as a mold release. I then covered it with fiberglass. After it hardened, I trimmed the edges and installed it into the torso arm hole using Bondo filler to attach it to the torso. I sanded till it was nice and smooth and the edges blended in with the torso. Then I primed it with truck bed liner paint.

User-inserted image

User-inserted image

User-inserted image

User-inserted image

User-inserted image

User-inserted image

User-inserted image

User-inserted image

User-inserted image

User-inserted image

More pictures soon....

#21  

Project Magnus:

Chest Control Panel:

I tried several ideas for a chest panel. I wanted to be able to open it up to work on things so I abandoned the metal panel. To much trouble to cut and adapt to what I wanted. I looked around a long time trying to find something better...something simpler...and as I was staring at my work bench I saw the plastic parts bin where I kept all my screws and fasteners...eureka! There it was! Quickly I removed all the little plastic drawers and cut out the web that the drawers slide into. I left a short length of web around the inside edge.

Next I cut out a thin metal plate to fit snugly inside the recessed area. I used square plastic tubing to form a sort of frame around the plate and epoxied it on. Next I cut a hole in the torso 1/2" smaller all the way around so the plastic parts bin would overlap the edge of the hole.

Then I used hot glue to fasten (4) wooden block spacers just inside along the plastic walls. I set it down over the hole and evened it up so it was square with the hole edges and marked where the spacers touched the torso. I drilled holes in the torso at these points and fastened the whole thing to the torso with dry wall screws. This was just to get the whole thing secured and tight against the torso in preparation for the next step. (The screws will never be taken out.) User-inserted image

Next I used Bondo to seal around the edges (inside and outside) and blended it in with the torso, put a little primer on it, and presto! A chest panel.

Then I needed to be able to secure the metal chest panel to the plastic bin and make it so it was removable. So, I drilled four holes; two on each side and then hot glued wooden blocks to the back of the metal chest panel so they would line up with the holes. I marked, drilled and tapped threads in the wooden blocks. I wanted to use machine screws to hold it in place but, I didn't like the way the screw heads looked so, I cut the screw heads off. Then I took plastic wire nuts, the kind you would normally use to connect two wires together, and cut the top off of them (sort of looked like little knurled plastic caps now). I epoxied the wire nut caps onto the screws. So now it does not look so drabby.

The black ring around the arm socket was a test to see what trim rings would look like. Trim rings are next.

User-inserted image

User-inserted image

User-inserted image

#22  

I am afraid that I cannot help you with the Wi-Fi questions, but I am sure that someone here will know. Here is a link to how I built my torso. Since these pictures, I have put in the arm sockets, and almost completed a Bondo skim coat over everything. I did the arm sockets in a similar way to yours. I put sheet metal forms into the holes, then just fiber glassed the inside right onto the torso. When it had hardened, I pulled the sheet metal out.

I should update my pictures, but I am close to finishing the sanding and painting. I will probably wait until I do that.

Torso

#23  

Wow...that looks like a lot of work. I went the lazy way. I wish I had done what you did mainly because the metal torso blocks all R/C signals. I hoping the fiberglass dome idea I talked about earlier will work.

Man...I can't wait to get to the cool stuff...the electronics and control system! Be so glad when I finish the mechanical part.

I feel your pain...sanding...endless sanding :)

Something I want everyone's opinion on in the near future is a color scheme. I can't decide what colors to use when I finally paint all his parts. What I might do is post a sketch with numbers pointing to different parts and ask everyone to help me decide what would be a cool color scheme to use. We''ll see.

Thanks for your support.

#24  

Another milestone for Magnus. I ordered my EZ-B Kit and the Xbee XSC 900 with the support boards needed for long range control. Yeah!!!!!! Can't wait till it gets here!

#25  

Hey, RGORDON,

I too have built a LEAF Robot.  I am very excited for you. Leaf is about 5' Tall. The thing that makes him special is that you can give him voice commands and control him. He also has emotions. You can put him in almost any robot and the plans and software are FREE!!! 
I love that bubble top and the dryer inside. I think it is going to be grand.  The original B9 has a place inside for the human to  operate. But, it is much more cool to have a remote control and even cooler to have the bot have it's own brains.
Leaf was a lot of hard work, but it was all worth it. He was born on halloween day of last year. He is a member of our family now.
There is NOTHING that can compare with having finished your basic robot and you turn it on for the first time and he comes to life.  I am retired and on a fixed income, so I don't have the beans to do all of this stuff with anymore. So, I am LIVING this thrill all over through you.

Good Luck!

Sincerely,

MovieMaker

#26  

hey rgordon;

can you provide me a listing and links on what parts you ordered to make EZ-B for long range control. I also looking into it but I diont know what parts and how many and how to put it all together. Is there a tutorial?

Thanks

#27  

@rgordon - where did you get those super cool claws/hands for Magnus?

#28  

@GotRobbed

I got my info on the long range application from imrisaac. See thread Ez-b Project V3.0 under Project Showcase category.

Here is what I ordered:

User-inserted image

I'm new to all this myself. So when my parts come in and I get things sorted out maybe we could learn/work together on this. imrisaac said he would help with any questions.

#29  

@bret.tallent I got them at Walmart in the hunting and fishing section. Don't know if they still carry them. I will check. I removed the ratcheting mechanism and made a custom plate to mount them on the wrist. I am working on a part to be able to motorize it. They look really cool but may prove difficult to animate. I may could use a cable and spring to close them. I think they were around $50.

Kolpin Gear Grips

Kolpin Gear Grips manual

#30  

@MovieMaker

Thanks so much for the kind comments. That means a lot to me.

I have looked at the LEAF Robot site and I'm extremely interested in being able to give Magnus a personality and for him to be able to interact with people. If I pursue the Leaf Project would you be available to help me along? I can build whatever it takes but, programming is my weakness right now. I've been working with electronics for more than 40 years and am comfortable with digital logic circuits. When it comes to using or programming micro controllers is where I am lost.(for now:))

#31  

@rgordon,

I will be willing to help you as much as I can. Fred was a tremendous help to me and also so many others. I think if one person cannot help you, someone else will. Sometimes, depending on the month of the year, you might have to wait a few days for an answer. But, a reply usually comes quickly. And people are wanting to help.

Oh, BTW, Fred is the Robot Maker.

Sincerely,

Mel (MovieMaker)

#32  

Awesome Claws and a great find; using ATV Gear!!!!! I'd Love to Hack those!

#33  

are looking at over $90 a pair,not included the hack parts it is a little steap

@gotrobbed on longe range wireless i have the s ame parts,except found a cheaper place

#34  

@robotmaker & MovieMaker

Looks like the price has gone up a bit on the claws. I checked the Walmart site but they don't seem to carry them anymore.

OK....so you all got me hooked....What's the first step you recommend in starting a LEAF Bot?

I think I can do this if I have you and MovieMaker looking over my shoulder and coaching me along.

#35  

@RR333

Thanks for the comment on the claws. If I find another set somewhere I'll let you know. I'll keep you updated on how I end up hacking them.

#36  

@rgordon,

You need BOTH a regular computer ie; Desktop, laptop,etc. AND a microcontroller. The one that was made for Leaf is recommended. You can get that one from a board member. Probably Alex. I think the board ran $200-$300.  You might be able to find one used. the micro controls the motors, sensors, ect. while the main computer does the A.I.  .

good Luck!
#37  

@rgorgon that is one way only if you are not using the EZ BOARD,if using arduino or other microcontroller boards that are listed on ROBOREALM site ,then you dont need the microcontroller board made by ALEX microcontroller it a little like the EZ-BOARD it has a cpu,I/O DIGITAL pports i think 64 ,8 analog and 8 used foR IR SENSORS,PLUS ACCELOMETER a nd GYRO plus you can use motors with feedback or servo's project you have can fit the board or smaller boards at ROBOREALM ,they do have many and soon a interface to EZ-board (cant wait)

@MEL you only need one computer with the LEAF SOFTWARE on it,only if he uses LINUX ROS does he may need both

#38  

No, Fred. I meant One CPU and one Micro. Like a notebook and Alex's board.

Hope your leg get's better.

Mel.

#39  

just a small sprain,going on a long trip to china next week for work,will be able to get on my new laptop work gave me,bad news no ROBOT WORK stress stress

@rgordon forgot newegg is the best place to buy itx or pico or others computer stuff sometimes ebay pico is PX10000G little high $229 but very low current sometimes ebay has the used for $139 but i mostly buy them up sometimes can try also robotshop usa,they have a few your design may hold a laptop,but i would change the hard drive to SSD low current is not the main reason for SSD all hard drives may get damage it robot fall or bumps or ? SSD IS SOLID STATE it cant get damage,no moving parts

#40  

I saw Leaf micros on a few web sites that were $29.95. What's up with that? If I need the one MovieMaker is talking about I will have to save up some more money.

Anyway, I can test out the A.I. software now ....right? How good is it at giving the robot a personality? Can it interact with people well? Can you give me any examples of how your robot behaves?

I will investigate the newegg site....

Thank both of you for your help. May I call you both by your names or should I use your avatar names?

My name is Rex.

robotmaker ....hope yor leg gets better....I've always wanted to visit China...be safe my new friend.

#41  

Rex,

You can call me whatever you like. probably the $29.99 is Unpopulated, Meaning just the bare board and no components. or , it may not be the same micro. Check our newsgroup. Someone may have a working one used. If you get a good price, heck , even version one would be ok.

Yes, you can test and work with the A.I. immediately. The requirements are a computer system with windows XP,Vista, or Win7. , An amplified speaker system, a cheap microphone. That is it. Now, the software packages are a little tricky to install. Everything is Explained on our group Wiki.

The micro that would work best in my opinion is the original Leaf board designed by Alex of our newsgroup. I would get version3 which is the latest design. It would be the easiest to get up and running unless you are a professional programmer. You will find that knowing c,C++,C#, and LISP will help.

Good luck,REX!!

Mel (MovieMaker) (yhmmc)

#42  

rex here is the parts needed for building the board ,fairly easy i made 7 so far and made a special very small compact microcontroller board main item you need is the microcontroller and pcb ,microcontroller is is adapt9s12dp512 is the lastest plus a few support parts ,gyro and accel can add latter you need me to make you one i can ,its about $300 in parts may be less may be more all listed on pdf file scheet,ALEX who design the board can get you the pcb or the company that sells it i would stay away of using windows 7,couple of very good reasons one is very hard toi install the LEAF SOFTWARE and sometimes other hardware wont work,but main item is takes up much much battery power ,plus more hard drive space,,i know alot love using windows 7 because it the lastest on the market till windows 8 and the windows 9 ,and so on,on a robot design dont need very fast computer any dual cor or quad core or even 1 mhz will work too without slowing it down plus add the high cost.,it great to have on a desktop pc,because ac line always hook up pdf file for parts you said you wanted to use the EZ board,dont really need the microcontroller and EZB microcontroller is little better andd much faster,but can add latter when ROBOREALM makes the module for it ,and can use a webcam that a better video source too if you join the club you can ask THOMAS who made the B9 from lost in space for help its on the main leaf project web page also he new the creator of the B9 used in lost in space BOB something has a photo of him with that guy

#43  

Thanks to both of you.

My EZ Board kit ($235.00)should arrive any day now. My items from Sparkfun for long range XBee control are already here($136.00).

So, You are saying that I can eventually use the EZ Board instead of the LEAF Micro? I may wait then. Money is a little tight now since I ordered this stuff. Got to start saving up again.

How long do you think before ROBOREALM is ready? Have you heard any news?

I will be downloading the software you mentioned tonight.

#44  

should be in a few days STEVEN the man at ROBOREALM told me got the board and working on the code (software) to use the EZB I WOULD TRY leaf out get use to itan run on windows 7,its is very hard to install

#45  

What we are saying, Rex, is that it will work with the EZboard. But you will have to do a lot of complicated programming. Mostly in c language. No one that I know of has used the EZboard with Leaf. So, there is going to be some pioneering to be done. If you follow the same path that many have with Alex's board, you have a better chance of finishing quickly and with fewer hassles.

Good Luck!

Mel

#46  

I've never done any programming in C before (big learning curve there). Mainly a few programs in Basic a long time ago. So, I guess I will still do what you and Fred were advising before and get the Leaf board and parts, It may be awhile though due to $ reasons. I spent my current robot fund on the EZ Board and Sparkfun stuff.

Anyway I can still try out the software. Hope I can get it installed without too much trouble. May have to get you guys to come to the rescue:)

While I've got your attention I would value both of your opinions on my idea for a servo mimic. See the threads at Hardware >> Turn Dc Gear Motors Into Servos

Thanks!

#47  

I will let Fred handle that one. He is an Engineer. Me, I am only a hobbiest.

Mel

#48  

RGORDON Turn Dc Gear Motors Into Servos thats what i really do alot on

#49  

robotmaker

I would like your opinion for my idea for a servo mimic See my drawings and explanation on page 2 of thread category .........Hardware >> Turn Dc Gear Motors Into Servos.

Australia
#51  

Hangin for more pics of your progress - this has to be one of the biggest efforts I've seen, absolutely fantastic - Cheers mate

#52  

@Hazbot

Thanks for the kind words. Yeah....I'm still planning to finish Magnus. It has been my dream to build a robot like this for the last 40 years. I not going to let my dream die out. :)

#53  

Don't Ever Quit! You have a gift for it. Just like Hazbot.

:D

#54  

Thanks Mel. That means a lot to me.

Time is my enemy. I don't have the time that most of the people on this forum have to work on their bots. Magnus is my dream robot and I have not given up on him. Building something that size from scratch has been a daunting task so far.

As for building robots.....I do have another smaller one in the works. One that I can work on inside the house, using a much simpler design. I will unveil him soon.

I am guardian to three children that we took in a few years ago. My wife's nephew and his wife lost custody of their children due to domestic violence and drugs. So we took them in to keep them from going to foster homes. It has been quite a task. One girl and two boys. Brittany is now 13 years old, Jacob is 11, and Justin is 7. Justin is now hooked on robots and he is helping me with the new smaller bot. I also have a 20 year old daughter who is now in college. So money is now becoming an issue.

I work at a power plant (140 Megawatt) in Clarksville, VA. Usually by the time I get home and all the chores around the house and yard are done, cooking, cleaning, repairing, etc. I sometimes have a little time to work on the robot. Unfortunately most of the time I end up falling asleep at my desk tired

Sorry....didn't mean to drop the life story bomb on ya.

Anyway...thanks for your verbal support. Now go build robots! :)

#55  

Kudos rgordon on taking the kids in.

#57  

Thanks Troy and Bret. Yeah it's like someone hit reboot and now I'm starting over. It's like trying to change the course of three rivers. We have them back on track and they are doing well in school. Jacob is the biggest challenge. He has Attention Deficit Disorder (ADD) and is quite the handful. Justin is becoming my little robot building buddy and I am helping him learn electronics. Having someone to teach is beneficial to my life.

@ DJ......Thanks for creating such a wonderful device that is inspiring young and old to dare to dream again and enter into the amazing world of robotics! You are my hero sir!

Rex

#58  

RGORDON time is my enemy too,but best news is i am retiring at a very early age in almost 3 months (i cant wait) ,since money is not a problem and can work on my robots almost full time Instead of a hour or so a day MY girlfriend kinda helps me build robots

#59  

Gotta luv the humanity behind robot makers..kudos rgordon...persevere..but family first!

#60  

Amazing build. Yes family first. Sometimes dreams take time, but that just adds to the fun of making progress and finally building something you always dreamed of. Thanks to DJ many robot dreams can come true.

#61  

Thanks for the kind words everyone.

#62  

Wow! What a Great Build so far. Can't wait to see the Finish!

:D