Hello again,
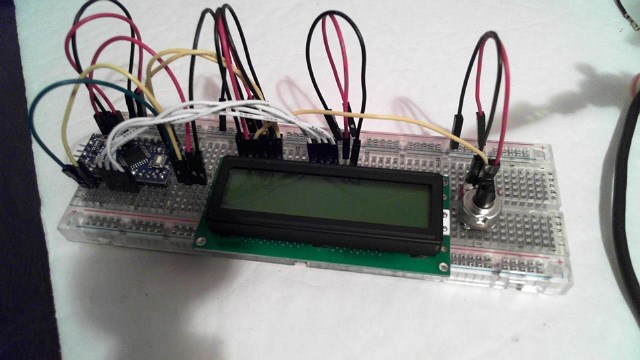
I have created an LCD Display for the EZB4.
This is a very cheep and easy project.
You will need
1 LCD display ( my code is set up for 2 line 16 char display) here are 5 of them for about 10 bucks USD
1 Arduino ( any model will work but i recomend the Pro MINI)
Here is a listing of them on ebay
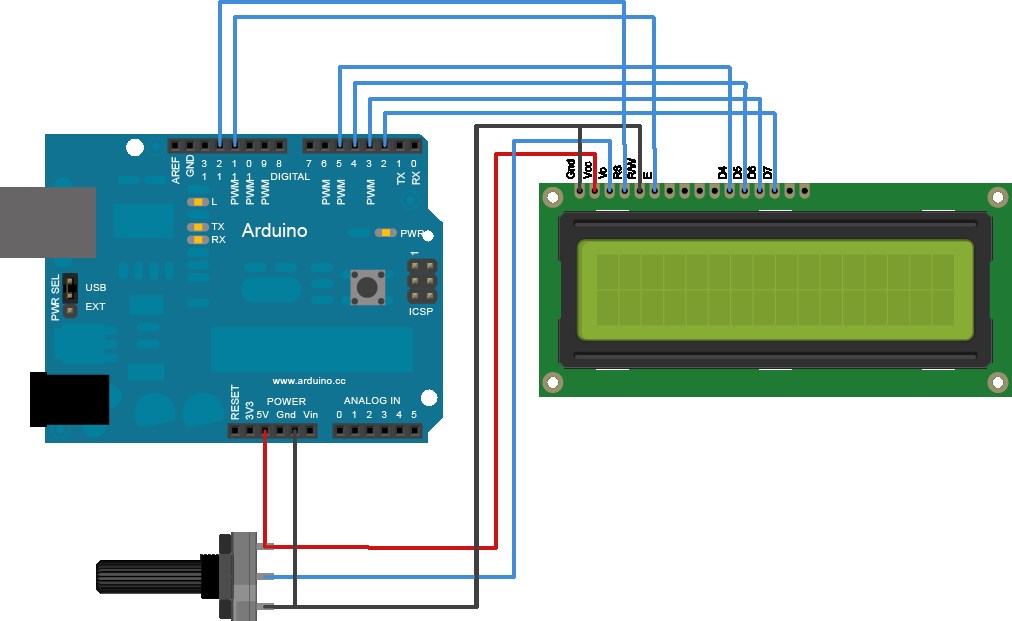
Oh here is the wiring . again I am using the pro mini . this is showing and UNO board. the pin outs are the same.
To wire your LCD screen to your Arduino, connect the following pins: LCD RS pin to digital pin 12 LCD Enable pin to digital pin 11 LCD D4 pin to digital pin 5 LCD D5 pin to digital pin 4 LCD D6 pin to digital pin 3 LCD D7 pin to digital pin 2 Additionally, wire a 10K pot to +5V and GND, with it's wiper (output) to LCD screens VO pin (pin3).
Arduino code:
// LCD and Arduino to EZB4
// Project Created by Luis A. Vazquez
// www.dragontear.com
#include <LiquidCrystal.h>
String content = "";
LiquidCrystal lcd(12, 11, 5, 4, 3, 2);
void setup() {
Serial.begin(9600);
lcd.begin(16, 2);
lcd.setCursor(0,0);
lcd.print("EZB4 LCD Display");
lcd.setCursor(0,1);
lcd.print("By DragonTear");
}
void loop() {
readSignalFromComp();
}
void readSignalFromComp() {
if (Serial.available()) {
delay(100);
while (Serial.available() > 0) {
int temp = Serial.read();
Serial.print("Debug:");
Serial.println(temp);
if (temp == 17){lcd.clear();}
if (temp == 18){lcd.setCursor(0,0);}
if (temp == 19){lcd.setCursor(0,1);}
if (temp > 31){ lcd.write(temp); }
}
}
}
EZ-Builder Script
UartInit(0,2,9600)
UARTWrite(0,2,17, 18, "Hello From" , 19 , "EZ-Builder")
The control codes are:
17 - to clear the screen 18 - Move cursor to line 1 19 - Move cursor to line 2
I hope this was complete and self explanitory, but if not please ask , I am willing to help.
I assume this is SDK stuff?
@Zap, nope. It's not SDK stuff, he is using that inside ARC.
@Zap... Just basic arduino code for an LCD... HippieGeek is showing how to use it with the V4...
You write the arduino code on the Windows Arduino IDE and then download it to the arduino controller. Then connect it to the UART port of the V4.... Old School stuff
I still use the arduino once in a while, but not too often now that EZ Robot came into my life....
Sorry, I have never used arduino. Of course, I have never used ARC either. When I started looking for a robot platform I decided EZB was going to be the way to go for me. I can look at code and figure out what it is doing for the most part, but sitting down and banging out code such as that has a little too high of a learning curve for me at this stage in my life
Nice work, saves getting an LCD with serial/i"c backpack (however is it cheaper?)
this solution is about $6.00 and some time soldering. Pretty cool. Thanks for sharing.
Thanks guys.
Yes this is very basic stuff. but I see a lot of folks on here are not aware of what you can do. Also when i got into robotics the first thing i found was developers and engineers were putting the complete load of running a robot on a single controller when controllers were expensive that made sense , but controllers are cheep now so our components should start becoming smarter and almost robots in their selves.
This is my core goal , to created a robot that has thinking parts.
Like a part called a Knee. the chip in the Knee will limit the max min on the server based on the hardware design. then when the robot controller tells the knee to move to 45 degrees , the knee will have logic in it that knows its capability and will refuse to go into a position that could damage it self, another object or a person or other living thing. because the programmer did not under stand the limitations of that hardware item.
Its very difficult to explain my architecture for robotic design in a forum like this. but I am working on a website to further explain my opensource Robotic Framework Ideas.
Hey, I didn't say it wasn't good... which it is... I have a few projects in mind myself that will probably use arduinos as a low level controller... Arduinos are still a really good tool for robotics....
oh @Richard R , I did not take your first comment in a negative way.. heheh
Luis you are a big help! I've got lots of Arduino C++ code and was disappointed that I could not use it with the EZ-B. I followed your instructions and succeeded in getting to EZ-B talking to and listening to the Arduino via serial didn't realize it was that easy. There is so much sensor code out there for Arduino it's just not practical trying to recode using EZ-Script. This forum post is huge!
Thanks @leversofpower.
Im thinking about putting together a weekly video pod case. Focusing on the ezb4 but also how to hack and reuse other tech with the ezb and robotic in general.
That's a great idea. If you need any help please feel free to let me know.
Thanks for sharing this Luis Im working on a project that was primarily Arduino based until i stumbled onto the EZB4. The Arduino will still play a major role in the overall project, but not the Main robot operation, since that has been handed over to the EZB4. But Ive been wondering how to integrate the Arduino into the system as a backup/fail-safe, in the event that the PC/EZB drops out, such as loss of signal, and still maintain some basic functionality.
@Luis Vazquez, This is great info and yet so simple. Thanks for this thread.
Again Dana I would love to help. The forums here are a bit hard to follow for information like this. I looked at your issue in another post. I hope it helps
Hi, Luis, can you tell me how you connect your arduino to the UART port of the EZB4, thanks a lot.
@Gerald... All you need is just 3 wires
@Richard R & @Luis Vazquez - this post really got me thinking about a lot of different things I have wanted to do in the past when I was playing with PICs but quit because I got tired of wire wrapping everything. I got all excited cause I have harvested a bunch of LCD parts, steppers, light banks and what-not from different pieces of equipment and bought an Arduino Micro 'cause it was on sale for $15 at the shack and even bought a SD Card Shield only to find out that you can't use a shield with a Micro, which shows my ignorance to the subject. So I started searching for items online and am now worse off. There is Arduino UNO, YUN, Compatibles, Leonardo and some I can't say nor spell. I found 'Beagle Black Bone' and then the tasty sounding Rasberry PI, which one project I saw for a self contained MAME machine has got me salivating, Canact. My question is: I want to buy something that I can use on its own, but also integrate with EZ-B v4 what would you guys recommend and what 'accessories/shields' should I start with? Or do you know of a good 'bundle' out there for a good price. (USA is my location). confused
A Rasberry Pi is a great place to start. Arduino, is more of a single purpose controller, that you program to do something, and walk away, and it simply repeats that, forever. Arduino has no operating system, where as RP, can be used as a stand alone computer and or media center. Python is a coding language you can use with RP, and much simpler to use than C++ on the Arduino. In terms of what they can do, it's sort of a toss up, and each one is geared for a specific thing, with a huge overlap, in what is possible in terms of motor robotics, ei. motors and controls. To make the RP a little more robust in the world of external electronics projects, you will most certainly want an add on shield for expansion, but not needed out of the box, plenty I/O to get you up and running. If you looking for more of a warm and fuzzy device that is more on the surface that a plain text IDE, than RP. If you simply want to code out a project put it to work repeating and carrying out task, then Arduino.
@Dana W - sounds like a Raspberry PI is the way to go for most of what I want to do and Arduino will be setup for smaller projects. Now another question - does anyone have a recommended package/brand to purchase. I have been looking at
www.amazon.com/Raspberry-Ultimate-Starter-components--Raspberry-Kingston/dp/B00LAAZKXQ/ref=sr_1_6?s=pc&ie=UTF8&qid=1421967181&sr=1-6&keywords=raspberry+pi or
www.amazon.com/CanaKit-Raspberry-Complete-Original-Preloaded/dp/B008XVAVAW/ref=sr_1_3?s=pc&ie=UTF8&qid=1421967181&sr=1-3&keywords=raspberry+pi
I want to buy a 'package' because I don't want to get one and then have to turn around immediately to purchase something else to start using because I forgot something.
The first kit is a great buy! Looks like im going to be getting that one next Building my Grandson a RP computer.
@Dana W - I will let you know about the first kit listed. Should be on my doorstep tomorrow. I also ordered an Arduino Uno because I couldn't resist.
kk And since your having fun spending money, heres a great little add on for the PI. Makes life much easier!
http://www.amazon.com/gp/product/B00BBK072Y/ref=oh_aui_detailpage_o00_s00?ie=UTF8&psc=1
Thank you @Richard R & @Luis Vazquez for the tips on ez integration with arduino, serial, etc...question what would be the method for connecting multiple nodes?
I think this approach is what ROS is geared towards, but using a different protocol (MQTT?), but seems to be the progressive model by having independent nodes/slaves to an MCU or central node. I want to start building with ez for the complex built in functions, but certainly see the value in having other micros doing other functions but with 2 way communication to ez.
I2c is the smartest. Because there will never be interference and it's much easier to let the hardware do the work, unlike mqtt
Ok so @DJ you would suggest I look into connecting arduinos or other micros via the I2c bus? I can have multiple nodes on I2c correct?
You bet. Each arduino would be an i2c Slave mode. 127 devices can be chained.
And it's fast!
Thanks @DJ that sounds familiar, I hadn't used the I2c bus too much in previous arduino/pi projects.
I am still looking into mqtt for some other uses, perhaps through a plugin as we've been discussing here https://synthiam.com/Community/Questions/9646 , for easy integration into openHAB and some other systems I have running in the home.
I recently bought the EZ dev kit and am eagerly awaiting my recent omnibot purchases to get going on my first project!