Hello again,
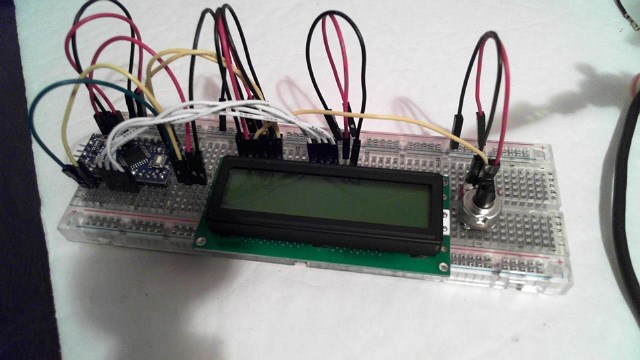
I have created an LCD Display for the EZB4.
This is a very cheep and easy project.
You will need
1 LCD display ( my code is set up for 2 line 16 char display) here are 5 of them for about 10 bucks USD
1 Arduino ( any model will work but i recomend the Pro MINI)
Here is a listing of them on ebay
Oh here is the wiring . again I am using the pro mini . this is showing and UNO board. the pin outs are the same.
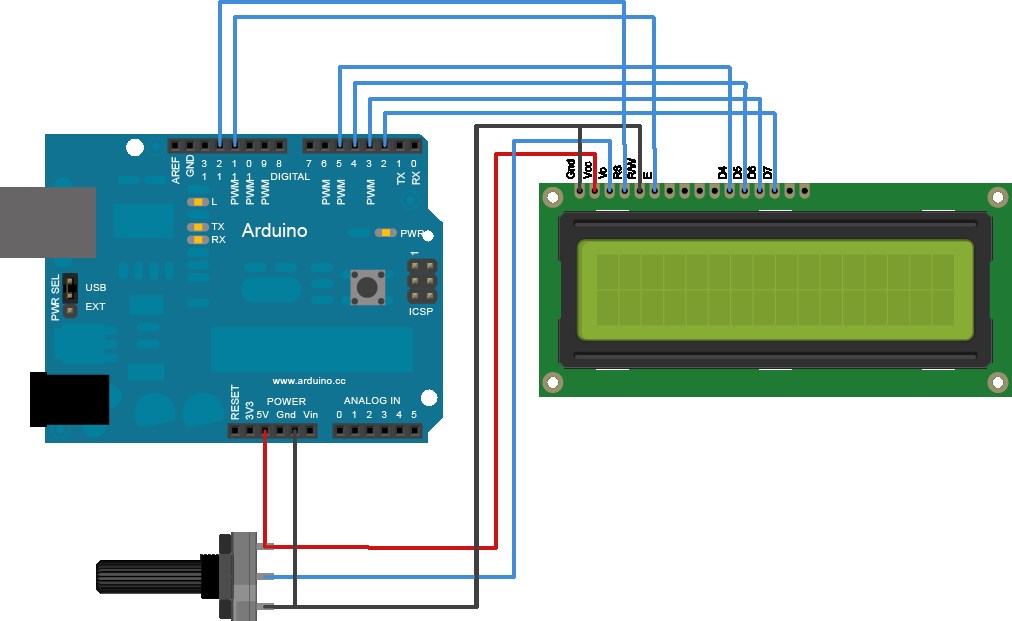
To wire your LCD screen to your Arduino, connect the following pins: LCD RS pin to digital pin 12 LCD Enable pin to digital pin 11 LCD D4 pin to digital pin 5 LCD D5 pin to digital pin 4 LCD D6 pin to digital pin 3 LCD D7 pin to digital pin 2 Additionally, wire a 10K pot to +5V and GND, with it's wiper (output) to LCD screens VO pin (pin3).
Arduino code:
// LCD and Arduino to EZB4
// Project Created by Luis A. Vazquez
// www.dragontear.com

#include <LiquidCrystal.h>
String content = "";
LiquidCrystal lcd(12, 11, 5, 4, 3, 2);
void setup() {
  Serial.begin(9600);
  lcd.begin(16, 2);
  lcd.setCursor(0,0);
  lcd.print("EZB4 LCD Display");
  lcd.setCursor(0,1);
  lcd.print("By DragonTear");
}
void loop() {
  readSignalFromComp();
}

void readSignalFromComp() {
  if (Serial.available()) {
  delay(100);
  while (Serial.available() > 0) {
  int temp = Serial.read();


  Serial.print("Debug:");
  Serial.println(temp);

  if (temp == 17){lcd.clear();}

  if (temp == 18){lcd.setCursor(0,0);}

  if (temp == 19){lcd.setCursor(0,1);}

  if (temp > 31){  lcd.write(temp);   }

    }
  }
}
EZ-Builder Script
UartInit(0,2,9600)
UARTWrite(0,2,17, 18, "Hello From" , 19 , "EZ-Builder")
The control codes are:
17 - to clear the screen 18 - Move cursor to line 1 19 - Move cursor to line 2
I hope this was complete and self explanitory, but if not please ask , I am willing to help.
Discover more robots

Buratino's Luxor Cab As Seen In Back To The Future 2 -...
Pirumpi's Pringles Robot

@Gerald... All you need is just 3 wires
@Richard R & @Luis Vazquez - this post really got me thinking about a lot of different things I have wanted to do in the past when I was playing with PICs but quit because I got tired of wire wrapping everything. I got all excited cause I have harvested a bunch of LCD parts, steppers, light banks and what-not from different pieces of equipment and bought an Arduino Micro 'cause it was on sale for $15 at the shack and even bought a SD Card Shield only to find out that you can't use a shield with a Micro, which shows my ignorance to the subject. So I started searching for items online and am now worse off. There is Arduino UNO, YUN, Compatibles, Leonardo and some I can't say nor spell. I found 'Beagle Black Bone' and then the tasty sounding Rasberry PI, which one project I saw for a self contained MAME machine has got me salivating, Canact. My question is: I want to buy something that I can use on its own, but also integrate with EZ-B v4 what would you guys recommend and what 'accessories/shields' should I start with? Or do you know of a good 'bundle' out there for a good price. (USA is my location). confused
A Rasberry Pi is a great place to start. Arduino, is more of a single purpose controller, that you program to do something, and walk away, and it simply repeats that, forever. Arduino has no operating system, where as RP, can be used as a stand alone computer and or media center. Python is a coding language you can use with RP, and much simpler to use than C++ on the Arduino. In terms of what they can do, it's sort of a toss up, and each one is geared for a specific thing, with a huge overlap, in what is possible in terms of motor robotics, ei. motors and controls. To make the RP a little more robust in the world of external electronics projects, you will most certainly want an add on shield for expansion, but not needed out of the box, plenty I/O to get you up and running. If you looking for more of a warm and fuzzy device that is more on the surface that a plain text IDE, than RP. If you simply want to code out a project put it to work repeating and carrying out task, then Arduino.
@Dana W - sounds like a Raspberry PI is the way to go for most of what I want to do and Arduino will be setup for smaller projects. Now another question - does anyone have a recommended package/brand to purchase. I have been looking at
www.amazon.com/Raspberry-Ultimate-Starter-components--Raspberry-Kingston/dp/B00LAAZKXQ/ref=sr_1_6?s=pc&ie=UTF8&qid=1421967181&sr=1-6&keywords=raspberry+pi or
www.amazon.com/CanaKit-Raspberry-Complete-Original-Preloaded/dp/B008XVAVAW/ref=sr_1_3?s=pc&ie=UTF8&qid=1421967181&sr=1-3&keywords=raspberry+pi
I want to buy a 'package' because I don't want to get one and then have to turn around immediately to purchase something else to start using because I forgot something.
The first kit is a great buy! Looks like im going to be getting that one next Building my Grandson a RP computer.
@Dana W - I will let you know about the first kit listed. Should be on my doorstep tomorrow. I also ordered an Arduino Uno because I couldn't resist.
kk And since your having fun spending money, heres a great little add on for the PI. Makes life much easier!
https://www.amazon.com/gp/product/B00BBK072Y/ref=oh_aui_detailpage_o00_s00?ie=UTF8&psc=1
Thank you @Richard R & @Luis Vazquez for the tips on ez integration with arduino, serial, etc...question what would be the method for connecting multiple nodes?
I think this approach is what ROS is geared towards, but using a different protocol (MQTT?), but seems to be the progressive model by having independent nodes/slaves to an MCU or central node. I want to start building with ez for the complex built in functions, but certainly see the value in having other micros doing other functions but with 2 way communication to ez.