Canada
Asked — Edited
Resolved Resolved by DJ Sures!

Newbie Needs Help With First Robot

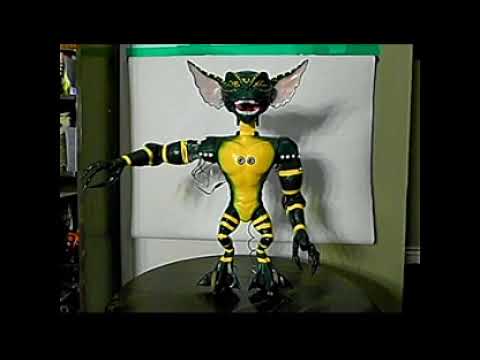
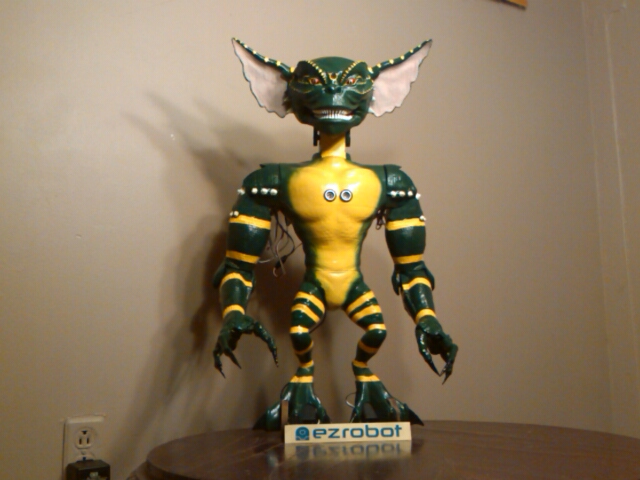
Hello, I've never posted in any forum before, so I hope I'm doing this properly. I've designed, 3D printed and assembled a robotic Gremlin using the EZB v4 DIY kit that I would like to control with a joystick (and eventually an A.I. autonomous companion) I've followed the courses for this product, but I'm a complete newbie to DIY robotics and find it difficult to find what I'm looking for. It seems to go from general servo set up straight to roboscratch. I'm having trouble figuring out how to set up the controls for my robot. Which Movement Panel controls would be best? should I be using multi servo set up? If so, how? I understand the master and slaves concept, but don't really understand how to set them up so I can use the joystick controls. I will be uploading a brief video showing the servos being used by individual servo control (to see the movements available) If anyone could point me in the right direction, it would be GREATLY appreciated! Thank you, Atarka

User-inserted image


ARC Pro

Upgrade to ARC Pro

Don't limit your robot's potential – subscribe to ARC Pro and transform it into a dynamic, intelligent machine.

PRO
Synthiam
#1  

I love it!

The tutorials are set up to familiarize yourself with the product. So yes, RoboScratch and the others are there to teach you the steps of programming that you’re trying to skip:). It’s okay because some people get really excited and skip instructions.... I’m also one of those people.

But really, what’s tough here is that you’re asking for help by skipping the tutorials and activities that we made. So all I can really do is tell you to follow the activities to learn how things work.

Your robot doesn’t seem to have wheels or any way to physically move forward, left, right etc, so it wouldn’t have a movement panel. Please read what a Movement Panel is. A Movement Panel is for physically moving a robot from one location on earth to another. If your robot has no way to move geographically on earth, it doesn’t need a movement panel.

If you want to skip right to a control that you’ll use the most for a puppet style robot, it’s the Auto Position control. Here’s a link to it that also includes activities: https://synthiam.com/Tutorials/Help.aspx?id=180

Once you have created a bunch of animation actions, then you can trigger them from the joystick buttons.

If you read how the joystick control works and watch one of the activities on the joystick control page, you can eventually start controlling servos as well with the analog sticks.

Here’s how you add a joystick control and configure it to move servos: https://synthiam.com/Tutorials/Help.aspx?id=43

Canada
#2  

Thank you, DJ I have been reading the tutorials, but I've been neglecting the activities. You are right, I wanted to play with my new toy and couldn't properly wait to further my education, but that's no excuse. Gadget does have wheels, though. I used the 2 continuous rotation servos from the DIY kit. I had to 3D print my own due to the size constraints. I don't show them in the servo test video because 1 of them is defective (motor engages, but the gears don't move) But he moves perfectly (only in a circle at the moment) I have to wait until I can afford to buy more. I did figure out a way to remotely manipulate him, I created a mobile app and using the servo pad controls and multi-servo set up can now control both arms, head, jaw and hands. Thank you for the support and for this great product, I could never have brought my Gremlin to life without the EZB v4. Atarka Post Script :Interested in 3D printing your own robot Gremlin? The files can be downloaded @ https://pinshape.com/items/42746-3d-printed-gadget-the-robotic-gremlin https://www.thingiverse.com/thing:2788843 https://cults3d.com/en/3d-model/gadget/gadget-the-robotic-gremlin

User-inserted image

PRO
Belgium
#3  

very cool robot.looks like he has a turning waist too?

#6  

What a nice job on your Gremlin bro keep it up.

#7  

That is really awesome. Appreciate you sharing.

PRO
Canada
#8  

Wow! @Atarka that is beyond amazing that you designed, 3D printed and painted this Gremlin! It definitely looks like a real life product. At first I thought you had hacked an existing toy, but was blown away to find that this is your own design! Awesome work!

I didn't even notice the wheels at his feet either, they just blend in nicely:)

May I ask about your painting process? Do you use primer then air brush the cosmetic paint on? Do you use acrylic paint?

PRO
Synthiam
#9  

I concure, that 3D printing gadget is an impressive feat! Lots of parts and design, wow. Good job

Nomad’s sound board is gonna be great. You can use the File -> Merge option to load his soundboard into your project.

For movement, I recommend the Continuous Rotation Movement Panel, since that’s what it uses for wheels: https://synthiam.com/Tutorials/Help.aspx?id=12

Still use the Auto Position Control that I mentioned earlier for the servo animations.

Lastly, the joystick will automatically be configured to control the movement panel. Which means you can drive him around immediately.

Once you create action animations with the auto position, simply assign the actions to joystick buttons. This is done using the Cheat Sheet for the controlCommand(). Or use the Movement tab in blockly. Same thing:)

Canada
#10  

First off, Thanks for all the positive feed back! To answer the comments/questions in order... He was originally designed to have a rotating waist and have functioning legs, but I was afraid the rotating waist would throw him off balance, as he is top heavy. I used a slide rail to attach the bottom to the torso in case I ever decided to try the functioning legs. I tried to blend the wheels into the feet so they wouldn't stand out, that's why I didn't use the wheels that came with the DIY kit. (they were just a little too big) I used Krylon spray paint (hunter green/canary yellow, it's primer and paint) for the over all finish and used Testors model paints for the stripes and finishing details. I sliced the model so that the parts can be printed on a desktop 3D printer with a build area of 180mm. Most of the parts have a print time of about 5 hours @ 20% infill and 35mm/s (you can shorten time by reducing the infill and increasing print speed) the files are free, so I hope to see other gremlins one day. special thanks to nomad 6R for the soundboard, I can't get it to work, but the thought is appreciated. I downloaded and merged it like DJ instructed, but the files won't play (mp3s not found) it does give me a new connection number in the listings, though. I tried the Auto Position controls knowing (thanks to the lessons/tutorials) that it's what I require to create animation frames that can be assigned to the buttons/keyboard. When I initialized the stand command, Gadget had a seizure. (Like I mentioned before, I REALLY am not a computer person, things never seem to work the way they are supposed to) that's why I posted my original query. Once I fix (or replace) the defective continuous rotation servo, I will definitely be using the Movement Panel to use the joystick to move him around. Thank you all for the suggestions and help, Atarka

PRO
Belgium
#11  

Save your ARC on your pc and save in the cloud .can you place a screenchot from your ARC.

Canada
#12  

Hello Nomad 6R, I uploaded 2 files(I think), before and after I merged files, and here are some screen shots. Thanks for the help

User-inserted image

User-inserted image

User-inserted image

PRO
Belgium
#13  

ok i see 3 ARCs.first one is the mobile interface second one is an new selfmade ARC where is a lot missinf also the thirth is an new ARC, with a lot missing.so my first question would be,did you use this button, see pic ?

User-inserted image

Canada
#14  

No, I didn't. Was I supposed to? I clicked it now and it opens a browser window, but says "site can't be reached" The first pic is my mobile before I got the soundboard. (uploaded as GADGETS mobile test original) The second pic is the soundboard I downloaded, showing the mp3 files in the listings, but I don't get any sound from them. The third pic is after I click FILE, click MERGE, add to my mobile test project and add to soundboard from the options available. As you can see, after I merge the files, most of my controls disappear and I gain a new connection link. I uploaded the merged project as gremlin soundboard test result. I appreciate the time you've taken to help, Thank you, Atarka

Canada
#15  

I just tried the merge again and realized that I can choose more than one option to merge with. Now I don't lose everything after the merge. (I did say I wasn't a computer person) the soundboard is there with my other soundboard, but still no sound. my original board puts out sound, though. I uploaded this file as "merged with soundboard"

PRO
Belgium
#16  

normal yes,if you click on that ,you will see the webpage where you can cilibrate, your servo's.

second you always have to save on your pc and in the cloud. soundboard v4 = the ezbv4-this sound you will hear out the ezbv4 soundboard= sound you hear from pc i made a complete ARC for the gremlin.you will need to adjust some, also first thing is calibrate all servo's on the webpage,means you have to, unscrew all horns before hit the button ( set all ports to 90 degree ) els you can brake the robot.

calibration servo

PRO
Belgium
#17  

ok you didn ad your ezbv4 in the ARC.see pic. thr number is mine ezbv4.you have to put yours in.

User-inserted image

Canada
#18  

I did everything as you said, unfortunately, when I clicked connect the whole program froze. I did a manual shut down and now the computer won't even restart. I had to used my daughters tablet to write this and probably won't be able to go online myself in the near future. I just wanted to thank you for the effort. Maybe you could just email the mp3s? My address is gadgettarka@gmail.com