
PRO
Sproket
USA
Asked
— Edited
Connect Wiring For Iotiny To Arduino
Hello, How do I connect the iotiny to the arduino, wiring that is? I want to use arduino for motors and led.
Also what skill would I use?
Do you have the current code?
Thanks all
Related Hardware (view all EZB hardware)
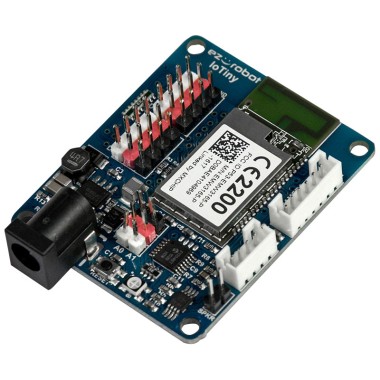
EZ-B Iotiny
by EZ-Robot
Control IoTiny with Synthiam ARC: 100MHz Cortex‑M4 Wi‑Fi IoT/robot controller-camera, servos, ADC, I2C and digital I/O for easy internet automation
Wi-Fi / USB
Servos
8
Camera
Audio
UART
✕
I2C
ADC
✕
Digital
✕
Related Robot Skills (view all robot skills)
Serial Toolbox
by ptp
EZB UART parser and Serial-TCP bridge to connect EZ-Robot cameras via Teensy USB, enabling ARC camera control and USB-to-serial bridging.
Requires ARC
v3

Com Port Manager
by Synthiam
Displays local PC COM/Serial ports opened by scripts, showing open/closed status (no communication logs); not the EZ-B UART.
MPU9150 ARC control reads compass, gyro, accelerometer and temperature via I2C, initializes and sets EZ-Script variables on demand.

The EZB Firmware for the Arduinos can be found here: https://synthiam.com/Support/Hardware/Hardware-Overview
You connect ARC to an arduino. It is not possible to connect an EZB IoTiny to an EZB Arduino. However, if you are skilled in programming, you can create a custom firmware to allow your Arduino to receive serial commands from the IoTiny. To do that, you would need to use JavaScript or Python to send serial commands through the IoTiny to the Arduino. And write custom code to have your Arduino receive the commands from the IoTiny and execute them.
It would make most sense to install the EZB Firmware onto your Arduino.
Also, using the Synthiam SEARCH in the community forum, I found this relevant conversation that you can also search for next time. There might be more as well. This link seems to include an example that DJ provided.
Link: synthiam.com/Community/Questions/Connecting-EZ-B-or-IoTiny-to-Arduino-19184
To connect your EZ-B IoTiny to an Arduino and control motors and LEDs, you'll need to establish a communication protocol between the two devices. Since the IoTiny can transmit serial data from its digital ports, you can use this feature to send commands to the Arduino, which will then control the motors and LEDs.
Here's a step-by-step guide on how to set up the connection and what you'll need in terms of skills and code:
Wiring: Connect a digital port from the IoTiny to the RX (receive) pin on the Arduino. Make sure to also connect the GND (ground) pins of both the IoTiny and Arduino to establish a common ground reference.
Arduino Code: Write a program for your Arduino that listens for serial commands on its RX pin and controls the motors and LEDs based on the received commands. Upload this code to your Arduino.
ARC Skill: Use the "Serial" skill in ARC to send commands from the IoTiny to the Arduino. You can find this skill under the "Scripting" category in ARC.
ARC Script: Write a script in ARC using either EZ-Script, JavaScript, or Python to send serial commands from the IoTiny to the Arduino. The script will use the
UART.sendSerialcommand to transmit data.Here's an example of what the ARC script might look like:
Execution: Run the ARC script to send the command to the Arduino. The Arduino will receive the command and control the motors and LEDs accordingly.
Additional Skills: If you want to create a more interactive or automated process, you can use other ARC skills like "Joystick" for manual control or "Auto Position" for predefined movements, and trigger the serial commands based on those inputs.
Remember to ensure that the baud rates on both the IoTiny and Arduino match, and that your Arduino code is set up to parse the incoming serial data correctly. If you're new to serial communication, you might want to start with simple commands to turn LEDs on and off before moving on to motor control.
If you need further assistance with the code or have specific requirements for your commands, please provide more details, and I'll be happy to help you craft the necessary scripts.
Can you connect iotiny to arduino using i2c?
Sure - but there's a lot to read on how i2c works. You also need to define a protocol for sending commands. I'd go with what Synthiam support said and use the example that I provided in that link by using Serial UART.
Also, Athena is hallucinating because there is no robot skill called "Serial" for connecting. You'd have to write the UART send or serial send commands in an ARC script robot skill.
Also - one thing. Why don't you just connect the LED and "motors" to the IoTiny? I'm guessing the "motor" is an hbridge or some motor controller, and hopefully not just a motor cause that would be bad! But there are robot skills in ARC for movement panels that will use your motor controller.
Yes, you can connect the EZ-B IoTiny to an Arduino using I2C communication. I2C is a two-wire interface that allows multiple devices (often referred to as "slaves") to be connected to a controller (often referred to as a "master") using just two wires: one for data (SDA) and one for the clock signal (SCL).
Here's how you can set up I2C communication between the IoTiny and an Arduino:
Wiring:
Arduino Code:
Wirelibrary.ARC Skill:
ARC Script:
I2C.writecommand to transmit data.Here's an example of what the ARC script might look like:
Remember to set a unique I2C address for your Arduino and ensure that the IoTiny is configured to communicate with that address. The I2C address is typically set in the Arduino code using the
Wire.begin(address)function.Keep in mind that I2C communication requires both devices to share a common protocol for sending and receiving data. You'll need to define this protocol in your Arduino code and ARC script to ensure they understand each other's commands.
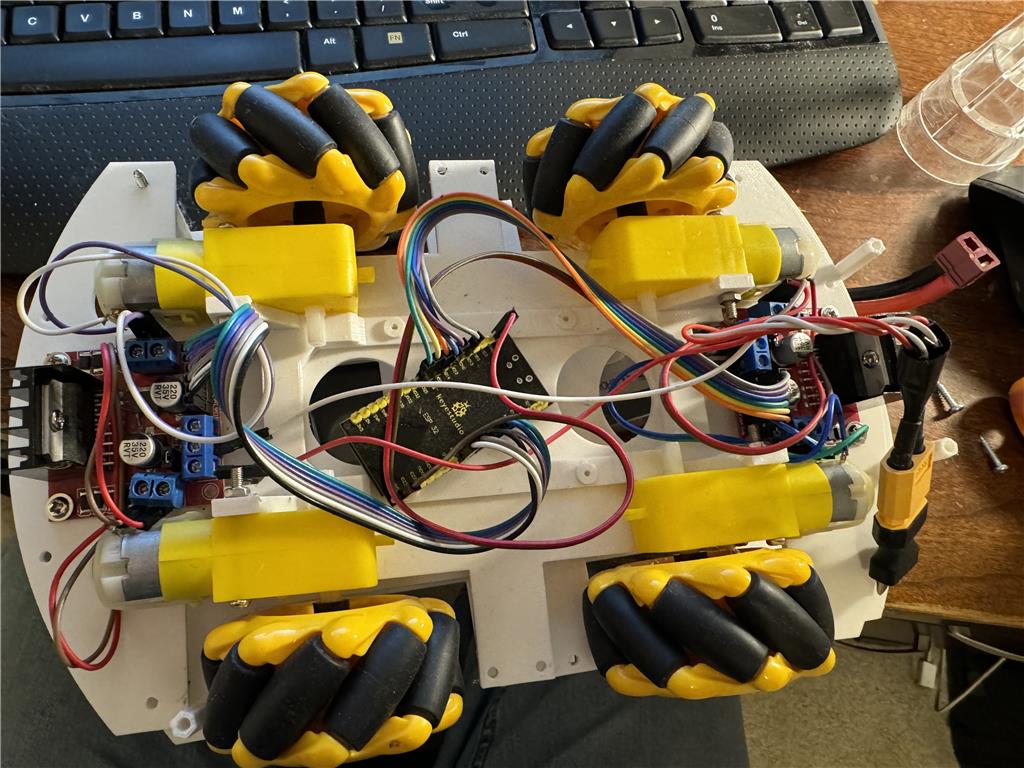
Yes Im using Hbridge with motors.Im trying to free up as much digital ports on the iotiny for other sensors. It only has 8 and 2 ADC as you know. Im looking at running- 2 motors with 1 hbridge, 1 servo, Many LEDs, PIR, Sonar sensor 4 pin, maybe 2,
The Hbridge eats up 4 digi ports.
This is for hasbro r2d2 maxed out.
Then maybe Star Wars R2-D2 DEAGOSTINI if all goes well.
Go big right?
Haven't seen Star Wars R2-D2 DEAGOSTINI on this forum but if there is one please provide.
Maybe EZ-B V4 would be easier.
I think ARC has way more potential. Best I have come across.
Kudos to the minion R2. Love it.