Asked — Edited

Charging Dock Ideas

Repost :

@Everyone

I am designing a charging dock for my bot, and a lot of what @Rich said, I'm already doing in the background...I'm already in touch with a few great programmers willing to help - compensated of course. However I think we need to approach this problem from a different angle? If sensors or coding is so much work, why not do it from the engineering/mechanical perspective? I have a few ideas I'm drawing up, I will post this on the forum maybe we can all dissect it.

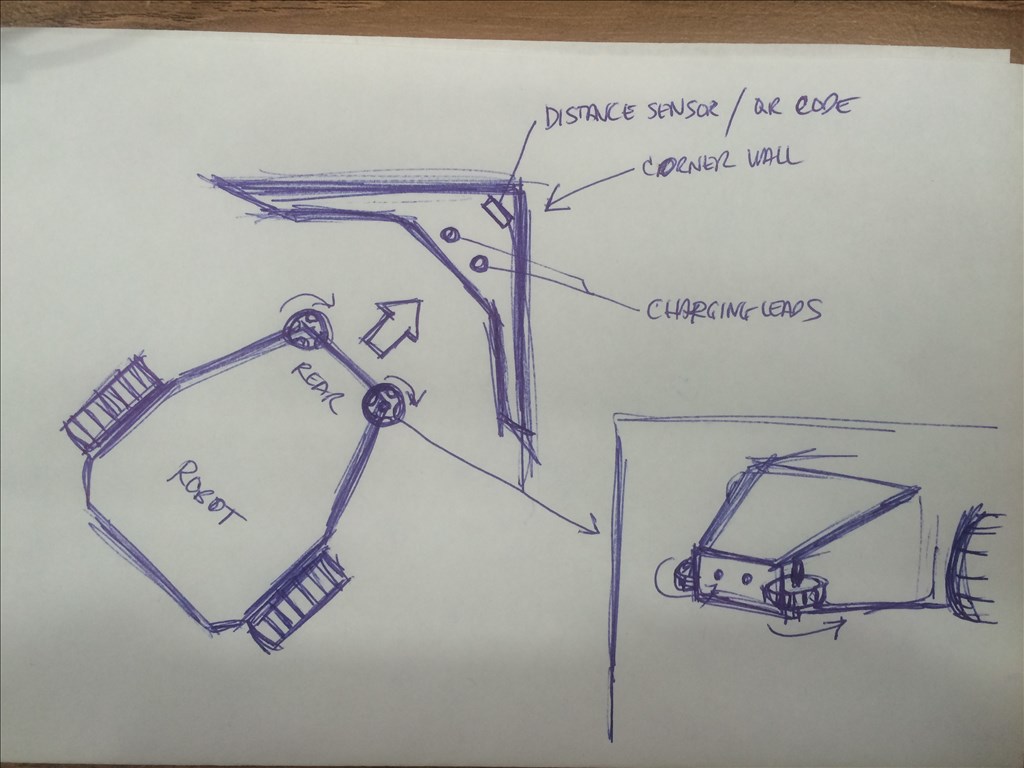
Here's one of them(rough sketch of course be kind):

User-inserted image

I was thinking omni wheels going on the back of the bot, sideways, so all it needs to do is find the QR code or distance sensor, and the wheels would pretty much "force" the robot to go to the corner of the wall, where the charging leads could touch. we can do it to where the charging leads are hidden or have some cover on it, that will pop open (using the distance sensor) when the bot is within the vicinity. Any thoughts? This seems doable to me.


ARC Pro

Upgrade to ARC Pro

Stay at the forefront of robot programming innovation with ARC Pro, ensuring your robot is always equipped with the latest advancements.

United Kingdom
#1  

You could use a mechanical lever to open/expose the charging connectors similar to how MK Electrical do with their UK plug sockets to avoid live parts being accessible until safe (in this case, when the earth pin is pushed in it drops the covers exposing and opening up the live and neutral "holes", no earth means you cannot push anything in to the live connectors).

A spring loaded lever which the weight of the robot could hold down could open up similar holes for connections to go in to and therefore be very safe and no requirement for the charger to ever need isolating from the mains power supply.

#2  

@Rich... That's right, I work with Euro Plugs at my job all time. Brilliant.

#3  

With a QR code posted in the charging nest, when the robot enters the charging nest and sees the QR code, have a servo on the robot open a door exposing the charging plug, pin, etc.

#4  

@rgordon

Yep that's in my original plan...not only a QR Code but you can also use Glyphs or the distance sensor too...you can even use color...if you can get JD to pick up a red ball why not approach a red charging dock, then the guide omni wheels can do the rest...

However I do like @Rich's idea. For these things you need something more simple and fool proof, like an actual physical switch or something to mechanically actuate the cover to expose the hot charging leads...That's why I wanted to use something like an Arduino just for that purpose...plus it doesnt need to depend on ARC or another EZb to work.

#5  

@Doombot I got slammed last week. Just had a moment to look in on the forums. But I have a "Dog house" (for lack of a better description) charging house outside thing for the scouts.

They roll in when on stand-down and monitor sensors for outside activity and charge at the same time.

I like the Roomba style you have drawn but on the big boys I have probes that insert into the bot after hitting the park sensor.

I still owe D.Cochran a EIA report on servers but after I get this client done I'll get some pictures of the charger if you are interested

#6  

@Pacowang

Please do man! I'm interested...is it autonomous? how do you get it to dock?

#7  

@Anthony... I personally don't think of a remote control bot as "real" robot in the true sense of the word... Having a robot do things autonomously is yes a huge challenge (depending on what you want it to do), but it is so much more rewarding... The shelves are full of boring remote control robot toys... If you're into that, then that's cool... Me personally? I want more... That's why I took the time (and still learning) to use d.cochran's AI. AI will enhance all my future bots that I make... My bots are going to navigate and think on their own.... :)

#8  

@Anthony My plan roughly is , when the bot's battery is low, maybe at 5%, >

  1. it will throw an alarm, >
  2. set off a movement script to where the bot would spin 360 degrees>
  3. set the camera tracking to start scan on either a QR code or Glyph,>
  4. stop when it finds it,>
  5. head towards the QR code or Glyph;>
  6. the distance sensoron the dock would then engage the charging leads to pop out/cover to open when it detects the robot in front of it;>
  7. robot stops when it senses the charging dock at a certain distance;>
  8. Then robot goes a complete 180 degree turn (so the butt faces the dock);>
  9. then it backs into the dock.

I'm gonna try to write individual scripts on each of these actions and basically piece them together...in theory this may work but please I'm trying to learn so correct me if anybody has a better way of doing this.

:P

#9  

@Doombot.... The individual scripts are the way to do it man... With your scripts in segments (modules) it makes it far easier to understand later on... Plus it allows some scripts or modules to be used again (re-cycled so to speak) in other program segments...

#10  

To accurately turn a specific number of degrees, you will need a compass. Luckily EZ-Robot will have one for sale soon. Otherwise you have to turn for a certain amount of time, and adjust based in some ither sensor input until you are lined up.

Gyro sensor may also be a good adjunct to distance sensor to know you are in place (if you aren't moving, you must have hit the wall...)

Alan

#11  

@Richard R Yeah dude that's how I TRY understand things...I always use flowcharts...storyboards so to speak. One step at a time...the big picture all at once becomes overwhelming and I wouldn't know where to start LOL

@thetechguru

What about math? calculate the circumference of the 360 degree and calculate the speed and figure that in milliseconds? That should be accurate right? maybe not precise but close enough, that's why i came up with the wheel on the sides design to "correct" the bot if it's a little off....

#12  

@Alan... Bingo, a compass would work well enough but I was thinking a gyro would be even more accurate for turning...

#13  

@Doombot... It's pretty straight forward if you use a gyro... you take a reading from the gyro (would be awesome if you could reset the gyro at this point to 0 prior to the turn) before the turn... and since you have already determined from testing, you will know how far to turn until the gyro reads that number that equates to a 360 degree turn or whatever...

#14  

For example say your gyro starts a 0... from testing you know that when your bot turns 180 deg the gyro reads 1000 (I just made this number up, the actual value will have to wait until I get one)... So your bot begins to turn while you monitor the gyro variable and when it his 2000 you have completed a accurate 360 deg turn... So now you stop the turn and begin your back up....

The cool part is it gyro readings are relative so it doesn't matter what direction your bot is facing it will always turn the required amount.... So you don't have to worry what corner of the room you put the docking station in...

#15  

@Richard R I use the same principle on the potentiometers on my bot's shoulder motors...

#16  

@Doobot... yep, you got it... Gyros are continuous too and can keep turning until your hearts content... plus they don't have to be attached mechanical to the axis of rotation...

#17  

@Richard R You mean I can just use gyros to determine the position of my high powered motors? So I can just eliminate the pots and use the gyro to determine X,-X or Y,-Y? Theyre probably gonna be more accurate than a pot would they? I'm just thinking out loud here :D

United Kingdom
#18  

Quote:

8. Then robot goes a complete 360 degree turn (so the butt faces the dock);> 9. then it backs into the dock.

Not to nit pick, but shouldn't the robot turn 180 and back in to the dock? A 360 and it would be going full circle. Also I wanted to ask, is the idea of this to charge a battery connected to an EZ-B or a separate battery?

#19  

@Steve G Haha you're correct bud. 180 degrees :D

I'm gonna be using 2 12v 9A batteries...the ones for kids electric cars...not a LiPo so it can be charged even while the system is running right? Please correct me if I'm wrong...

And please everyone, nitpick away! I'm here to learn so I don't have to live the (expensive) pains of trial and error ;)

#20  

@Steve G Obviously you're not up to speed on North American usage of the compass... :P

#21  

@Doombot, yes, SLAs can be charged and used at the same time (think car or motorcycle battery). That is one reason I am going to be using them in my k9 (just haven't decided on 24v and wheelchair motors or 12v and Powerwheel motors. I'll post my own thread for help deciding. Pluses and minuses to both choices).

Alan

United Kingdom
#22  

Lol, blame it on the beer giving me some clarity (doesn't happen often). I was thinking, that would be one dizzy robot :P

On a serious note though, this is something I'm very interested in for a future project. The one obstacle I see is yes, charging batteries while the EZ-B is still operational. An idea I had was a module that would plug in to the EZ-B's power socket with the battery connected to the other side of the module where the battery can be charged while the EZ-B is on, much like a cell phone or laptop. I think from what I understand, charging a LiPo battery while connected to an EZ-B is a no no, so does using other batteries like lead acid make a difference in this situation? confused

EDIT: I see Alan answered the question while I was writing. So why is it a LiPo cannot be charged while the EZ-B is still operational? It maybe a dumb question, but I really don't know.

#23  

@Steve G Yeah I thought so you can charge and use SLA batteries. I originally was gonna use a motorcycle battery...since I have those lying around...

#24  

I would have to look up the science behind it, but charging lipos while discharging them is one of the things that makes them get explody.

Alan

#25  

@Doombot,

The only issue with gyros for things like arm position is that they can't tell you what position you are in, just whether you are moving and how much, so you need some kind of initialization like a limit switch and possibly intermittent calibration depending on how long they are powered on and how much movement has occured.

Pots are absolute position (if properly tuned and calibrated) where gyros are relative position.

Alan

#26  

@thetechguru

Ah gotcha. I'll stick with absolute position (pots). I understand that. ;)

United Kingdom
#27  

@Alan.

Got it. Makes scenes now. LiPo's discharge then recharge, SLA's just get topped up. Thanks.

United Kingdom
#28  

So if it's cool, I'd like to put the autonomous seek and dock side of things aside just for a moment, as I wanted to share in idea I had about the mechanical side of dock charging that @Doombot mentioned. I did a bit of searching through my couple of thousand pictures on my laptop this evening and found some drawings (you can have a good laugh, I don't mind) that I knocked up a couple of years back when I was mucking around with radio controlled projects. It was a docking station idea I had that never got past the drawing stage.

In the first picture, the idea was to have the dock move on a small track and to also be mounted on a bearing that would freely rotate when the robot docked incase the robot wasn't exactly aligned. Where for example a Roomba would do its little shuffle dance when it aligns and about to mount the dock, my idea of a mobile docking station would do the necessary movements and alignments that were necessary...

User-inserted image

The second picture shows the idea if the charging terminals themselves. With the exception of the robot mounting the docking station, the only real electro mechanical part here is the deploy and retract battery terminals of the robot. As the robot gets close to the dock, a servo or actuator would deploy the battery charging terminals, pushing through a hanging flap on the back of the robot (secured by a low strength magnet so it doesn't flap about when the robot is moving). As the robot docks, the battery charging terminals would push through a second flap on the dock, slide inside the dock casing and make contact with spring dock charging terminals insuring a secure contact. When charging was complete the robot would initiate, leave the docking station and retract the battery charging terminals. Both flaps on the back of the robot and dock would simple fall back down ad secured by the magnet's keeping the terminals covered and dust free...

User-inserted image

These are only a couple of simple designs, but the idea was to keep things simple, safe, yet practical. I don't know if any of these ideas are of any use to you guys, but I thought I'd share them just incase. :)

#29  

So i'm a long ways from this stage in my project. But I have been thinking about this issue. (And automatic beer retrieval) I understand that the Roomba docks itself for charging. I don't want re-invent the wheel if i don't have to. Have yall played with their dock/program?

PRO
Belgium
#30  

another idea for docking.

#32  

@SteveB I have and so has Steve S and Robot Doc.... If you search the cloud I have an example program that I posted that demonstrates some random (various) commands you can use to control a Roomba 500 and above....

It will be under my name when you use the filter function in the cloud....

#33  

@Steve G I am so glad your bot design doesn't have your robot dock facing forward. It would however, be a very unique way of recharging if you know what I mean.... :P

United Kingdom
#34  

@Richard.

Lol, come on now, this is a family friendly forum. :P

#36  

@Doombot ... sorry dude, didn't see your post #20.... You'll still need pots as you been using them (as Alan mentioned).... The gyro is good to provide the "general" orientation of the entire bot.... It lets the bot know where it is in'space' relatively speaking...

United Kingdom
#37  

@Steve & @Richard, front facing appendages for charging have been mentioned before and believe it or not, similar thoughts were posted :)

#38  

It is very simple to just use a Nail with a spring.

#39  

Loki is still the benchmark of homemade robots.... Brilliant design and programming...

United Kingdom
#40  

@Rich.

That doesn't supprise me at all, lol. :)

I do love the design of Loki. I saw that video some time back and thought to myself, "I want to do something like that".

#41  

@Steve... The indoor nav that Loki does is just simply awesome.... I got Andrew to navigate around my kitchen island, but that is very basic.... One of my goals is to have complete room to room navigation like Loki can do.... It may be a stretch for my programming abilities, but I am going to give it a shot.... :)

#43  

@Richard R cool man...Loki is great but I ABHOR that design. I don't get why everyone likes the Johnny 5 - Wall-E - Omnibot head design. Serious engineering and programming on that guy though...I love the chain sprocket shoulder design he did...It actually reminded me of that bot from that 80's movie Evolver or something like that...

@rgordon I missed that topic from a while back I guess...

Here's the question, has someone actually got to do this and get it working? With the exception of possibly having to use a Roomba...

#44  

I think @pacowang is actually doing something, not just talking possible solutions.

Alan

#45  

@Doombot Not that I am aware of. Although there are many methods discussed in that topic.

#46  

That is fine if the robot will stay in the same room all the time. But, what if it has wandered all the way to the back bedroom area when his battery runs low and the charger is several rooms away? This is what eventually bogged down the thread I started 2 years ago about this. The robot needs to have a way to know what room it is in so that it can plot a direct course to the charger and also avoid obstacles along the way. This may can be done in a number of primitive ways such as Glyphs or QR codes posted in strategic places around the house or IR Beacons that flash a specific room code with a detector on the robot that reads these flash codes and determines what room it is in. But most people don't want to plaster Glyphs all over the place or have a beacon in every room (which has to be clearly seen by the robot from most anywhere in the room).

If it knows what room it is in then, a script could run based on this info. Say it was roaming around and it detects that the batteries are running low. Using some method it determines it is in bedroom #3. "OK, I am in bedroom # 3 so i need to head East to get to my charger."First it would have to find its way out of the bedroom (which may not be in a East direction). Then, after it is out in the hall, it determines..."OK, I have exited the bedroom and I am now in the hall." " I need to turn right and move down the hall and find the kitchen." Then it has to find its way out of there and so on and so on......

We desperately need some form of room mapping/ localization /navigation system or our autonomous bots will be stuck living in one room or be found out of battery power in some dark corner of a back room.

Maybe someone here on the forum or DJ and his team will work out something in the near future.

United Kingdom
#47  

@rgordon.

You do bring up a good point. Here's an idea I'm throwing out there. This could be based on two separate location sources. An inferred beacon (close quarters) and a WiFi signal of sorts (long distance) both located on the charging station dock. A 2.4g Wireless signal can cover quite a large area (depending on the quality of router) which as we know can flood different rooms.

So here's the Sanrio. A robot is roaming around in one room. It detects that it's batteries are running low and activates a WiFi locator script. From here the bot would follow the strength of the WiFi signal, navigating towards where the signal is strongest which is where the docking station is (like following the signal bars on a cell phone. The more bars that light up, the robot knows it's getting closer to the dock). This would help the robot determine where it needs to turn left, right, go straight ahead just by following the strength of the signal. Once the bot is in the same room as the dock station, the IR beacon would take over and do the precision guidance so the robot can succsessfully dock and charge.

It's a bit of a cruid discription, but I hope you get the idea. Is this a fesable idea?

PRO
Belgium
#48  

cant you use more dockings?

United Kingdom
#49  

@nomad.

You could, but I'd say It would depend on the size of robot and docking station. For smaller robots then yes, that would be a good idea. But personally if I had a full size robot (like I'm planning on building), then I wouldn't want large docking stations dotted all around the house taking up room and power sockets. Just the one station tucked away in the corner of a room.

The docking idea I mentioned is based on an idea I had that I posted about an additional feature that could be added to ARC. Much like a mobile/cell phone or laptop/tablet has a signal strength indicator in the corner of the screen, a control in ARC could display the current status of the WiFi signal in either AP or Client mode in a numeric value or bar graph indicator.

This then could be scripted for autonomous or manual control where if the robot roams to a place where the signal hits one bar, it would do a 180 about face, and head back to the last known stronger signal location. Also useful for debugging EZ-B disconnection issues so you would know if it was due to weak signal or not, thus narrowing down the variables of the disconnection issue. The docking station idea works on the same principle, but instead of avoiding a weak signal, the bot navigates towards a stronger signal.

#51  

Design a robot and charging station so it can swap out a dead battery for a charged one.

Have a small backup battery to keep the ez-b powered while the robot is swapping out the batteries.

#52  

You're back to step one. The robot has to find the battery changing station robot to have the battery changed.

#54  

Haven't checked your links yet @rgordon, but some more good for thought. I think there is a lot of promise for location recognition and navigation back to home using hte EZ-B integration to Roborealm. Specifically the AVM module.

See http://www.roborealm.com/help/AVM_Navigator.php

I want to start experimenting with this, my only issue is that you used to be able to use Roborealm on two computers, one development and one embedded, but now need a separate license for each, so that is a more significant investment to experiment with a function that DJ is more than likely going to build into ARC at some point.

Alan

#55  

@Alan... I too am going to be looking into just that very thing since I also have roborealm and the avm module...

About the lic thing... If I had of known that before I bought a copy I would have installed roborealm on a different computer. I have it on my desktop but I wish I had installed it on my laptop for obvious mobility reasons...

#56  

@Richard, you can move it from one computer to another. You need to uninstall it from one, and then install it on the other, and sometimes send an email to their support if the license gets "stuck". It is the installing on two at once that is an issue.

Alan

United Kingdom
#58  

Here is a solution that lets the robot move from room to room and find the docking charger, it can do this because it knows where it is, where doors are and where the charger itself is thanks to accurate mapping - this is the reason my robots have highly accurate odometry and low slippage wheels. This system also allows the robot to predict the best path to take based on a dynamically updating volume occupancy algorithm.

In the Nineties, I did a lot of work on these kind of algorithms and my testbed was my cybernetic animal ELF cyberneticzoo.com/?p=3984

My work culminated in a tech that I named "Volume Occupancy Mapping"

It works like video memory (an X/Y grid)

Each grid point (X/Y location) is a byte, which is broken up into 2 x 4bit nibbles of ( learnt) data about that grid point. The lower nibble is the probability of that grid point being blocked or free to move across. The system is totally dynamic and self adjusting, here is how it works.

When you start every grid (X/Y) location is set to 0, from this point the algorithm starts to learn about the area (or room) that it is in. With a matrix map filled with zero's it has no idea yet how to plan the best path across the room, so the first job of the algorithm is to get an idea of where all the fixed (stationary) objects are like tables, armchairs etc. It first starts with a wall following algorithm that gives it a idea of the area its trying to map, if armchairs etc are against the wall then it builds that into the map. From the wall following, it goes into a crisscross following pattern across the area to map this part out. Now say that at grid point 5,9 it senses an obstacle then it increments that locations nibble, so it now has a value of "1". Now if this was a piece of fixed furniture then grid point 5,9 would always be impassable so after some more exploring of the area over time then its location nibble would soon fill up to F (decimal 15). Now if it was say a dog or something transient at that location then at some point the grid point clears (now passable), when the algorithm finds this it decrements the location nibble, so in the first example above, the "1" would return to "0".

What this gives the robot is a method for it to compute a high probability route that will give it a clear path across the room. This is done by looking at all the X/Y grid locations, and it knows that any with a zero (or very low value) has a high probability of being clear and any grid locations with high values have a high probability of being blocked, from this the best route can be computed.

This concept needs seriously good odometry, the AIMEC/ALTAIR motor drive encoders, give 64000 "clicks" per single drive wheel Revolution so the resolution is amazing. The next problem to overcome is wheel slippage which can introduce errors, and any major errors obviously have a exponential effect on the map accuracy, on our robots we limit wheel slippage by a special design of our tires.

The upper nibble is used to tell the robot what is at that location in the ELF and AIMEC/ALTAIR robots the highest bit denotes danger and a "don't go there" mechanism, this is useful for things like fireplaces or tops of staircases where clearly you do not want your robot wandering into. So if the robot see's a grid location of >127 then it will just never go there or plot a path through that location. The lower three bits of the upper nibble gives info on things like "entry door", "exit door", "docking charger" position etc, so the map not only has a method for the robot to find a clear path (with high probability), but also knows where to find certain things that is useful to its operation. Using a map for each room and knowing where the doors are located means that the robot can navigate by itself around the home.

Here is the simple volume occupancy map from the old AIMEC:3 robot

User-inserted image

Tony

#59  

@Tony...Thanks for sharing this. I have a few questions:

Is this algorithm proprietary? Is this something that we can download? Is there any other software that is needed? You have this working with the EZ-B? Are there any tutorials on this that you would recommend?

I, for one, would need a lot of coaching and help to get something like this this up and running with my robot. This is exactly what I am wanting my robot to be able to do. Otherwise it just wanders around aimlessly. I would like to be able to tell the robot to go to a certain room without any assistance or for it to be able to find its own charger no matter where it happens to be.

@Doombot...Thanks for starting this thread man. It gets the creative juices flowing again. Check out the links I provided earlier. They may spawn some more ideas for docking. Collectively I think we can make this a reality.... :D

United Kingdom
#60  

Rex, To use Volume occupancy mapping (VOM) you need a locomotion drive system with motor encoders and (PID) motor controllers that can read these encoders and sync both drive motors to move/turn accurately and drive in a straight line.

Below is a picture of the original AIMEC locomotion unit using the Motor Mind 3 motor controllers and next to it is the new ALTAIR loco unit using the Kangaroo x2/Sabertooth combo which as you can see the latter is much less complicated.

User-inserted image

Here are the answers to your questions

<< Is this algorithm proprietary? >>

I invented it in the late nineties, but it is in the public domain now so you can use it.

<< Is this something that we can download? >>

Not at this time

<< Is there any other software that is needed? >>

I use microcontrollers to interface with the EZ-B v4 to limit its workload and this is the case here I am developing a new EZ-B v4 interface PIC to do all the mapping hard work but you could code the EZ-B v4 to do all the mapping/reading.

<< You have this working with the EZ-B? >>

This is on the "next to do" list so will it be working with the EZ-B v4 in the near future.

<< Are there any tutorials on this that you would recommend? >>

Not that I am aware of

So in conclusion VOM could be coded to run direct from the EZ-B v4 if someone wanted to write the scripts, in my system an external PIC will do this so that the EZ-B v4 can get on with other important stuff.

I put the idea up here so people can try this concept if they want to. Hope this helps explain the concept more.

Tony

#61  

@rgordon

Don't mention it. I was surprised the previous thread got buried. I would think this is a common thing robotic enthusiasts would wanna learn to do... :D

#62  

@Marc... Eventually I will be working on an auto docking and recharging routine... However, I will be coming at it from a slightly different angle... I recently bought RoboRealm and with it's advanced object recognition features (using the avm module) my goal will to have my bot navigate by object recognition check points (like a visual beacon) using the camera to find it's way to not only the docking station but anywhere around the room in general... Challenging for sure... Mind you, that's down the road a little, but definitely on my to do list... :)

#63  

@Richard R Yes that's what I was gonna get at with you when my bot is done...however I was gonna do mine with just QR codes plastered all over the house...the bot would be consistently scanning after an x amount of time of inactivity...as part of it's "personality generator" script...the cleverly placed QR codes would act as directions to whatever task needs to be done (like here for example, looking for the charging dock). That was my initial idea anyway. Forgive my ignorance but what's an AVM Module?

#64  

@Marc... The avm module is an add-on that you purchase with Roborealm... It is what you use to do object recognition and navigation with... LOL... QR codes would work well too... You know me, have to do things the hard way... LOL... Roborealm does a lot more, but I haven't really delved into to it yet.... Eventually I will....

#65  

Roborealm sounds awesome and I've heard great things about their object recognition...however I'm going for simpler here with no other things to buy as I'm planning to package everything with Dirgy...I was gonna make QR code stickers that the new owner could just stick all over their homes...scripting will do the rest...so different floorplans would be irrelevant it's just gonna work...correct me if I'm wrong, anyone. Just seems more foolproof (and cheaper) to me.

#66  

@Marc... You don't need to be corrected... your idea will work very well.... Simple is better with what you want to do (a marketable product), less to go wrong and less expensive to produce/support.... What I want to do is more or less just experimenting....