Pulse Flash LED with PWM
Description
Pulse Width Modulation is the method of having a digital port, which is only On or Off to have a varying output voltage. Use this approach to flash and LED with a pulsing effect.
Step 1
DC electricity works by having Positive and Negative. An LED is short for a Light Emitting Diode. A diode prevents current from flowing both directions. Diodes only allow current to flow in one direction, and they’re always polarized. A diode has two terminals. The positive side is called the anode, and the negative one is called the cathode.
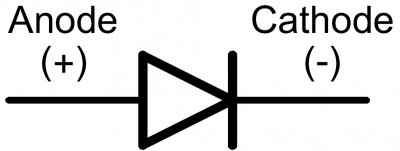
Current through a diode can only flow from the anode to the cathode, which would explain why it’s important for a diode to be connected in the correct direction.
Did You Know: Physically, every diode has some sort of indication for either the anode or cathode pin. Usually the diode will have a line near the cathode pin, which matches the vertical line in the diode circuit symbol.
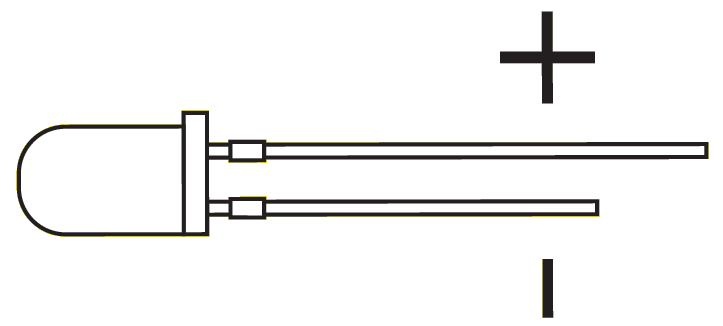
An LED has a physical indication of Anode and Cathode pins as well. LED stands for light-emitting diode, which means that much like diodes, they’re polarized. Find the longer leg, which indicates the positive, anode pin.
Connect an LED to port D0 of the EZ-B. In this example, we will provide power (+) to the LED from a signal pin of the EZ-B. The EZ-B will output +3.3 volts on the signal pin when it is in the ON state. The signal pin will respectively output GND when it is in the OFF state.
Connect the LED's Anode (+) wire to the signal (white) pin D0 of the EZ-B.
Connect the LED's Cathode (-) wire to the ground (black) pin D0 of the EZ-B.
The Code Use the ServoSpeed() command to apply a ramping speed to the PWM. The PWM command to set the brightness. The PWM essentially turns the state of the digital pin ON and OFF hundreds/thousands of times per second to produce the result of a "varying" voltage. The PWM range is between 0% and 100%, called the Duty Cycle.
The ServoSpeed() command will configure Ramping between two PWM duty cycles.
Add an EZ-Script control to your project, edit and paste this code...
# set the servo speed to 2
ServoSpeed(d0, 2)

:loop

# Set LED On
pwm(d0, 100)

# wait some time for the pwm to do its ramping thing
sleep(3000)

#set LED Off
pwm(d0, 0)

# wait some time for the pwm to do its ramping thing
sleep(3000)

goto(loop)
Tweak the Sleep() command time and the ServoSpeed() command time to see the different pulsing effects.

@Bobsheaux
can you give the part number used and the url/web site were you bought the LED?
...Edited... Also have you tried a different LED?
Cheers
@Nomad 6R Making those modifications to the script didn't work.
@merne I bought two 2760143 LEDs from the local Hobby Town, and neither is working.
are they 3 volts? can you test the led with two AA batt 1.5 volt per batt ?
They're 1.5 volts, and testing it with a charged 1.5 volt AAA battery did nothing.
a signal port is 3.3 volts.so i gess it burns your led.
Hey, that's great. In my uncanny ability to botch even the simplest tasks, we've uncovered more information for future users. The tutorial already says that the ports give out 3.3 volts, now we just need it to say "Be sure to get 3.3 volt LEDs for this project, unless you enjoy pulling out your hair while screaming 'WHY WON'T YOU WORK?!'"
3 volts will also be good.
@Bobsheaux: I found the issue.
I code and I do code debugging a lot, and sometimes you need to debug other's people code,one of the most common mistakes is to assume specific conditions or listen to other people (developers) when you are debugging their code and ignoring the details because you trust their assumptions.
The most important thing details.... what kind of led you have ? if you don't know please post the part. Everyone here assumed you picked the correct led, and you know how a led works.
Merne:
This is the 1M questionBobsheaux:
Your led is a special led: INFRARED https://en.wikipedia.org/wiki/Infrared Science textbooks say we can't see infrared light. ... Like X-rays and radio waves, infrared light waves are outside the visual spectrum. you are barking up the wrong tree,
LEDs don't work like ordinary lights:
They have a polarity, hence they must be powered using DC respecting that polarity. Reverse the polarity and they won't work. You may also damage them if you apply more than ~4V-5V in the reverse direction (these are safe values; the exact maximum tolerable value depends on the specific device).
Light emission begins only if a certain voltage is reached (Forward voltage), under that voltage the emission is negligible
After the Forward voltage is reached, any very slight increase in voltage makes the LED conduct heavily, i.e. absorb a huge current. Hence you need a resistor in series to limit that current to a safe limit.
Once conducting, the light intensity emitted is roughly proportional to the current (not voltage) that flows in the diode (so you get a brighter LED if you decrease the value of the limiting resistor). This up to the maximum current limit of the LED. After that limit has been reached, the led goes POOF!
Jeremie:
You can connect a led directly to EZB/Iotiny DIGITAL PORT because there's a resistor (inline) inside.Bobsheaux:
@Bobsheaux: You shouldn't, you will damage.Nomad:
@Nomad: Bad advise, please read about leds!Nomad:
No, Jeremie already explained, @Nomad please read the posts!Nomad:
@Nomad: voltage is not important, if you add a resistor with a correct value, you can connect a led to a 9v battery, Please READ ABOUT LEDS! https://ohmslawcalculator.com/led-resistor-calculator@Bobsheaux: I'm assuming you have this led: https://www.hobbytown.com/radioshack-highoutput-infrared-led-rsh2760143/p787932 And looking to your video it looks like the picture. If not please post the correct part / link.
Regular leds: https://www.hobbytown.com/miniatronics-5mm-dia.-blinker-flasher-led-1ea-red-green-yel-mnt1215003/p285117