EZ-Face is the first in what I plan to develop into a suite of supporting application for ARC and other robotics applications. EZ-Face performs multiple face recognition. It has a interface for training faces and assigning names. When the application sees faces that are recognized the names are displayed and visually you'll see boxes around the faces with the names assigned. If a face is detected but not recognized there will be a display of a box around the face with no name. The more pictures of a face you train, the easier it is for the application to recognize a face.

This is a stand alone application developed in C# under Visual Studio.NET 2013. You should have .NET framework 4.5 and it is for Windows7 and Windows8.x systems.
This project showcase explains the technology behind the application and highlights development milestones.
Technology: Developed in .NET Visual Studio 2013 (you can use express versions with the source code) Designed to work with ARC but could be integrated into other software or robotic systems Is a standalone application Is open source, source code is included Uses emgu cv wrapper for .NET (Open CV)
Resources: (Things I found helpful in creating the application) ARC Telnet interface tutorial (Enable Telnet as the first part Shows, this is used to test communications manually to ARC via TCP/IP): https://synthiam.com/Tutorials/Help.aspx?id=159 If you do not have Telnet installed on your system go to this site: https://technet.microsoft.com/en-us/library/cc771275 ARC SDK Tutorial 52: https://synthiam.com/Community/Questions/4952&page=1 ARC script for listening to the TCP/IP port for variables: https://synthiam.com/Community/Questions/5255
Acknowledgements: DJ Sures, for making EZ-Robot and ARC so robust Rich, for his help with ARC scripting Sergio, for his emgu cv examples
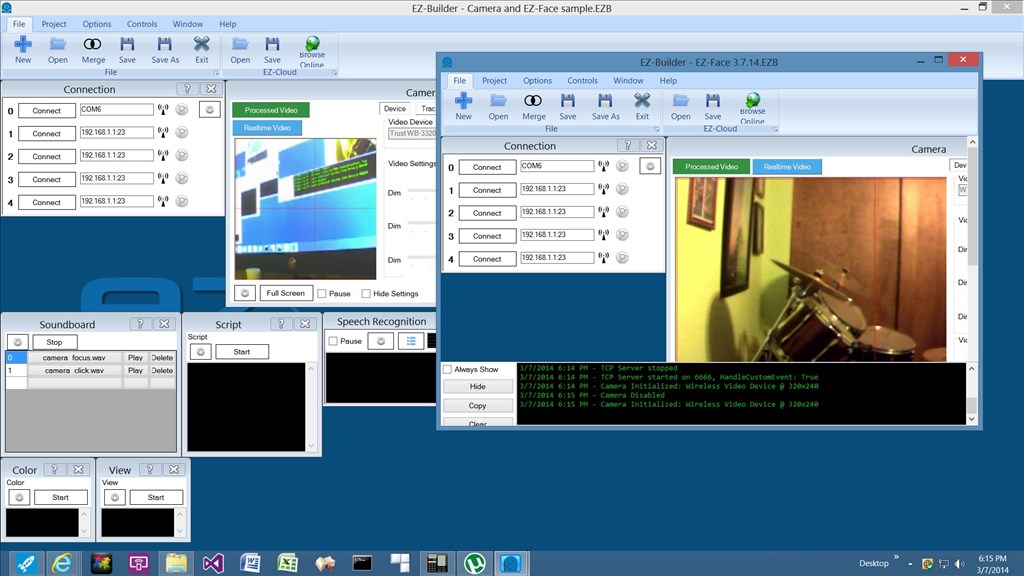
Basic Usage Direction (after download and install): 1.) Open ARC and load the included EZ-Face example 2.) Click on the Script start button (this sets up the communications from the ARC side of things) 3.) Open the EZ-Face application 4.) Refresh your camera list (click the button) 5.) Select your camera (in the drop down list) 6.) Click the "1. Detect and recognize" button 7.) Train at least one face 8.) Change the local address and port number as needed (the local IP address may not be your computer's address - you can enter "localhost" and leave the port set to 6666 unless you changed that setting in ARC) 9.) Click File and select Save User Settings (to store your changes) 10.) Click Connection (this opens the communication line to ARC from the EZ-Face app side 11.) Allow EZ-Face to recognize the face you trained - then with your computer speakers turned on ARC should speak "Hello (the name of the face you trained)" 12.) If the example work - integrate in your EZ-Robot applications as you see fit
Tips: 1.) If after training several faces if you get false recognition of faces (faces recognized with the wrong name) - to correct this you should train the incorrectly recognized faces with the correct name. After a couple of training pictures are stored the accuracy of the face recognition will improve. 2.) Do not train faces with one camera, then switch to another camera for face recognition - recognition accuracy will drop.
Using Two Cameras: What I found worked best was to start ARC, select the camera I wanted and started the camera feed, then I started EZ-Face. If I reverses the process (even though I was selecting a different camera) I would get a black image in ARC.
2.26.14 Update: I still have several improvements I want to make before I upload the first public version of the application.
3.2.14 Update: The first public version is ready for release and is posted at the link below. This version has many user improvements to allow you store many settings, including http and port address, camera device, logging of faces in a text file (up to 1mb of data before the file auto deletes), face variable output to ARC, face training and more.
3.3.14 Update:
I updated the script, version 3.3.14 has the HTTP server panel (which is not used - you don't need to start it) but it does show you your computer's IP address so you can enter it in EZ-Face. Remember to save your settings under the File Menu. I also changed the script so it will no only speak for variable values greater than "" or NULL.
EZ-Face3.3.14.EZB
3.7.14 Update: I updated the EZ-Face application: "localhost" is now the default address, new option for auto connect, functions to receive commands from ARC or other 3rd party application to stop and start the camera feed within EZ-Face. There is also a new ARC project with several new scripts to test out the functions. Please go to my site to download the latest version. You will also find a video there that demonstrations the new functions and provides directions for setup and usages.
Download: The latest version will be published here: https://www.j2rscientific.com/software For support and reporting any errors please use the ContactUs feature from https://www.j2rscientific.com with the subject line "EZ-Face".
I welcome any and all feedback!
Thank you
Discover more robots
Linux's New Desktop For Modification To Installation In To...
Pabi!O's Pabi!O's Wall-E

Wow JustinRatliff , I'm really excited to put this into my B9. Your the best kind of entrepreneur; releasing your product a day early! Nicely done! Thanks for the hard work!
Hi, I am trying and that is ... AWESOME! Very simple to implement. It's great. Thousand thanks.
Had a quick look this morning, worked well on a quick test
Also, thanks for the source code! As someone just starting out with C# and visual studio express I'm sure it will come in handy (although I hate working with other people's code it helps the learning process).
Tested EZ Face and added my face and my name comes up every time it sees me ( excellent !)
Im using my pc built in cam ,
Copied the ARC project example and opened it up in ARC ,
Now Since I don't have an EZB Board yet , Im guessing i cannot just test this and have a play directly from Ez Face to ARC ?
Like , while we wait for our EZ B's to get here .... Without the hardware and just using ARC , We can do scripts just with PC and Cam and colour tracking to practice.
I did a HAL 9000 parody with sound samples , just with ARC , built in cam and Speech commands , it was just to learn and get started with ARC.....Kids loved it , Now every time i ask them to get me something they say " Im Sorry Dave, Im Afraid I can't do that" S
you know what i mean ?
Thanks
Hais.
@Hais - good question. The neat thing about ARC is a lot of functions work, without an EZ-B, including the script to connect to EZ-Face. So you can test getting the variable and acting on. You can setup scripts for speaking, camera controls (for your web camera), voice recognition and anything else that does not directly require the EZ-B like output to a servo.
Yes , Test getting the variable and acting on it , I understand ,
Like
But is Ez Face Example script already setup to communicate directly to EZ Face app ?
Coz I had both up and running , and my face was added to EZ Face and being detected on the EZ Face , Running the EZ Face Example , should have returned " Hello Hais" , but nothing happens...
Do I have to make a connection between the ARC and Ez Face ?
Or is it only setup so that we need to connect to an ARC address and TCP port , and thats when it will communicate to ARC ?
Sorry if I'm being a noob
Thanks
Hais.
I'd have thought the settings required would be saved to the project however you do need to enable the script console in the connection dialogue and set up the IP address in EZ-Face.
I'm not home right now so I can't post any screenshots however, if Justin doesn't get to it before I get home I'll gladly do a quick walk through for it.
I just did mine. You have to change the ip address to what your computer is. Also did you install it at the C:? Here is his Readme file located in the resources directory.
Make sure the application folder is installed on the C:\ drive. Once uncompressed the final destination path should be as follows: C:\BotBrain\EZ-Face
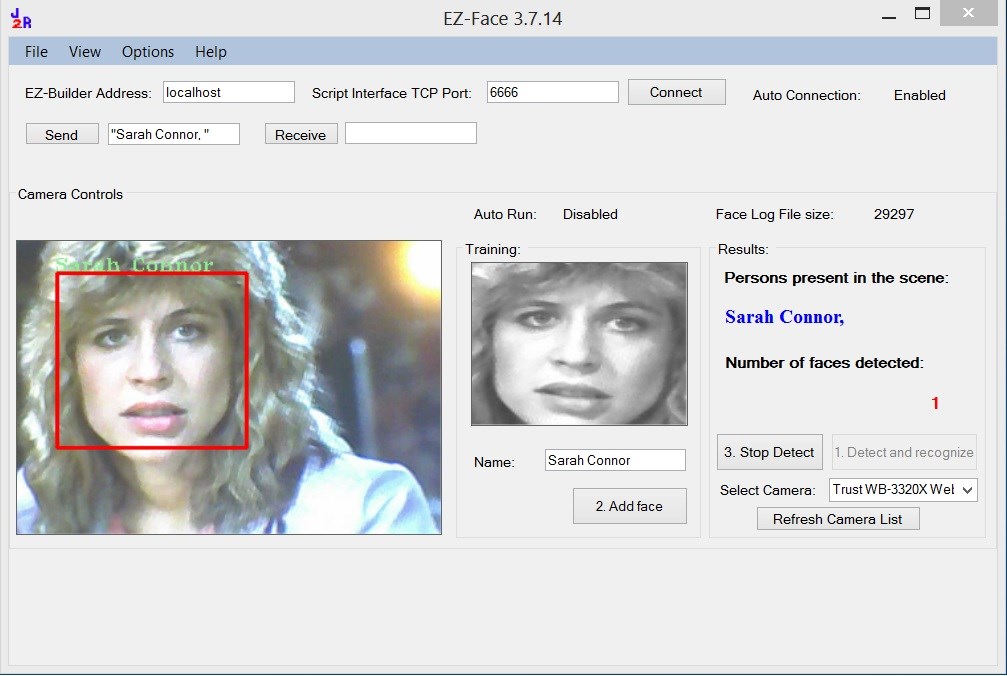
Run the application, and select your camera device of choice in the "Select Camera" drop down.
Click button "1. Detect and recognize" to start the camera feed and recognition process.
Train new faces by entering the person's name in the "Name" field and when the camera highlights the new face with a Red Box around it, click the "2. Add face" button.
To integrate with ARC, copy the included ARC project to your ARC project folder (this is usually located under My Documents or Documents folder". Open ARC, open the included ARC project. Follow the direction in the "Notpad" of the project.
When you are ready to run EZ-Face with ARC, change the ARC Address and TCP port as needed and click the "Connect" button.
EZ-Face also creates a log file, which you can review by clicking "View" on the menu bar and selecting "View Log of Detected Faces". This size if this file is displayed when the application is opened and is updated every minute or so. If the file size exceeds 1mb, the file is deleted and a new log file is created. This file can be used by other applications as a short term memory file.
EDIT: Sorry. I see some of this was answered already in previous pages.