Eddie. The I-cybie & Synthiam Mongrel Robot Dog

Steve G

United Kingdom

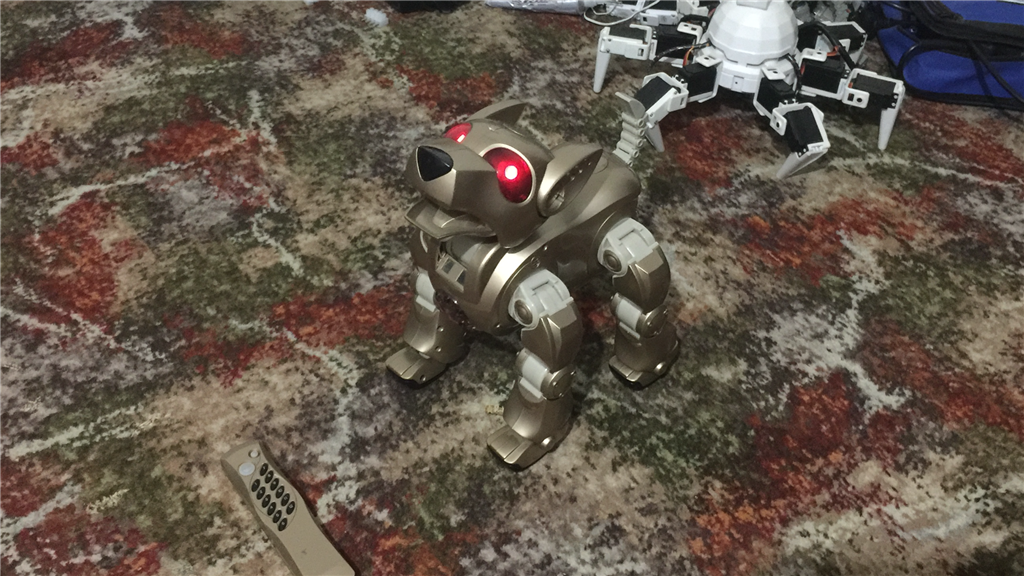
I-Cybie and EZ-B v4 conversion.

Day 1. 23/01/2016

User-inserted image

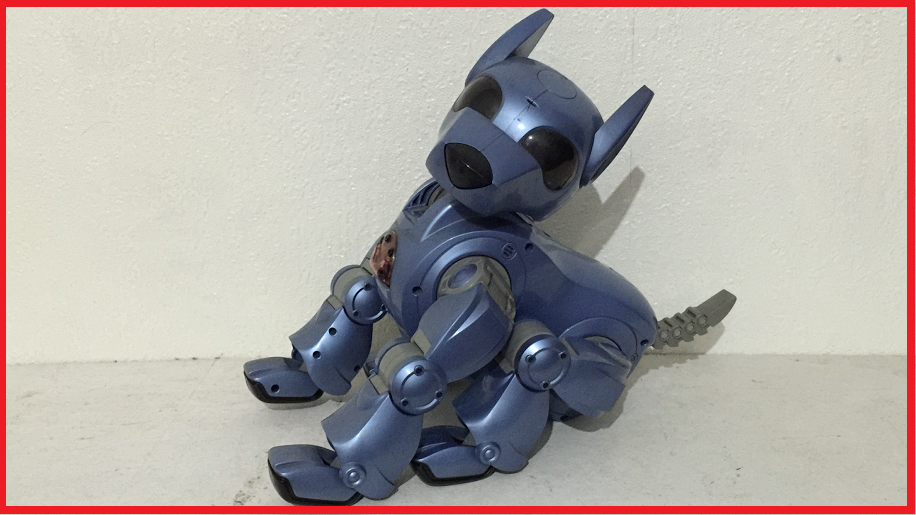
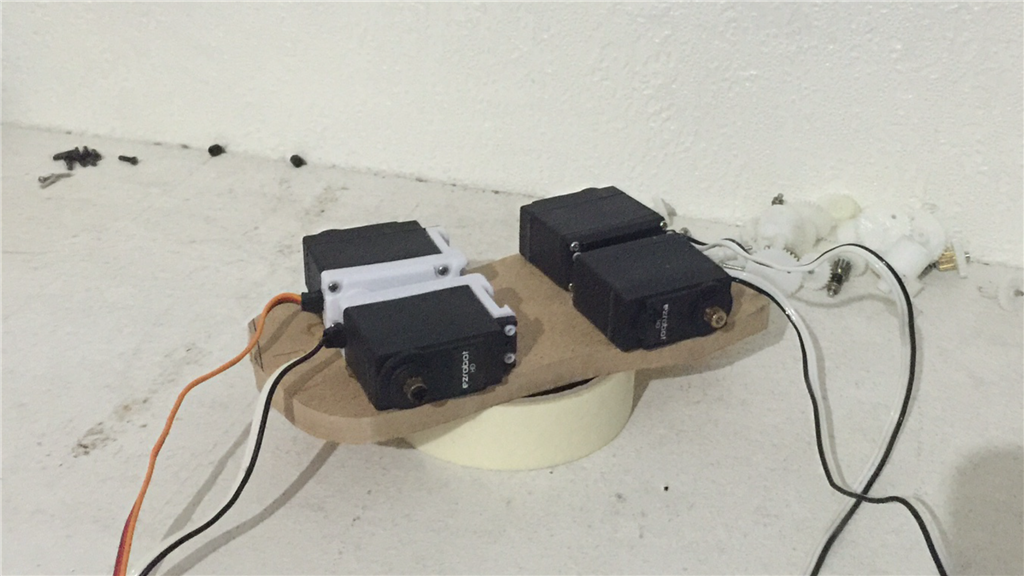
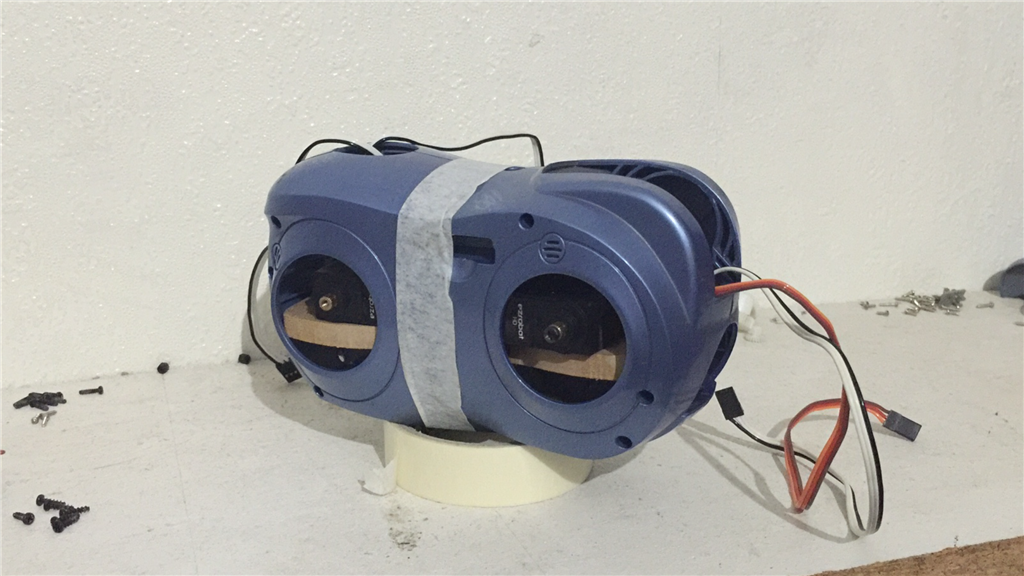
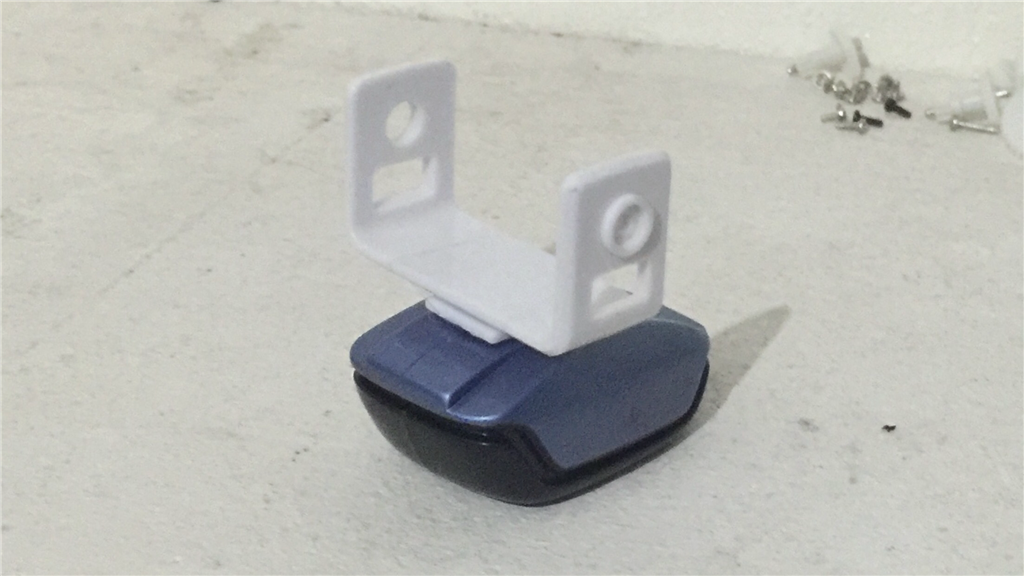
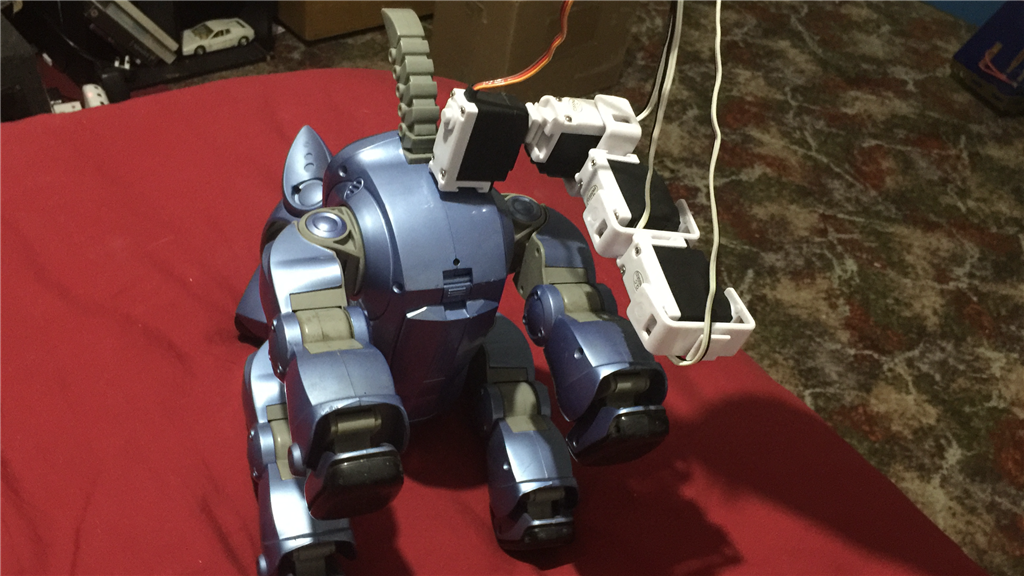
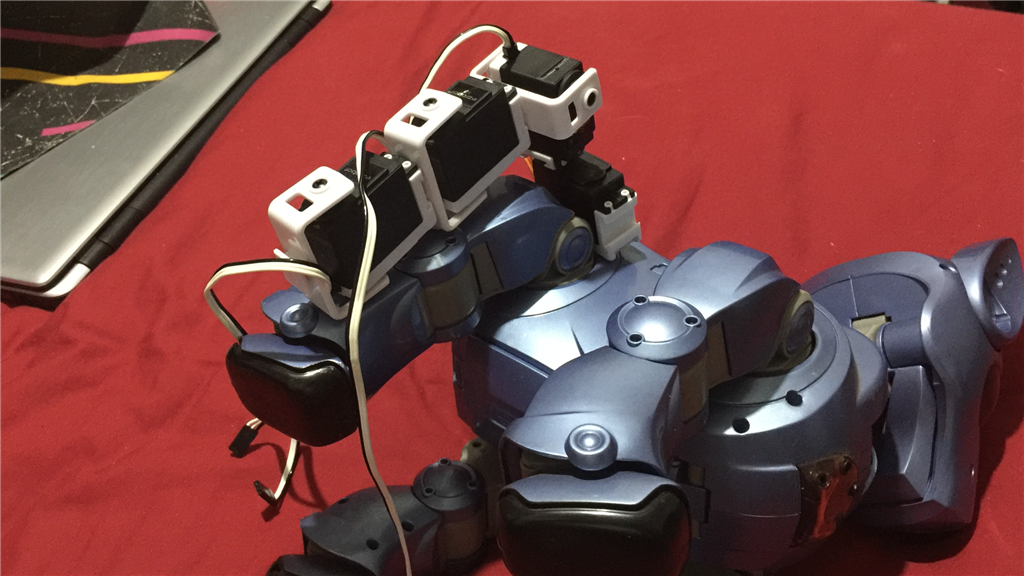
Continuing from my other thread asking if anyone has hacked an I-Cybie, this showcase thread will detail my first EZ-Robot "toy" hack with this little dog. Because of the inner workings and circuitry of the I-Cybie robot dog, the idea to incorporate the EZ-Robot platform in to this little fella will be to completely gut it out, and replace the DC motors with HD servos for the limbs, and a couple of micro servos for the heads pan and tilt action. It will be a tight fit go get an EZ-B, battery, and servos inside, but I think it can be done.

Unlike my previous "Built from scratch" robot builds where I plan out most of what I would like to achieve, and how to go about it, this project I am just going to... well... wing it. I have little idea of the internal layout of the I-Cybie (apart from a few photos I have seen online), so this will involve quite a bit of trial and error.

User-inserted image

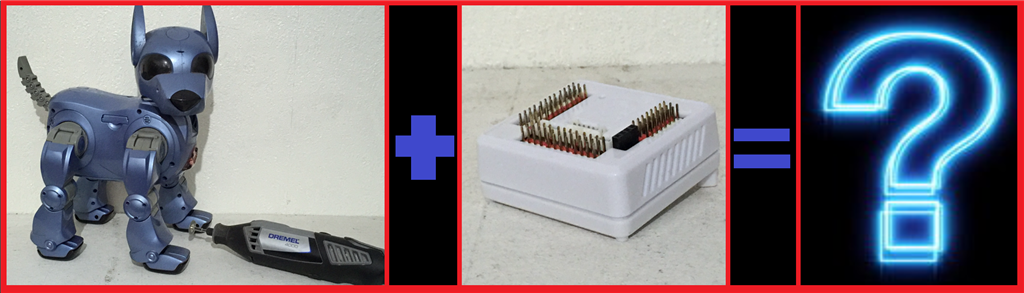
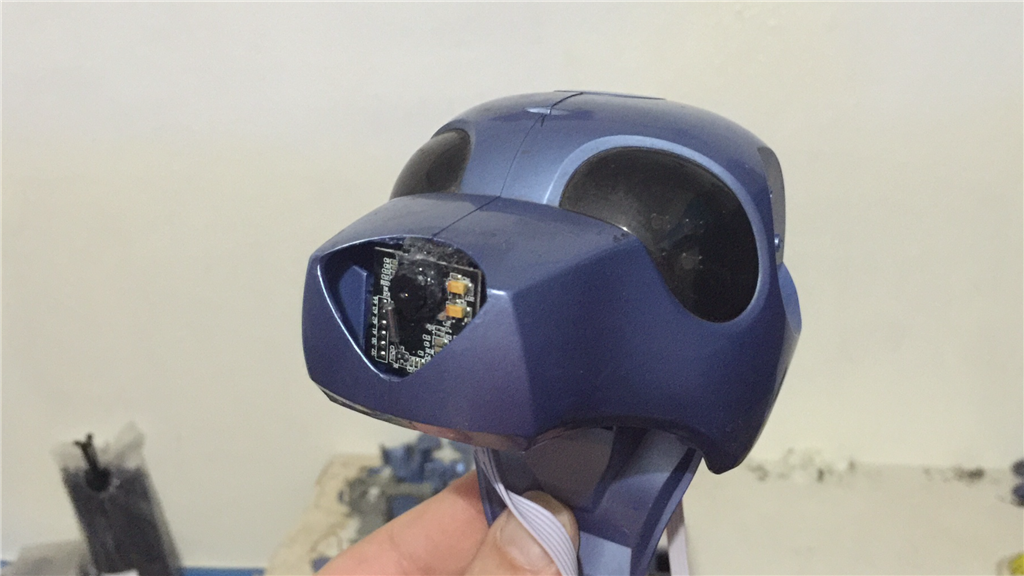
After posting this, I'm going to break out the screwdrivers and start to take the little guy apart. One of the main things I want to have a look at and test once disassembled, is the existing I-Cybie sensors, and test them with a spare EZ-B to see I will be able to use some of them. If not, I'll replace them with EZ-B comparable sensors. Additions will be to change the eye LED's, add a camera, 4 in 1 sensor, and see what else i can fit inside that will be useful.

I have no idea how this is going to turn out (hence the first picture, lol), but this should be a fun and unique project, and I think this will be the first I-Cybie to EZ-B conversion project showcase. I'll try to remember to take lots of photos of the insides in case anyone else is tempted to do a hack themselves, and I will document my progress with this project. Below are a couple of thread links about possibly hacking an I-Cybie with an EZ-B...

https://synthiam.com/Community/Questions/162

https://synthiam.com/Community/Questions/152

:)confused Let the head scratching begin... confused:)

By — Last update

ARC Pro

Upgrade to ARC Pro

Stay at the forefront of robot programming innovation with ARC Pro, ensuring your robot is always equipped with the latest advancements.

United Kingdom
#1  

UPDATE cont:

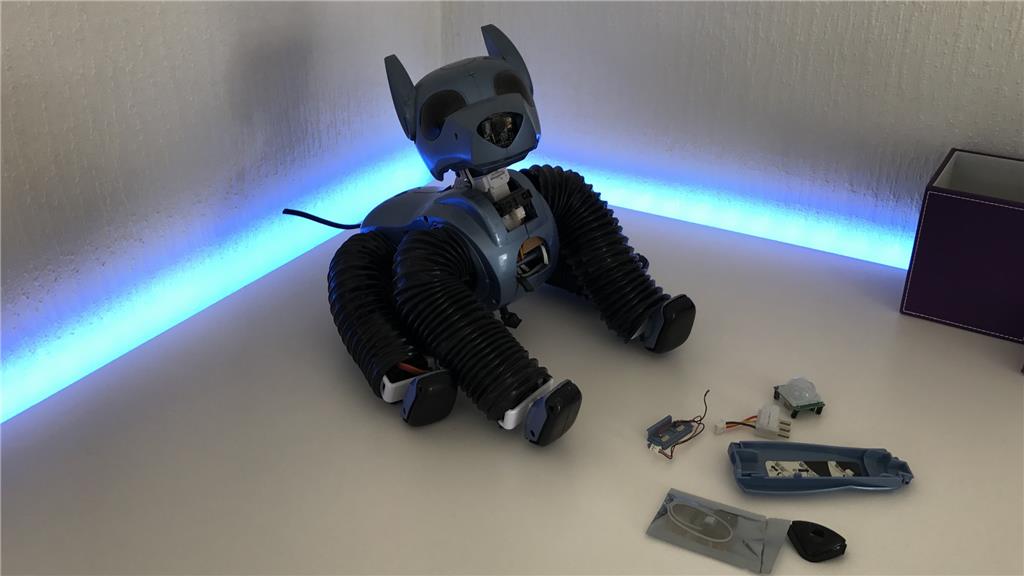
Well, nearly three hours, and the little fella is in pieces now. This is going to be a little bit more of a challenge than I thought. Anyone know how to put it back together, lol?

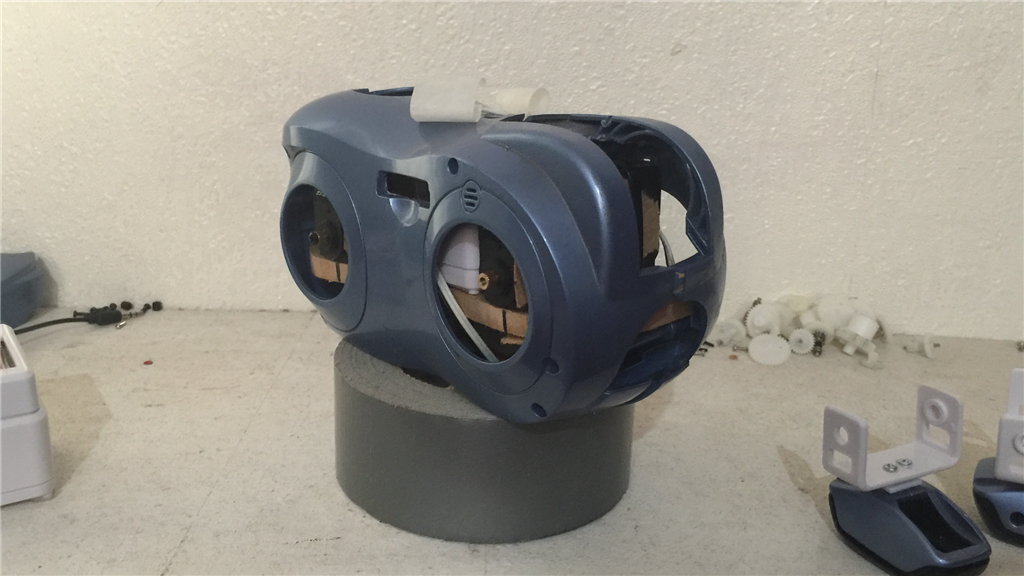
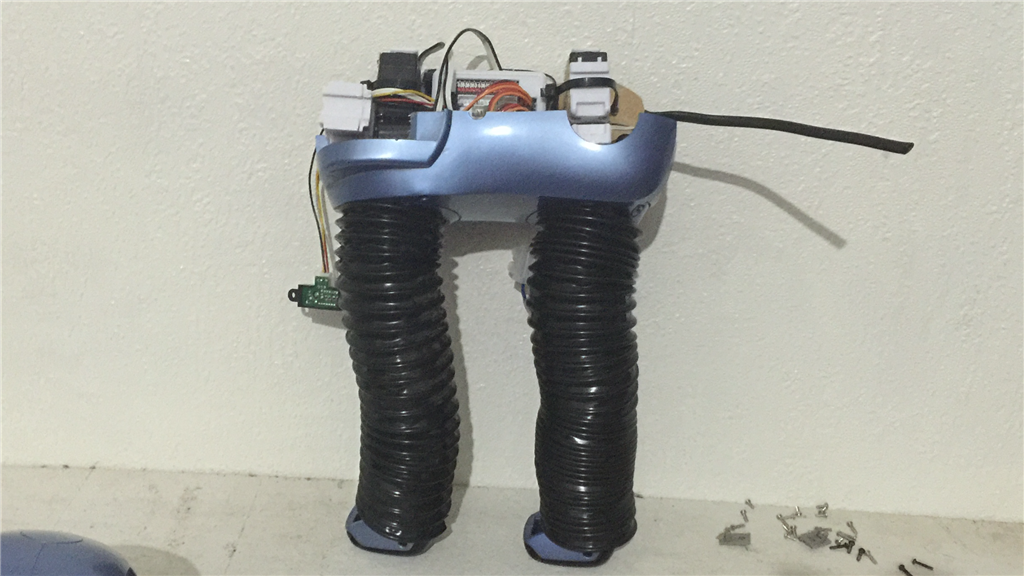
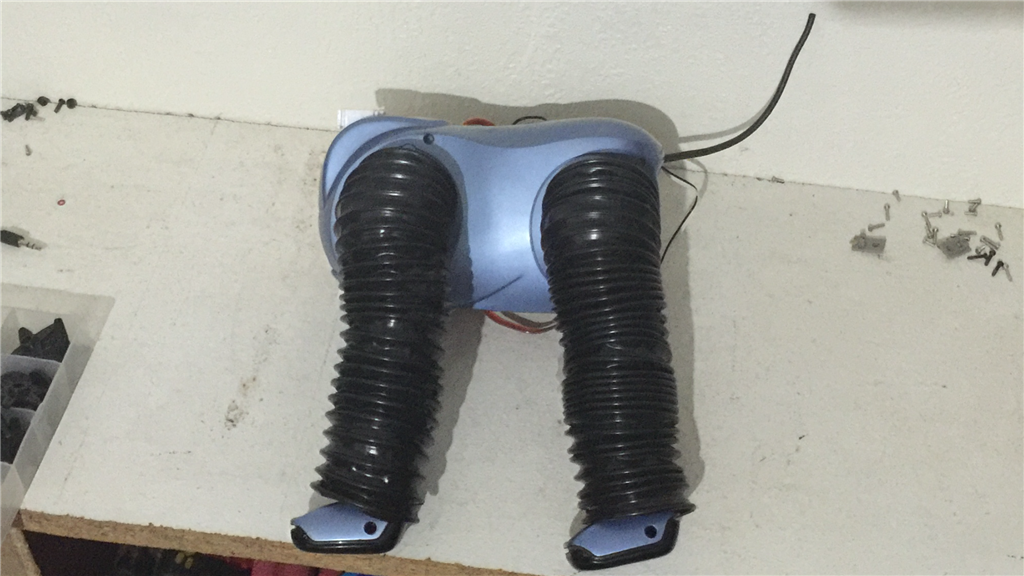
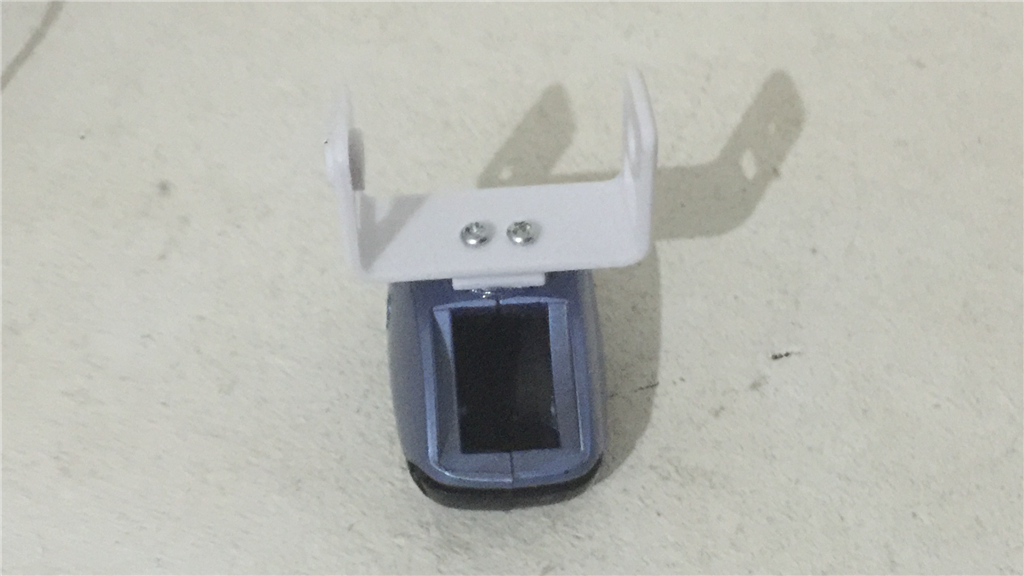
Leg covers and body panels removed... User-inserted image

User-inserted image

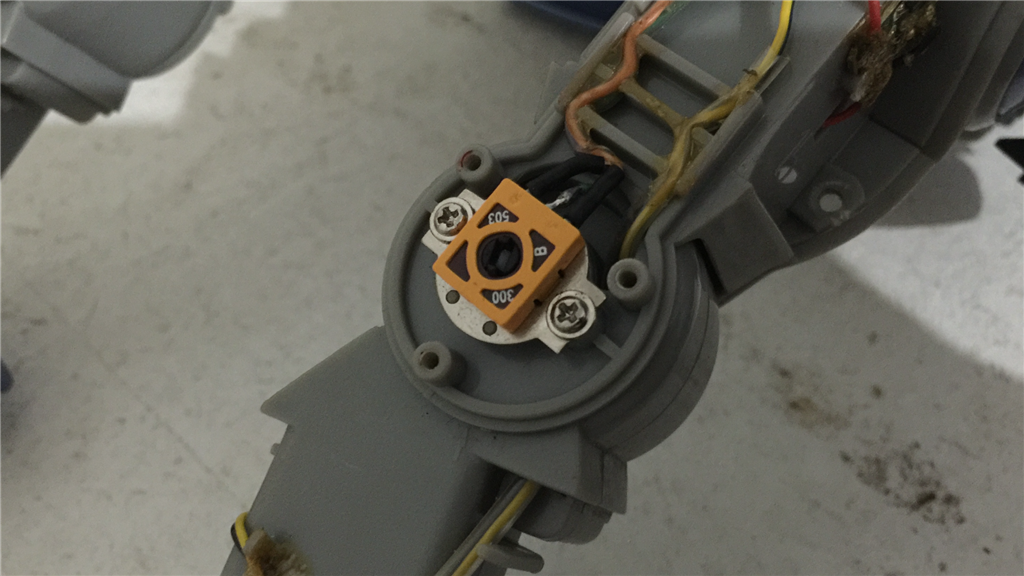
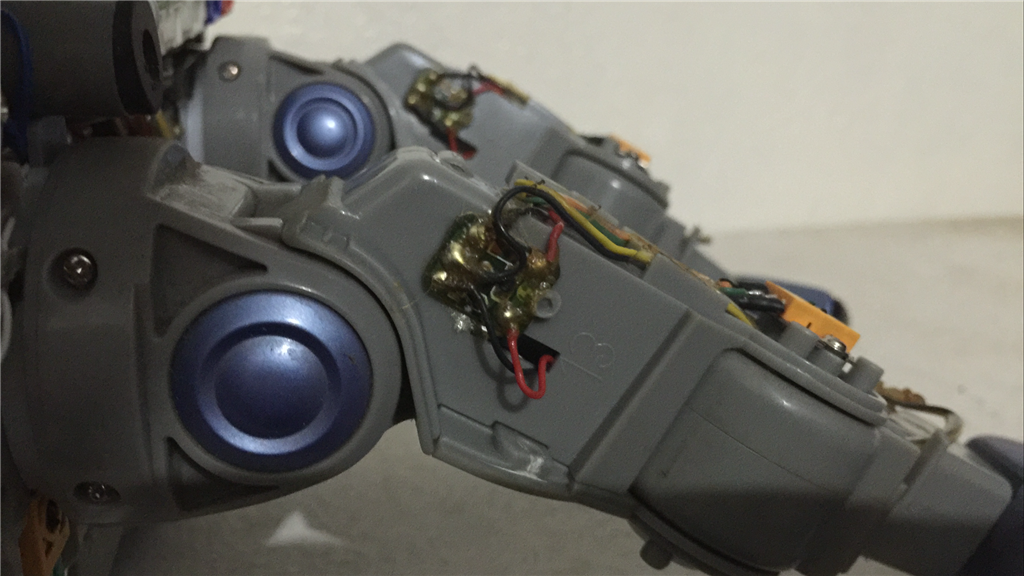
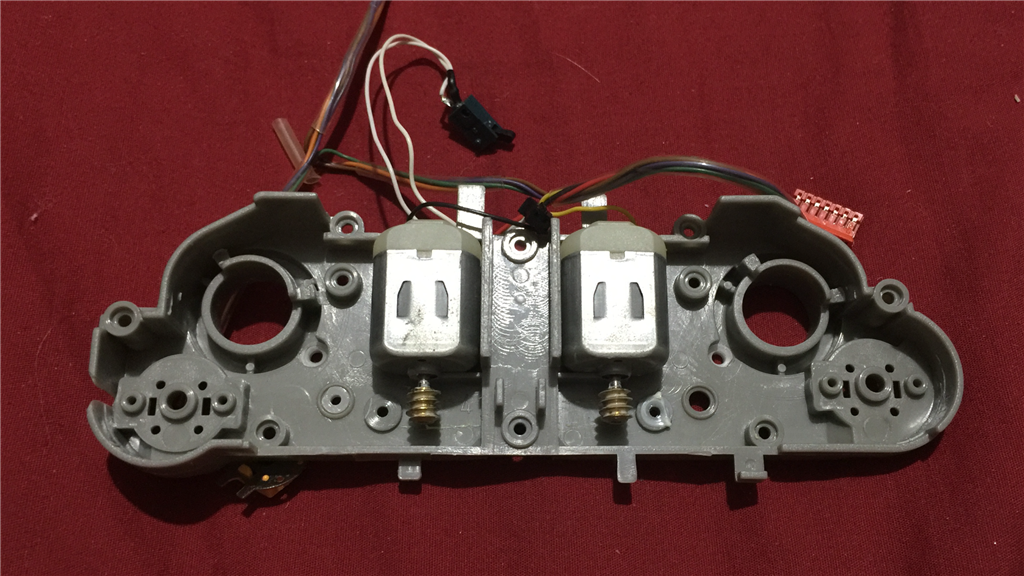
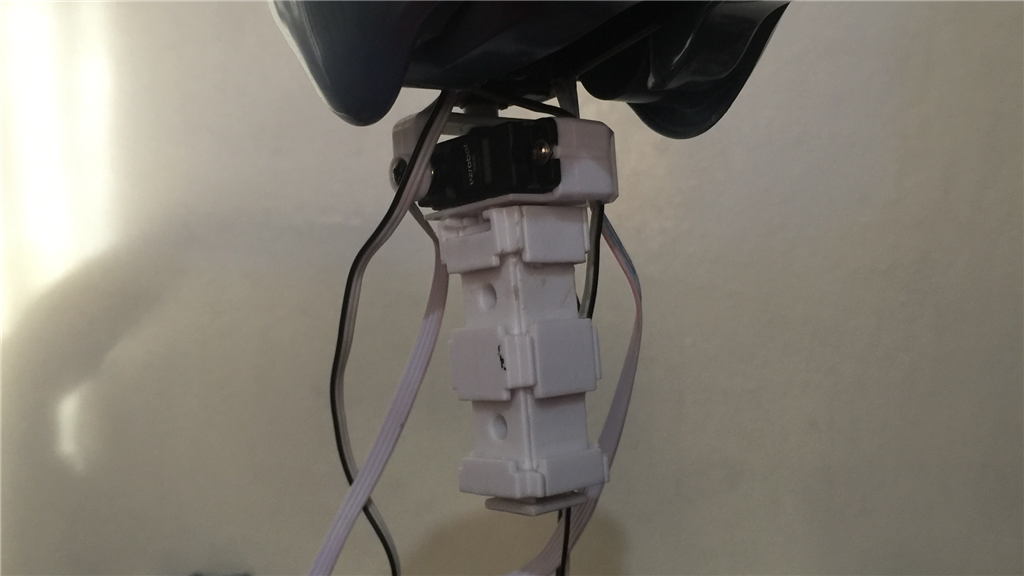
These are the encoders and back of the DC motors for all of the joints... User-inserted image

User-inserted image

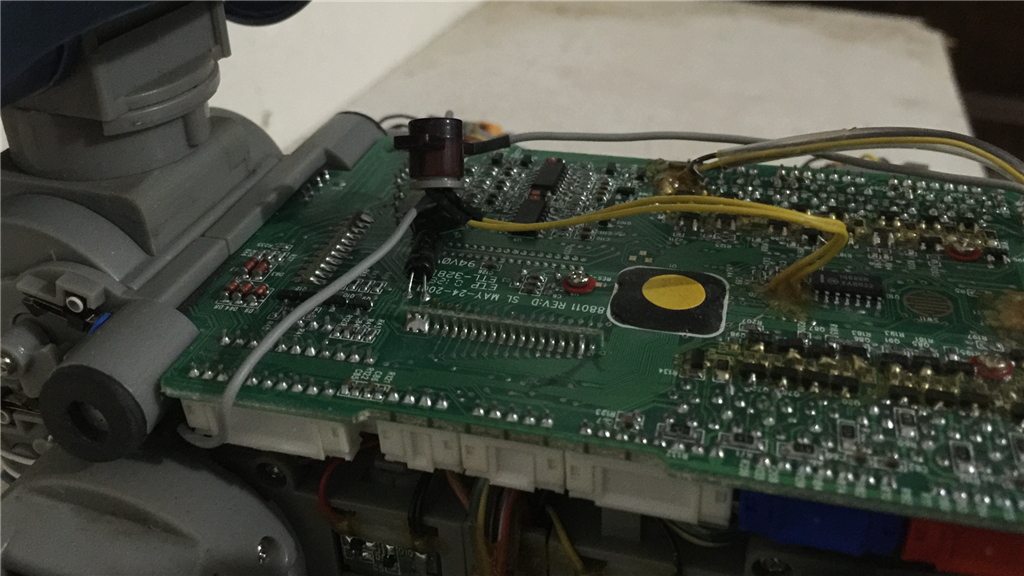
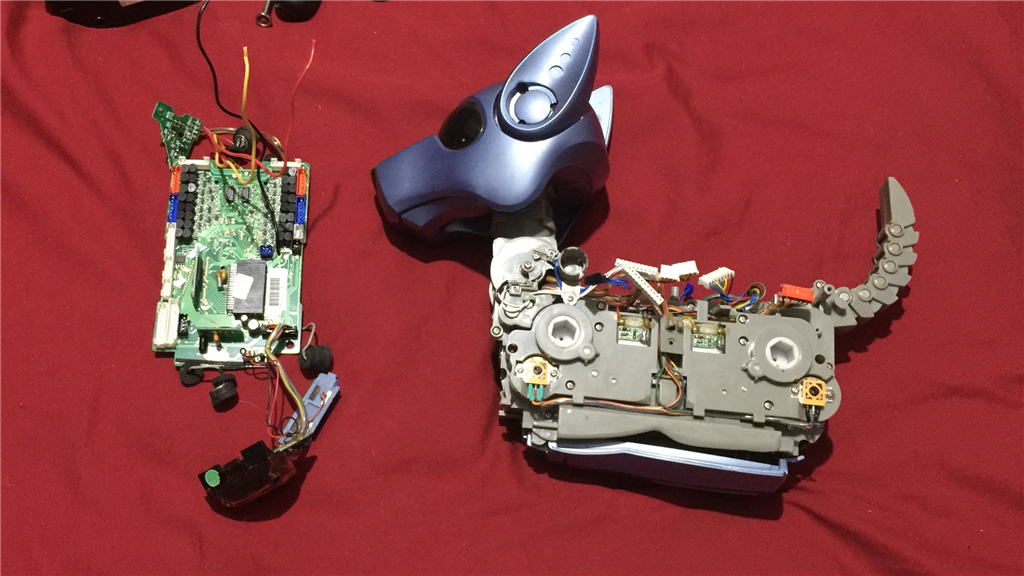
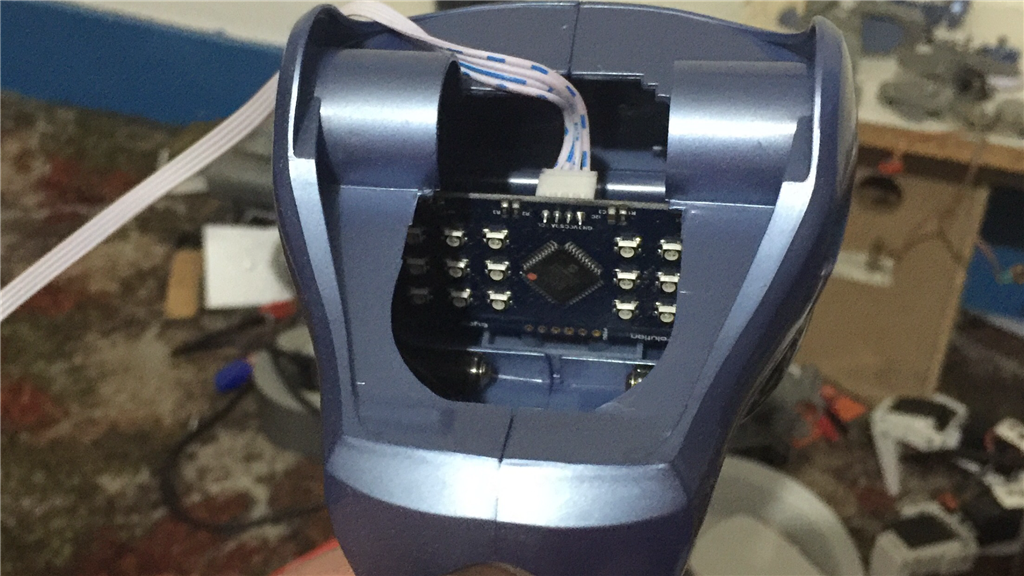
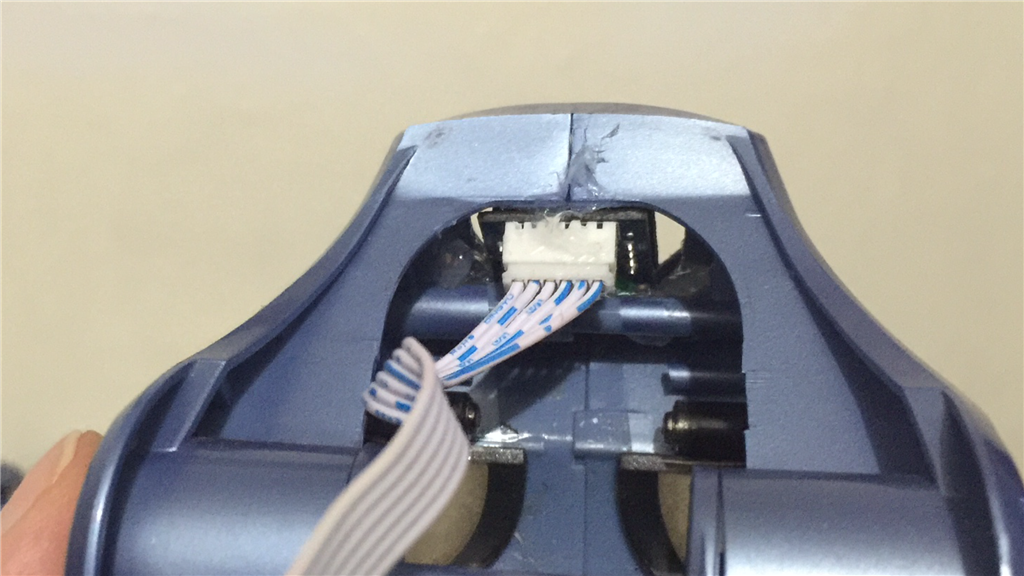
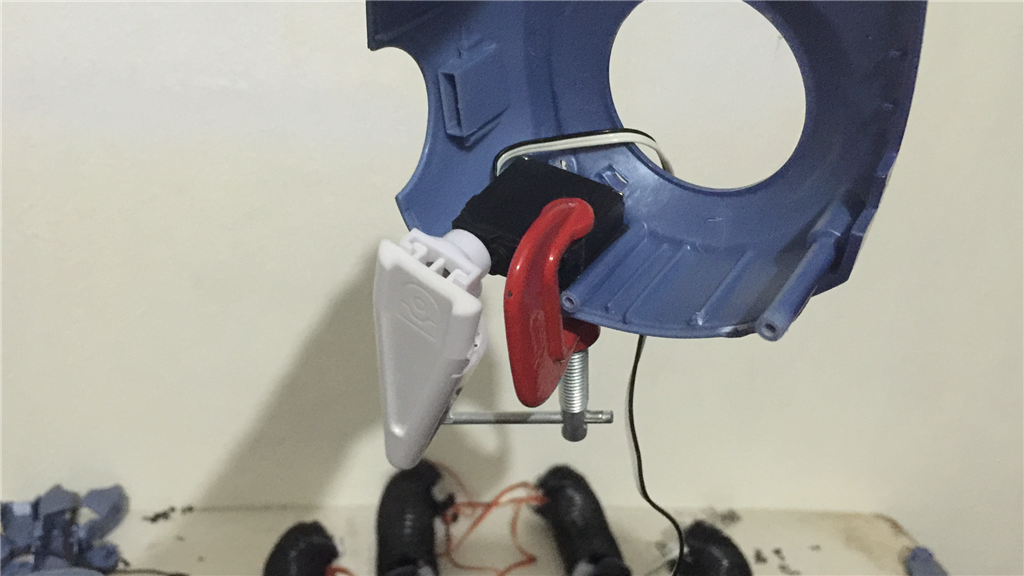
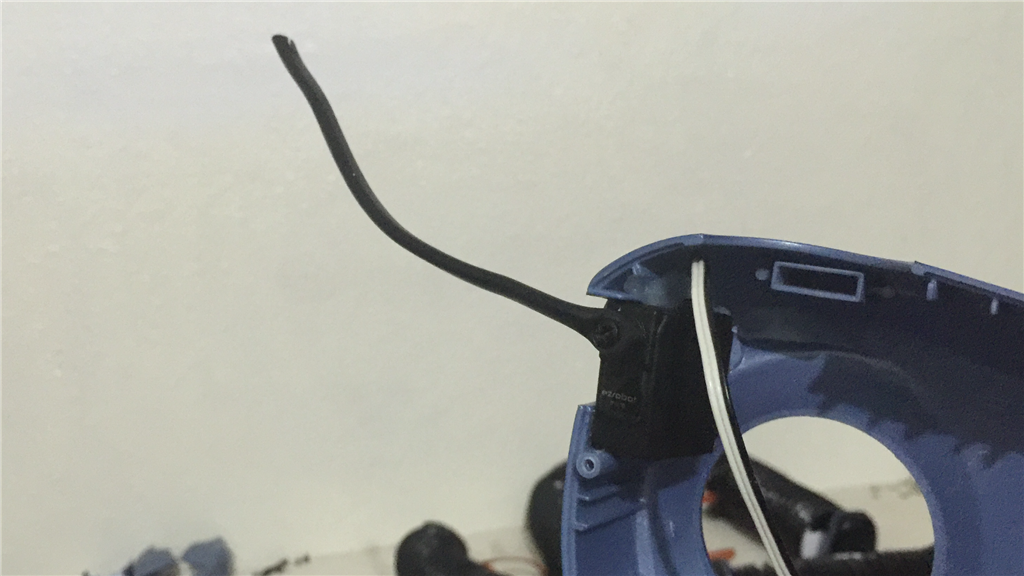
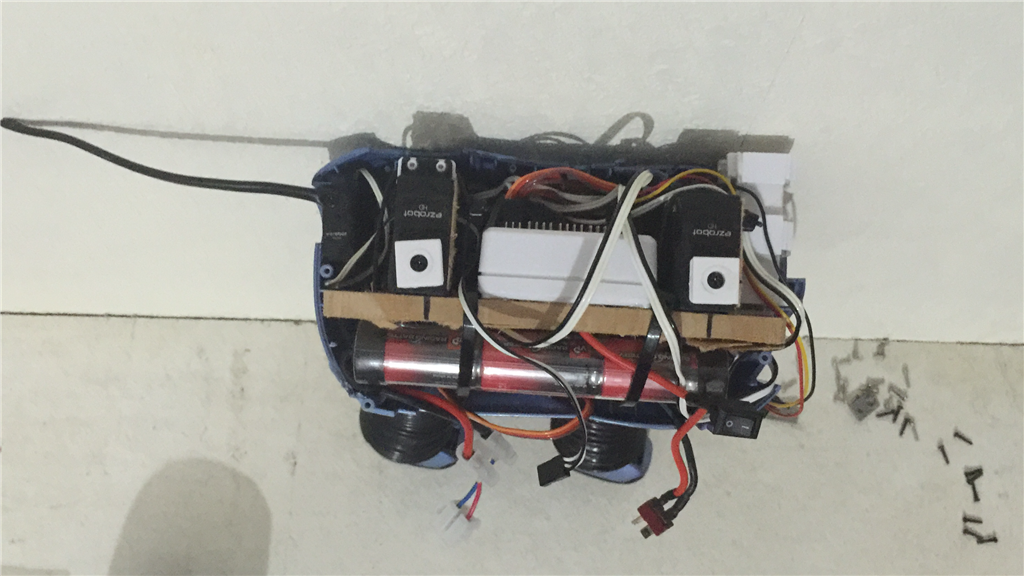
Here is the chest IR sensor and main PCB. Unfortunately, all of the sensor modules, sound, ballance, body IR in the dog are imbedded on to the main and head PCB's, so no EZ-B integration which is a shame. Guess I'll have to make a small shopping list... User-inserted image

User-inserted image

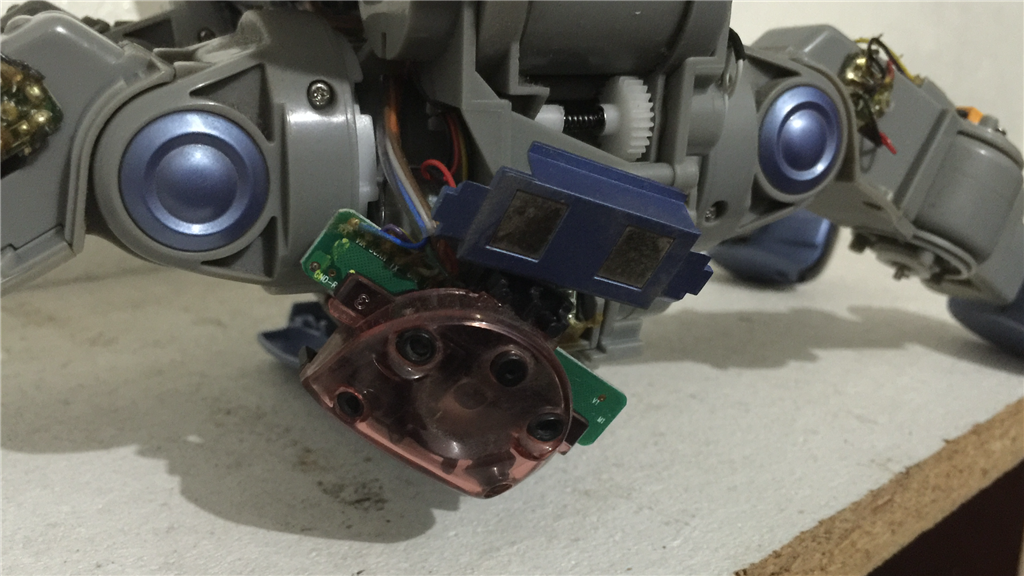
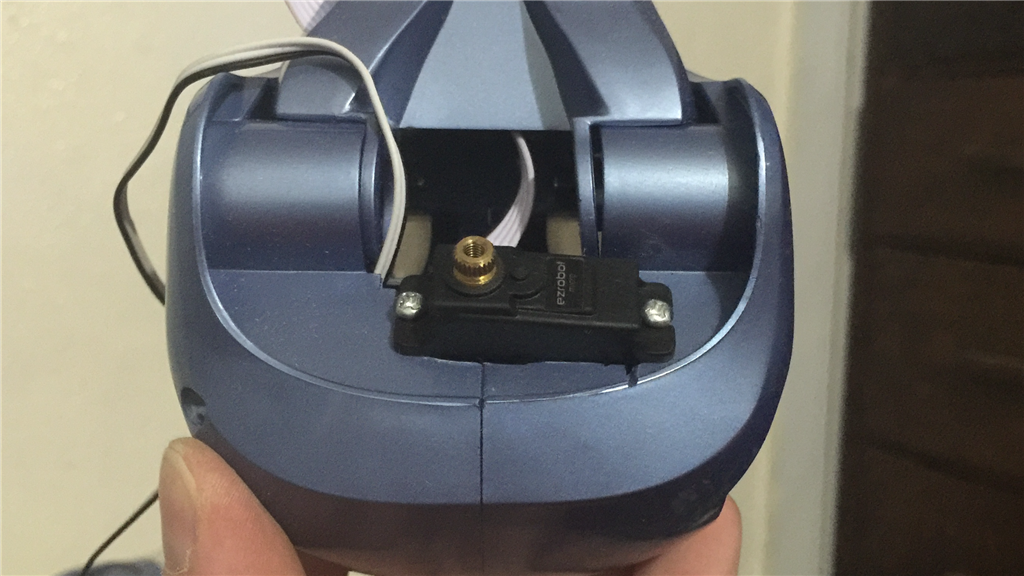
A couple of shots of the rear. The tail is also run off a DC motor and I'm not sure what the enternals look like. I may strip it down tomorrow and have a look... User-inserted image

User-inserted image

These are a couple of the DC motors that makes the thing move... User-inserted image

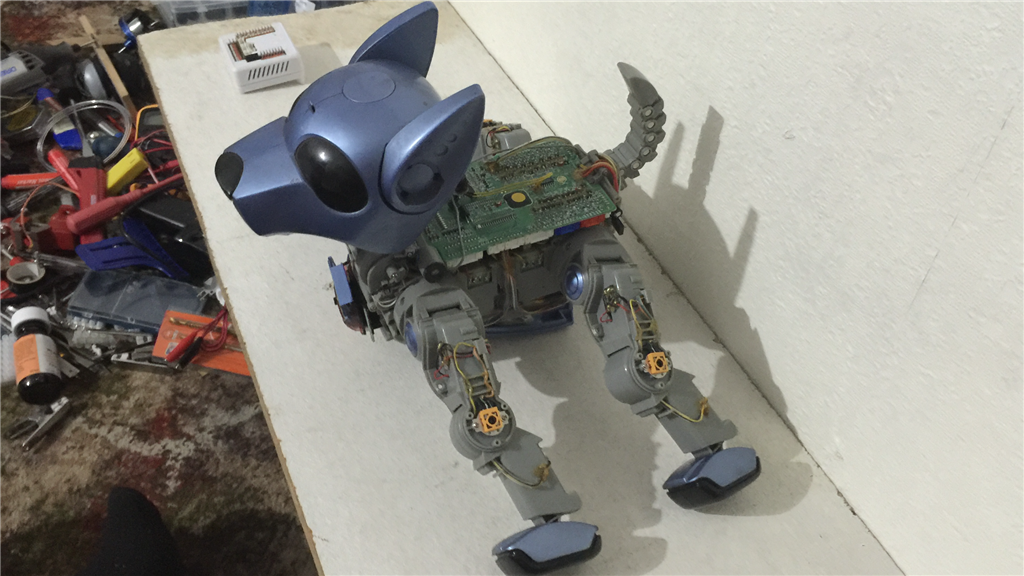
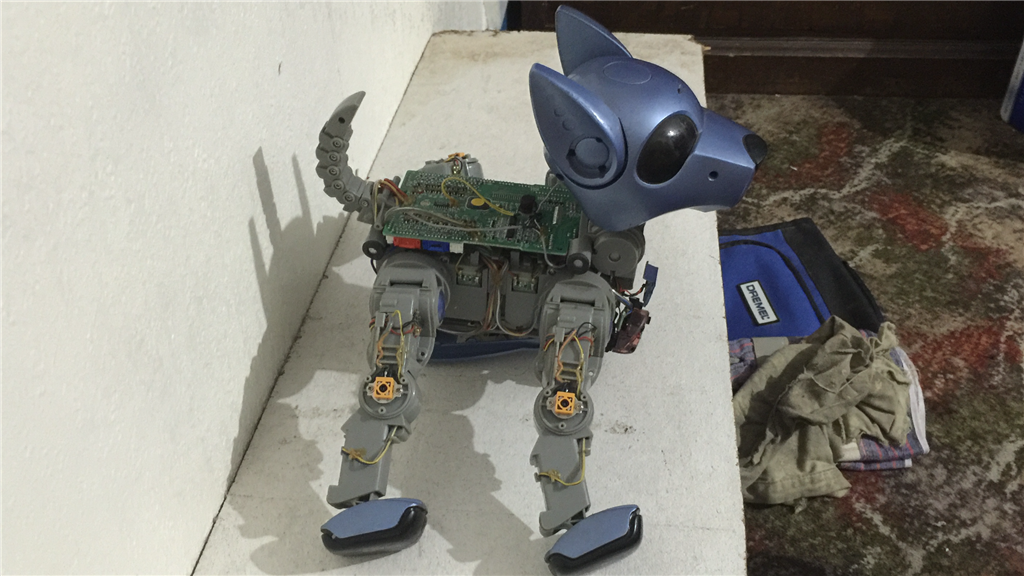
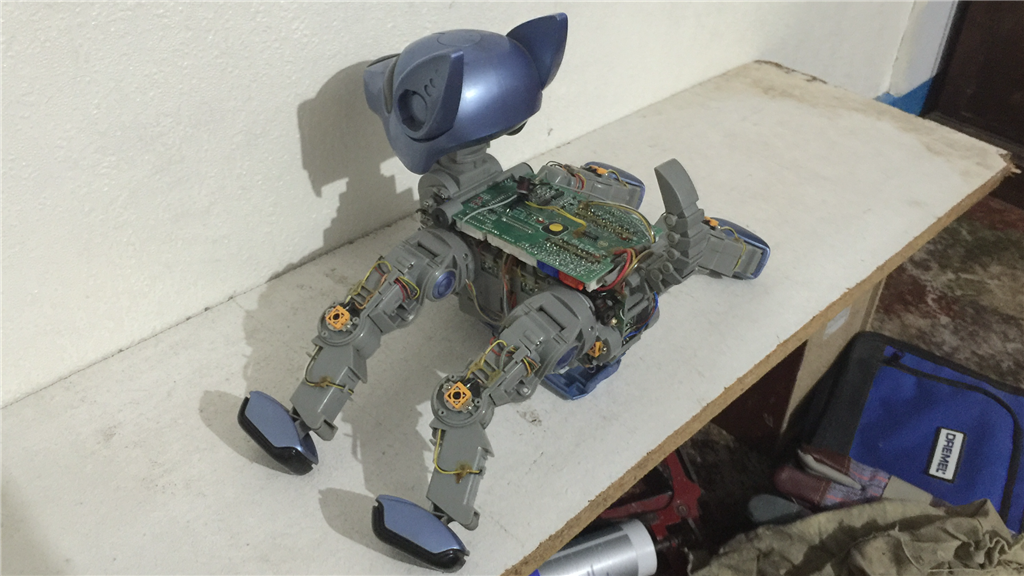
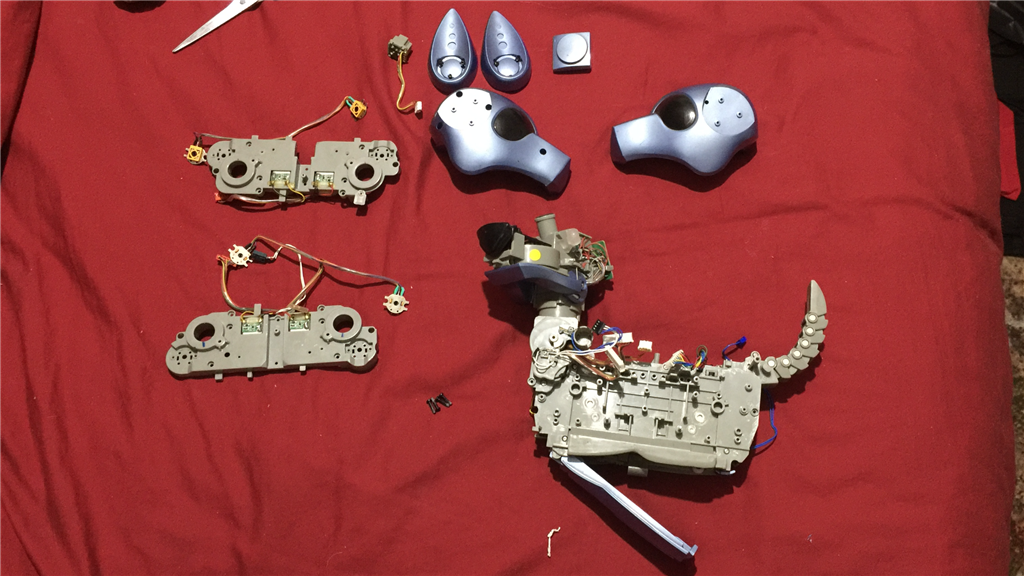
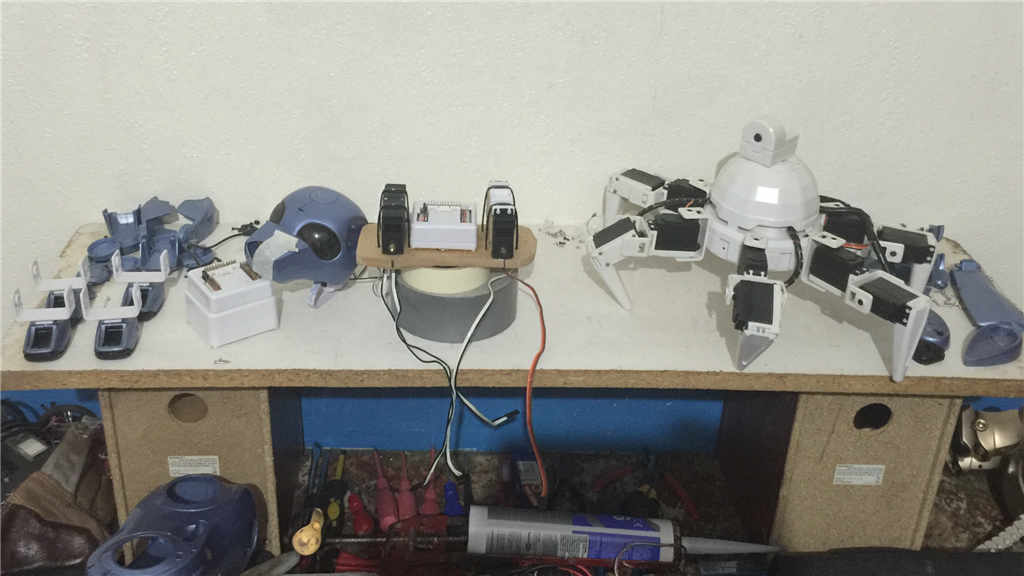
And here he is almost completely stripped apart. Apparently, he is made up of 1400 parts. I'm telling you, most of them parts, were screws. So many screws eek ... User-inserted image

User-inserted image

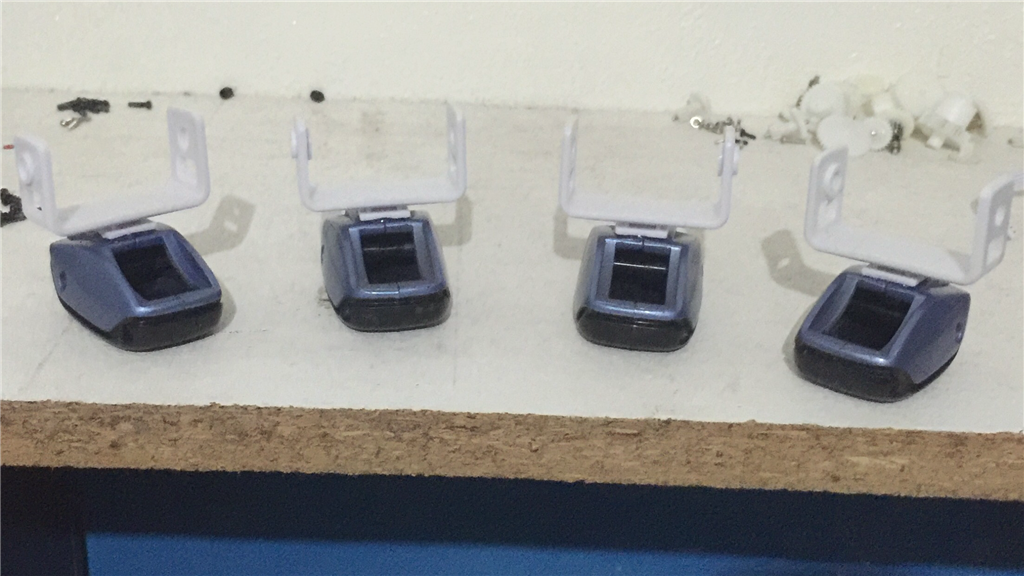
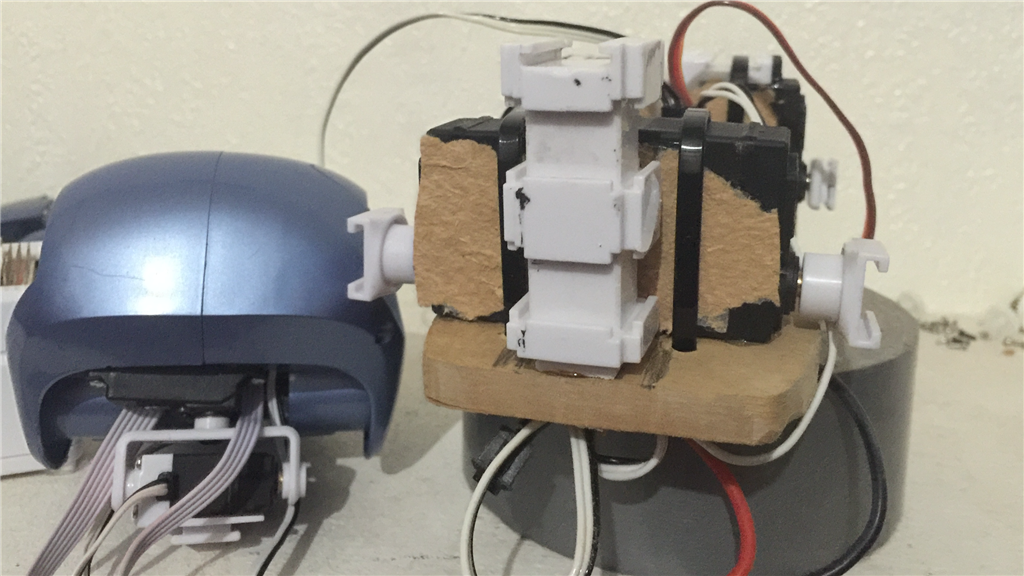
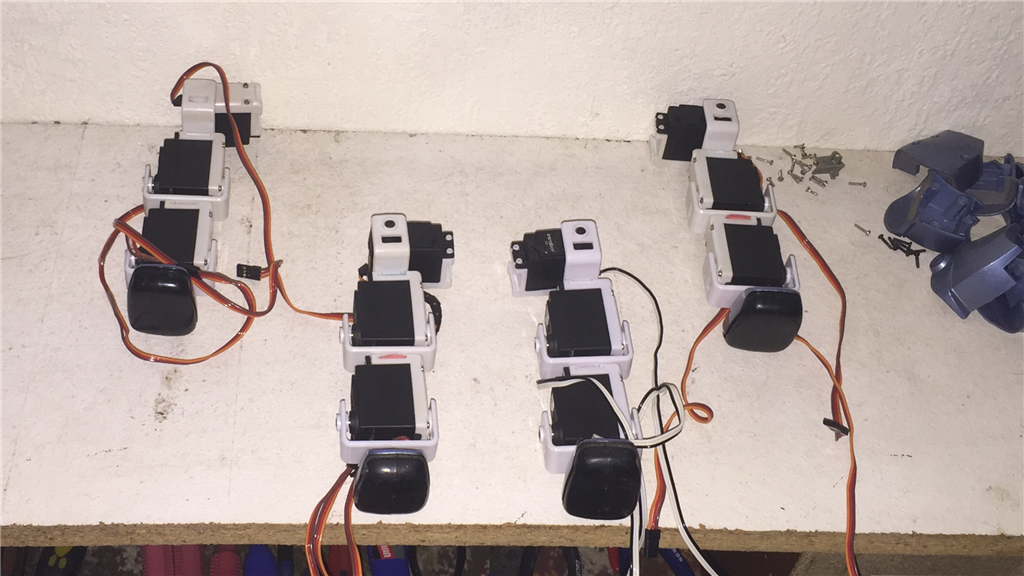
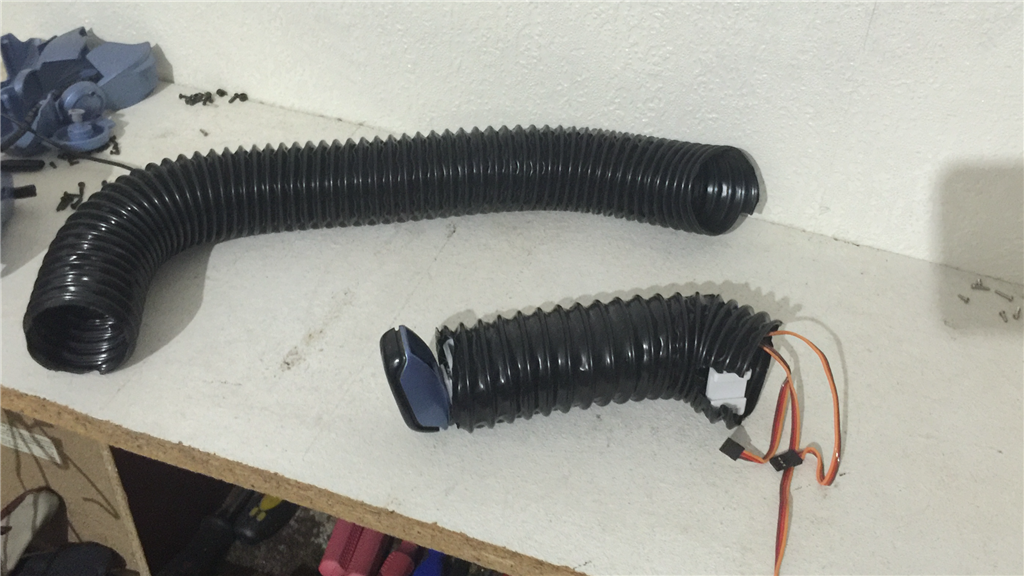
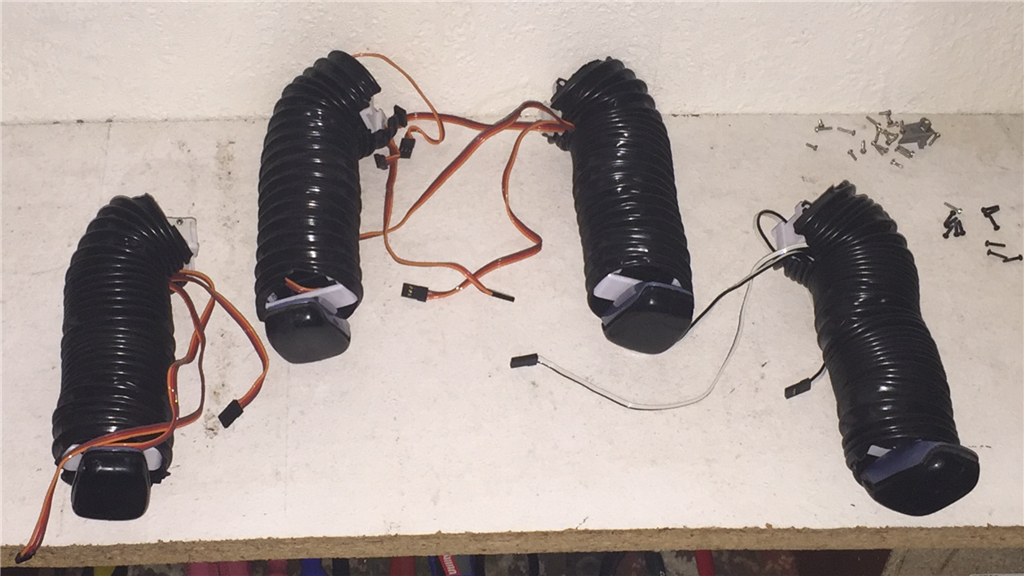
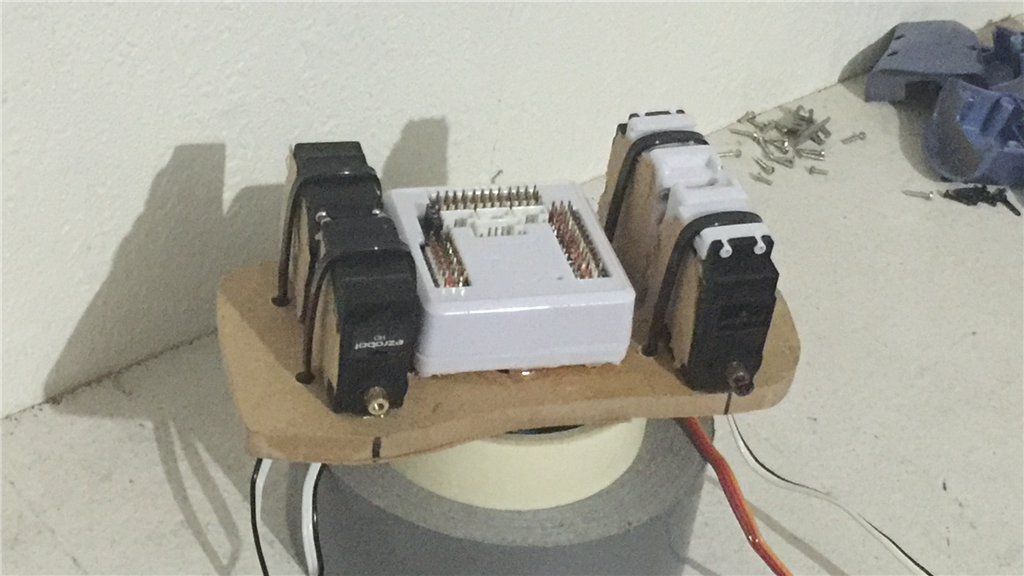
And these are the usable parts that I'm left with... User-inserted image

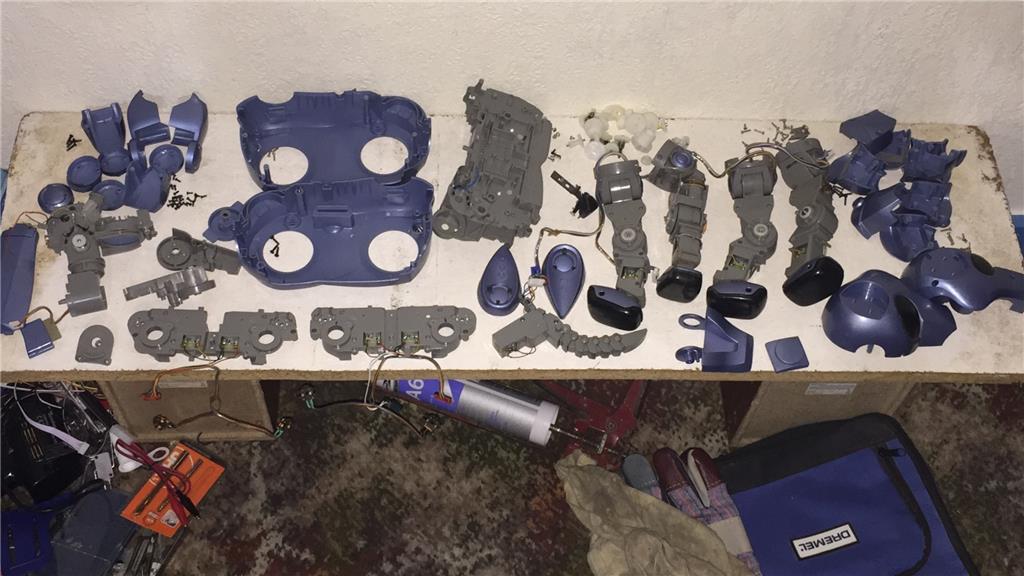
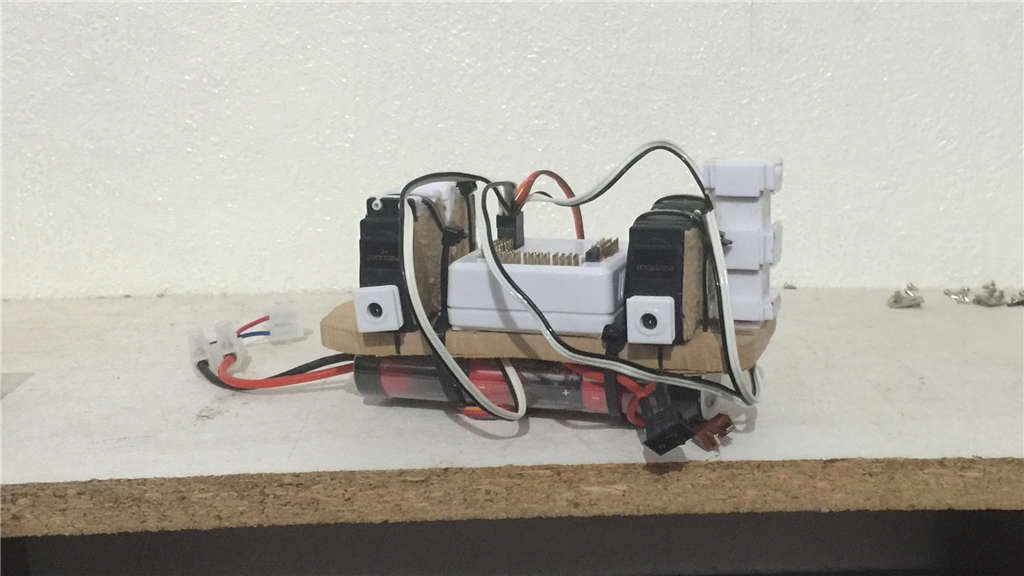
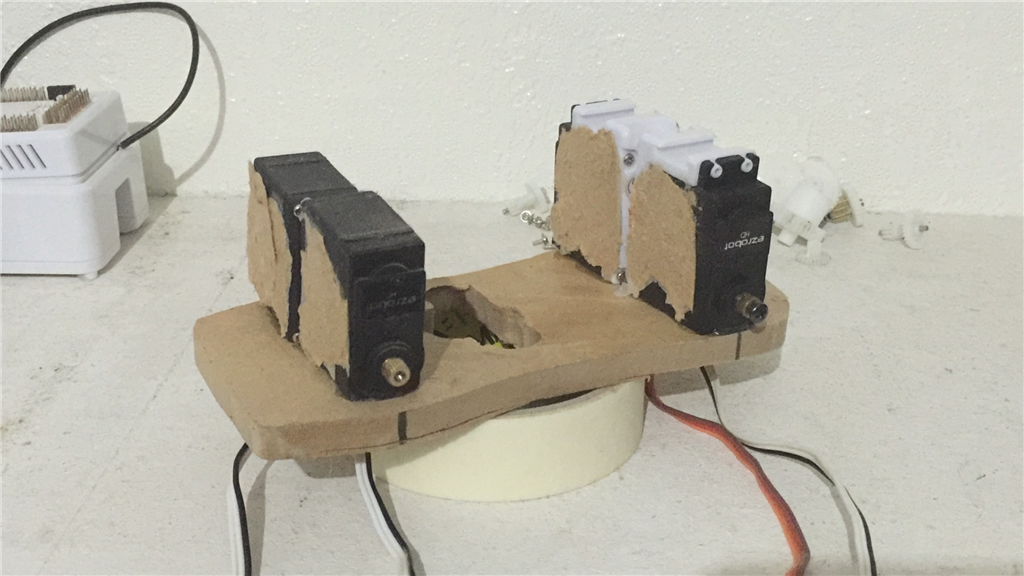
So I have a choice of using the inner skeletal frame and cut a load of plastic out of it to fit the four shoulder servos, EZ-B, and battery (tight fit)... or make a flat platform to fit everything to which would give me much more room, but would need to find a way to attach the body panels. I've got a few things that may work with this build, I've just got to sort out the best way to go about it. My bran needs a good workout after the Xmas holidays.

Stay tuned.

PRO
Belgium
#2  

amazing whats all in there. sick

United Kingdom
#3  

Yeah, there's a lot to it. I have to say that these were really well put together.

United Kingdom
#4  

Hi Steve, You do nothing by half! Interesting little project ??

I just love this, and l'll be very interest to see how you get the EZB to fit in, and all the Servo's.

Keep posting up-dates, looking at one on eBay at the moment without battery.

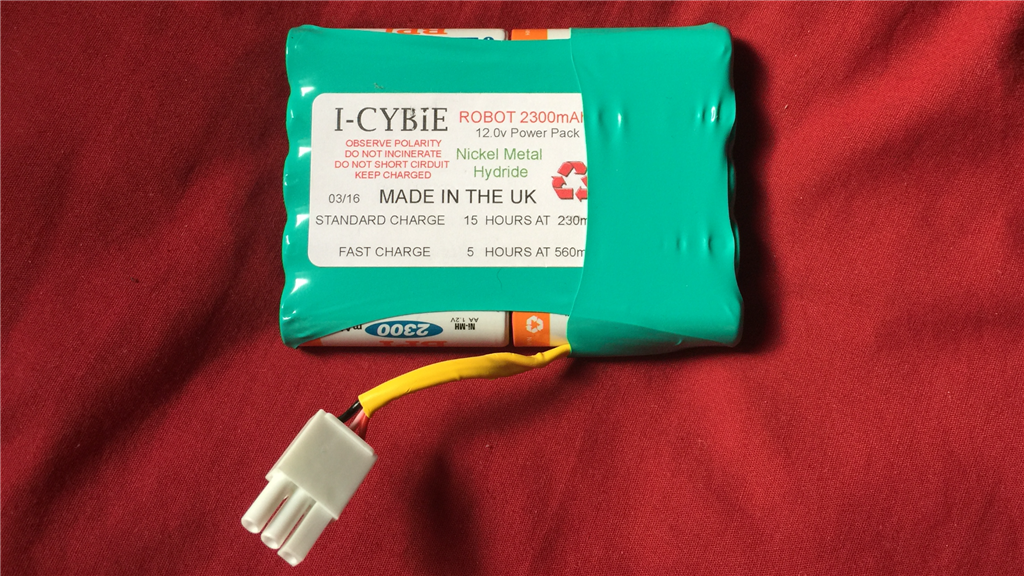
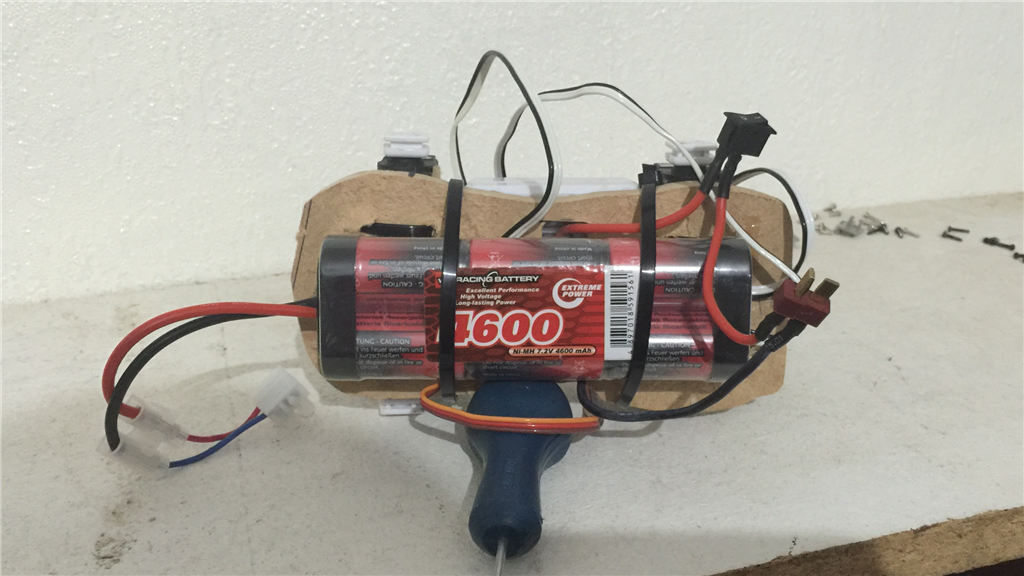
The battery is a 12v. correct? I heard someone say it has a centre tap 6v off the battery for the electronics, is that actually on the battery output, or carried out on the PCB board?

Cheers Chris.

United Kingdom
#5  

@Cem.

Quote:

and l'll be very interest to see how you get the EZB to fit in, and all the Servo's.
Yup, it sure will be, as I'm still scratching my head about it. :D

Yes, the battery is a 12v pack, and the actual 6v split is done on the battery end. See below...

This is not the original battery, but it's the same design. User-inserted image

The pink middle wire on the battery, and yellow wire on the loom is the 6v split. The red and black wires make up the 12 volts , and you charge the battery as a hole 12 volt pack with just the two red and black wires. User-inserted image

Hope that helps.

I'm looking to use a LiPo or NiMH and hopefully have easy access to it. I've got a couple of hours to play tonight, so I'll decide on what the best way to mount the EZ-B will be.

More updates soon.

United Kingdom
#6  

@ Steve G.

Thanks for the battery photo's, That explains it well. I've purchased the one on Ebay UK so I've committed myself. :)

I'm going to look for an LiPo as an alternative, and build a regulator to split out the 6v supply.

The originals batteries off Ebay are expensive, and this iCybie comes without the battery, but I got it very cheap.

I hope it doesn't distract me to much away from still building my Inmoov. :)

Thanks Chris.

#7  

Hi Steve,

WOW you have a challenge ahead of you, as if ALL your others weren't challenges.. LOL. It looks real cool and so many parts.. Yikes ! I hope you remember where it all goes.

I was wondering if you are going to make a mock up body to make everything fit then cut up the old main body and mount the stuff, or make all new? I was sorry to hear none of the sensors were salvageable. Can any of the actuators be re-used? Are standard servos going to fit? or you going mini's.

Anyway, enjoy the build and I look forward to your progress posts.

Ron R

United Kingdom
#8  

I'll follow this with interest!

I always wanted an Aibo, but when Sony discontinued them, I thought it would be best to go my own route so it could grow into more real world situations. You are doing just that with your z-cybie!

United Kingdom
#9  

@Cem.

No problem about the photos. Glad they helped.

Nice one on getting the one of eBay. Yes the battery packs are a bit pricey, and hard to come by, and the non original battery packs are about £25 which you may have already seen.

United Kingdom
#10  

@Ron.

Yes it would be a challenge putting it all back together, but the more I think about doing the conversion, it seems I'll be using a lot less original parts I'll be using. Basic, just the body and head panels. Don't think I can really call this a hack... more of a rebuild.

Still not sure about the layout for the insides just yet. The way I have it worked out will be to use standard size HD servos for the legs, and micros for the head. I should just get two rotation servos sitting back to back for the shoulders, and the rest will be a good height...

User-inserted image

User-inserted image

User-inserted image

Definitely looking forward to getting stuck in. Lord only knows what it's going to turn out like thought, lol. :)

United Kingdom
#11  

Thanks Dan.

I always fancied one of the Aibo's too, and just missed out on one for a good price on eBay a couple of years back. I thought about making my own quadruped using EZ-Bits some time ago, but never got around to it. This is he next best thing I guess.

#12  

Are the encoders for the motors potentiometers ? If they are maybe you could wire them up as servo. Connect them to standard servo internal boards.. Just a thought.

United Kingdom
#13  

@rb550f.

Yes, they are potentiometers that fit to one of the gears. Your idea was one of my initial thoughts, but to keep all 16 motors and gear mechanisms in place would mean zero room for the EZ-B or anything else, which is a shame. And I don't think I would have enough ports to hook up all of the encoders and H-bridges anyway.

Thanks for the idea though.

United Kingdom
#14  

I was back in my attic today and found another mistery box with some goodies inside. Looks like I have found my next mini project...

User-inserted image

I though this was smashed to pieces and was thrown out, but it's in pretty good condition. It's not the U-command version, but the interactive one and stands about 25cm tall. Can't find the control for it, but no matter as I'll do a full EZ-B hack for this much like DJ and others have done.

Anyway, back to the dog, and I've got the head setup worked out. I've taken the camera, two micro servos, and RGB array out of JD's head and worked out where to fit them in the dogs head. The RGB array fits just nicely behind the tinted eye covers, the camera will go in the nose, and a bit of cutting in the head panels should house the pan micro servo quite well.

I'll hopefully start work on that tomorrow.

United Kingdom
#15  

UPDATE: Day 4. 26/01/2016

Time for a little progress report. This really is going to be a rebuild and not a hack, otherwise there just won't be the room I need. Anyway, I started work on the head by fitting the RGB panel behind the eyes, and attached the camera in to the nose...

User-inserted image

User-inserted image

User-inserted image

I'll look to using the original nose button to cover the camera up and drill a hole for the lens. Next, I cut out a small MDF platform and mounted the four rotation servos for the inner shoulder joints...

User-inserted image

User-inserted image

Then I fitted some servo brackets to the original feet. The gaps that are showing on the top of the feet will be filled in with something...

User-inserted image

User-inserted image

Next I'll strap some zip ties around the shoulder servos for added support, then see about fitting the EZ-B. I'll also fit the micro servos to the head, then to the body.

That's all for now.

PRO
Belgium
#16  

its very injoyeble to see this build.

United Kingdom
#17  

@Steve It's coming on well, and as you said it not just a hack but a complete Rebuild. I like the camera in the nose, but could this be a problem when the head is in the normal position, and the nose pointing to the floor?

I've found a very cheap solution for the battery pack, I have two 6v AA Ni-MH 2800mAh Packs, which I plan to put in series for 12v it makes a simple solution to use a centre tap for the 6v supply. I will put then together in the orgination as the original battery to fit in the I-Cybie. Still waiting for my I-Cybie to arrive!

Chris.

United Kingdom
#18  

@nomad.

Yeah, it's quite a fun little project. Much easier than working out designs and building larger robots, although I do enjoy that too.

@cem.

Nice idea with the battery, and certainly a cheaper solution, and should give you a really good run time.

In regards to the camera position, you do make a good point. But, you've also got to remember that the little fella is going to be completely reprogrammed using ARC, so I can (and will) have the default head resting position facing forwards instead of pointing at the floor. I've got a sharp IR and a PIR sensor winging their way to me, so these could also go towards motion detection to activate or disable the camera.

#19  

Hi Steve,

He is coming along well. I like the head design. Camera in the nose will look good and is my favorite location. I am not a fan of the "gun shot hole in the head" designs. Noses make good places for "eyes"...LOL.. I look forward to your continued progress reports.

Ron R

He sure has a Snoopy looking face..

United Kingdom
#20  

Cheers Ron.

I used to love snoopy when I was a kid. Yeah, the camera in the nose seemed a better choice for this, and hey, don't dogs kinda see with their very sensitive noses anyway? ;)

Hey, what happend to your Wallmart R2 project?

#21  

He is running but I am wanting to get the navigation working. I am embarrassed to show him incomplete just running on a AutoPosition script. I am still waiting for an update on the compass so I can continue. I also will be adding one or more pings, which I want to hide somewhere on him. I let him out once in a while to stretch his legs.. I mean spin his wheels or what ever.

Hey, just a thought, instead of the ears that came with Eddie, why don't you change them to Snoopy ears. That way he fulfills an old memory.

In the mean time "Anton" has taken over my time. He is a talking head which will have moveable eyes, neck functions, a camera installed (in his nose), possibly a moveable jaw, and can control lights, and coffee maker on command. At the current time he has a Cepstral voice, a limited vocabulary and responds to phrases loaded. He will be posted soon. I have some of it built and programmed, but still have more to go.

Some day I want to combine all my robot projects into one. This is a way to develop all the parts and gain the knowledge I need. I am real thankful for the EZB.

Ron R

United Kingdom
#22  

You and me both Ron. EZ-Robot certainly has reignited my passion for robots. :)

Thanks for the update. I remember reading one of your threads about the compass, and wondered if that was for R2. No need to feel embarrassed about showing a half done robot, as it's all part of the process.

Your "Anton" project sounds interesting. I'll look forward to the time when you share your work on that. Sounds pretty sweet.

United Kingdom
#23  

Sorted out the final few boxes from my treasure trove of an attic. I knew I had another one...

User-inserted image

This one is in really good nick, still working and has it's remote. I also found an old Commodore 64 computer. No idea if that works. It's like christmas all over again.

Not a bad week all in all. :)

#24  

Keep looking for the cartridges, they must be somewhere... LOL

Looks like you got a second one as a keeper, with remote and now a spare battery and parts.

Ron

#25  

@Steve Seriously? You have a VIC64? I would seriously consider buying it off you if it worked... That's the first computer that I ever programmed (actually it was a vic20, but same thing)...

United Kingdom
#26  

@Ron.

Cartridges, if you mean for the 64... tape deck dude, lol. I'm currently charging up the battery for the gold I-Cybie, but it's probably only got a short charge cycle. Got a new one though.

@Richard.

I know right. I used to have the VIC 20, then the Spectrum 128k, but the 64 was always my favourite. Didn't really do much programming myself, mostly played games (if I only knew then what I know now about how important computers are nowadays). Waiting 3 or so minutes for it's cassette deck to load a game, then hurray. Out Run was a cool game.

I did actually plug it in tonight, but unfortunately nothing happened. I won't give up though and I'll investigate further. If I do manage to breath life in to it, you're more than welcome to have it (after I have a quick play with it first, lol). I wouldn't take any cash from you though. It would be great just to pass it on to someone who appritiates what a wicked bit of kit it was for its time. :)

#27  

You guys were lucky, ,, I had to build my Sinclair

Ron R

United Kingdom
#28  

@Ron.

I tell you, digging out that 64 sure bought back some fun memories. The one thing I remember about my Spectrum 128 was loading up software from its built in tape deck... the loud and irritating "whining and screeching" noises. Commodore never did that, lol. I thought I might of had a Tomy Trax buried away, but I think that went to "a better place" a long time ago. Shame.

It's certainly been a nostalgic few days. :)

United Kingdom
#29  

UPDATE: Day 4. 26/01/2016

A bit of an EDDIE update. Well, things were all coming together, the shoulder servos were solidly mounted and aligned nicely, the EZ-B just had room to fit nice and snug... then I had a Homer Simpson moment. The EZ-B was a nice fit, but I didn't take in to account the protruding peripheral plugs (servos etc) when plugged in to the ports. The extra height meant NO ROOM.

User-inserted image

Yep, what a doughnut eyeroll. So a re-design was in order. I peeled off the servos (and took some MDF with them. That E6000 glue is good stuff), flipped the platform over, and re-mounted the servos so that they now stand on end. I had to cut a bit of plastic away from the inner body, but it's a good fit. Now the EZ-B fits in-between the servos with the power loom fitting snugly in a recess cutout.

User-inserted image

User-inserted image

The head is almost done now, with the pan and tilt servos fitted in place, and a micro servo wedged in to operate the mouth. I had to do a bit of extra cutting, but everything fits nicely now.

User-inserted image

User-inserted image

User-inserted image

As I mentioned, E6000 glue is good stuff, but I decided to put in a couple of screws to properly secure each foot to the brackets, as the feet will tack a lot of weight and movement.

User-inserted image

Now that I'm back on track, I can get on with adding a few sensors, fitting the head to the body, and to start on the legs. If only Six new what's in store for him tomorrow, he'd run a mile.

User-inserted image

Barring any more "Doh" moments, the next update should hopefully having the little dog looking more like... well, a dog. ;)

#30  

The build is looking great Steve. Keep up the good work!

#31  

Looking good, even with the Homer mod...

Ron R

United Kingdom
#32  

@rgordon and Ron.

Thanks guys. Hopefully I'll make a lot more progress later today. Fingers crossed. :)

@Richard.

About the C64, I believe it's the power supply that's faulty. A just hooked up a temporary supply and the little red light light up, so it's looking good so far. A friend of mine says he has a spare "working" original supply that he will give me next week. If all is good... it's all yours buddy. ;)

#33  

@Steve... Sounds awesome... Do you have PayPal? How much do you want for it and shipping to Ontario, Canada?

Can you check what kind of video output it has? I am guessing VGA as If I remember correctly you can hook it up to an old TV?

Cheers Richard

United Kingdom
#34  

Hey Richard.

I'll check the ports later and let you know, but I think you're correct though. That's how I used to use it, on an old tube TV. Like I mentioned, I don't want anything for it bud, but once I confirm everything is hunky-dory, I'll investigate shipping costs and email you. (Yes, I do have a PayPal account). :)

United Kingdom
#36  

@Steve,

My Cybie arrived today, and its smaller than I expected, see why its so hard to mount every thing in for your EZB hack/rebuild.

I had to modified the 6/12v battery pack I made up as its a VERY tight fitted for the battery, also I brought 3 pin tamiya connectors, for the 6v & 12v supply, but the 3 pin connector on the Cybie must be a special as it a lot smaller, so I put a tamiya connector of both ends, and it just fits in. I'll also make up a small convertor cable for the Charger.

User-inserted image

I got it working, but noticed it doesn't have a on/off switch, as soon as you connect the battery and close the battery lid it powers up, the battery lid as the push switch, but you can't power it off, without removing the battery which is crazy, you can only put it in a pause mode by the remote! I think I'll put a switch on it somewhere? I'm not sure if I going to EZB mine yet, I wait to see how yours goes. :)

By the way where about do you live in the UK, I live in Berkshire near Reading.

Chris.

United Kingdom
#37  

@Richard.

About the C64, It actually has an RF/RCA port which I used to run it on a CRT telly, but there are S-video to VGA converters to run the 64 on a VGA monitor if you wished. Apparently the C64 runs great on an LCD flatscreen if it has S-video. :)

United Kingdom
#38  

@Chris.

Hey, that's great that your little guy arrived. Yes that are not the biggest robots in the world that's for sure (I'll post an update in a bit). Have to admire the the assembly of that thing.

Nice work with the battery pack. Even the originals are a tight squeeze, but then he (or she) does throw itself around a bit when doing tricks, so I guess it needs to be a snog fit.

That was one thing I forgot about, was the lack of power switch. I haven't used it for years and thought I was going mad when I couldn't find the switch, then remembered it didn't have one confused. Bit of a design flaw in my opinion, so I'm fitting one in my rebuild.

I used to drive around the Berkshire quite a lot a few years back. I'm down in (currently very windy) Surrey near the Wimbledon area.

United Kingdom
#39  

UPDATE: Day 7. 29/01/2016

I had a bit more time to get a few more bits done last night, and it's starting to come together now.

User-inserted image

I've used an EZ-Bit extension block for the neck support which is screwed to the body platform.

User-inserted image

User-inserted image

I've fitted the feet to the the leg servos, calibrated the servos, and tried to use the original leg covers to finish the legs off. Unfortunately, even with cutting a load of plastic away to make them fit, they didn't fit nicely and quite frankly, they looked rubbish. So, a length of flexible black corrugated hose cut in to four pieces, then feeding them over the servos, I had instant leg covers which don't look too bad and have enough movement.

User-inserted image

User-inserted image

User-inserted image

Next job was to finish its tail. I was going to use an EZ-Bit for the tail, but I would have had to cut a lot away from the rear end for full freedom of movement. A piece of two core wire, pulled out the core, then screwed the sheath to the servo. Instant tail.

User-inserted image

User-inserted image

Something that I was trying to work out, was what battery would be best to use. I thought about using Six's LiPo pack, but I would like to get an auto dock 'n' charge thing going on. So I went with a 6 cell 7.2 NiMH pack as this would add weight to make the little dog more stable when walking, it is a perfect fit which makes all of the internals secure when he will do his tricks, plus it should give him a nice long run time between charges. This is simply zip tied to the platform.

User-inserted image

User-inserted image

Final job of the evening was to start putting things together. The platform slotted in to place, and two legs were attached. I now have half a dog...

User-inserted image

User-inserted image

Next jobs will be to fit a PIR and Sharp IR sensor, and the 4 in 1 module. I also need to attach a power switch (in place, but need to house it), then he's pretty much ready to have the head and other legs fitted. Then it will be ARC time. :)

User-inserted image

#40  

Hi Steve, Once you get going, there is no stopping you... LOL... I never would have thought of the way you did the legs. They look great. Neat tail also.

I can't believe you got all that stuff in such a small space. It will be interesting where you put the sensors.

I look forward to the next updates.

Ron R

United Kingdom
#41  

@Ron.

Thanks buddy. Yeah, I thought working with such a small space might be a bit of a challenge, but it all kind of worked out... so far.

I would have liked to have used one of the feet from Six for his tail, but the cutout I would have had to if done wouldn't have been aesthetically pleasing. Using the wire covering works well and is flexable enough so it will bent out of the way when he will eventually sits.

I'm thinking the Sharp IR will go in his chest area, and the 4 in 1 will go inside along with the photosensitive light sensor, with the diode poking through a small hole. The PAR I'm not so sure about. It could go in the top back of the body, or go in the chest area as well.

PRO
Belgium
#42  

i like this build very much.

United Kingdom
#43  

@nomad.

I'm pleased you like it so far. Hopefully the building part should be done by the end of the weekend.

United Kingdom
#44  

Wow Steve, It's coming a long very nicely, shame about the outer leg casings not fitting, but the hose was a very Nifty idea and looks good. The 4600mAh battery should give you a long run time.

I'm thinking of replacing the battery lid switch for a on/off switch, but need to remove the side casings to get at it. BUT trying to get back to finishing off my InMoov build. Can you give me your email address.

Cheers, Chris.

United Kingdom
#45  

Thanks Chris. Looking forward to getting him finished now and testing out the movements etc.

My email address is in my profile.

United Kingdom
#46  

Sorry Steve, I must be blind, I looked first in your profile and couldn't find it, but that was on my iPhone, and my eyes aren't what they were! :)

Thanks Chris.

United Kingdom
#47  

It's not you Chris. I just added it back in there. I took it out a while ago as I was getting a lot of emails asking for help with their EZ-Robot issues... far to many for me to deal with.

United Kingdom
#48  

@Richard.

C64 seems to be alive, and the tape works too. Oh the memories all came flooding back. :D

PRO
Belgium
#49  

hows the dog build going.

#50  

Hey there. For anyone reading this thread which unfortunately seems to have stopped development, I have just picked up an I-Cybie myself and have begun modifications. I found a way to re-use the existing legs which will work with the EZ-B. Check out my thread here https://synthiam.com/Community/Questions/10171 if you want to know how. I don't even own an EZ-B yet but am thinking I will purchase one for this project. Regardless, this same method can be used to hack Wowwee products, possibly Zoomer as well.

United Kingdom
#51  

Not stopped development... just put on hold for a while I've been dealing with a few things such as moving house.

EDDIE has recently been unpacked so I'll post an update soon when I get back to it, finished off the last few little jobs that need to be done and start on his Auto Position control etc.

Back soon. :)

User-inserted image

User-inserted image

#52  

This looks like fun. I hope you get back to it.