

CrustyBot 1.2
The CrustyBot 1.2 is made from:
Jet3 mobility chair base Sabertooth 2X60 Motor Controller EZ-B 3.0 Robot Controller Sonar distance sensor Wireless Camera Ubiquiti Bullet 2 Access Point Tactic TTX650 6 channel 2.4 Ghz Remote Control 2 Voltage Controllers QStar 818XT 10Hz Bluetooth GPS TightVNC Software
The two voltage controllers provide voltage to run the access point and power the netbook. Camera power is provided by the EZ-B. This makes the robot totally powered from the 24v battery system. I used the factory wiring harness to allow for easy removal of the control box for access to the inside of the jet3. I just unplug the harness, and flip a lever, then I can remove all the electronics. The factory battery charger allows the robot to just be moved close to a wall outlet and plugged in to be charged. The netbook running ARC is connected to the EZ-B via Bluetooth, and also connected to the Access Point via wifi. I run the TightVNC Server on this netbook. I use my other laptop, connect to the robots access point, and run the TightVNC Client to view the desktop of the netbook remotely. This allows for great coverage and range of remote use. Thinking about using a 3drobotics APM Flight Controller and the APMRover Software for navigation around the yard. Going to put a hitch on it and drag the modified push mower around the yard maybe! Got to figure out a useful use for it so the lady can see some good from the investment... LOL We shall see what I can come up with...
Things to do for version 1.3
Going to try to figure out a way to have the EZ-B and the Remote Control hooked up at the same time. I would like to be able to have EZ-B control, but also to be able to grab the remote, turn it on, and control it without having to swap wires. Then possibly throw the APM GPS controller in there too!
Install APM Controller and run APMRover software to have the robot navigate to way-points hopefully by voice command using triggers from EZ-B via voice recognition.
Install 2 X 16 LCD for unnecessary fun and taunting messages
Maybe a Paintball gun! (For getting skunks here in the sticks)


Discover more robots
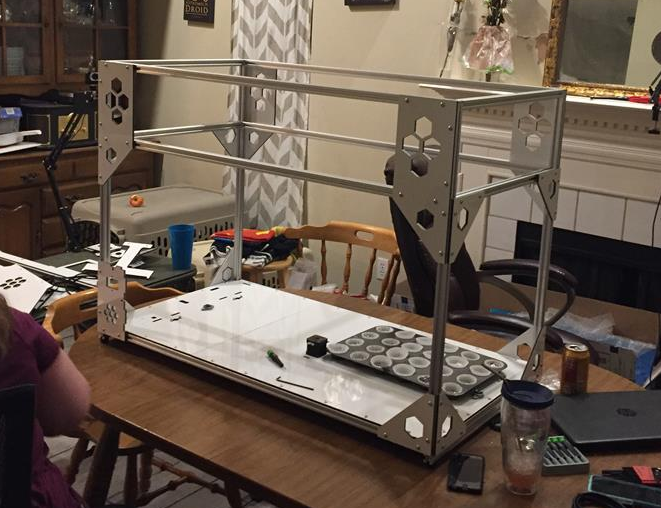
Jstarne1's Building A Giant 3D Printer 720X350x~400Mm Build...
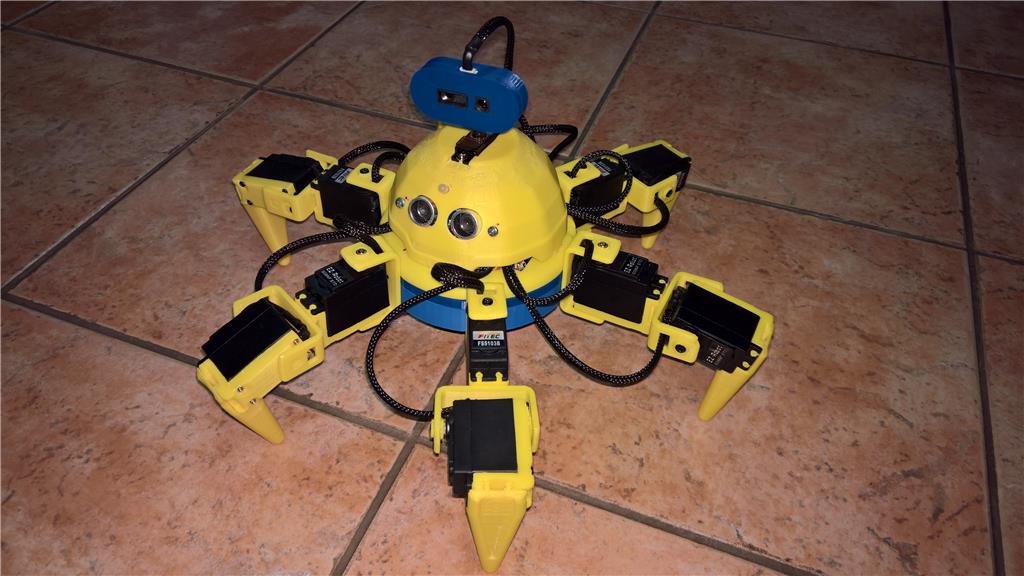
Donesvarc's Printed - Revolution Six

Looks like are very nice build! With the water tight box it looks like you were almost going for an all weather robot? How is the range of the Ubiquiti Bullet 2 Access Point?
I have about 2.25 acres here. I can sit on my back porch towards the front of the property and drive it all the way to the back of the field with a good connection throughout the yard. Had to tweak tightvnc to get the video refresh rate as fast as I could. It works pretty good... Figured I would go with the water proof box just in-case I was going to try to mow the yard with it. I want to get the GPS guidance working so I can mark way-points so it will mow the field by itself. Now that I've got it built, I haven't decided if I want to blow grass and dirt all over it. LOL
This is sweet... I love these kind of robust and durable, "functional bots"... A lot of guys on here like the "toy" entertainment robots, but these (yours) are the kind I like to build... True, I did build an R2 project and it's still on the go, but my next one will be using a Zagros robot base and EZb4 controller when it shows up... Next after that is to find a bot chassis capable of outside use.... lawn mowing, GPS, et al
Sounds like it gets really good range! Instead of mowing maybe your bot could haul a yard cart. Or help carry things from the car to the house. Keep kids off your lawn. Play hide and go seek in the back yard. With a leaf blower it could clean leafs off your drive way. With a chassis like that there are so many cool things you could do.
Just be careful when building one, cause setting up the motor controller sometimes plays havoc on the walls of the house. It's pretty powerful... LOL No holes, just a few scrapes on the wall and a small dent on the dishwasher in the kitchen...
Lovin' the crustybot
Awesome sauce! I look forward to see more pics and maybe a video demonstration. I'm in Chattanooga TN , where are you?
Thanks for the compliments! I live outside of Stephenville, TX.... I'll work on making some video so you guys can see it in action...