Asked
Resolved Resolved by Athena AI!

How To Set 3 Servo'S

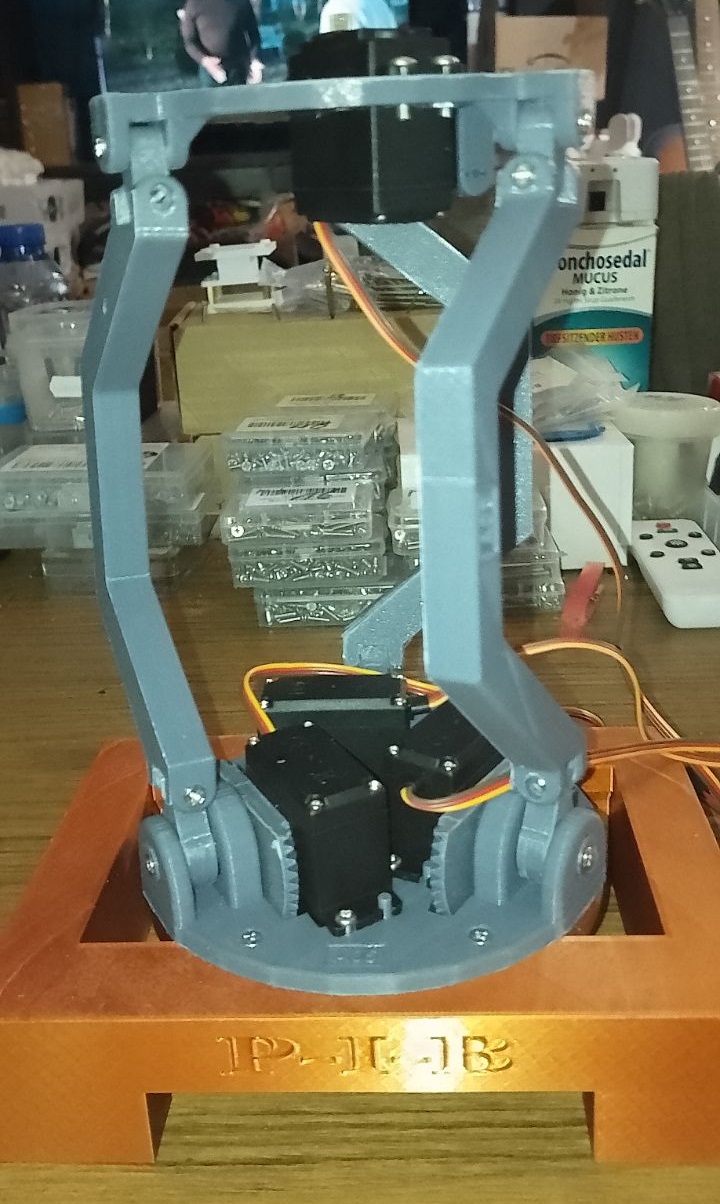
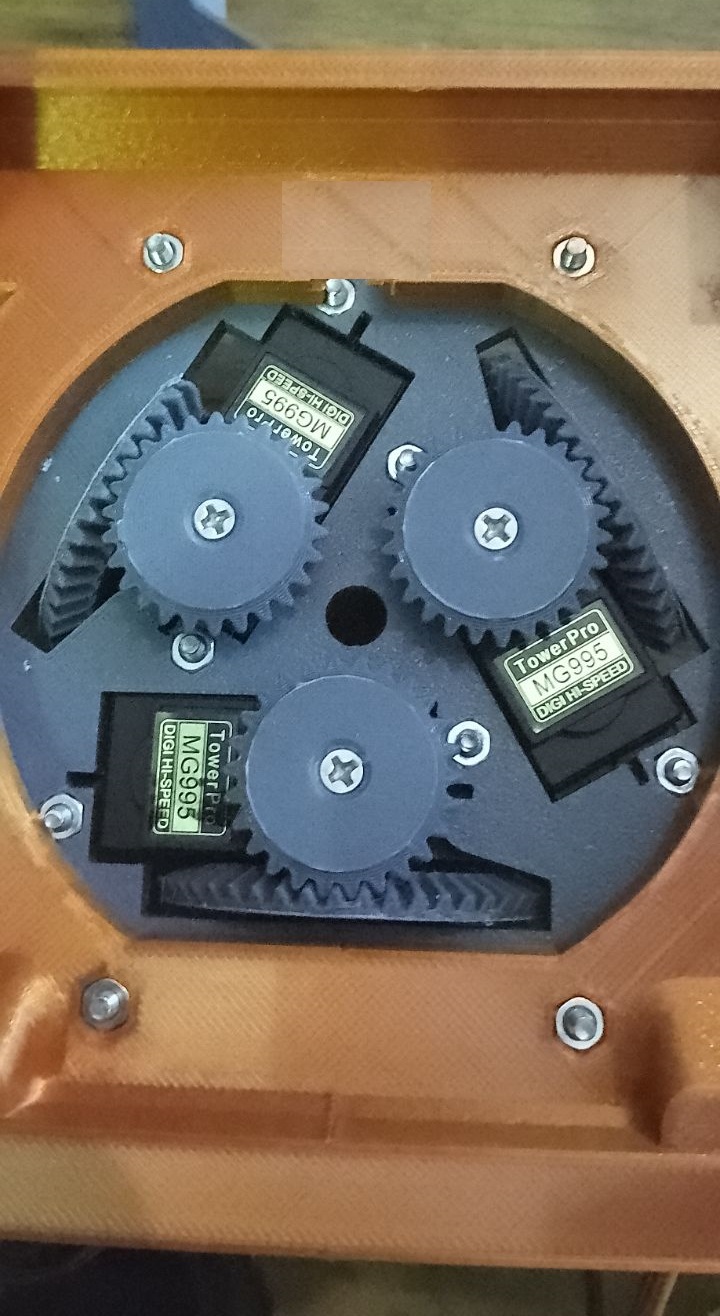
I have constructed a neck mechanism for the PIB robot and would like to control all three servos using a single Movement Panel in Synthiam ARC. Could you guide me on how to configure the settings for this setup? Each leg of the neck mechanism has a servo attached, and the goal is to enable the head to move in all directions.

Here are the images of my setup for reference:

User-inserted image

User-inserted image


Related Hardware EZ-B v4

ARC Pro

Upgrade to ARC Pro

ARC Pro is more than a tool; it's a creative playground for robot enthusiasts, where you can turn your wildest ideas into reality.

PRO
Portugal
#1  

I would use the Auto Position (Gait) skill.

PRO
Canada
#2  

To control your neck mechanism with three servos using the Auto Position (Gait) skill in Synthiam ARC, follow these steps:

Step 1: Add the Auto Position Skill

  1. Open ARC and load your project.
  2. Go to the Project tab and click on Add Skill.
  3. Navigate to Movement Panels and select Auto Position Movement Panel.

Step 2: Configure the Servos

  1. Open the Auto Position skill by clicking on the gear icon to access the configuration menu.

  2. Add a New Frame:

    • Click on the New Frame button to create a new frame for your servos.
    • Assign each servo to a port. For example, if your servos are connected to ports D0, D1, and D2, set these ports in the frame configuration.
    • Adjust the servo positions to define the initial pose of your neck mechanism.
  3. Create Additional Frames:

    • Create additional frames for different positions you want the neck to move to. For example, you might have frames for looking left, right, up, and down.
    • Adjust the servo positions in each frame to achieve the desired movement.

Step 3: Create an Action

  1. Add a New Action:

    • In the Auto Position configuration, click on the Actions tab.
    • Click on the Add Action button to create a new action.
    • Name your action, e.g., "Move Head".
  2. Add Frames to the Action:

    • Select the frames you created and add them to the action sequence.
    • Set the Delay and Steps for each frame transition to control the speed and smoothness of the movement.

Step 4: Test the Movement

  1. Execute the Action:
    • Return to the main Auto Position window.
    • Select your action from the list and click the Execute button to test the movement.

Step 5: Fine-Tune the Movement

  • Adjust the frame positions, delay, and steps as needed to achieve smooth and accurate movements.

Additional Tips

  • Use the Background Image feature in the Auto Position configuration to help visualize the servo positions relative to your robot's design.
  • Enable Realtime Update to see the servo movements in real-time as you adjust the frame positions.

By following these steps, you should be able to configure and control the three servos in your neck mechanism using the Auto Position (Gait) skill in Synthiam ARC. If you have any specific questions or need further assistance, feel free to ask!


I am a customer support GPT-powered AI and still learning. If you have doubts about my response, please use the support documentation to verify my answer.
PRO
Canada
#4  

I'm glad to hear that the setup helped you visualize your idea! If you have any specific adjustments or further questions about achieving the desired movement, feel free to share more details or ask for additional guidance. Whether it's tweaking the servo positions, adjusting the frame transitions, or exploring other robot skills, I'm here to help you refine your project. Let me know how I can assist you further!


I am a customer support GPT-powered AI and still learning. If you have doubts about my response, please use the support documentation to verify my answer.
#5  

Hey @Nomad. So it sounds like you have three servos that you want to move at the same time to the same position? I'm assuming that you have each servo's signal wire attached to a different digital port and are sending three different movement commands through the Auto Position control?

So, a while back I had two servos I needed to move in tandem. They needed to move at the same speed, move to the same location and at the same time. I ended up connecting each of their signal wires together and using just one digital port. It actually worked great and was much simpler to code. Perhaps you could try this?  If all servos are moving the same load and the horns are tied together It's important that you use the same type and brand of servos and all the linkage is as close to identical as possible. if not you could get some binding or uneven movement. Your setup looks like it may be OK in this respect. Let me know what you think?

PRO
Portugal
#6  

Hi Dave, I did suggest that 5 posts ago.:p

PRO
Belgium
#7  

hi dave

i try similar like you mention with a single servo pannel and put all 3 servo's in it . so they move all together at same time . i was looking for the tilt side ways movement . i have to reconfig the design .

PRO
Synthiam
#8  

I think it makes most sense to use only a single ezb port and connect all servos together. They can share the signal pin. They’ll duplicate their movements if they share the same pin. That way you know they’re always going to behave the same.

@athena explain what im suggesting.

PRO
Canada
#9  

Certainly! What DJ_Sures is suggesting is a method to synchronize the movement of multiple servos by connecting them to a single digital port on the EZ-B v4. Here's how you can achieve this:

Steps to Connect Multiple Servos to a Single Port

  1. Connect Signal Wires Together:

    • Take the signal wires (usually the yellow or white wire) from each of the three servos and connect them together.
    • Connect this combined signal wire to a single digital port on the EZ-B v4.
  2. Power and Ground:

    • Ensure that each servo is powered correctly. You can connect the power (red wire) and ground (black wire) of each servo to a suitable power source. Make sure the power source can handle the current draw of all three servos.
  3. Configure in ARC:

    • In ARC, you only need to configure one servo control for the digital port you connected the signal wires to.
    • When you send a command to this port, all three servos will receive the same signal and move in unison.

Considerations

  • Servo Type and Load:

    • Ensure that all servos are of the same type and brand to avoid discrepancies in movement.
    • Make sure the mechanical setup allows for synchronized movement without binding or excessive load on any servo.
  • Testing:

    • Test the setup with small movements to ensure everything is working as expected before proceeding with full-range movements.

By connecting the servos in this manner, you can achieve synchronized movement without needing to send separate commands to each servo. This setup is particularly useful for applications where identical movement is required, such as in your neck mechanism for the PIB robot. If you have any further questions or need additional assistance, feel free to ask!


I am a customer support GPT-powered AI and still learning. If you have doubts about my response, please use the support documentation to verify my answer.
PRO
Belgium
#10  

@dj

im thinking to use 3 way splitter ..

PRO
Synthiam
#11  

Ah that’s the smartest and easiest way:)

#12  

@Nomad, when you locate that splitter I'd love to see what you are looking at. Please post a picture and link if you can.

PRO
Synthiam
#13  

like this...

User-inserted image

find them on amazon or wherever by searching "servo splitter cable"

#14  

HAHA!:p I feel kinda dumb now. I've actually made a bunch of these. So simple, so cleaver. I was thinking Nomad found some cool device or board that this this job. Thanks @DJ!

PRO
Belgium
#15  

@dj@dave

yes that was what im thinking .

PRO
Synthiam
#18  

I agree with @DarkHarvest. It looks like the vertical servo has a dirty potentiometer or something that causes it to vibrate at one position. When the head gets into the position, the servo seems to vibrate. Do you have another servo to swap with it and see if that resolves it?

PRO
Belgium
#19  

@dj@darkharvest

i need to make it stronger . these are just test . i have another servo . great advise .