
Sound Activated Circuits (Leds, Lamps Etc)
One item that crops up often is sound activated LEDs or lights. And while the Sound servo control in ARC can handle this it is not perfect. So some clever scripting needs to be used to activate/deactivate/dim the lights or LEDs.
A quick little example of the outcome of the script initially done for Rex's project Questor.
So how is it done? It's very simple to be honest.
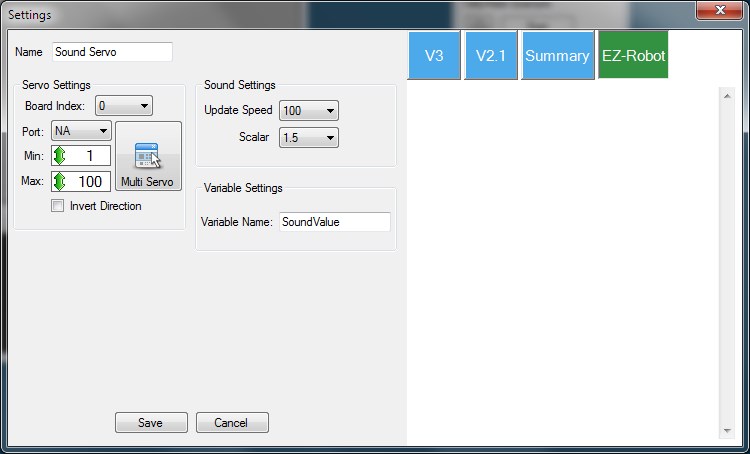
First add the Sound servo control and set it up as below.
Then add a new script control or new script to a script manager...
# Sound servo to PWM range Script
# Author: Rich
# Version: 1.0.0
# Date: 25th June 2013

# Variables (do not adjust)
# $soundvalue = auto
$pwmvalue = 0

# Main script
# Set the start point for the never ending loop
:loop
# Check the variable from the Sound servo control against a list of pre-determined levels (you may need to change these) and set the PWM value to suit.
IF ($soundvalue < 10)
  $pwmvalue = 0
ELSEIF ($soundvalue < 20)
  $pwmvalue = 10
ELSEIF ($soundvalue < 30)
  $pwmvalue = 20
ELSEIF ($soundvalue < 40)
  $pwmvalue = 30
ELSEIF ($soundvalue < 50)
  $pwmvalue = 40
ELSEIF ($soundvalue < 60)
  $pwmvalue = 50
ELSEIF ($soundvalue < 70)
  $pwmvalue = 60
ELSEIF ($soundvalue < 80)
  $pwmvalue = 70
ELSEIF ($soundvalue < 90)
  $pwmvalue = 80
ELSEIF ($soundvalue < 100)
  $pwmvalue = 90
ELSE
  $pwmvalue = 100
ENDIF

# Set the PWM with the value chosen above (you may need to change the port to suit)
PWM(D7, $pwmvalue)
# Add any other PWM ports above this line with PWM(PortNo, $pwmvalue)

# Sleep for 100ms to avoid saturation (you may need to adjust this to increase accuracy or increase stability. Reduce the delay for better accuracy, increase for better stability)
Sleep(100)

# Jump back to the start
Goto(loop)
Change the port on the PWM command line if needed, I used D7 but any port will work. Duplicate that line with a different port number if you need 2 (or more) ports to react.
You may also need to adjust the PWM values in the if/elseif part to suit your robot, LEDs, Lamps etc.
Lastly, connect up the LEDs, Lamps etc. to the EZ-B using the TIP Transistor circuit method.
Now, when any sound is detected by the Sound servo control it should adjust the PWM of the digital port in steps, as defined in the If/ElseIf/Else statement. If low level sound (in this case below 10 however that can be adjusted) the PWM is set to 0 and therefore the LED, Lamp etc. is off.
If you have any questions, queries, problems or even suggestions please feel free to ask. This is currently Version 1.0.0 of this script, there is always scope to improve I may, should time permit, add in the usual variables for ease of use (that'll be V1.0.1)

Thanks Rich... I am anxious to try this out.... as usual you are my hero sir.
This has been on my wish list for a long time.
ControlCommand("voice", ScriptStart) SayWait(" blah blah blah") ControlCommand("voice", ScriptStop) Have just tested this and works very well ...
How can I get this to work with other than "Say" or "SayWait"? For example to work with say a RSS Feed?
Rich, as always very grateful for your time & energy you are sure a GREAT asset to this community!
You could just have it constantly running, so started with a ControlCommand in an init script run on connection.
It then picks up any sound. However this does include sound picked up by the microphone (so when you speak) and any system sounds.
Or you could just add the ControlCommand to the start and end of the scripts that cause speech. There is an RSS Feed script somewhere in the forum that I tinkered with, when I get home I'll look for it and show the adjustment needed.
My solution was not as high tech but has worked fantastic for me Mini-B Speaks I used an op-amp tied into the speaker output from my sound board to my LED array. I can adjust the brightness and responsiveness of the LEDs by adjusting the op-amp output. See my build here
Mini-B Build
Rich did you get a chance to look at the script I did in this thread post #112 and view the video I posted?
I had come up with what @Herr Ball mentioned above. The nice thing about doing it this way is the LEDs are not triggered by any sounds, the loop script flickers them only while the text is being spoken. The SayWait lets the flicker loop run until the text finishes then the script is stopped by the ControlCommand("Voice Lights", ScriptStop) that I made. The only thing is I am sure that you could help me clean up the code some to streamline it.
I still want to test your latest version using the SoundServo. I have other uses for that.
Thanks
Yes I found that yesterday (seems I missed a whole page of the topic out).
With Herr Balls method one thing I thought about was if the LEDs are on when the ControlCommand stops the script, they would stay on. But an easy solution. I'll post on that something shortly
I am making a sound activated led design by voice its a VU meter it will use 30 BAR LEDS
CHECK OUT THIS PROJECT FOR DETAILS
LYNXMOTION JOHNNY FIVE PROJECT
What I did was to place a PWM(D15,0) right after the ControlCommand("Voice Lights", ScriptStop) to make sure it set it back to off when the SayWait was finished.