One item that crops up often is sound activated LEDs or lights. And while the Sound servo control in ARC can handle this it is not perfect. So some clever scripting needs to be used to activate/deactivate/dim the lights or LEDs.
A quick little example of the outcome of the script initially done for Rex's project Questor.
So how is it done? It's very simple to be honest.
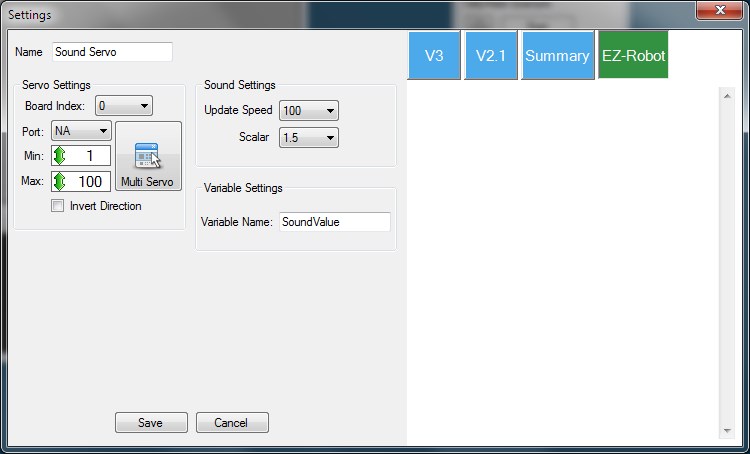
First add the Sound servo control and set it up as below.
Then add a new script control or new script to a script manager...
# Sound servo to PWM range Script
# Author: Rich
# Version: 1.0.0
# Date: 25th June 2013

# Variables (do not adjust)
# $soundvalue = auto
$pwmvalue = 0

# Main script
# Set the start point for the never ending loop
:loop
# Check the variable from the Sound servo control against a list of pre-determined levels (you may need to change these) and set the PWM value to suit.
IF ($soundvalue < 10)
  $pwmvalue = 0
ELSEIF ($soundvalue < 20)
  $pwmvalue = 10
ELSEIF ($soundvalue < 30)
  $pwmvalue = 20
ELSEIF ($soundvalue < 40)
  $pwmvalue = 30
ELSEIF ($soundvalue < 50)
  $pwmvalue = 40
ELSEIF ($soundvalue < 60)
  $pwmvalue = 50
ELSEIF ($soundvalue < 70)
  $pwmvalue = 60
ELSEIF ($soundvalue < 80)
  $pwmvalue = 70
ELSEIF ($soundvalue < 90)
  $pwmvalue = 80
ELSEIF ($soundvalue < 100)
  $pwmvalue = 90
ELSE
  $pwmvalue = 100
ENDIF

# Set the PWM with the value chosen above (you may need to change the port to suit)
PWM(D7, $pwmvalue)
# Add any other PWM ports above this line with PWM(PortNo, $pwmvalue)

# Sleep for 100ms to avoid saturation (you may need to adjust this to increase accuracy or increase stability. Reduce the delay for better accuracy, increase for better stability)
Sleep(100)

# Jump back to the start
Goto(loop)
Change the port on the PWM command line if needed, I used D7 but any port will work. Duplicate that line with a different port number if you need 2 (or more) ports to react.
You may also need to adjust the PWM values in the if/elseif part to suit your robot, LEDs, Lamps etc.
Lastly, connect up the LEDs, Lamps etc. to the EZ-B using the TIP Transistor circuit method.
Now, when any sound is detected by the Sound servo control it should adjust the PWM of the digital port in steps, as defined in the If/ElseIf/Else statement. If low level sound (in this case below 10 however that can be adjusted) the PWM is set to 0 and therefore the LED, Lamp etc. is off.
If you have any questions, queries, problems or even suggestions please feel free to ask. This is currently Version 1.0.0 of this script, there is always scope to improve I may, should time permit, add in the usual variables for ease of use (that'll be V1.0.1)

Thanks Jeremie. That's a more elegant solution, but defitiely beyond what I can figure out. I'll probably just activate a 2 sets of LED runner boards for the control panel lights. Is there an easy way to do that directly from the EZ B v4 or will I need something like this relay switch?
https://www.dimensionengineering.com/products/picoswitch
Frank
You couldn't light up a runner board of LEDs with a digital pin as there would be too much current draw (they are limited to 10mA), the simplest way would be to use a transistor or mosfet to pass the battery voltage directly to the runner board with a digital pin controlling it.
That Dimension engineering product looks like it would work if you sent it a servo command to it but it seems to be fairly expensive for what a 50 cent transistor can do.
There are a number of great tutorials on these forums such as this one that can help you put your circuit together.
Relays can work too but you likely won't need them unless your LEDs are very high in current draw (like 10Amps).
So what would I need to do to be able to set a desired servo position based on the sound level? I'm trying to make my servo respond rhythmically to exterior sounds (ie music, voices etc.)
@CWIST Just use the sound servo control....
@RichardR Ive been trying to use the Sound servo control to no avail. Maybe Im not setting it up properly but I set the servo ports and the range of min and max. Still no dice. This may sound dumb but is there a mic on the robot that is picking up the audio or is it capturing via my laptop mic? Have been also playing with microphone control and don't seem to be creating any waveforms. When I record, I only hear hiss during playback. Please help!
There is no mic on the ezb or Revolution robots... The only mic would be the one on your PC... Are you using sound servo PC or sound servo EZB? Sound servo PC uses the mic on your PC to move the servo (which works quite well)... Sound servo EZB does it without sound, it uses software to compute the sound levels and then apply them accordingly to control servo movement...
Hi @CWIST
You can look up your audio settings in windows at check if your microphone is working. There you can also increase the microphone gain if you need to in order to make sure your mic is picking up your voice.