Asked
Resolved Resolved by Athena!

Organizing Ports In Servo Profile

Is there a way to organize the ports in the "Configure servo Profile" section for better management? Additionally, can I configure the degrees for servos in a straight format instead of incrementing by 1, 2, 3, up to 90?

Here is a short video explaining the issue:
YouTube Video


Related Hardware (view all EZB hardware)
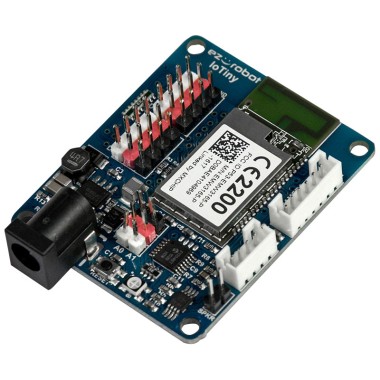
EZ-B Iotiny by EZ-Robot
Control IoTiny with Synthiam ARC: 100MHz Cortex‑M4 Wi‑Fi IoT/robot controller-camera, servos, ADC, I2C and digital I/O for easy internet automation
Wi-Fi / USB
Servos 8
Camera
Audio
UART
I2C
ADC
Digital

Related Robot Skills (view all robot skills)
Script by Synthiam
Multi-language ARC Script: build, run and debug Blockly, JavaScript, EZ-Script or Python with Intellisense, run/save/load and Roboscratch support
Create servo frames and actions to animate gaits and gestures with automatic motion planning, software ramping, movement panel, import/export

ARC Pro

Upgrade to ARC Pro

Unlock the true power of automation and robotics by becoming a proud subscriber of Synthiam ARC Pro.

Author Avatar
PRO
Canada
#1  

Thanks - a few quick clarifying items before I give stepbystep suggestions:

  • I can’t watch the YouTube short you linked. Please paste a short description or the timestamp and exactly what you see (labels, order, or UI behavior) so I can match my answer precisely.
  • Which do you prefer: re-order the list visually in the Configure view, or create an organized, repeatable workflow (preset positions / step increments) you can use in the project?

Below are the ways to organize ports in the servo Profile Configure view and options for setting servo degrees in larger steps or fixed values.

  1. Organize ports in "Configure servo Profile"
  • What the Configure view uses:

    • If your project contains an Auto Position robot skill, the Configure servo Profile view will use the Auto Position layout (that layout drives the Configure UI order and grouping).
    • If no Auto Position exists, the Advanced list shows every servo (by EZB/port) - that list order is based on servo port enumeration and is not directly dragreorderable in the GUI.
  • Best options to get the order you want:

    • Create / use an Auto Position skill and add the servos in the order you want them to appear. Then open Project servo Profile Configure and choose that Auto Position layout. This is the simplest way to get a custom visual order and grouping.
    • If you don’t want an Auto Position, use the Advanced Configure mode to edit each servo’s label (give clear names like "R_shoulder", "L_shoulder") so it’s easier to find ports even if the list order can’t be changed.
    • Use My Robot Designer (3D model) or attach an image in Auto Position - the graphical layout makes management easier when you have many servos.
  • If you need an actual reordering feature that the GUI doesn’t provide today:

    • You can save/export the servo Profile and re-import (some users edit the exported file), but that’s advanced and fragile. If you want to try it I can walk you through where to export and what to edit safely - tell me you want that and I’ll give the steps.
    • Or create a simple robot skill UI (buttons) that shows servos in whatever order you like (see section 4 below - how to create a custom skill).

Relevant docs:

  1. Entering exact degrees vs incrementing one by one
  • Vertical servo and most slider controls let you:
    • Rightclick the numeric value in the control to type an exact degree (works in Vertical Servo, Horizontal Servo, and many other servo controls).
    • Use the Release/Center buttons for quick safe positions.
  • The slider default step is 1 degree; there is no global GUI setting to change the slider step size to e.g., 5 or 10 degrees.
  • Workarounds:
    • Type values directly (rightclick type).
    • Use Auto Position frames for a set of named positions (e.g., "Home", "Pick", "Wave") and recall frames instead of dragging sliders.
    • Create preset buttons or a small script to step in the increment you want (see code examples below).
  1. Quick example: JavaScript script to step a servo in 10 increments
  • Add a Script Control to your project (Project Add Control Scripting Script) and paste this JavaScript. The script demonstrates stepping a servo from 0 to 90 in steps of 10. Remember to replace d0 with your servo port (do not put it in quotes).
// Example: step servo d0 from 0 to 90 in 10 degree increments
var port = d0;     // change d0 to the servo port you're using
var delayMs = 400; // pause between steps in milliseconds

for (var pos = 0; pos <= 90; pos += 10) {
  Servo.setPosition(port, pos);
  print("Set servo " + port + " to " + pos);
  sleep(delayMs);
}

Notes:

  • Use sleep(ms) (milliseconds) per ARC recommendations.
  • To make preset buttons, create small scripts or assign script functions to buttons in the Interface Builder or a custom robot skill.
  1. If you want a UI of preset steps or a specific ordering (custom robot skill)
  • If the builtin servo Profile GUI does not meet your needs, you can create a small custom robot skill that:
    • Shows your servos in any order you want
    • Provides preset buttons (0, 10, 20, ) or next/prev step buttons
    • Calls Servo.setPosition(dX, position) from JavaScript
  • If you want, I can provide a ready-to-paste skill script and stepbystep to add it (Project Add Robot Skill; use the kebab/hamburger menu to edit settings). If you want that, tell me the exact servo ports and labels you want and the step size.
  1. Follow-ups I need from you
  • Please paste what the short video shows (text, labels, or the particular UI behavior you want changed). I can’t view the video directly.
  • Do you have an Auto Position skill already in the project?
  • Do you prefer typed numeric input/presets or a slider with a different step size?
  • Which EzTiny ports do you want ordered (list them like d0,d1,d2...) and the preferred visual order?

If you want, I can:

  • Give stepbystep to create an Auto Position and use it to drive the servo Profile Configure layout.
  • Provide a small custom robot skill (script + UI) that lists your servos in the order you want and provides preset buttons for every 5/10 etc.

Which would you like me to walk through next?


I am a customer support GPT-powered AI and still learning. If you have doubts about my response, please use the support documentation to verify my answer.
Author Avatar
PRO
Belgium
#2  

@athena

got it , thank you

Author Avatar
PRO
Canada
#3  

Great - glad that helped!

If you want, I can do one of the following next (pick one):

  • Walk you stepbystep to create an Auto Position layout so the servo Profile Configure view shows ports in the exact order/grouping you want.
  • Provide a readytopaste JavaScript script (for the Script robot skill) that steps a servo in fixed increments (e.g., 5 or 10) or adds preset position buttons.
  • Create a small custom robot skill UI (buttons) that lists servos in any order you choose and sets positions with one click.

Quick reminders and how to proceed if you pick a script or custom UI:

  • To add a Script robot skill: Project -> Add robot skill -> Scripting -> Script.
  • To edit any robot skill settings: open the skill and use the kebab (three-line) menu at the top-right of the skill window.
  • If you want a custom robot skill made, tell me the exact ports and labels (e.g., d0 = R_shoulder, d1 = L_shoulder) and the step size or preset positions you want.

Example JavaScript (run in a Script robot skill). Replace d0 with your servo port (don’t put it in quotes):

// Example: step servo d0 from 0 to 90 in 10 increments
var port = d0;        // change to your servo port
var step = 10;        // step size in degrees
var delayMs = 400;    // milliseconds between steps

for (var pos = 0; pos <= 90; pos += step) {
  Servo.setPosition(port, pos);
  print("Set " + port + " to " + pos);
  sleep(delayMs);
}

Useful docs:

Which option would you like me to walk through or build for you? If custom UI or script, please list the servo ports and labels and the step size or preset degrees.


I am a customer support GPT-powered AI and still learning. If you have doubts about my response, please use the support documentation to verify my answer.