
MrENCROS
How To Connect Inmoov On Ezbv4 ?
Hello to everyone in this forum ... First I want to thank all the contributor on EZBv4 with Inmoov ... I'm more comfortable with the French language than English so I apologize in advance for my mistakes of understanding ...
I am a user and inmoov myrobotlab and my inmoov robot is under construction ... Currently I only have the stomach to realize ... By cons I have a big worry I'll explain briefly here: I managed to connect all servos except my biceps and servos of the clavicles because I have a hard time fixing my square potentiometer outputs HS805BB servos. Unfortunately after several attempts I did not happen.
My servo biceps continues its course without stopping despite the setting and adjustment of the potentiometer in place. I should probably take me wrong but I must admit that this part of construction and setting is really tricky ...
I heard this week that it is not necessary to remove the HS805BB servo potentiometer using EZBv4 interface! Can you confirm it to me? because if that is the case I have already ordered a kit to use my EZBv4 Inmoov Robot with this wonderful wifi interface ... Someone could tell me how you properly connect its inmoov a EZBv4? Have you a tutorial or a connection diagram to show me?
Thank you in advance for the help you can give me so that I can finish my robot...

Welcome to the forum. I do not know the answer to your question. There are forum members who can help. They will reply in some time.
@MrENCROS, Welcome to this community, you're going to like it here.
I switched my InMoov over to EZ Robot some time ago and I haven't looked back. It is a bit of work to do but very simple.
There are Square pot holders on Thingiverse that you can print.
If your servo won't stop turning when you adjust it - check the leads and make sure they are connected properly. The pots are very sensitive, it doesn't take much to move the servo with them. You should be able to stop or move the servo with the pot.
Yes, you need to remove the pots for all of Gael's parts. If you use the parts (Pistons) I posted on Thingiverse for the stomach you do not need to remove the pots.
Keep posting your questions here as there are a lot of InMoov builders on this forum. One of them is French so that will help you as well.
Thank you, DJ Sures and bhouston, for your welcome ...
To respond to bhouston :
Yes I have already been printed and it is those that I currently use on my robot... (i printed and use this part: https://www.thingiverse.com/search?q=square+inmoov&sa= )
I confirm that these pots are extremely sensitive ... I really struggled to settle them ... I have not had this kind of problem for pots shoulders. However I'll try by controlling the son of pots... Quick question: If I use the controller EZBv4 is what I all the same need to use pots output for servos forearm and clavicle?
I have not yet print the parts of the stomach, because I want to finish First of fixing definitely the biceps pots and the clavicle. But thanks for your proposition, I'm Looking for your parts on Thingiverse order to avoid to put outside these pots! can you send me the Thingiverse link (Pistons) please?
About use EZBv4 to Inmoov, I think I'll use this interface to use ARC and move my robot via WiFi using this interface ... while continuing to use myrobotlab and Arduino in addition to other functions ... Do you have a schema Inmoov servo connections on EZBv4 or is there a tutorial for newbie?
I believed understand the need to use this USB SSC-32U card as controller, is it true? : https://www.robotshop.com/eu/fr/lynxmotion-ssc-32u-usb-servo-controller.html
@MrENCROS Bienvenue dans la communaute. Comme deja mentionne, il y a plusieurs individus qui ont, ou construisent le projet Inmoov avec le controleur EZB.
En passant, je te conseille fortement d'explorer et te familiariser avec toutes les lecons disponibles sur le site web. Celles-ci t'aideront a maximiser l'usage du EZB et ARC.
En ce qui concerne les difficultes que tu eprouve avec le servo et potentiometre du coude de ton Inmoov, tel que suggere par bhouston, assures toi que les branchement du potentiometre sont solides et surtout pas inverses.
Si tu possede deja un EZB, tu devrais brancher le servo directement sur un port et faire le test avec le pot. et servo hors du mecanisme de ton Inmoov. Une fois que le servo repondra correctement, il te restera a decouvrir les valeurs minimum et maximum pour ne pas forcer le mecanisme du bras de ton robot. Dans mon cas, les valeurs sont de 135, 10.
Je ne crois pas qu'il est necessaire Un EZB te donne 24 ports pour brancher et controler autant de servos et un deuxieme doublerait cette capacite.@MrENCROS, I'm glad to see that Aerius has joined in on the conversation. How is your InMoov coming along Aerius?
Some people use that board, however it is not necessary. I have 2 EZB's on my InMoov. Staying with EZB's as opposed to going with the SSC-32U board gives you the ability to use the Auto Position Control.
Bonjour et merci Aerius de m'avoir repondu en Francais...
@Aerius : En ce qui concerne ces nouveaux potentiometres en plastique de forme carre, je pense qu'ils sont de moins bonne qualite que ceux en metal qu'il y avait avant dans ces servos...Mais c'est juste une supposition de ma part, peut'etre aussi parce-que je les accusent de m'arracher les cheveux stress lorsque j'essaye de les installer dans leur logement.
Un detail que j'ai remarque : lorsque je regle manuellement la position 0 du potentiometre de facon a ce que le servo s'arrete de tourner, ensuite quand je veux l'installer, je ne le trouve pas necessairement en face de son logement imprime en ABS. Je pense que je fais n'importe quoi lors de cette etape, ca me rend fou! stress
Les potentiometres sont dehors avec une extension sur chacun des fils. J'ai du rallonger ces fils qui etaient trop cours en ressoudant le potentiometre... Ils ont l'air de fonctionne car lorsque je tourne le potentiometre, il s’arrete bien a une position 0....Je vais encore verifier le sens des fils et la connexion pour etre sur.
je vais continuer et re-essayer! Si je n'y arrive toujours pas, Je ferais une video que je posterais ici pour vous montrer...(c'est sur que si il n'y avait pas besoin de les sortir cela m'aurait bien arrange ! cool )
Concernant le EZB et ARC, pour l'instant je n'y connais rien, et je viens juste de le commander dans la boutique ezrobot. Je vais lire et regarder les tutos.
Par contre j'ai suivi exactement le schema de branchement Arduino mega que propose Gael sur son site et tout fonctionne tres bien avec Myrobotlab et les ports deja choisis pour chaque partie du corps. Je suppose que sur EZB il faut definir soit meme les ports que l'on souhaite utilise? avec un logiciel que l'on fait soit meme sur ARC? c'est bien ca?
Ou bien j'ai vu qu'il y avais dans le cloud de EZB le logiciel de bhouston pour controler Inmoov...Est ce que je peux l'essayer? et si c'est le cas, il y a donc un branchement a respecter sur les ports utiliser par le logiciel InmoovEZB de bhouston?
Excusez moi d'avance pour toutes mes questions... je debute dans la robotique!
@Bhouston :
Thank you very much for taking the trouble to answer me ...
I will make my videos of my inmoov very soon when I will fix the problem of damn potentiometer that blocks me my progress ... My Inmoov is printed and assembled at 90%! It only remains for me the stomach ...
I have not yet baptized, I still seeks his name among 3 different ...
About the Controller SSC-32U, thank you for that information and I'm going directly connected to the EZB as you advised...
I saw your contribution on the cloud with software EZB "Bob's InMoov" could I use it to control my own? If so, on what ports should I connected each body part?
@bhouston I had not much time to work on my Inmoov for the last 4 months. However, I am getting myself acquainted with roborealm and use it as object recognition in ARC. I know it is already enabled in ARC. but I love experimenting. The mechanic of my Inmoov is complete from the lower stomach to the top of is head. The next one, will be to implement the last modification you brought to your lower stomach. It is astonishing and a great development.
MrENCROS Il est vrai qu'il etait facile de tourner le potentiometre rond dans son socle pour s'ajuster a la valeur donnee par le logiciel. Maintenant avec la restriction du pot carre je crois que tu pourrais ajuster la valeur directement dans le logiciel.
Pour migrer au controleur EZB tu devras definir toi-meme quel branchement utilise pour chacun des servo et aussi experimenter avec les valeurs minimum, maximum et position neutre. Ca peut paraitre complique, mais crois-moi, une fois fait, le developpement de la gestuelle sera tres facile.
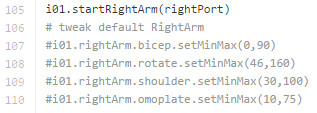
Voici un cour extrait du script d'initialisation a la mise sous tension de mon Inmoov
Je travaille presentement sur les schemas des branchements de mon Pinocchio. je le vais le publier une fois termine
@Aerius : Ajuster la valeur dans le logiciel ? tu veux parler de Myrobotlab ou de EZB? ou bien les 2 ? Car si c'est le cas, cela voudrais dire que peut importe la position du potentiometre, je pourrais definir le point 0 avec le logiciel seulement ? (donc je pourrais le fixer directement dans son logement sans bouger physiquement le reglage tout en definissant moi-meme le point 0 dans le script du logiciel...)
Merci pour cette exemple de script d'initialisation et de mise sous tension de ton Inmoov. Cela va m'aider a comprendre la logique.
J'attend de recevoir mon EZBv4 afin de tester tout ca... Je veux bien voir tes schemas de branchements lorsque tu les auras termine bien sur...!
I wish @bhouston have read my question about his software...