Asked — Edited

First Post - My Robotic Arm Design Is Finally Finished - Hopefully A Complete Ro

Hello fellow robot enthusiasts! First time poster here, allow me to introduce myself, my name is Gray and I am an artist and inventor based in Los Angeles.

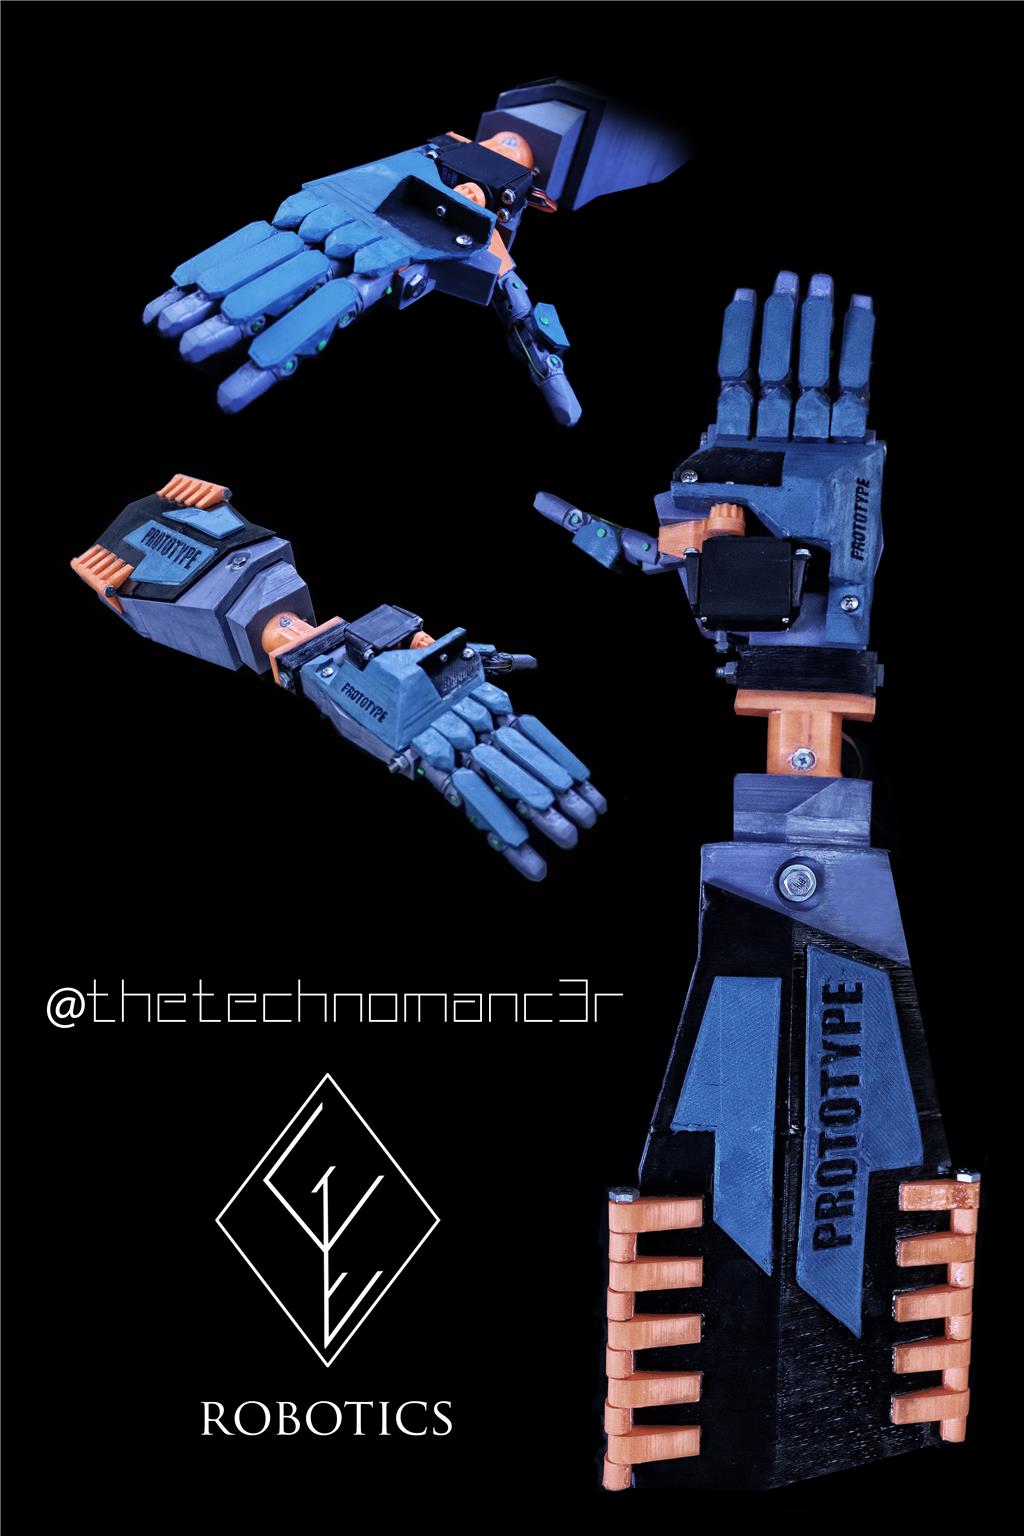
I just wanted to show off my first robotics project of my own design, made in blender and printed on a heavily modified XYZ DaVinci 1.0 3d printer in ABS and Algix ALGA filament. I am also working on a seperate InMoov build simultaneously, with pics and videos on both to come. But my robotic arm is done! I spent months designing, printing, re-designing, and reprinting this, and am very happy with the results! It is fully functional and ready for programming, I'll throw together some code and post the video soon, but in the meantime, here are some pictures! I will be updating the project in this thread for those interested, as well as my upcoming youtube channel "The Technomanc3r". My instagram username is @thetechnomanc3r as well, for more images following my projects.

The arm is powered by 7 servo motors, it has motion in the wrist, each individual finger, and the thumb has two different positions for different tasks. The arm and grip is VERY strong, because of the forearm gearbox design, will be doing a strength test very soon.

User-inserted image


ARC Pro

Upgrade to ARC Pro

Become a Synthiam ARC Pro subscriber to unleash the power of easy and powerful robot programming

United Kingdom
#1  

Welcome, looking forwards to seeing your youtube channel on your progress, your design looks very interesting.

Cheers Chris.

PRO
Synthiam
#2  

That's excellent - nice build! You can take a look at the ARC projects from bob Houston, perry_s, cem or Richard R.. They've already created the Auto Position for the ezb you'll need to control the servos for hands.

Those servos you're using will burn out pretty quick, when they do replace them with the ezrobot servos from your developer kit. They're much stronger and very quiet as well!

#3  

That hand(s) looks like an awesome design... If I might ask, any chance will you be sharing the stl files for it?

#4  

@Cem @DJ Sures Thank you both! Glad you like the design! This is the first time I've ever used blender for mechanical parts like this, so I'm still working out a few little issues. But I am really happy with it overall!

As for the servos, I think you are totally right! I just used some cheap ones for this proof of concept, I've already started Mk 2 though, which is modeled to fit the better servos.

@Richard R Thank you! Yeah I do plan on putting the STL files up for download, I have to make a few adjustments with the fingers though, they're a little bit loose and occasionally jam against eachother. I fixed this by putting a small washer in the trouble joints, but I would like to fix it in the model before I put them up to download so all your parts fit. :)

Also, here is a photo of my inmoov project I'm working on simultaneously (I plan on making a full robot to go with my arm here, but I may make an adapter to make it inmoov compatible as well, my main worry is it being too heavy for the inmoov frame) I have the second arm printing right now, but as soon as that's done I'll put a video on this guy as well.

User-inserted image

#5  

Hi Gray, that arm looks fantastic! I'm also interesting in hearing about your XYZ DaVinci 1.0 modification as I own one of those as well. Welcome to the community!

#6  

@TheTechnomanc3r Dude you rock!... You have some serious skills man... Fantastic... Please keep posting updates... :)

#7  

@JustinRatliff - Sure! Have you done any mods to yours yet? The first thing I'd recommend doing is updating it to run Repetier rather than XYZware. There are a few tutorials online but those are outdated and will brick your printer. you neede a different version of arduino and an additional patch. I'll be posting a video tutorial as soon as I get a chance to film it, but that'll improve your print quality 10x and give you waaaayyy more features and filament options. I also converted it to a bowden extruder, I am still perfecting that mod, but will share my experience as I go! I'm also thinking about replacing the glass bed with an aluminum one if I can fabricate that, as the glass on mine started to chip (I flipped the glass over to the unchipped side and always use painters tape, but I'm not sure how long it will last because of the weakened glass)

@RichardR Thank you very much! I'll get some updates up as soon as possible! I'm so glad to get so much positive feedback on this project!

PRO
Synthiam
#8  

Rad effect on the inmoov print. Where will you be putting the camera? I know Richard put mine in the eye. Not sure where others have theirs

We are expirementing with a few wide angle lens upgrades as well. Which will be super useful for tracking by increasing peripheral view

#9  

@DJ Sures - I actually took out one of the white eyes and put the camera in there since I took this photo. I forgot that that photo was a little outdated! I have also since installed the PIR sensor in the chest and upgraded to Bob Houston's ball jointed neck.

A wide angle lens would be awesome!

#10  

Welcome aboard Gray. Arm design an Inmoov progress look great. Let us know if you need anything.

#11  

Hey everyone, sorry for the lack of updates, I had some problems with a spool of ABS i bought, which led to me having to re-print some of the 3D printed components due to faulty plastic that started to disintegrate during testing! Never seen that happen before! But like any maker I saw it as an opportunity to improve my design even further, rather than be discouraged! I'm calling this one the "Mark 1.5" because I re-used a lot of parts from the original, just in a different configuration!

The first videos are filmed for my YouTube channel, @thetechnomanc3r and are awaiting editing, I got the arm hooked up to the EZB so easily, this really makes the process so much easier! I was using arduino up until now. so I'll share those here as well either tonight or tomorrow! I am entering a robotics competition to fund my project and get me a college scholarship! So that would be pretty neat!

New upgrades-

  • 4 more reliable, stronger fingers with flexible rubber joints, as opposed to 5 weaker fingers with rigid plastic joints

-Stronger, reinforced wrist gear, with dual servos. I found the old single servo design, could rotate the hand with no problem, but struggled when the hand was actually holding something with any weight, so I changed that! Will probably come up with something more "elegant" for mk 2, but this does the job!

-New actuator gear mechanism, allowing the fingers to hold more weight without failing or damaging the servos, my goal is to great the strongest, low cost 3D printable robot arm on the market, while using only consumer-available parts.

-folding, modular design for easy maintenance/part replacement.

  • smaller, more compact design and reinforced with steel rods. This thing is a tank! While still remaining relatively lightweight.

That's all for now! The rest of the robot coming soon. I am on hold until I get a printer better suited for stronger and flexible materials. Along with my separate InMoov robot build! User-inserted image

User-inserted image

The arm folds open for easy access!

User-inserted image

And unfortunately... here is what happened to the last one. It just began rottign and falling apart one day as I was testing it, I kept trying to patch it with acetone, but that jut made it worse (must not have been pure ABS, some luck huh?)

User-inserted image

#12  

Hey everyone, so I have question about the EZB 4, I have been fiddling with it for hours with both the included 6 battery holder (with both rechargeable and regular batteries) and a desktop power supply (I am using the included servos). And every time I connect it, it just reboots! Even if I only connect 1 servo, or no servos at all, it just seems to be struggling for power. I understand that this is an amp issue and not a voltage issue, but I just want to get it right if I'm going to have to buy more stuff! Working on an artist/mad scientist budget always complicates things!

I am entering this robot arm in a robotics contest and scholarship application that really means a lot to me, so I'm in a bit of a hurry and the deadline is this week. What power supplies are you all using? I'm totally okay with really any option whether that's a different battery or wall plug, as long as it works, its crunch time now! I was really counting on the servos that came with the kit to work with the board and power supply included! :( I'm sure I'm going to feel really dumb when I figure it out, I'm still a EZB n00b! Been using arduino up until now!

PRO
Synthiam
#13  

Surely do not use the 6 battery adapter. Chuck that thing in the garbage :)

As for the power supply - can you provide more details? How many volts and amps? Have you looked at the power supply tutorial? Lots of great advice there!

PRO
Synthiam
#14  

Here's two power tutorials for you...

https://synthiam.com/Tutorials/UserTutorials/163/1

And

https://synthiam.com/Tutorials/UserTutorials/170/1

#15  

Thanks for your reply and awesome tutorials! This has all been very helpful! Yeah I kinda figured that would be the case with that battery adapter, I was looking through the forum and google for answers when your tutorial explains it just fine, that was silly of me to have somehow skipped the power video and watched the software tutorials! Guess I got a little overexcited and overconfident on the mechanical side of things.

And its just an adjustable desktop power supply, I didn't have a suitable battery in my parts bin and I was just eager to get my arm moving! I'll attach pictures and full specs when I've cooled down from frustration a little and go back to the workshop, I think I messed something up and fried a good portion of the servos in the arm and wont be able to get replacements in time for the scholarship deadline just due to time/finances...:( I'm wondering if that's why the board kept rebootingng even though I thought I was giving it the right power if I was trying to use a janky servo? Could have also been because of the different types of servos maybe? Since I was using the 4 from the dev kit to drive the fingers, and just some extra cheapo ones for the wrist and thumb temporarily until I can get more of the better servos. I tried testing the suspect servo on a regular servo tester, and it wouldn't power on either until I connected one of the working servos instead.

despite not going over 7.4v (I tried to set the power supply to match the output of the LiPo battery in the tutorial, I think I must have messed something up, gonna mess with it in a little bit and see if I can fix it or am just overlooking something)

Oh well I suppose.. Didn't get into robotics thinking there would never be mistakes to be made.

PRO
Synthiam
#16  

Man - burning out servos is the worst. Definitely consider ez-robot servos next time for replacement, they'll outlast the others

#17  

It actually was the EZ robot servos I burnt out, those are the ones driving the fingers since I figured they'd be getting the most "use and abuse". I totally think they are better than the cheapo ones though, I just must have done something wrong. Live and learn I suppose!

#18  

Hey everyone! I finally got this guy working, had to replace some servos with cheapo MG996rs I had until I can afford new Hd servos to replace the fried ones (I can't believe I fried them, I think I accidentally ran too much voltage while trying to adjust my shop power supply. How embarrassing!) just to get this video up for my scholarship, but I got the EZb working and it's great! I am very happy with it!:) excited to play with it more once I get the arm working properly. I'll also be releasing this for download, I just have a few pieces that need a few fixes. I'm a bit of a blender noob and I don't want to give you all bad files! Mk 2 is in the works, going to order some of the EZ micro servos and house everything in the hand itself, so it may also be used for a prosthetic design down the road! Also working on an adapter to make the hand (minus the relatively heavy forearm design) compatible with the inmoov as well, for the addition of an adjustable thumb.
https://youtu.be/-s_N6l1TrpM